
iOS MapKit 學習筆記:顯示地圖、加入標注與追蹤使用者位置
編輯:iOS 開發綜合
Map Kit 是 iOS 內建的在地圖開發框架,核心類別是 MKMapView。本文假設你已經取得定位座標(前置的 CoreLocation 流程不在此贅述),聚焦在三件事:把地圖畫出來、放標注、以及跟著使用者移動。
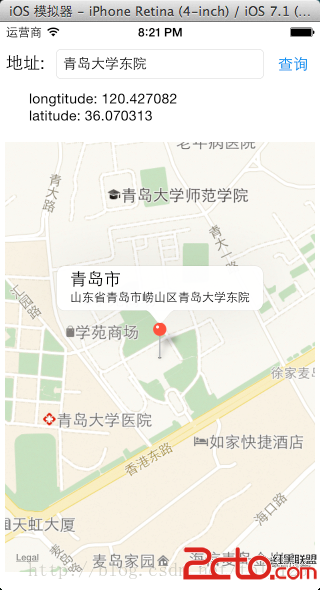
一、顯示地圖
先引入標頭並宣告委派:
#import <MapKit/MapKit.h>

// 委派協定為 MKMapViewDelegate
建立地圖視圖:
mapView = [[MKMapView alloc] initWithFrame:CGRectMake(5, 120,
                                      self.view.frame.size.width - 10, 430)];
mapView.mapType = MKMapTypeStandard;
mapView.delegate = self;
mapType 有三種可選值:
MKMapTypeStandard——標準街道圖,可疊加標注MKMapTypeSatellite——衛星影像圖MKMapTypeHybrid——混合模式,衛星影像上疊街道資訊
取得 placemark 之後,把地圖定位到目標區域:
- (void)showInMapView:(CLPlacemark *)placemark
{
    CLLocationCoordinate2D coordinate = placemark.location.coordinate;

    MKCoordinateSpan   span   = MKCoordinateSpanMake(0.01, 0.01);       // 顯示跨度
    MKCoordinateRegion region = MKCoordinateRegionMake(coordinate, span); // 中心點 + 跨度

    [mapView setRegion:region animated:YES];
    [self.view addSubview:mapView];
}
關於 MKCoordinateRegion 與 MKCoordinateSpan
typedef struct {
    CLLocationCoordinate2D center; // 區域中心點
    MKCoordinateSpan       span;   // 顯示跨度
} MKCoordinateRegion;

typedef struct {
    CLLocationDegrees latitudeDelta;  // 南北跨度
    CLLocationDegrees longitudeDelta; // 東西跨度
} MKCoordinateSpan;
數值越小,畫面放得越大。0.01 大約是街道級別的縮放;1.0 則會看到整個城市甚至更大範圍。要注意經度跨度代表的實際距離會隨緯度變化——赤道上一度約 111 公里,越往兩極越短,到極點趨近於零。
二、加入標注(Annotation)
先引入標頭:
#import <MapKit/MKAnnotation.h>
MKPointAnnotation 是最簡單的標注類別,只有三個主要屬性:
title——主標題subtitle——副標題coordinate——標注所在座標
- (void)showInMapView:(CLPlacemark *)placemark
{
    CLLocationCoordinate2D coordinate = placemark.location.coordinate;

    MKCoordinateSpan   span   = MKCoordinateSpanMake(0.01, 0.01);
    MKCoordinateRegion region = MKCoordinateRegionMake(coordinate, span);
    [mapView setRegion:region animated:YES];
    [self.view addSubview:mapView];

    // 建立並加入標注
    MKPointAnnotation *annotation = [[MKPointAnnotation alloc] init];
    annotation.coordinate = coordinate;
    annotation.title      = placemark.locality;
    annotation.subtitle   = placemark.name;
    [mapView addAnnotation:annotation];
}
自訂標注外觀
只加入 annotation 還不夠,畫面上不會有圖釘。要實作委派方法,回傳一個標注視圖:
- (MKAnnotationView *)mapView:(MKMapView *)mapView
            viewForAnnotation:(id <MKAnnotation>)annotation
{
    static NSString *pinID = @"PIN_ANNOTATION";

    MKPinAnnotationView *pinView =
        (MKPinAnnotationView *)[mapView dequeueReusableAnnotationViewWithIdentifier:pinID];

    if (pinView == nil) {
        pinView = [[MKPinAnnotationView alloc] initWithAnnotation:annotation
                                                 reuseIdentifier:pinID];
    }

    pinView.pinColor       = MKPinAnnotationColorRed; // 圖釘顏色
    pinView.animatesDrop   = YES;                     // 落下動畫
    pinView.canShowCallout = YES;                     // 點擊可展開氣泡

    return pinView;
}
dequeueReusableAnnotationViewWithIdentifier: 的機制與 UITableViewCell 相同——用識別碼從重用池取用,避免大量標注時不斷配置新物件。
三、追蹤使用者位置與方向
mapView.showsUserLocation = YES;
[mapView setUserTrackingMode:MKUserTrackingModeFollowWithHeading animated:YES];
追蹤模式共三種:
MKUserTrackingModeNone——不追蹤MKUserTrackingModeFollow——地圖跟著使用者位置移動MKUserTrackingModeFollowWithHeading——同時依羅盤朝向旋轉地圖
再實作位置更新的委派方法,就能取得即時座標:
- (void)mapView:(MKMapView *)mapView
     didUpdateUserLocation:(MKUserLocation *)userLocation
{
    mapView.centerCoordinate = userLocation.location.coordinate;
}
實作提醒
- 使用使用者位置前,務必在
Info.plist中補上NSLocationWhenInUseDescription等說明文字,否則 iOS 8 之後不會跳出授權提示。 showsUserLocation只是「顯示藍點」,若要在程式邏輯中取得座標,仍須透過 CoreLocation 的 CLLocationManager。- 大量標注時記得實作重用,並在
viewForAnnotation:中對「使用者藍點」這類系統標注回傳 nil,交給系統繪製。
掌握 MKMapView 的區域設定、標注機制與追蹤模式,基本的地圖功能就齊備了。