
iOS 多點連線(Multipeer Connectivity)的使用、協議逆向與安全性
什麼是多點連線?
多點連線說穿了就是把裝置兩兩相接,組成一個區域網路:
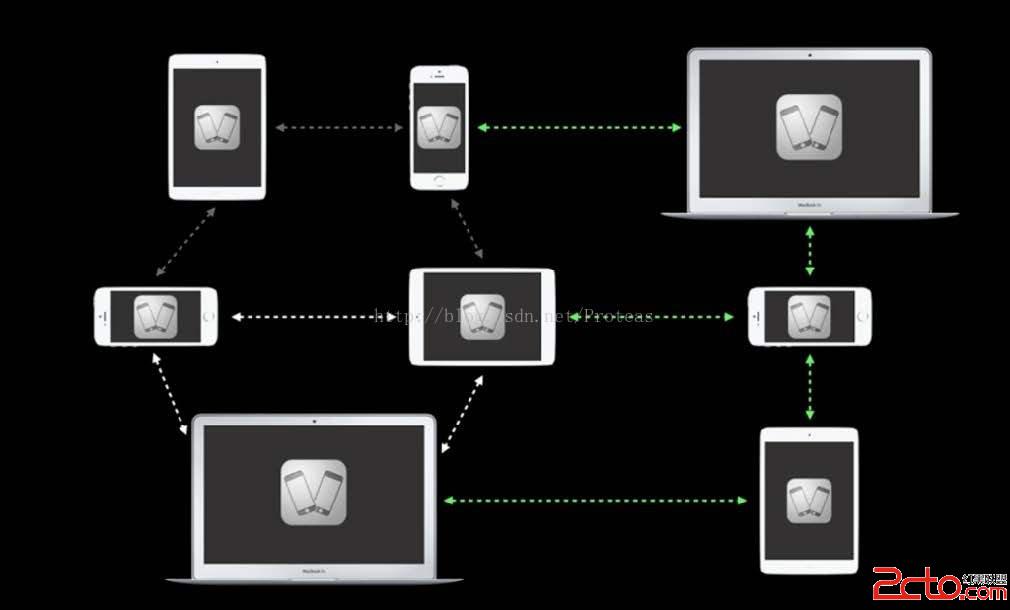
它可以基於兩種通道建立:

也就是藍牙與 Wi-Fi。而且「只有藍牙的裝置」能和「只有 Wi-Fi 的裝置」互通,這一切對開發者完全透明,不需要自己操心:
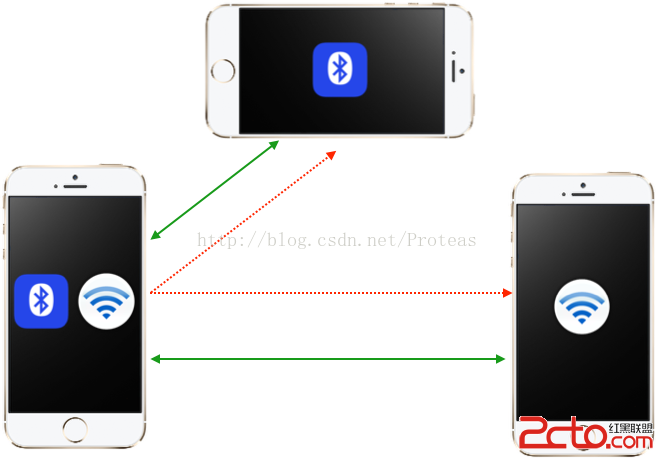
它的能力相當強大。既然能力這麼強,能用來做什麼?MC 本身只提供一條資料通道,具體用途取決於業務與想像力,常見的有:傳檔案、聊天室、把一台裝置當成資料採集外設(例如攝影機)並把即時資料導到另一台裝置、網路資料轉發等等。
多點連線 API 的使用
SDK 與版本資訊
MultipeerConnectivity.framework,iOS 7.0、OS X 10.10 起提供。由此可見,基於 MC 也能做到電腦與手機之間的通訊。
工作流程是:讓裝置可被發現 → 瀏覽裝置並建立連線 → 傳輸資料。
1. 初始化 MCPeerID 與 MCSession
MCPeerID 用來唯一標識裝置,MCSession 則是通訊的基礎:
-(void)setupPeerAndSessionWithDisplayName:(NSString *)displayName{
    _peerID = [[MCPeerID alloc] initWithDisplayName:displayName];
    _session = [[MCSession alloc] initWithPeer:_peerID];
    _session.delegate = self;
}
2. 廣播裝置,使其可被發現
-(void)advertiseSelf:(BOOL)shouldAdvertise{
    if (shouldAdvertise) {
        _advertiser = [[MCAdvertiserAssistant alloc] initWithServiceType:@"chat-files" discoveryInfo:nil session:_session];
        [_advertiser start];
    } else{
        [_advertiser stop];
        _advertiser = nil;
    }
}
3. 瀏覽「區域網」中的裝置並建立連線
-(void)setupMCBrowser{
    _browser = [[MCBrowserViewController alloc] initWithServiceType:@"chat-files" session:_session];
}
MCBrowserViewController 實例化後直接彈出即可,這個類別內部會負責查找裝置並建立連線。若有介面客製需求,也能透過相關接口自行實作類似功能。
4. 發送訊息
-(void)sendMyMessage{
    NSData *dataToSend = [_txtMessage.text dataUsingEncoding:NSUTF8StringEncoding];
    NSArray *allPeers = _appDelegate.mcManager.session.connectedPeers;
    NSError *error;
    [_appDelegate.mcManager.session sendData:dataToSend toPeers:allPeers withMode:MCSessionSendDataReliable error:&error];
    if (error) {
        NSLog(@"%@", [error localizedDescription]);
    }
    [_tvChat setText:[_tvChat.text stringByAppendingString:[NSString stringWithFormat:@"I wrote: %@", _txtMessage.text]]];
    [_txtMessage setText:@""];
    [_txtMessage resignFirstResponder];
}
發送時有個選項:MCSessionSendDataReliable 與 MCSessionSendDataUnreliable。但不論可靠與否,資料都是基於 UDP 傳輸的。
5. 接收訊息
-(void)session:(MCSession *)session didReceiveData:(NSData *)data fromPeer:(MCPeerID *)peerID{
    NSDictionary *dict = @{@"data": data, @"peerID": peerID };
    [[NSNotificationCenter defaultCenter] postNotificationName:@"MCDidReceiveDataNotification" object:nil userInfo:dict];
}
訊息接收是透過 MCSession 的回呼方法進行的。這些回呼非常重要——裝置狀態改變、訊息接收、資源接收、串流接收,全都靠它通知。
6. 發送資源
資源可以是本地的 URL,也可以是 http 連結:
-(void)actionSheet:(UIActionSheet *)actionSheet clickedButtonAtIndex:(NSInteger)buttonIndex{
    if (buttonIndex != [[_appDelegate.mcManager.session connectedPeers] count]) {
        NSString *filePath = [_documentsDirectory stringByAppendingPathComponent:_selectedFile];
        NSString *modifiedName = [NSString stringWithFormat:@"%@_%@", _appDelegate.mcManager.peerID.displayName, _selectedFile];
        NSURL *resourceURL = [NSURL fileURLWithPath:filePath];
        dispatch_async(dispatch_get_main_queue(), ^{
            NSProgress *progress = [_appDelegate.mcManager.session sendResourceAtURL:resourceURL withName:modifiedName toPeer:[[_appDelegate.mcManager.session connectedPeers] objectAtIndex:buttonIndex] withCompletionHandler:^(NSError *error) {
                if (error) {
                    NSLog(@"Error: %@", [error localizedDescription]);
                } else{
                    UIAlertView *alert = [[UIAlertView alloc] initWithTitle:@"MCDemo" message:@"File was successfully sent." delegate:self cancelButtonTitle:nil otherButtonTitles:@"Great!", nil];
                    [alert performSelectorOnMainThread:@selector(show) withObject:nil waitUntilDone:NO];
                    [_arrFiles replaceObjectAtIndex:_selectedRow withObject:_selectedFile];
                    [_tblFiles performSelectorOnMainThread:@selector(reloadData) withObject:nil waitUntilDone:NO];
                }
            }];
            [progress addObserver:self forKeyPath:@"fractionCompleted" options:NSKeyValueObservingOptionNew context:nil];
        });
    }
}
可以透過 NSProgress 查詢傳輸狀態。
7. 接收資源
-(void)session:(MCSession *)session didStartReceivingResourceWithName:(NSString *)resourceName fromPeer:(MCPeerID *)peerID withProgress:(NSProgress *)progress{
    NSDictionary *dict = @{@"resourceName": resourceName, @"peerID": peerID, @"progress": progress };
    [[NSNotificationCenter defaultCenter] postNotificationName:@"MCDidStartReceivingResourceNotification" object:nil userInfo:dict];
    dispatch_async(dispatch_get_main_queue(), ^{
        [progress addObserver:self forKeyPath:@"fractionCompleted" options:NSKeyValueObservingOptionNew context:nil];
    });
}
協議逆向
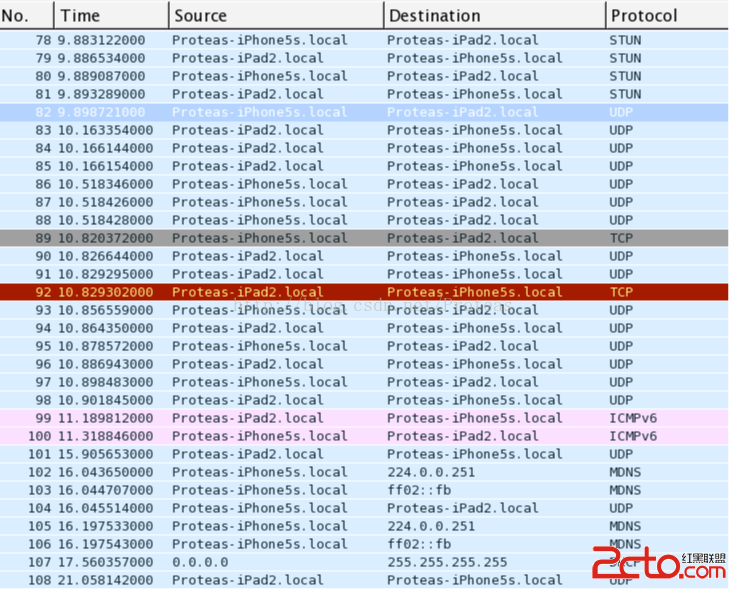
分析協議時我們以 Wi-Fi 為對象,因為這樣便於抓包。抓到的封包如下:
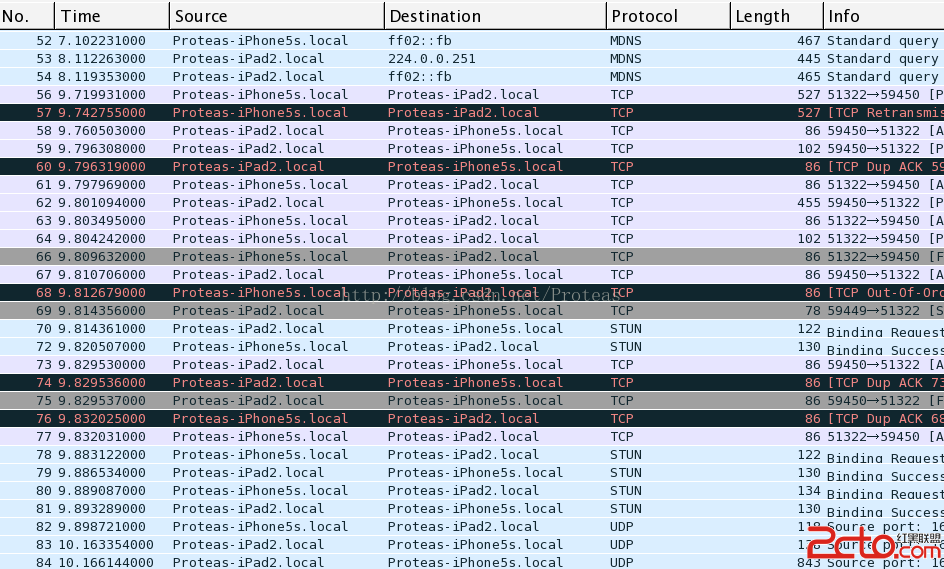
可以看到主要基於以下幾個協議:
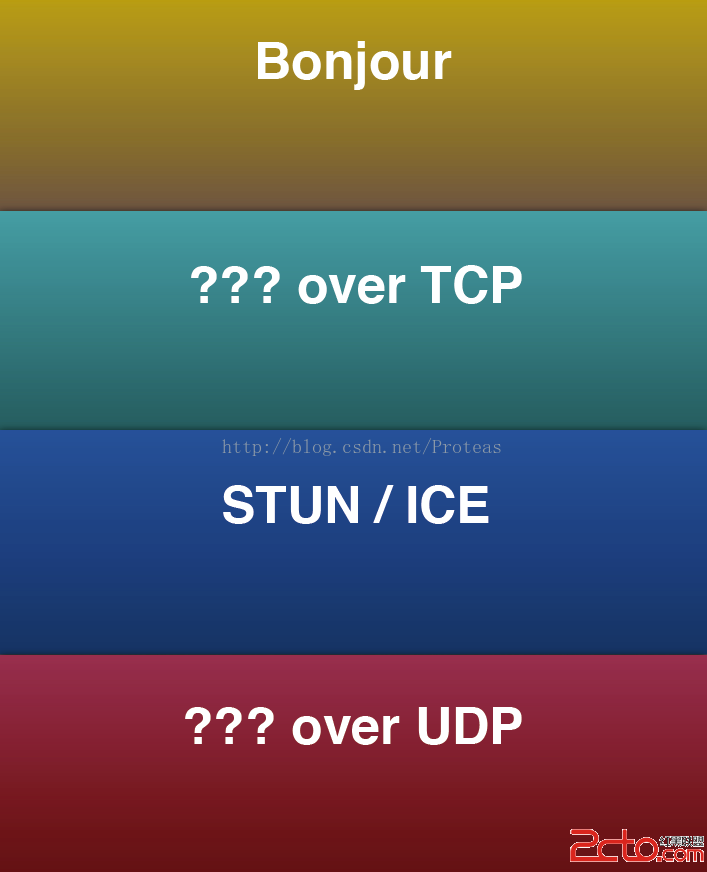
Bonjour 在法語中是「Hello」的意思,主要用來做服務發現;STUN 主要用來做連接埠映射,便於兩台裝置直接建立連線。剩下兩個協議未知:一個基於 TCP,一個基於 UDP。
先看基於 TCP 的那個,觀察 TCP Stream:
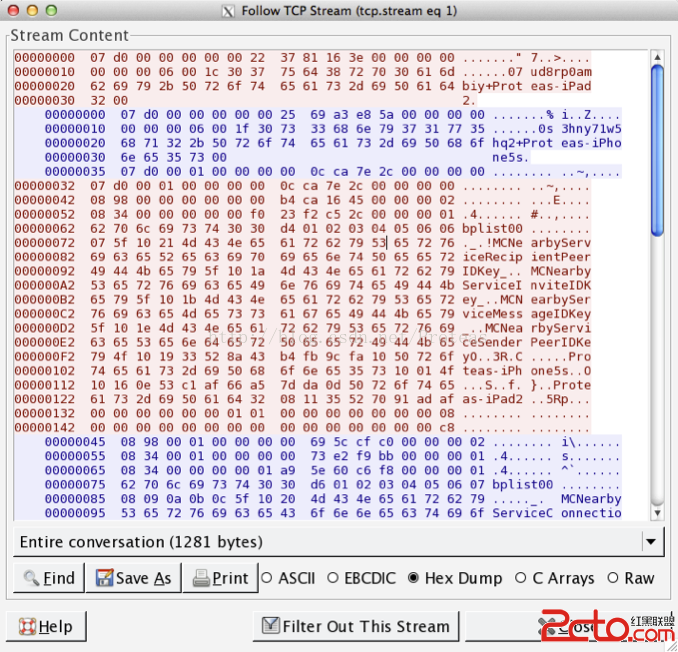
注意下圖紅框部分:
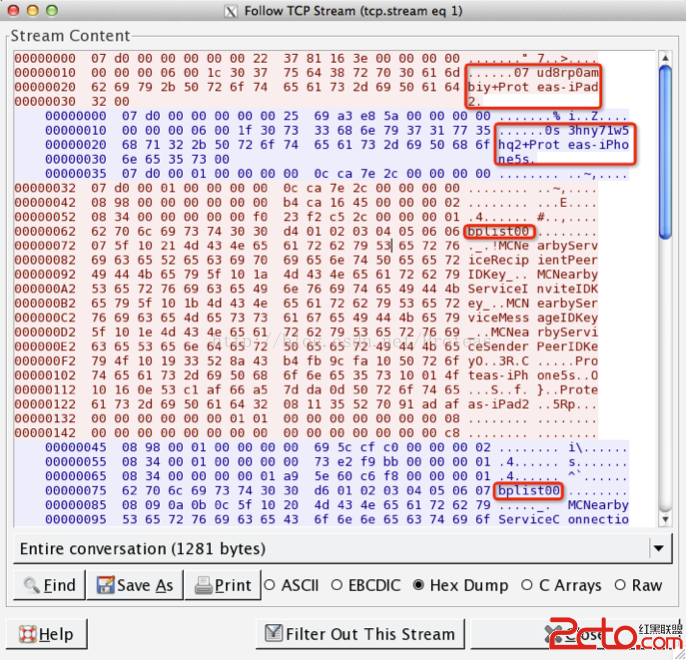
這是某種交握機制:先交換裝置 ID,再以 Binary Plist 交換資訊。提取 plist 時要參考 tcp stream 中的起始與結束位元組,取出後會看到一共交換了三個 plist。
plist-1:
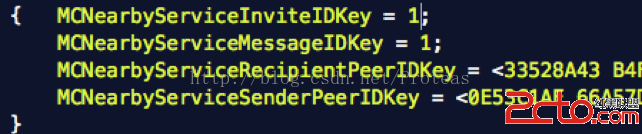
MCNearbyServiceInviteIDKey:MCEncryptionOption → 1,MCEncryptionNone → 0
MCNearbyServiceMessageIDKey:序號
MCNearbyServiceRecipientPeerIDKey:接收者的 PeerID
MCNearbyServiceSenderPeerIDKey:發送者的 PeerID
plist-2:
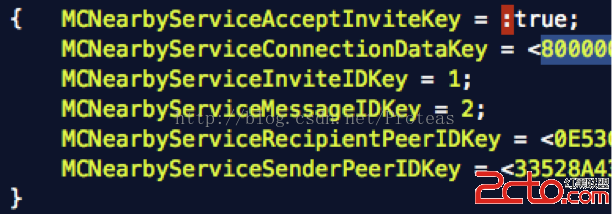
MCNearbyServiceAcceptInviteKey:是否接收連線
MCNearbyServiceConnectionDataKey
plist-3:
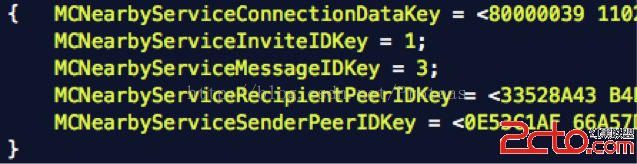
MCNearbyServiceConnectionDataKey
以上是 plist 的內容,但在 tcp stream 中我們還看到了裝置 ID。裝置 ID 是怎麼產生的?透過程式碼逆向可以得出一個大致結論:它在 -[MCPeerIDInternal initWithIDString:pid64:displayName:] 中實作,基本策略是——IDString 隨機(base36)、pid64 隨機、displayName 由外部傳入(例如 "Proteas-iPhone5s")。裝置間交換 ID 時需序列化,方法為 -[MCPeerID serializedRepresentation]。歸納起來就是:PeerID = 基於 pid64 產生的前 9 byte + displayName。
反編譯結果:
void * -[MCPeerID initWithDisplayName:](void * self, void * _cmd, void * arg2) {
    STK33 = r5; STK35 = r7; sp = sp - 0x28; r5 = arg2; arg_20 = self;
    arg_24 = *0x568f0; r6 = [[&arg_20 super] init];
    if (r6 != 0x0) {
        if ((r5 == 0x0) || ([r5 length] == 0x0)) {
            r0 = [r6 class]; r0 = NSStringFromClass(r0); var_0 = r0;
            [NSException raise:*_NSInvalidArgumentException format:@"Invalid displayName passed to %@"];
        } else {
            if ([r5 lengthOfBytesUsingEncoding:0x4] >= 0x40) {
                r0 = [r6 class]; r0 = NSStringFromClass(r0); var_0 = r0;
                [NSException raise:*_NSInvalidArgumentException format:@"Invalid displayName passed to %@"];
            }
        }
        arg_8 = r6; arg_C = r5;
        r8 = CFUUIDCreate(*_kCFAllocatorDefault); CFUUIDGetUUIDBytes(&arg_10);
        r11 = (arg_1C ^ arg_14) << 0x18 | (arg_1C ^ arg_14) & 0xff00 | 0xff00 & (arg_1C ^ arg_14) | arg_1C ^ arg_14;
        r10 = 0xff00 & (arg_10 ^ arg_18) | ((arg_10 ^ arg_18) & 0xff00) << 0x8 | arg_10 ^ arg_18 | arg_10 ^ arg_18;
        r5 = _makebase36string(r11, r10);
        r4 = [NSString stringWithUTF8String:r5]; free(r5); CFRelease(r8);
        r0 = [MCPeerIDInternal alloc]; var_0 = r10; arg_4 = arg_C;
        r0 = [r0 initWithIDString:r4 pid64:r11 displayName:STK-1];
        r6 = arg_8; r6->_internal = r0;
    }
    r0 = r6;
    return r0;
}
前面的 plist 中有一個 Data Key 我們沒多作說明,接著大致看看它的生成。在初始化一個多點連線 Session 時,可以指定加密方式,這是個列舉型別:
MCEncryptionOptional = 0
MCEncryptionRequired = 1
MCEncryptionNone    = 2
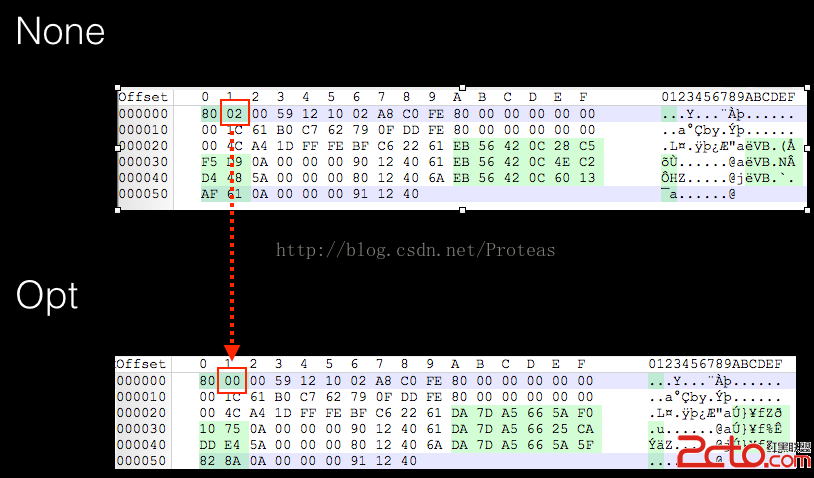
可見加密方式會影響 Data Key。但完全靠抓包分析 Data Key 相當耗時,而且很可能有遺漏。透過程式碼逆向,我們找到負責 Data Key 生成的類別:
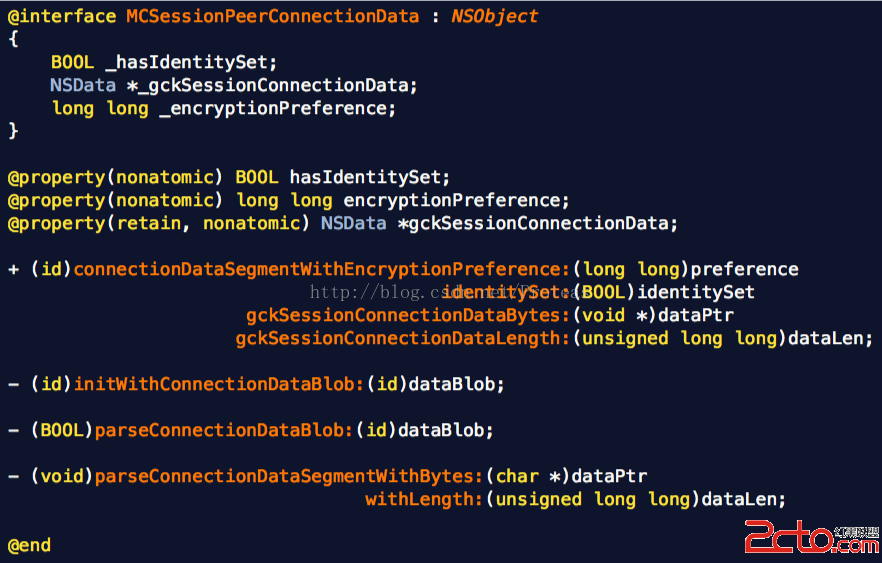
這裡可以作為分析 Data Key 的起點,有興趣的人可以深入往下挖。
上面談的都是基於 TCP 的未知協議,接著看基於 UDP 的那個。UDP 資料流:
單個 UDP 封包:
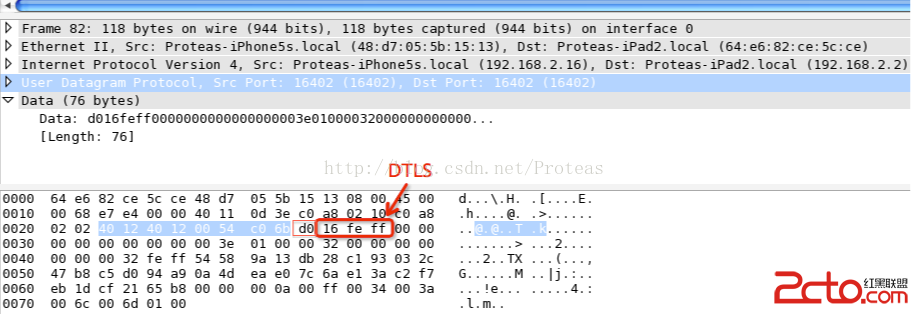
可以看出它是在 DTLS 之上做了封裝,只要把開頭偏移到 0xd0,就能讓 Wireshark 正確識別分析。BH-US 大會上並未公布具體工具與方法,筆者的處理方式是寫一個 Custom Protocol Dissector:
-- Apple Multipeer Connectivity Custom DTLS Protocol
-- cache globals to local for speed.
local format = string.format
local tostring = tostring
local tonumber = tonumber
local sqrt = math.sqrt
local pairs = pairs

-- wireshark API globals
local Pref = Pref
local Proto = Proto
local ProtoField = ProtoField
local DissectorTable = DissectorTable
local Dissector = Dissector
local ByteArray = ByteArray
local PI_MALFORMED = PI_MALFORMED
local PI_ERROR = PI_ERROR

-- dissectors
local dtls_dissector = Dissector.get("dtls")

apple_mcdtls_proto = Proto("apple_mcDTLS", "Apple Multipeer Connectivity DTLS", "Apple Multipeer Connectivity DTLS Protocol")

function apple_mcdtls_proto.dissector(buffer, pinfo, tree)
    local mctype = buffer(0, 1):uint()
    if mctype == 208 then
        pinfo.cols.protocol = "AppleMCDTLS"
        pinfo.cols.info = "Apple MC DTLS Payload Data"
        local subtree = tree:add(apple_mcdtls_proto, buffer(), "Apple MC DTLS Protocol")
        subtree:add(buffer(0, 1), "Type: " .. buffer(0, 1):uint())
        local size = buffer:len()
        subtree:add(buffer(1, size - 1), "Data: " .. tostring(buffer))
        dtls_dissector:call(buffer(1):tvb(), pinfo, tree)
    end
end

local function unregister_udp_port_range(start_port, end_port)
    if not start_port or start_port <= 0 or not end_port or end_port <= 0 then return end
    udp_port_table = DissectorTable.get("udp.port")
    for port = start_port, end_port do
        udp_port_table:remove(port, apple_mcdtls_proto)
    end
end

local function register_udp_port_range(start_port, end_port)
    if not start_port or start_port <= 0 or not end_port or end_port <= 0 then return end
    udp_port_table = DissectorTable.get("udp.port")
    for port = start_port, end_port do
        udp_port_table:add(port, apple_mcdtls_proto)
    end
end

register_udp_port_range(16400, 16499)
在 Wireshark 中套用自訂協議處理後:
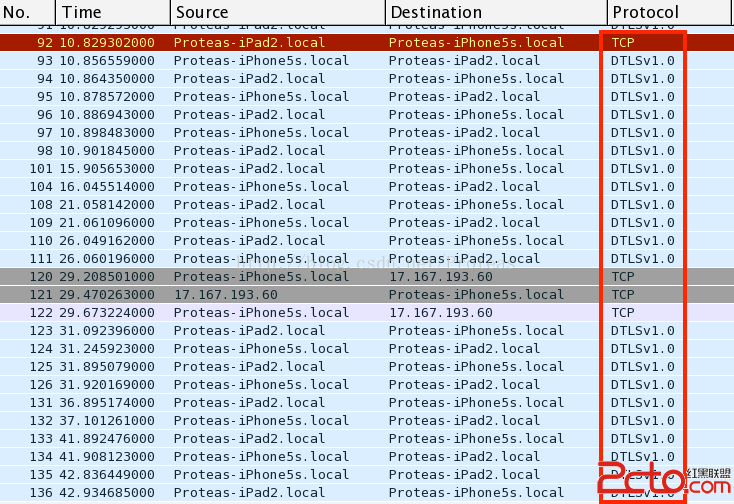
識別出協議後我們不再往下深挖,但在評估安全性時,例如在手機上 kill 掉 SSL 之後,就能在 DTLS 的 Payload 中看到明文資料。
安全性分析
如前所述,安全性的控制是在初始化 MCSession 時決定的,預設使用 MCEncryptionOptional;但只要有一方是 MCEncryptionNone,就會發生降級,也就是通訊不加密。
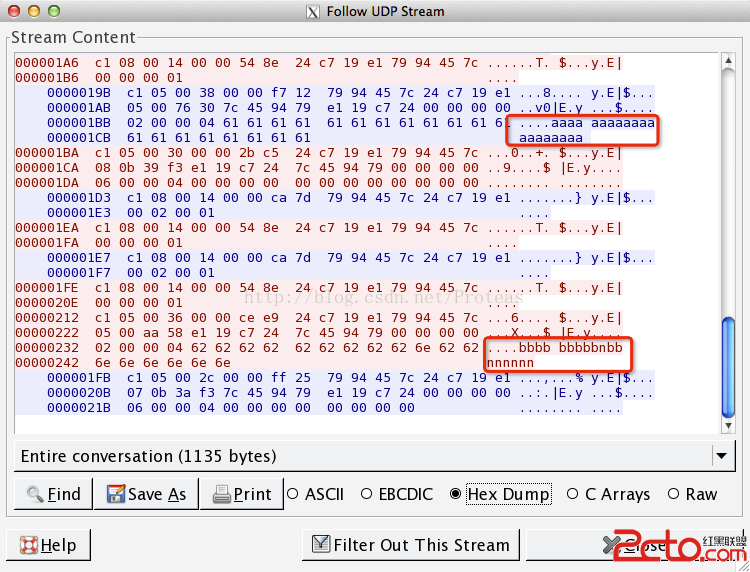
然而,當雙方都是 MCEncryptionOptional 時,通訊仍不安全,可能遭受中間人攻擊:
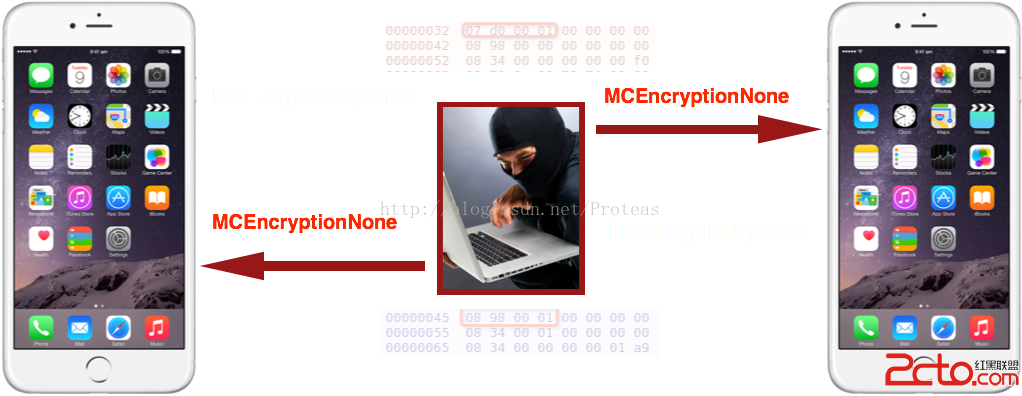
實施中間人攻擊的第一步是識別出基於 TCP 的那些封包(如上圖淺色部分),這些封包都有明顯特徵,因此可以辨識。之所以沒有實際演示攻擊,是因為 plist 中的資料似乎存在關聯性,單純把 0 改成 1 並不會讓 false 變成 true,反而會讓 plist 失效;因此實作時可能需要先把整個 plist 攔截下來,修改後再重新送出。
其他
目前尚未逆向出完整的通訊協議,但若想把某些周邊裝置模擬成 MC 裝置,就需要進一步把整個協議逆向出來。另外,MultipeerConnectivity 連結了 IOKit,因此可能間接暴露出 IOKit 的攻擊面。
- 上一篇文章: iOS 程式碼審查流程(Code Review for iOS)
- 下一篇文章: iOS 開發手記:iOS 8 定位服務的相容處理