
iOS:用 UIScrollView 實作頂部 Tab 切換與下拉刷新
頂部帶有滑動指示條的分頁切換,是資訊類 App 的標準配置。核心結構很單純:一排按鈕 + 一條指示線 + 一個開啟分頁的 UIScrollView,再用 scrollViewDidScroll 讓指示線跟手移動。
一、頭文件
// HJPagerViewController.h
#import <UIKit/UIKit.h>

@interface HJPagerViewController : UIViewController
    <UIScrollViewDelegate, UITableViewDataSource, UITableViewDelegate>

@property (nonatomic, strong) UIScrollView *scrolview;
@property (nonatomic, strong) UIButton *btn1;
@property (nonatomic, strong) UIButton *btn2;
@property (nonatomic, strong) UIButton *btn3;
@property (nonatomic, strong) UIImageView *imageLine;
@property (nonatomic, strong) UITableView *tableView;

@end
二、實作
// HJPagerViewController.m
#import "HJPagerViewController.h"
#import "MJRefresh.h"

NSString *const MJTableViewCellIdentifier = @"Cell1";

#define MJRandomData [NSString stringWithFormat:@"隨機數據---%d", arc4random_uniform(1000000)]

@interface HJPagerViewController ()
@property (strong, nonatomic) NSMutableArray *fakeData;
@end

@implementation HJPagerViewController

- (void)viewDidLoad {
    [super viewDidLoad];

    self.tabBarController.tabBar.hidden = YES;
    self.fakeData = [[NSMutableArray alloc] init];

    CGFloat mainWidth  = [UIScreen mainScreen].bounds.size.width;
    CGFloat mainHeight = [UIScreen mainScreen].bounds.size.height;

    // 三個分頁按鈕
    _btn1 = [[UIButton alloc] initWithFrame:CGRectMake(0, 66, mainWidth / 3, 40)];
    _btn1.backgroundColor = [UIColor colorWithRed:242/255.0 green:87/255.0 blue:96/255.0 alpha:1.0f];
    [_btn1 setTitle:@"距離" forState:UIControlStateNormal];

    _btn2 = [[UIButton alloc] initWithFrame:CGRectMake(mainWidth / 3, 66, mainWidth / 3, 40)];
    _btn2.backgroundColor = _btn1.backgroundColor;
    [_btn2 setTitle:@"價格" forState:UIControlStateNormal];

    _btn3 = [[UIButton alloc] initWithFrame:CGRectMake(mainWidth / 3 * 2, 66, mainWidth / 3, 40)];
    _btn3.backgroundColor = _btn1.backgroundColor;
    [_btn3 setTitle:@"篩選" forState:UIControlStateNormal];

    // 指示線:寬度等於一個按鈕,圓心對齊第一個按鈕中心
    _imageLine = [[UIImageView alloc] initWithFrame:CGRectMake(0, 104, mainWidth / 3, 5)];
    _imageLine.center = CGPointMake(mainWidth / 6, 107.5);
    [_imageLine setBackgroundColor:[UIColor greenColor]];

    // 承載三頁內容的 scrollView
    _scrolview = [[UIScrollView alloc] initWithFrame:CGRectMake(0, 111, mainWidth, mainHeight - 111)];
    _scrolview.delegate = self;
    _scrolview.pagingEnabled = YES;
    _scrolview.showsHorizontalScrollIndicator = NO;
    _scrolview.bounces = NO;
    _scrolview.contentSize = CGSizeMake(mainWidth * 3, mainHeight - 111);

    // 第一頁放一個可刷新的 tableView
    self.tableView = [[UITableView alloc] initWithFrame:CGRectMake(0, 0, mainWidth, mainHeight - 111)];
    [self setupRefresh];

    [self.tableView registerClass:[UITableViewCell class]
           forCellReuseIdentifier:MJTableViewCellIdentifier];
    self.tableView.delegate = self;
    self.tableView.dataSource = self;

    // 第二、三頁先用純色佔位
    UIImageView *image2 = [[UIImageView alloc] initWithFrame:CGRectMake(mainWidth, 0, mainWidth, mainHeight - 111)];
    image2.backgroundColor = [UIColor blackColor];

    UIImageView *image3 = [[UIImageView alloc] initWithFrame:CGRectMake(mainWidth * 2, 0, mainWidth, mainHeight - 111)];
    image3.backgroundColor = [UIColor greenColor];

    [_scrolview addSubview:self.tableView];
    [_scrolview addSubview:image2];
    [_scrolview addSubview:image3];

    [self.view addSubview:_btn1];
    [self.view addSubview:_btn2];
    [self.view addSubview:_btn3];
    [self.view addSubview:_scrolview];
    [self.view addSubview:_imageLine];

    // 用 tag 區分按鈕,避免為每個按鈕寫一個 action
    [_btn1 setTag:101];
    [_btn2 setTag:102];
    [_btn3 setTag:103];

    [_btn1 addTarget:self action:@selector(btnClicked:) forControlEvents:UIControlEventTouchUpInside];
    [_btn2 addTarget:self action:@selector(btnClicked:) forControlEvents:UIControlEventTouchUpInside];
    [_btn3 addTarget:self action:@selector(btnClicked:) forControlEvents:UIControlEventTouchUpInside];
}

#pragma mark - 按鈕點擊:讓指示線與 scrollView 同步移動

- (void)btnClicked:(UIButton *)sender {
    NSInteger tag = [sender tag];
    CGFloat w = self.view.bounds.size.width;

    [UIView animateWithDuration:0.5f animations:^{
        if (tag == 101) {
            _imageLine.center = CGPointMake(w / 6, _imageLine.center.y);
            _scrolview.contentOffset = CGPointMake(0, 0);
        } else if (tag == 102) {
            _imageLine.center = CGPointMake(w / 2, _imageLine.center.y);
            _scrolview.contentOffset = CGPointMake(w, 0);
        } else {
            _imageLine.center = CGPointMake(w / 6 * 5, _imageLine.center.y);
            _scrolview.contentOffset = CGPointMake(w * 2, 0);
        }
    }];
}

#pragma mark - 滑動時讓指示線跟手

- (void)scrollViewDidScroll:(UIScrollView *)scrollView {
    _imageLine.center = CGPointMake(scrollView.contentOffset.x / 3 + self.view.bounds.size.width / 6,
                                    _imageLine.center.y);
}
三、整合下拉/上拉刷新
#pragma mark - 整合刷新控件

- (void)setupRefresh {
    // dateKey 用於儲存刷新時間,可保證不同界面擁有不同的刷新時間
    [self.tableView addHeaderWithTarget:self
                                action:@selector(headerRereshing)
                               dateKey:@"table"];
    [self.tableView headerBeginRefreshing];

    [self.tableView addFooterWithTarget:self action:@selector(footerRereshing)];

    self.tableView.headerPullToRefreshText = @"下拉可以刷新了";
    self.tableView.headerReleaseToRefreshText = @"鬆開馬上刷新了";
    self.tableView.headerRefreshingText = @"正在刷新中…";

    self.tableView.footerPullToRefreshText = @"上拉可以加載更多數據了";
    self.tableView.footerReleaseToRefreshText = @"鬆開馬上加載更多數據了";
    self.tableView.footerRefreshingText = @"正在加載中…";
}

#pragma mark - 進入刷新狀態

- (void)headerRereshing {
    for (int i = 0; i < 5; i++) {
        [self.fakeData insertObject:MJRandomData atIndex:0];
    }

    // 模擬 2 秒後刷新 UI(真實開發中請移除這段 GCD 程式碼)
    dispatch_after(dispatch_time(DISPATCH_TIME_NOW, (int64_t)(2.0 * NSEC_PER_SEC)),
                   dispatch_get_main_queue(), ^{
        [self.tableView reloadData];
        [self.tableView headerEndRefreshing];   // 最好在 reloadData 之後呼叫
    });
}

- (void)footerRereshing {
    for (int i = 0; i < 5; i++) {
        [self.fakeData addObject:MJRandomData];
    }

    dispatch_after(dispatch_time(DISPATCH_TIME_NOW, (int64_t)(2.0 * NSEC_PER_SEC)),
                   dispatch_get_main_queue(), ^{
        [self.tableView reloadData];
        [self.tableView footerEndRefreshing];
    });
}

#pragma mark - UITableViewDataSource

- (NSInteger)tableView:(UITableView *)tableView numberOfRowsInSection:(NSInteger)section {
    return self.fakeData.count;
}

- (UITableViewCell *)tableView:(UITableView *)tableView
         cellForRowAtIndexPath:(NSIndexPath *)indexPath {
    UITableViewCell *cell = [tableView dequeueReusableCellWithIdentifier:MJTableViewCellIdentifier
                                                           forIndexPath:indexPath];
    cell.textLabel.text = self.fakeData[indexPath.row];
    return cell;
}

- (void)tableView:(UITableView *)tableView didSelectRowAtIndexPath:(NSIndexPath *)indexPath {
}

@end
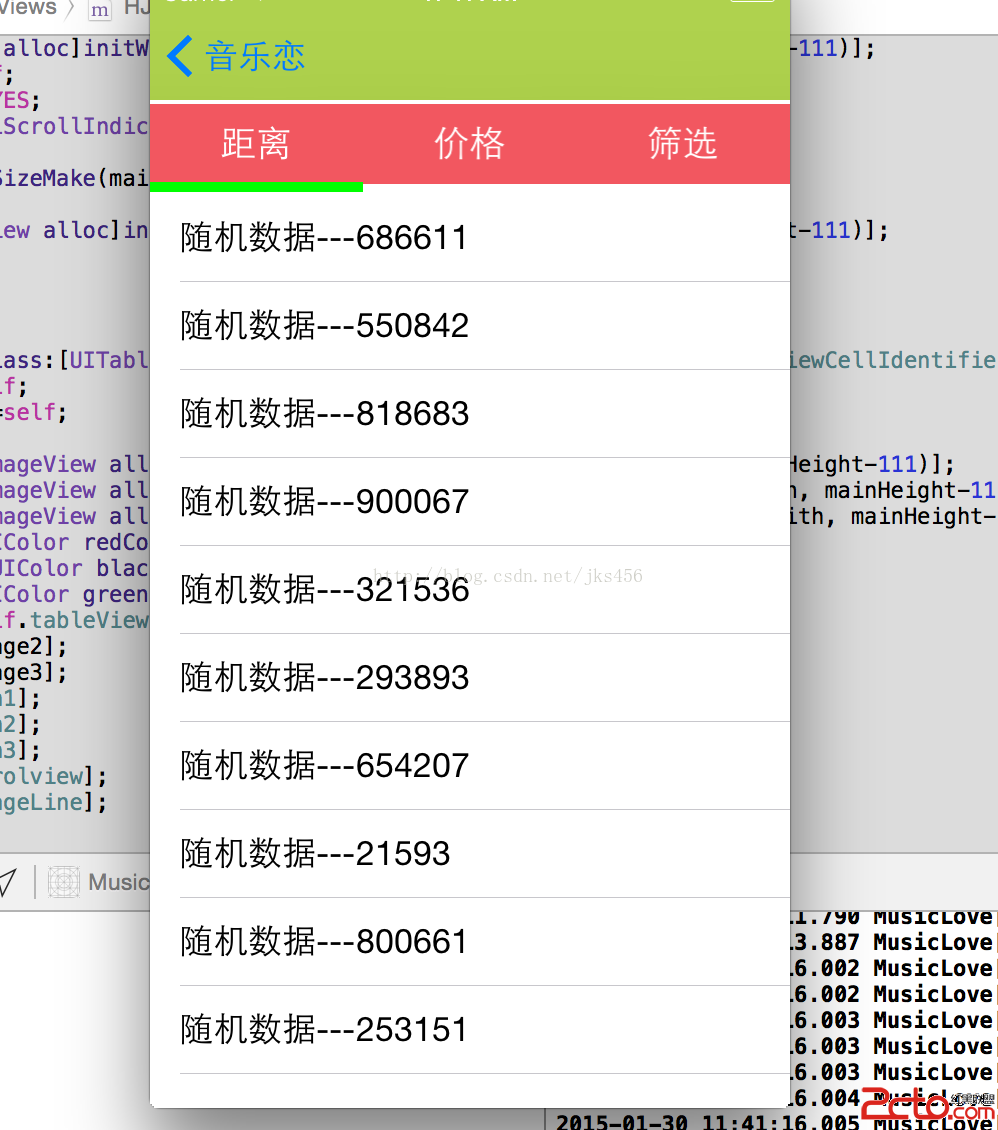
四、這個實作值得改進的地方
1. 三個分頁共用一個 tableView。範例中只有第一頁有內容,第二、三頁是純色佔位。真實場景中三頁各有不同的資料來源,應該為每一頁建立獨立的内容視圖,並在切換時按需載入。
2. 用 tag 區分按鈕的做法可替換為資料驅動。分頁一多,硬編碼的 if-else 就難以維護。建議把「標題 + 對應索引」抽成陣列,用 [sender tag] 或直接記錄 index 來更新,讓新增分頁只需改一處資料。
3. 指示線的移動應以 scrollView 的 contentOffset 為單一真相來源。目前點擊時直接設 contentOffset、滑動時又回算 center,兩條路徑容易在動畫中途手動拖動時互相打架。更穩健的做法是:點擊只負責設定 contentOffset,指示線位置一律由 scrollViewDidScroll: 計算。
4. MJRefresh 的 API 已改版。範例中的 addHeaderWithTarget:action:dateKey: 與 headerBeginRefreshing 屬於舊版 MJRefresh 2.x。目前版本請改用 mj_header 並搭配 MJRefreshNormalHeader:
#import <MJRefresh/MJRefresh.h>

MJRefreshNormalHeader *header = [MJRefreshNormalHeader headerWithRefreshingBlock:^{
    // 重新載入資料
    [self.tableView reloadData];
    [self.tableView.mj_header endRefreshing];
}];
header.lastUpdatedTimeLabel.hidden = YES;
self.tableView.mj_header = header;

self.tableView.mj_footer = [MJRefreshBackNormalFooter footerWithRefreshingBlock:^{
    // 載入更多
    [self.tableView.mj_footer endRefreshing];
}];
5. 分頁切換更推薦用 UIScrollView + UIPageControl 或 IGListKit。若只是想實作分頁,Apple 自 iOS 14 提供的 UIPageViewController 或社群的 JXCategoryView、SGPageView 都已經處理好指示線跟手、點擊動畫、懶載入與記憶體回收等細節。除非有特殊的排版需求,否則自行拼裝 scrollView 的維護成本通常高於收益。
6. 別忘了 contentInset 與 safeArea。在 iPhone X 之後的機型上,硬編碼的 y 座標會與安全區域衝突。請改用 safeAreaLayoutGuide 或 UITableView 自帶的 contentInsetAdjustmentBehavior 來處理。