
iOS UITableView 基礎知識詳解:數據源、代理與 Cell 復用
編輯:iOS 開發綜合
UITableView 是 iOS 中最常用的列表控件之一。本文以一個 RootViewController 為例,詳細講解 UITableView 的創建、數據源與代理的設置,以及 Cell 的復用機制等基礎知識。
一、聲明代理協議
打開頭文件,讓控制器遵循數據源與代理協議:
#import <UIKit/UIKit.h>

@interface RootViewController : UIViewController <UITableViewDataSource, UITableViewDelegate>

@end
二、創建並配置 tableView
打開實現文件:
- (void)viewDidLoad {
    [super viewDidLoad];

    UITableView *tableView = [[UITableView alloc] initWithFrame:self.view.bounds style:(UITableViewStyleGrouped)];
    [self.view addSubview:tableView];

    // 屬性設置
    tableView.rowHeight = 90;                        // 行高
    tableView.separatorColor = [UIColor redColor];   // 分隔線顏色

    tableView.dataSource = self; // 設置數據源代理(必須實現)
    tableView.delegate = self;   // 設置控制代理對象
}
三、數據源方法
// 設置分區數量(可選,默認為 1 個分區)
- (NSInteger)numberOfSectionsInTableView:(UITableView *)tableView {
    return 4;
}

// 設置每個分區的行數(必須實現)
- (NSInteger)tableView:(UITableView *)tableView numberOfRowsInSection:(NSInteger)section {
    return 5;
}

// 設置每行顯示的內容(必須實現)
- (UITableViewCell *)tableView:(UITableView *)tableView cellForRowAtIndexPath:(NSIndexPath *)indexPath {
    UITableViewCell *cell = [[UITableViewCell alloc] initWithStyle:(UITableViewCellStyleDefault) reuseIdentifier:@"cell"];

    // indexPath 包含 section(分區)和 row(行),索引均從 0 開始
    cell.textLabel.text = [NSString stringWithFormat:@"section:%ld row:%ld", indexPath.section, indexPath.row];
    cell.detailTextLabel.text = @". . . ."; // 在 Default 樣式下不顯示

    // 輔助視圖:只讓第一行顯示對勾
    if (indexPath.row == 0) {
        cell.accessoryType = UITableViewCellAccessoryCheckmark;
    } else {
        cell.accessoryType = UITableViewCellAccessoryNone;
    }

    return cell;
}
四、Cell 的復用機制
當某一行移出屏幕時,tableView 會把該行使用的 cell 放入「復用隊列」中保存,這一行便不再有 cell 顯示數據。因此,只要某行要進入屏幕,就必須執行上面的代理方法來重新設置。為了提升性能,實戰中推薦使用復用方式:
- (UITableViewCell *)tableView:(UITableView *)tableView cellForRowAtIndexPath:(NSIndexPath *)indexPath {
    static NSString *identifier = @"cell"; // 標識
    // 先從復用隊列中嘗試獲取可復用的 cell
    UITableViewCell *cell = [tableView dequeueReusableCellWithIdentifier:identifier];
    // 若隊列中沒有可用 cell,則自己創建
    if (cell == nil) {
        cell = [[UITableViewCell alloc] initWithStyle:(UITableViewCellStyleSubtitle) reuseIdentifier:identifier];
    }
    // 無論是否復用,都要重新設置當前 cell 的內容
    cell.textLabel.text = [NSString stringWithFormat:@"%ld", indexPath.row];
    cell.detailTextLabel.text = @"示例文本"; // 是否顯示與創建時的樣式(subtitle)有關
    return cell;
}
五、其他常用代理方法
// 為每個分區設置頭部標題
- (NSString *)tableView:(UITableView *)tableView titleForHeaderInSection:(NSInteger)section {
    return [NSString stringWithFormat:@"%ld", section + 1];
}

// 設置右側的索引欄標題
- (NSArray *)sectionIndexTitlesForTableView:(UITableView *)tableView {
    return @[@"1", @"2", @"3"];
}

// 檢測 cell 被選中的分區與行
- (void)tableView:(UITableView *)tableView didSelectRowAtIndexPath:(NSIndexPath *)indexPath {
    NSLog(@"分區 %ld,行數:%ld", indexPath.section + 1, indexPath.row);
}
效果圖如下:
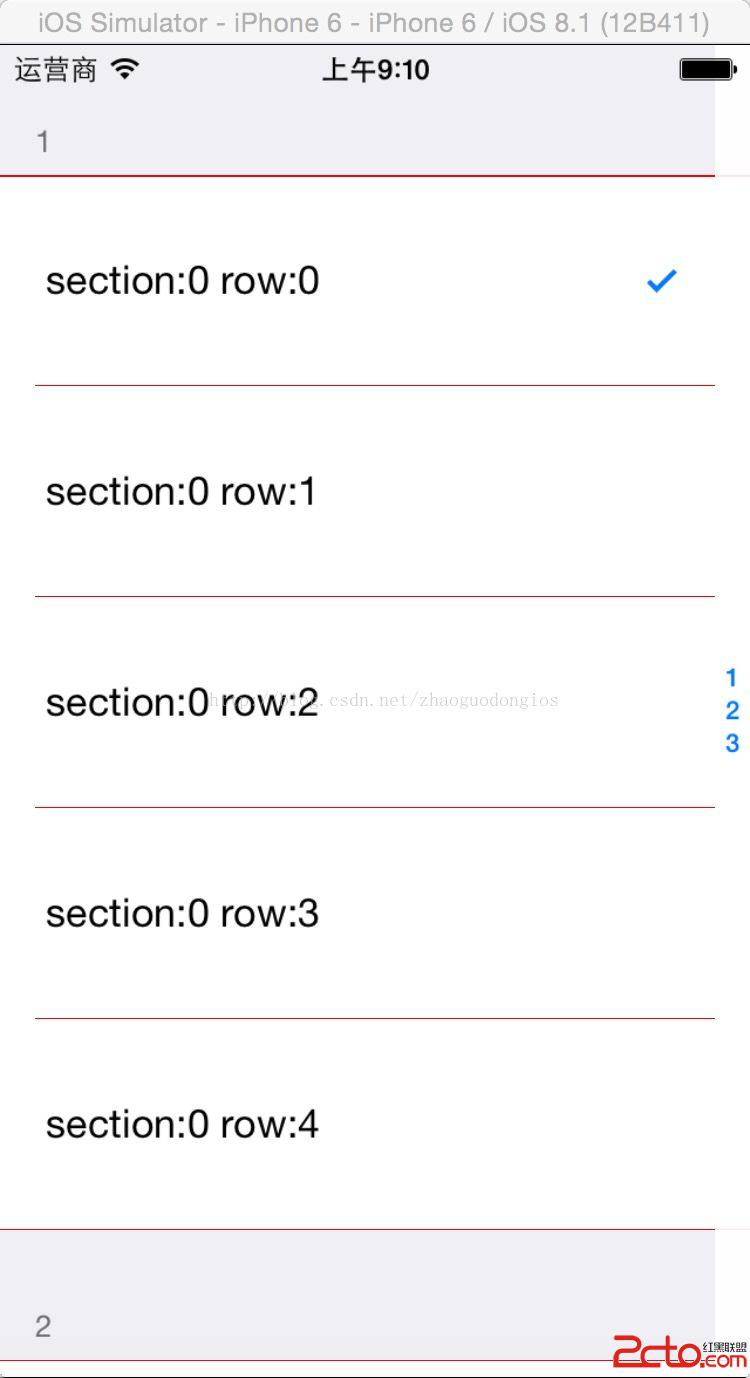
以上就是 UITableView 的基礎用法,涵蓋分區、行數、Cell 內容設置與復用等核心知識。掌握這些之後,再配合自定義 Cell、行高動態計算等進階技巧,就能應對絕大多數列表場景了。關於更複雜的用法與難點,後續再為大家整理。
- 上一篇文章: iOS 枚舉類型详解:enum、NS_ENUM 與 NS_OPTIONS
- 下一篇文章: UIToolBar 工具列的使用要點