
iOS CLLocationManager 定位實作與 iOS 8 差異注意事項
編輯:iOS 開發綜合
網上關於 CLLocationManager 的教學很多,程式碼大同小異,但許多人照著做之後在 iOS 8 裝置上卻遲遲拿不到座標、代理方法也不觸發。問題不在程式碼,而在 iOS 8 新增的授權機制。
基本定位程式碼
先導入 CoreLocation.framework,然後引入標頭檔:
#import <CoreLocation/CoreLocation.h>
定義屬性並遵循代理協議:
@property (nonatomic, strong) CLLocationManager *locationManager;
// ViewController 需遵循 CLLocationManagerDelegate
- (void)locate {
    // 先判斷定位服務是否可用
    if ([CLLocationManager locationServicesEnabled]) {
        _locationManager = [[CLLocationManager alloc] init];
        _locationManager.delegate = self;
        _locationManager.desiredAccuracy = kCLLocationAccuracyBest;
        _locationManager.distanceFilter = 10;

        // iOS 8 需要主動請求授權,見下方說明
        if ([[UIDevice currentDevice].systemVersion floatValue] >= 8.0) {
            [_locationManager requestWhenInUseAuthorization];
        }

        [_locationManager startUpdatingLocation];
    } else {
        UIAlertView *alertView = [[UIAlertView alloc] initWithTitle:@"提示"
                                                           message:@"定位不成功,請確認開啟定位"
                                                          delegate:nil
                                                 cancelButtonTitle:@"取消"
                                                 otherButtonTitles:@"確定", nil];
        [alertView show];
    }
}
代理方法:取得座標並反查城市
#pragma mark - CoreLocation Delegate

- (void)locationManager:(CLLocationManager *)manager didUpdateLocations:(NSArray *)locations {
    // locations 保存持續更新的座標,取最後一筆即為最新位置。
    // 若不想持續更新,可在此方法中呼叫 stopUpdatingLocation
    CLLocation *currentLocation = [locations lastObject];

    CLGeocoder *geocoder = [[CLGeocoder alloc] init];
    // 依經緯度反向地理編碼取得地址資訊
    [geocoder reverseGeocodeLocation:currentLocation completionHandler:^(NSArray *array, NSError *error) {
        if (array.count > 0) {
            CLPlacemark *placemark = [array objectAtIndex:0];

            // 取得城市名稱
            NSString *city = placemark.locality;
            if (!city) {
                // 直轄市的 city 為空,需改取省份欄位
                city = placemark.administrativeArea;
            }
            cityName = city;
            NSLog(@"定位完成:%@", cityName);

            // 只需要一次座標,取到後立即停止更新
            [manager stopUpdatingLocation];
        } else if (error == nil && [array count] == 0) {
            NSLog(@"No results were returned.");
        } else if (error != nil) {
            NSLog(@"An error occurred = %@", error);
        }
    }];
}
iOS 8 的關鍵差異
在 iOS 8 之前,上述程式碼可以正常定位;到了 iOS 8 卻完全無效。原因在於 iOS 8 修改了定位授權流程,CLLocationManager 新增了兩個方法:
(1)始終允許訪問位置資訊
- (void)requestAlwaysAuthorization;
(2)僅在使用應用程式期間允許訪問位置資料
- (void)requestWhenInUseAuthorization;
呼叫方式:
locationManager = [[CLLocationManager alloc] init];
locationManager.delegate = self;
locationManager.desiredAccuracy = kCLLocationAccuracyBest;
locationManager.distanceFilter = 10;

if (iOSVersion >= 8) {
    // iOS 8 定位必須先請求授權
    [locationManager requestWhenInUseAuthorization];
}

[locationManager startUpdatingLocation];
別忘了 Info.plist
光呼叫授權方法還不夠,還必須在 Info.plist 中加入說明用途的鍵值,否則 App 會直接崩潰:
(1)NSLocationAlwaysUsageDescription
(2)NSLocationWhenInUseUsageDescription
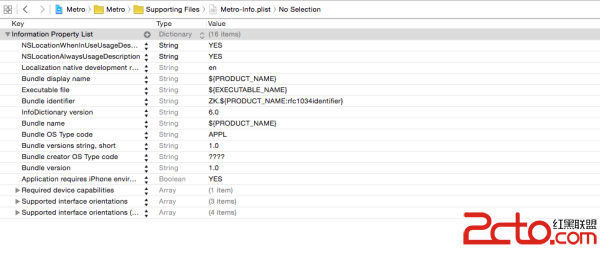
兩者對應關係很單純:呼叫 requestAlwaysAuthorization 就搭配 NSLocationAlwaysUsageDescription,呼叫 requestWhenInUseAuthorization 就搭配 NSLocationWhenInUseUsageDescription。字串內容會直接顯示在系統的授權提示彈窗中,寫清楚「為什麼需要你的位置」,通過率會高很多。
完成這兩步設定,定位功能就能恢復正常了。
- 上一篇文章: iOS 8 UITableView 自適應 cell 高度實作
- 下一篇文章: iOS 關於 App 支援的螢幕方向設定