
iOS 必學控件 UITableView 全面解析
UITableView 大概是 iOS 開發中出現頻率最高的控件,從設定清單到複雜表單幾乎都離不開它。本文把它的核心知識點、Cell 重用原理、Delegate 設計、自訂 Cell 到兩個完整實例一次梳理清楚。
必須掌握的幾件事
設定 dataSource 與 delegate;單組與多組資料的呈現;UITableViewCell 的常見屬性;利用 Cell 重用做效能優化;以及自訂 Cell。
資料從哪來:dataSource
UITableView 自己不知道要顯示什麼,它會反過來向 dataSource 索取:一共有幾組、每組幾行、每一行長什麼樣。沒有設定 dataSource 的 UITableView 就只是一個空殼。任何實作 UITableViewDataSource 協議的 Objective-C 物件都能當資料源。
@property (nonatomic, assign) id <UITableViewDataSource> dataSource;

// 一共幾組
- (NSInteger)numberOfSectionsInTableView:(UITableView *)tableView;
// 第 section 組有幾行
- (NSInteger)tableView:(UITableView *)tableView numberOfRowsInSection:(NSInteger)section;
// 每一行顯示什麼
- (UITableViewCell *)tableView:(UITableView *)tableView cellForRowAtIndexPath:(NSIndexPath *)indexPath;
MVC 設計思想
MVC 是貫穿整個 iOS 開發的設計思想:Model 負責資料,View 負責呈現,Control 負責協調。幾個明顯特徵是——View 顯示什麼取決於 Model;Model 一改,View 隨之更新;Control 負責建立 Model 並交給 View 解析。這套分層需要累積一些專案經驗才能真正體會到好處。
UITableViewCell 結構
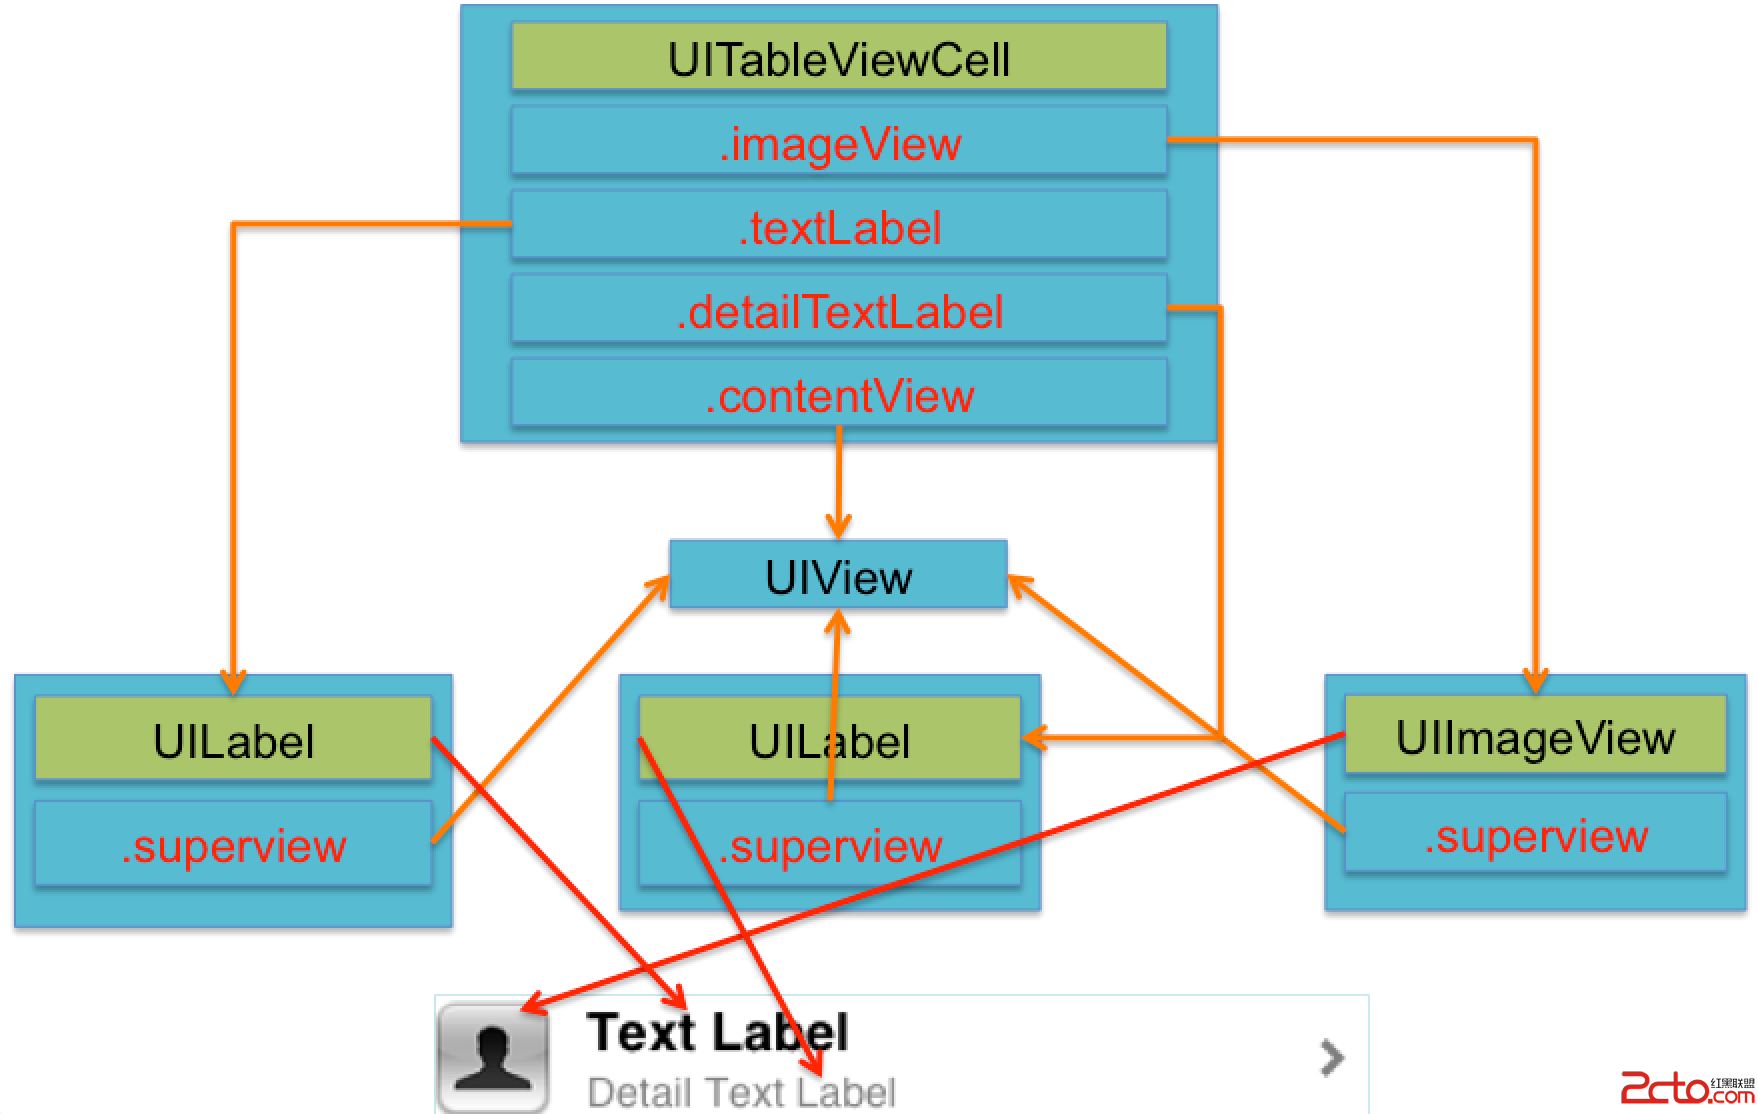
表格的每一行都是一個 UITableViewCell,由 dataSource 的 tableView:cellForRowAtIndexPath: 負責產生。Cell 內部有一個預設子視圖 contentView,它是所有顯示內容的父視圖,同時可承載輔助指示視圖。
輔助指示視圖透過 accessoryType 設定,預設為 UITableViewCellAccessoryNone,其他常見值:
UITableViewCellAccessoryDisclosureIndicator    // 右箭頭
UITableViewCellAccessoryDetailDisclosureButton // 藍色 i 按鈕
UITableViewCellAccessoryCheckmark              // 勾選
若想放自訂內容(例如一個開關),則改用 accessoryView 屬性。
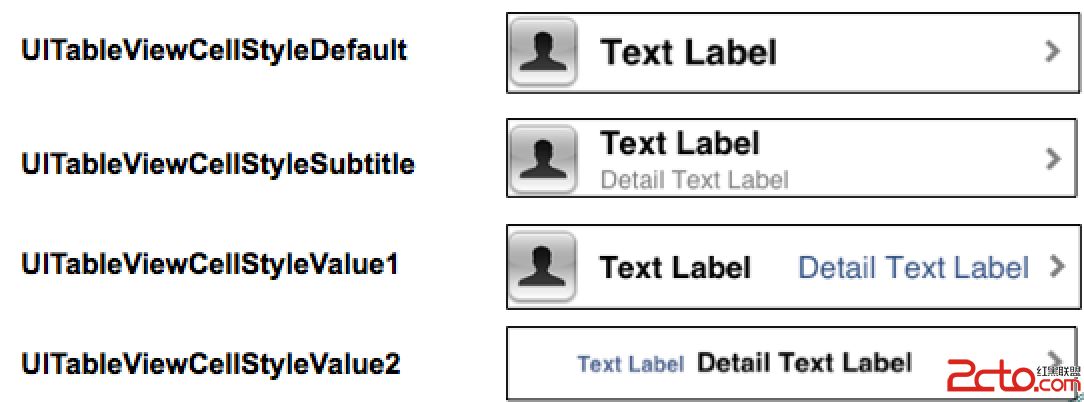
contentView 底下預設有三個子視圖:兩個 UILabel(透過 textLabel 與 detailTextLabel 存取)與一個 UIImageView(透過 imageView 存取)。而 UITableViewCellStyle 屬性決定使用哪些子視圖、以及它們的排列位置。
Cell 重用原理
iOS 裝置記憶體有限,若列表要顯示上萬筆資料,難不成要配置上萬個 Cell?顯然不可行,因此有了重用機制。
運作方式是:滾動時移出視窗的 Cell 不會被立刻釋放,而是放進一個物件池等待重用。當 UITableView 再來索取 Cell,dataSource 會先問物件池;池中有未使用的就拿來配置新資料後回傳,避免重複配置物件。
但這裡有個問題:一個表格可能同時存在多種自訂 Cell,物件池裡混著不同型別,重用時極可能拿到錯誤型別。解法是 reuseIdentifier——初始化 Cell 時傳入一個識別字串(慣例是用類名), UITableView 便會依識別字串去池裡找對應型別,找不到才新建。
重用標準寫法
- (UITableViewCell *)tableView:(UITableView *)tableView cellForRowAtIndexPath:(NSIndexPath *)indexPath {
    static NSString *ID = @"mjcell";                                  // 1. 定義識別字
    UITableViewCell *cell = [tableView dequeueReusableCellWithIdentifier:ID]; // 2. 從池中取
    if (cell == nil) {                                               // 3. 池裡沒有才新建
        cell = [[UITableViewCell alloc] initWithStyle:UITableViewCellStyleSubtitle
                                      reuseIdentifier:ID];
    }
    // 4. 配置資料
    return cell;
}
用 xib 封裝自訂 View 的步驟
新建一個 xib 描述 View 的內部結構(例如 XXXCell.xib);新建一個繼承自系統 View 的自訂類別,類名最好與 xib 同名;在 xib 中把控件連線到自訂類別的 .m;對外提供一個類方法回傳建立好的 View,把從 xib 載入的細節藏起來;再提供一個 Model 屬性讓外部傳入資料;最後在 Model 的 setter 中把資料配置到各子控件上。
Delegate 的使用時機
當物件 A 內部發生事情想通知物件 B,或 B 想監聽 A,或 A 想呼叫 B 的方法又不希望與 B 產生耦合依賴,或 A 想傳資料給 B——這些場合的結論都是同一句話:B 是 A 的 delegate。
實作順序:先釐清誰是誰的代理 → 定義代理協議(命名慣例:控件類名 + Delegate)→ 定義代理方法(通常標為 @optional,方法名以控件名開頭,且至少帶一個參數把控件本身傳出去)→ 設定 delegate → 代理物件實作協議 → 在恰當時機呼叫,並在呼叫前判斷對方是否實作該方法。
自訂 Cell(含可變高度)
1)新建一個繼承 UITableViewCell 的類別。
2)重寫 initWithStyle:reuseIdentifier:,把所有要顯示的子控件加入 contentView,並在這裡完成一次性的屬性設定(字型、固定圖片等)。
3)準備兩個模型:資料模型存文字與圖片;frame 模型存資料模型、所有子控件的 frame 以及 Cell 高度。
4)Cell 只持有 frame 模型,不要直接持有資料模型。
5)在 frame 模型的 setter 中統一設定子控件的內容與 frame。
6)frame 模型用懶載入,確保每個 Cell 只計算一次。
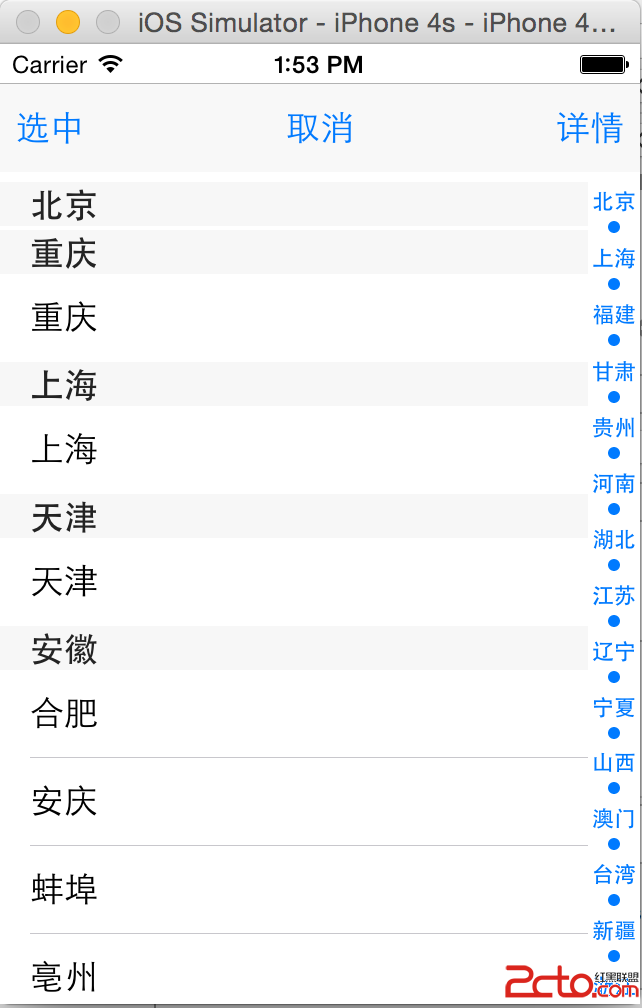
實例一:多組城市列表
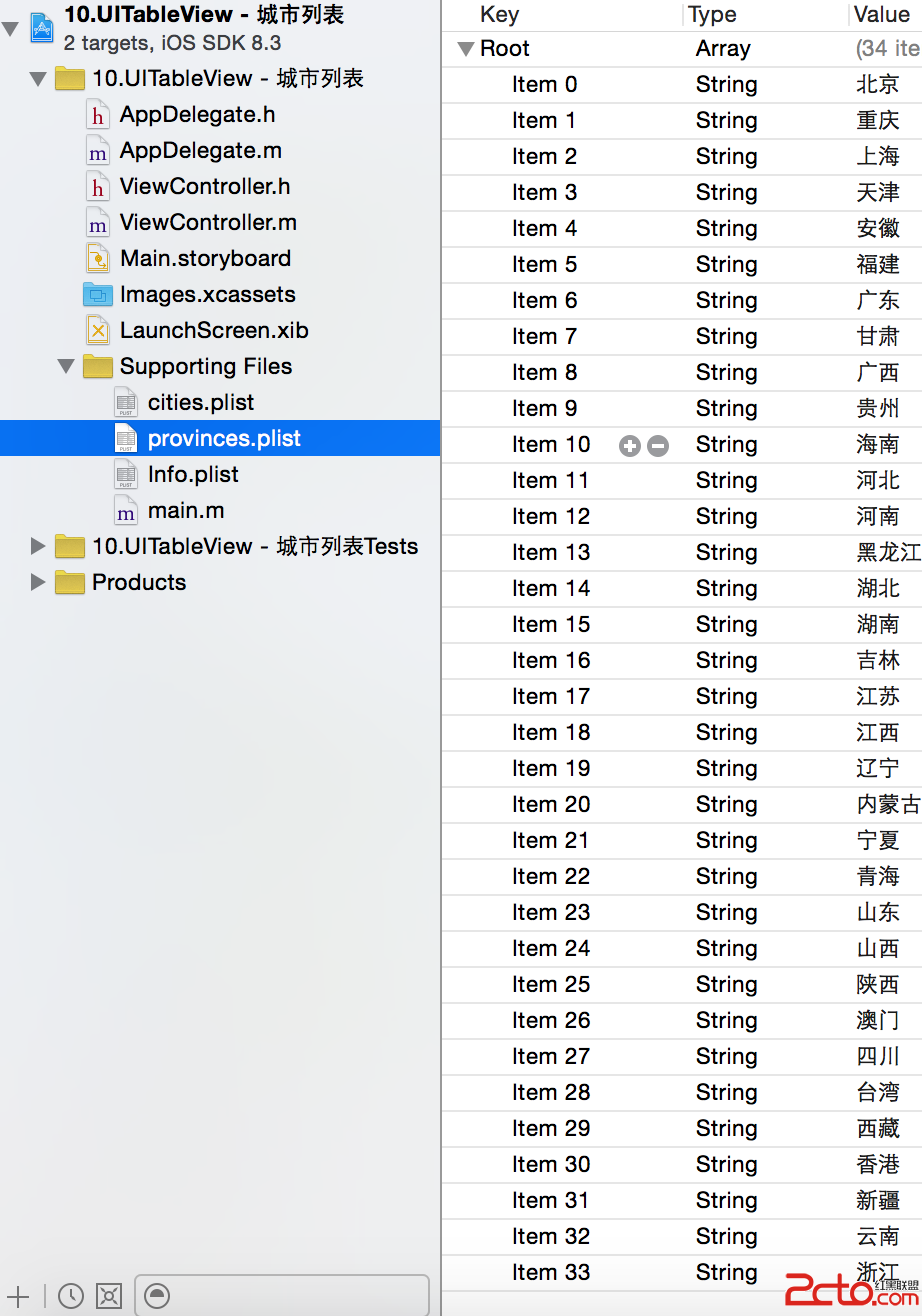
資料來源是兩個 plist:provinces.plist 與 cities.plist。
@interface ViewController () <UITableViewDataSource, UITableViewDelegate>
@property (weak, nonatomic) IBOutlet UITableView *tableView;
@property (weak, nonatomic) IBOutlet UIToolbar  *toolBar;
@property NSArray *provinces;
@property NSArray *cities;
@end

@implementation ViewController

- (void)viewDidLoad {
    [super viewDidLoad];
    NSBundle *mainbundle = [NSBundle mainBundle];
    self.provinces = [NSArray arrayWithContentsOfFile:
                      [mainbundle pathForResource:@"provinces.plist" ofType:nil]];
    self.cities = [NSArray arrayWithContentsOfFile:
                   [mainbundle pathForResource:@"cities.plist" ofType:nil]];

    for (UIBarButtonItem *item in self.toolBar.items) {
        if (item.title) [item setAction:@selector(toolBarItemClick:)];
    }
}

#pragma mark - DataSource

- (NSInteger)numberOfSectionsInTableView:(UITableView *)tableView {
    return self.provinces.count;
}

- (NSInteger)tableView:(UITableView *)tableView numberOfRowsInSection:(NSInteger)section {
    return [self.cities[section] count];
}

- (UITableViewCell *)tableView:(UITableView *)tableView cellForRowAtIndexPath:(NSIndexPath *)indexPath {
    UITableViewCell *cell =
        [[UITableViewCell alloc] initWithStyle:UITableViewCellStyleDefault reuseIdentifier:nil];
    cell.textLabel.text = self.cities[indexPath.section][indexPath.row];
    [cell setSelectionStyle:UITableViewCellSelectionStyleNone];

    // 已被選中的 row 顯示勾選
    if ([[tableView indexPathsForSelectedRows] containsObject:indexPath]) {
        cell.accessoryType = UITableViewCellAccessoryCheckmark;
    }
    return cell;
}

// 右側索引列
- (NSArray *)sectionIndexTitlesForTableView:(UITableView *)tableView {
    return self.provinces;
}

// 每組的標題
- (NSString *)tableView:(UITableView *)tableView titleForHeaderInSection:(NSInteger)section {
    return self.provinces[section];
}

#pragma mark - Delegate

- (void)tableView:(UITableView *)tableView didSelectRowAtIndexPath:(NSIndexPath *)indexPath {
    UITableViewCell *cell = [tableView cellForRowAtIndexPath:indexPath];
    [cell setAccessoryType:UITableViewCellAccessoryCheckmark];
}

- (void)tableView:(UITableView *)tableView didDeselectRowAtIndexPath:(NSIndexPath *)indexPath {
    UITableViewCell *cell = [tableView cellForRowAtIndexPath:indexPath];
    [cell setAccessoryType:UITableViewCellAccessoryNone];
}

- (void)toolBarItemClick:(UIBarButtonItem *)sender {
    if (sender.tag == 3) {
        NSLog(@"已選:%@", [self.tableView indexPathsForSelectedRows]);
    }
}

@end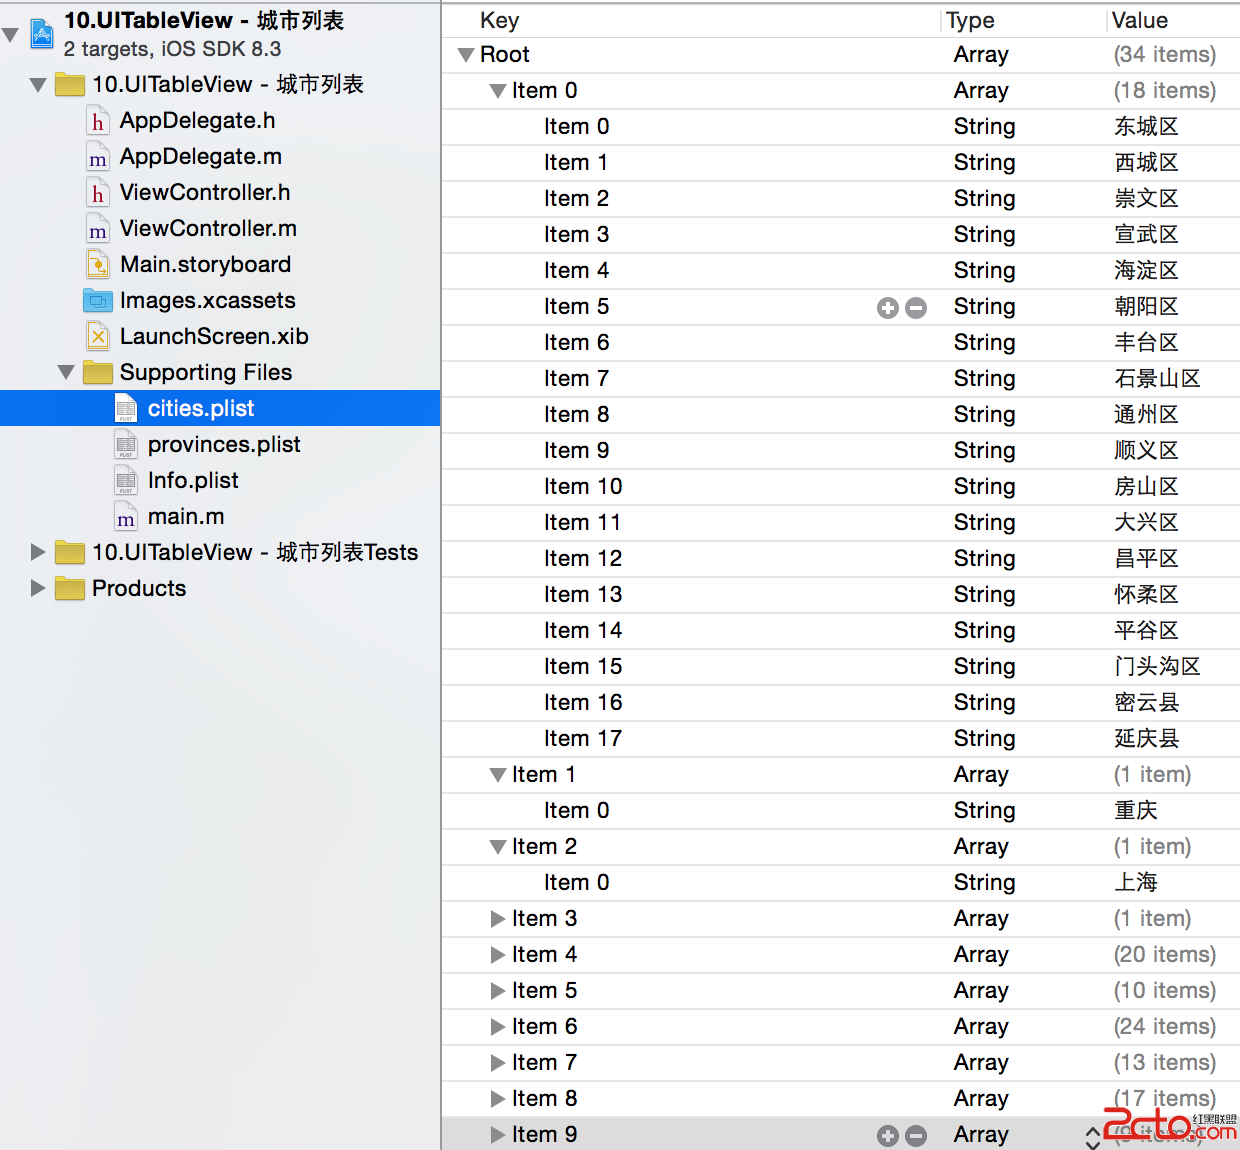
實例二:單組模型展示
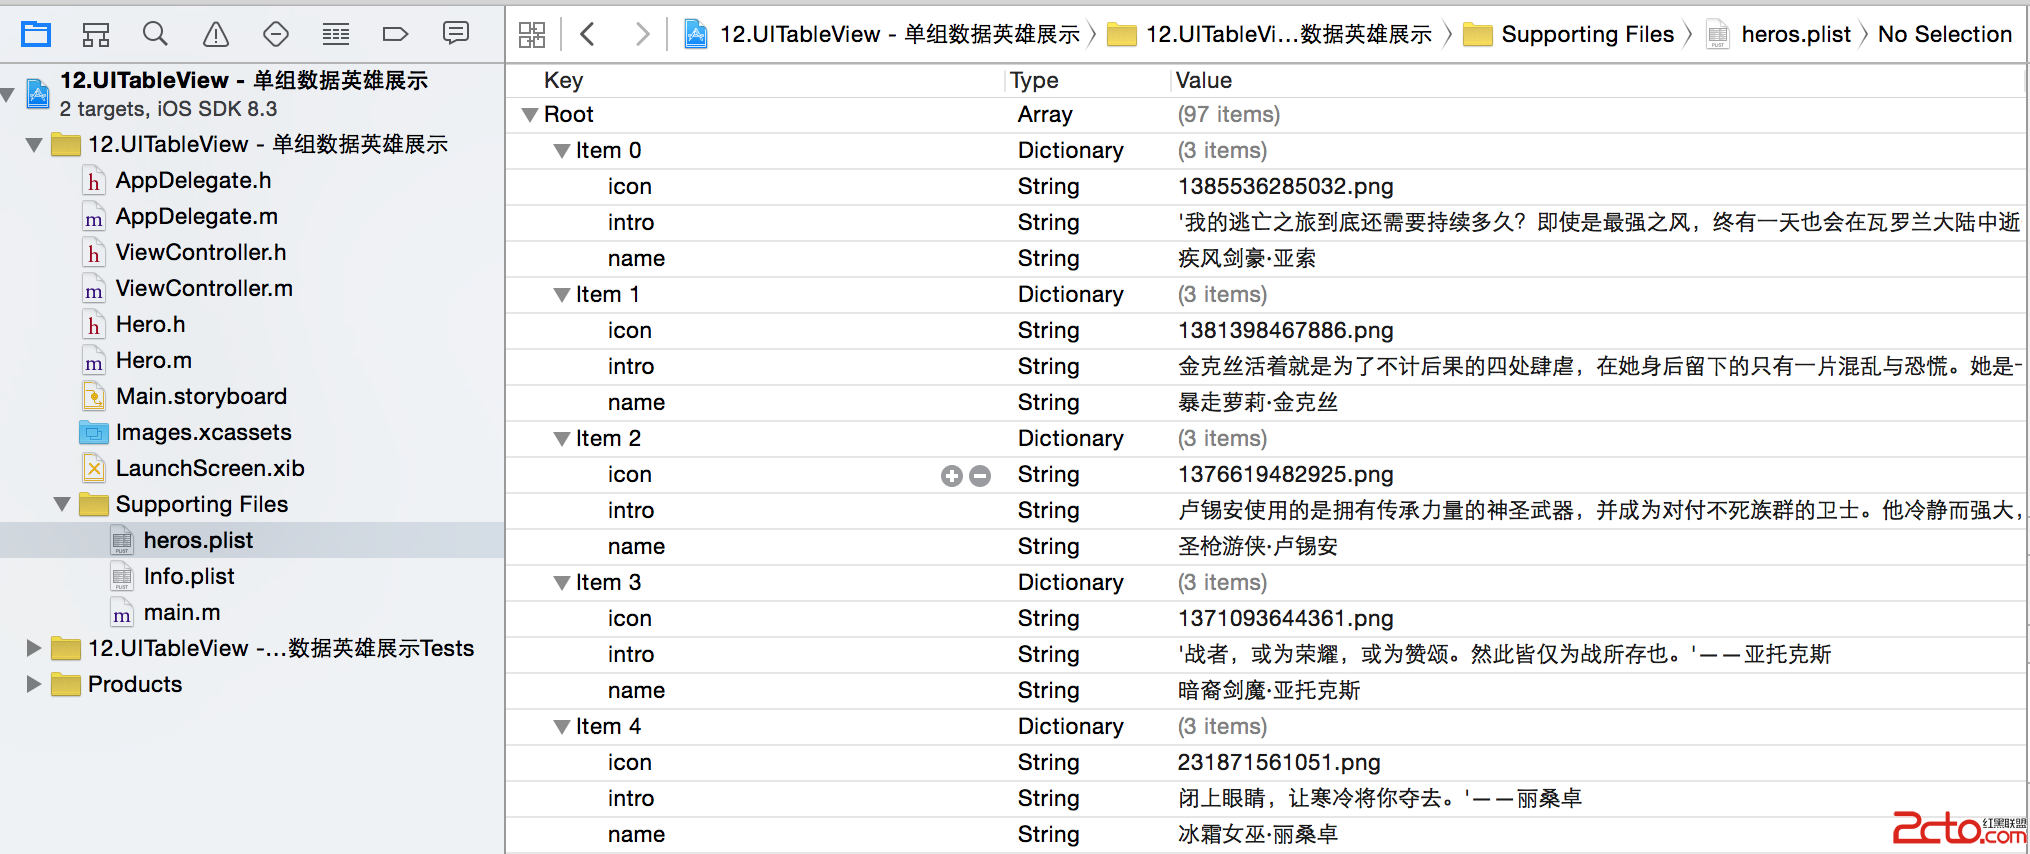
這次資料先轉成模型再上屏,示範更典型的 MVC 寫法。
// Hero.h
@interface Hero : NSObject
@property (nonatomic, copy) NSString *name;
@property (nonatomic, copy) NSString *icon;
@property (nonatomic, copy) NSString *intro;
+ (instancetype)heroWithDict:(NSDictionary *)dict;
@end

// Hero.m
@implementation Hero
+ (instancetype)heroWithDict:(NSDictionary *)dict {
    return [[self alloc] initWithDict:dict];
}
- (instancetype)initWithDict:(NSDictionary *)dict {
    if (self = [super init]) {
        [self setValuesForKeysWithDictionary:dict];
    }
    return self;
}
@end
@implementation ViewController
// 懶載入:把 plist 裡的字典全轉成模型
- (NSArray *)heros {
if (_heros == nil) {
NSString *path = [[NSBundle mainBundle] pathForResource:@"heros.plist" ofType:nil];
NSArray *dictArray = [NSArray arrayWithContentsOfFile:path];
NSMutableArray *heroArray = [NSMutableArray array];
for (NSDictionary *dict in dictArray) {
[heroArray addObject:[Hero heroWithDict:dict]];
}
_heros = heroArray;
}
return _heros;
}
- (NSInteger)tableView:(UITableView *)tableView numberOfRowsInSection:(NSInteger)section {
return self.heros.count;
}
- (UITableViewCell *)tableView:(UITableView *)tableView cellForRowAtIndexPath:(NSIndexPath *)indexPath {
static NSString *ID = @"hero";
UITableViewCell *cell = [tableView dequeueReusableCellWithIdentifier:ID];
if (cell == nil) {
cell = [[UITableViewCell alloc] initWithStyle:UITableViewCellStyleSubtitle
reuseIdentifier:ID];
}
Hero *hero = self.heros[indexPath.row];
cell.textLabel.text = hero.name;
cell.detailTextLabel.text = hero.intro;
cell.imageView.image = [UIImage imageNamed:hero.icon];
cell.accessoryType = UITableViewCellAccessoryDisclosureIndicator;
UIImageView *bgView = [[UIImageView alloc] init];
bgView.image = [UIImage imageNamed:@"buttondelete"];
cell.backgroundView = bgView;
UIView *selectedbgView = [[UIView alloc] init];
selectedbgView.backgroundColor = [UIColor greenColor];
cell.selectedBackgroundView = selectedbgView;
return cell;
}
- (CGFloat)tableView:(UITableView *)tableView heightForRowAtIndexPath:(NSIndexPath *)indexPath {
return 60;
}
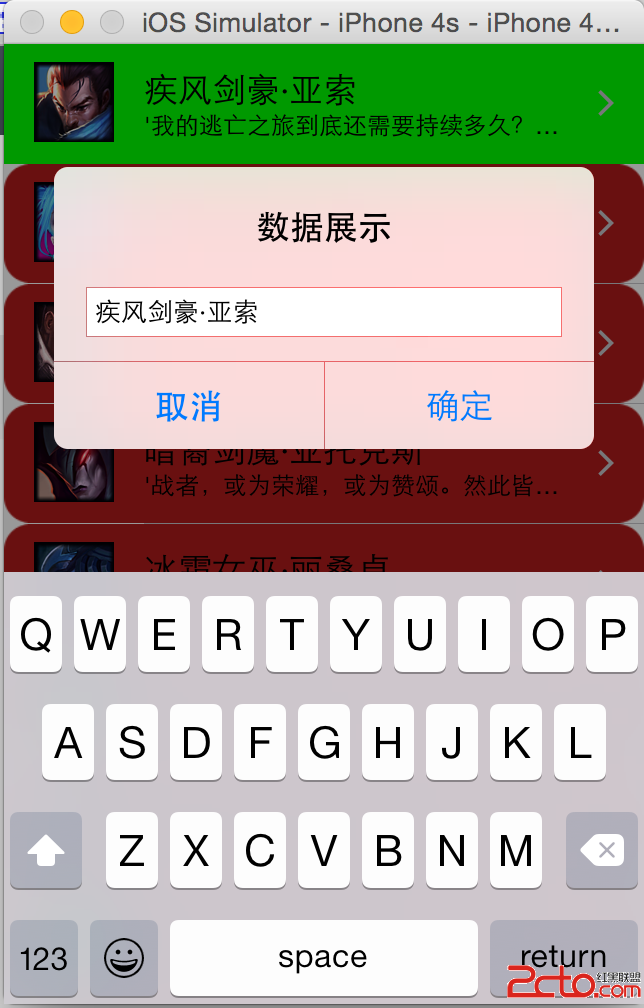
- (void)tableView:(UITableView *)tableView didSelectRowAtIndexPath:(NSIndexPath *)indexPath {
Hero *hero = self.heros[indexPath.row];
UIAlertView *alert = [[UIAlertView alloc] initWithTitle:@"資料展示"
message:nil
delegate:self
cancelButtonTitle:@"取消"
otherButtonTitles:@"確定", nil];
alert.alertViewStyle = UIAlertViewStylePlainTextInput;
[alert textFieldAtIndex:0].text = hero.name;
alert.tag = indexPath.row; // 把 row 綁到 alert 上
[alert show];
}
- (void)alertView:(UIAlertView *)alertView clickedButtonAtIndex:(NSInteger)buttonIndex {
if (buttonIndex == 0) return;
NSInteger row = alertView.tag;
Hero *hero = self.heros[row];
hero.name = [alertView textFieldAtIndex:0].text;
// 局部刷新:只更新被改動的那一行,動畫也更自然
NSIndexPath *path = [NSIndexPath indexPathForItem:row inSection:0];
[self.tableView reloadRowsAtIndexPaths:@[path]
withRowAnimation:UITableViewRowAnimationBottom];
}
@end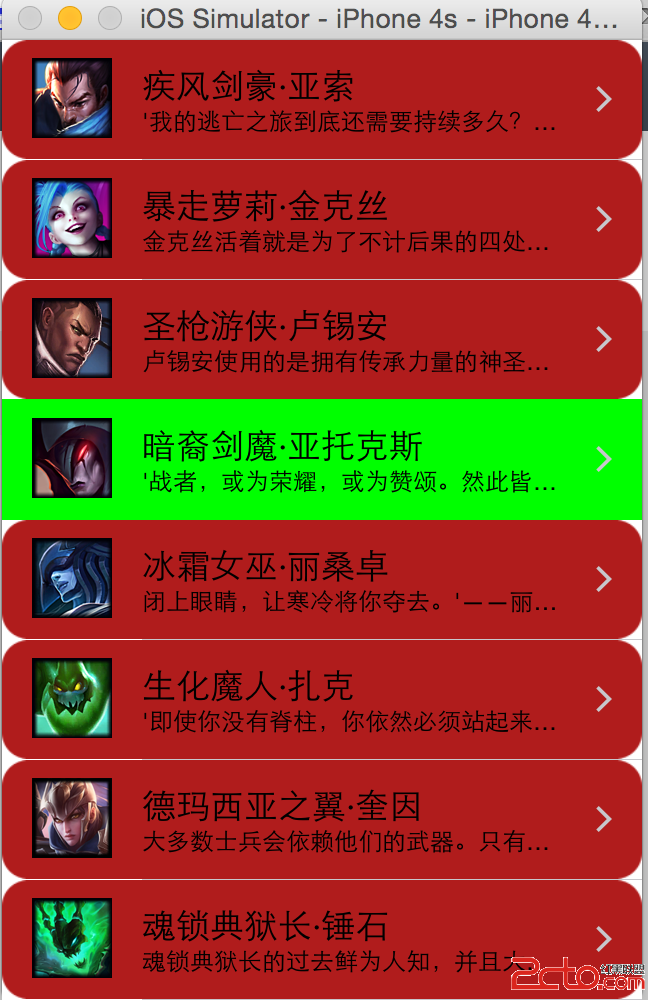
刷新機制補充
reloadData 會讓 UITableView 重新向 dataSource 索取全部資料,也就是重跑 numberOfRowsInSection: 與 cellForRowAtIndexPath:。若只改了一兩行,用 reloadRowsAtIndexPaths: 做局部刷新,既省效能又能帶入動畫,是更好的選擇。
- 上一篇文章: iOS App 接入微信支付的完整實作筆記
- 下一篇文章: iOS 實作:滑動頁面時即時切換狀態列(電池條)顏色