
iOS CoreText 圖文混排:把純 C 程式碼封裝成物件導向
前一節我們用物件導向的思路,把 Core Text 純 C 的介面包裝成好用的類別。這一節要進一步把「圖文混排」也一起封裝進去。本節程式碼建立在上一節的基礎上,先看最終效果:
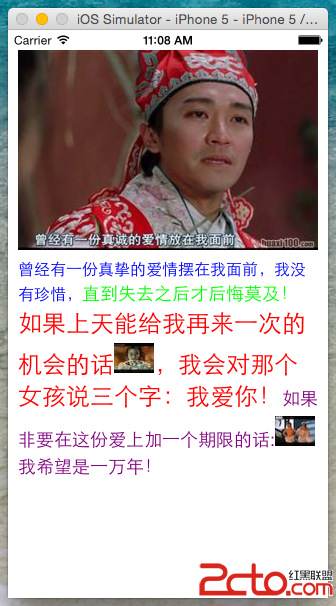
一、調整資料結構
因為多了圖片,plist 的結構需要擴充。為每一項加上 type 欄位:"txt" 代表純文字,"img" 代表圖片。圖片資訊包含 name、width、height,其中 name 是圖片路徑(這裡存在沙盒中,實際開發時可改成遠端 URL)。
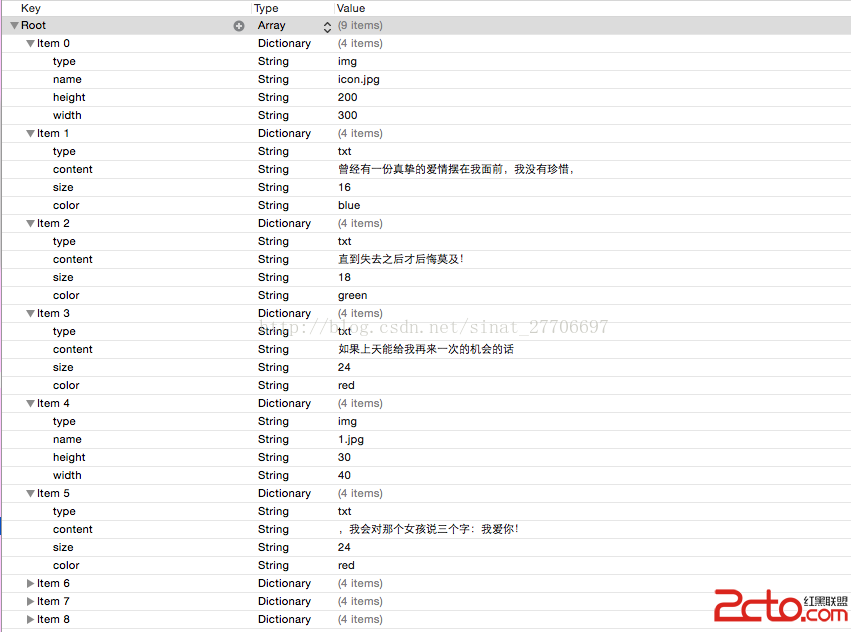
這裡有一個非常重要的設計決定:width 與 height 一定要由服務端提供。原因是 Core Text 排版必須先知道每個元素的佔位大小才能計算換行。如果等圖片下載完再量尺寸,在網路不佳時圖片一直不到,整段文字排版就會明顯錯亂。反之,只要後端給了尺寸,即使圖片尚未載入,也能先用等大的空白區塊佔位,整體版面不受影響。這是圖文混排能否穩定運作的關鍵。
二、新增 CoreTextImageData 模型
@interface CoreTextImageData : NSObject
@property (nonatomic, copy) NSString *name;
// 注意:此座標是 CoreText 的座標系,而不是 UIKit 的座標系
@property (nonatomic, assign) CGRect imagePosition;
@end
三、擴充 CoreTextData
因為可能有多張圖片,這裡用陣列存放:
@interface CoreTextData : NSObject
@property (nonatomic, assign) CTFrameRef ctFrame;
@property (nonatomic, assign) CGFloat height;
@property (nonatomic, strong) NSArray *imageArray;
@end
四、改造 parseTemplateFile
+ (CoreTextData *)parseTemplateFile:(NSString *)path
                             config:(CTFrameParserConfig *)config {
    NSMutableArray *imageArray = [NSMutableArray array];
    NSAttributedString *content = [self loadTemplateFile:path
                                                 config:config
                                             imageArray:imageArray];
    CoreTextData *data = [self parseAttributedContent:content config:config];
    data.imageArray = imageArray;
    return data;
}
五、在 loadTemplateFile 中處理 img 類型
+ (NSAttributedString *)loadTemplateFile:(NSString *)path
                                  config:(CTFrameParserConfig *)config
                              imageArray:(NSMutableArray *)imageArray {
    NSMutableAttributedString *result = [[NSMutableAttributedString alloc] init];
    NSArray *array = [NSArray arrayWithContentsOfFile:path];

    if (array && [array isKindOfClass:[NSArray class]]) {
        for (NSDictionary *dict in array) {
            NSString *type = dict[@"type"];
            if ([type isEqualToString:@"txt"]) {
                NSAttributedString *as =
                    [self parseAttributedContentFromNSDictionary:dict config:config];
                [result appendAttributedString:as];
            } else if ([type isEqualToString:@"img"]) {
                CoreTextImageData *imageData = [[CoreTextImageData alloc] init];
                imageData.name = dict[@"name"];
                [imageArray addObject:imageData];

                NSAttributedString *as =
                    [self parseImageDataFromNSDictionary:dict config:config];
                [result appendAttributedString:as];
            }
        }
    }
    return result;
}這裡遇到一個根本問題:Core Text 本身並不支援顯示圖片。解法相當巧妙——在需要放圖片的位置插入一個特殊空白字元(0xFFFC,Object Replacement Character),並透過 CTRunDelegate 告訴 Core Text「這個字元請預留這麼大的空間」。如此一來,CTFrame 生成時就會自動把圖片的位置留出來。
六、設定佔位字元與 CTRunDelegate
static CGFloat ascentCallback(void *ref) {
    return [(NSNumber *)[(__bridge NSDictionary *)ref objectForKey:@"height"] floatValue];
}

static CGFloat descentCallback(void *ref) {
    return 0;
}

static CGFloat widthCallback(void *ref) {
    return [(NSNumber *)[(__bridge NSDictionary *)ref objectForKey:@"width"] floatValue];
}

+ (NSAttributedString *)parseImageDataFromNSDictionary:(NSDictionary *)dict
                                                config:(CTFrameParserConfig *)config {
    CTRunDelegateCallbacks callbacks;
    // memset 把 callbacks 的記憶體初始化為 0
    memset(&callbacks, 0, sizeof(CTRunDelegateCallbacks));
    callbacks.version = kCTRunDelegateVersion1;
    callbacks.getAscent = ascentCallback;
    callbacks.getDescent = descentCallback;
    callbacks.getWidth = widthCallback;

    CTRunDelegateRef delegate = CTRunDelegateCreate(&callbacks, (__bridge void *)(dict));

    // 使用 0xFFFC 作為空白佔位符
    unichar objectReplacementChar = 0xFFFC;
    NSString *content = [NSString stringWithCharacters:&objectReplacementChar length:1];
    NSDictionary *attributes = [self attributesWithConfig:config];
    NSMutableAttributedString *space =
        [[NSMutableAttributedString alloc] initWithString:content attributes:attributes];
    CFAttributedStringSetAttribute((CFMutableAttributedStringRef)space,
                                   CFRangeMake(0, 1),
                                   kCTRunDelegateAttributeName,
                                   delegate);
    CFRelease(delegate);
    return space;
}
七、計算佔位字元的實際座標
第五、六步驟執行完後,程式碼回到第四步的 data.imageArray = imageArray;。這個 setter 被我們覆寫了,目的是在排版完成後回頭計算每個佔位字元的實際 frame。
流程如下:
1. 呼叫 CTFrameGetLines 取得所有 CTLine。
2. 呼叫 CTFrameGetLineOrigins 取得每一行的起始座標。
3. 呼叫 CTLineGetGlyphRuns 取得每一行所有的 CTRun。
4. 從 CTRun 的 attributes 中尋找 key 為 kCTRunDelegateAttributeName 的值;存在就代表它是佔位字元,否則跳過。
5. 計算該佔位字元的實際尺寸與位置。
- (void)setImageArray:(NSArray *)imageArray {
    _imageArray = imageArray;
    [self fillImagePosition];
}

- (void)fillImagePosition {
    if (self.imageArray.count == 0) return;

    NSArray *lines = (NSArray *)CTFrameGetLines(self.ctFrame);
    int lineCount = (int)lines.count;

    // 每行的起始座標
    CGPoint lineOrigins[lineCount];
    CTFrameGetLineOrigins(self.ctFrame, CFRangeMake(0, 0), lineOrigins);

    int imageIndex = 0;
    CoreTextImageData *imageData = self.imageArray[0];

    for (int i = 0; i < lineCount; i++) {
        if (!imageData) break;

        CTLineRef line = (__bridge CTLineRef)(lines[i]);
        NSArray *runObjectArray = (NSArray *)CTLineGetGlyphRuns(line);

        for (id runObject in runObjectArray) {
            CTRunRef run = (__bridge CTRunRef)(runObject);
            NSDictionary *runAttributes = (NSDictionary *)CTRunGetAttributes(run);
            CTRunDelegateRef delegate = (__bridge CTRunDelegateRef)
                ([runAttributes valueForKey:(id)kCTRunDelegateAttributeName]);

            // delegate 為空,代表這不是圖片佔位
            if (!delegate) continue;

            NSDictionary *metaDict = CTRunDelegateGetRefCon(delegate);
            if (![metaDict isKindOfClass:[NSDictionary class]]) continue;

            // 計算圖片 run 的 frame
            CGRect runBounds;
            CGFloat ascent = 0, descent = 0;
            runBounds.size.width = CTRunGetTypographicBounds(run, CFRangeMake(0, 0),
                                                             &ascent, &descent, NULL);
            runBounds.size.height = ascent + descent;

            // 圖片相對於每行起始位置的 x 偏移
            CGFloat xOffset = CTLineGetOffsetForStringIndex(line,
                                CTRunGetStringRange(run).location, NULL);
            runBounds.origin.x = lineOrigins[i].x + xOffset;
            runBounds.origin.y = lineOrigins[i].y;
            runBounds.origin.y -= descent;

            imageData.imagePosition = runBounds;

            imageIndex++;
            if (imageIndex == self.imageArray.count) {
                imageData = nil;
                break;
            } else {
                imageData = self.imageArray[imageIndex];
            }
        }
    }
}
八、在 CTDisplayView 中完成繪製
兩步即可:先用 CTFrameDraw 把文字整體畫上去(此時圖片位置是一片空白),再遍歷 imageArray,用 CGContextDrawImage 把圖片補進對應的空白區域。
- (void)drawRect:(CGRect)rect {
    [super drawRect:rect];

    CGContextRef context = UIGraphicsGetCurrentContext();

    // 座標系翻轉,讓 Core Text 的座標系與 UIKit 對齊
    CGContextSetTextMatrix(context, CGAffineTransformIdentity);
    CGContextTranslateCTM(context, 0, self.bounds.size.height);
    CGContextScaleCTM(context, 1.0, -1.0);

    // 先整體繪製文字
    if (self.data) {
        CTFrameDraw(self.data.ctFrame, context);
    }

    // 再把圖片畫進佔位區域
    for (CoreTextImageData *imageData in self.data.imageArray) {
        UIImage *image = [UIImage imageNamed:imageData.name];
        if (image) {
            CGContextDrawImage(context, imageData.imagePosition, image.CGImage);
        }
    }
}
為什麼這個封裝值得做
這個設計有一個很好的優點:圖片的位置由 Core Text 的排版引擎決定,而不是靠我們手動算座標。文字換行、字型大小、螢幕旋轉後的重新排版,全都交給 Core Text 處理,我們只需要在排版完成後「讀取」佔位字元的 frame,再把圖片貼上去。這比手動計算「第幾行第幾個字之後放圖」要可靠得多。
實作時有兩個細節別漏掉:一是 CTRunDelegateGetRefCon 取回的記憶體必須是 ARC 管理的物件,這裡用 __bridge 轉換是正確的;二是 Core Text 的座標系原點在左下,因此 drawRect: 中的翻轉不可省略,否則整段文字會上下顛倒。