
iOS 開發實戰:串接新浪微博 OAuth2.0 用戶授權
編輯:iOS 開發綜合
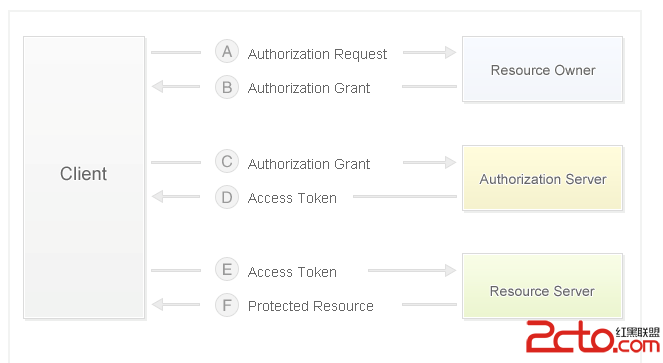
新浪微博開放平台所提供的各項接口,無論是發布微博、關注他人還是讀取用戶資料,前提都是先取得用戶的身份認證。目前微博採用的是 OAuth2.0 這套授權機制。相比 1.0 版本,2.0 的整個驗證流程更為簡潔,安全性也更高,可以說是未來用戶身份驗證與授權的主流方向。本文以一個實際的 iOS 應用為例,完整走一遍微博登入授權的流程。
步驟一:建立應用
首先需要到新浪微博開放平台(https://open.weibo.com)註冊並建立一個應用。應用建立完成後,停留在「開發階段」即可進行測試,無需急著提交審核。以下是我使用測試帳號建立好的應用資訊:

步驟二:取得授權用的 code
接下來透過 WebView 載入微博的授權頁面。其中 client_id 對應應用的 App Key,redirect_uri 則是註冊應用時設定的回跳位址。

UIWebView *web = [[UIWebView alloc] init];
web.frame = self.view.bounds;
NSString *str = @"https://api.weibo.com/oauth2/authorize?client_id=3272733387&redirect_uri=https://www.21-sun.com";
NSURL *url = [NSURL URLWithString:str];
NSURLRequest *request = [NSURLRequest requestWithURL:url];
[web loadRequest:request];
[self.view addSubview:web];
web.delegate = self;
載入後便會看到微博的登入與授權頁面,使用者完成登入並按下授權即可:

授權成功後,返回的網址後方會拼接上一段 code 參數,這段 code 是後續換取 token 的關鍵,必須攔截下來備用。我們可以透過 WebView 的代理方法來截取這個回跳網址:

#pragma mark - 允許代理加載請求
- (BOOL)webView:(UIWebView *)webView shouldStartLoadWithRequest:(NSURLRequest *)request navigationType:(UIWebViewNavigationType)navigationType {
    NSString *str = request.URL.absoluteString;
    if ([str containsString:@"https://www.21-sun.com/?code="]) {
        NSInteger index = [str rangeOfString:@"="].location;
        NSString *code = [str substringFromIndex:index + 1];
        return NO;
    }
    return YES;
}
步驟三:用 code 換取 access_token
拿到 code 之後,接著向微博發送請求以換取 access_token。請求時需要攜帶以下參數:
client_id:申請應用時分配的 AppKey。
client_secret:申請應用時分配的 AppSecret。
grant_type:請求類型,固定填寫 authorization_code。
code:上一步取得的 code 值。
redirect_uri:回調位址,必須與註冊應用時設定的位址一致。

程式碼如下:
- (void)_getToken:(NSString *)code {
    NSDictionary *dic = @{
        @"client_id": @"3272733387",
        @"client_secret": @"10003f9922c9d0e0fefb03500c8d4dbc",
        @"grant_type": @"authorization_code",
        @"code": code,
        @"redirect_uri": @"https://www.21-sun.com"
    };
    AFHTTPRequestOperationManager *manager = [AFHTTPRequestOperationManager manager];
    manager.responseSerializer.acceptableContentTypes = [NSSet setWithObject:@"text/plain"];
    [manager POST:@"https://api.weibo.com/oauth2/access_token" parameters:dic success:^(AFHTTPRequestOperation *operation, NSDictionary *responseObject) {
        NSString *token = responseObject[@"access_token"];
    } failure:^(AFHTTPRequestOperation *operation, NSError *error) {
        NSLog(@"請求失敗");
    }];
}
取得 access_token 之後,就能代表用戶調用微博的各項接口,完成諸如發微博、讀取用戶資料等操作了。