
iOS 為鍵盤加上控制欄:UIToolbar 切換輸入框實作
編輯:iOS 開發綜合
鍵盤在 iOS 中使用頻繁。當畫面上有多個輸入框時,在鍵盤上方加一條控制欄,讓使用者能直接「上一個/下一個」切換,或一鍵收起鍵盤,體驗會好很多。
實現思路很簡單:建立一個 UIToolbar,讓它貼在鍵盤頂端,並隨鍵盤高度變化而動態調整位置。
一、頭文件
#import <Foundation/Foundation.h>
#import <UIKit/UIKit.h>

@interface UIKeyboardTool : NSObject

/// 用於界面展示的 toolbar
@property (nonatomic, strong) UIToolbar *toolBar;

/// 用於光標切換的輸入框陣列
@property (nonatomic, strong) NSArray *fieldArray;

/// 顯示工具欄
- (void)showToolBar:(UITextField *)field;

@end
二、初始化
- (instancetype)init {
    if (self = [super init]) {
        CGFloat screenHeight = [[UIScreen mainScreen] bounds].size.height;
        CGFloat screenWidth  = [[UIScreen mainScreen] bounds].size.width;

        toolBar = [[UIToolbar alloc] initWithFrame:
                   CGRectMake(0, screenHeight, screenWidth, 44)];

        UIBarButtonItem *nextItem = [[UIBarButtonItem alloc]
            initWithTitle:@"下一個" style:UIBarButtonItemStylePlain
                   target:self action:@selector(showNext)];
        UIBarButtonItem *previousItem = [[UIBarButtonItem alloc]
            initWithTitle:@"上一個" style:UIBarButtonItemStylePlain
                   target:self action:@selector(showPrevious)];
        UIBarButtonItem *spaceItem = [[UIBarButtonItem alloc]
            initWithBarButtonSystemItem:UIBarButtonSystemItemFlexibleSpace
                                 target:self action:nil];
        UIBarButtonItem *doneItem = [[UIBarButtonItem alloc]
            initWithTitle:@"隱藏" style:UIBarButtonItemStylePlain
                   target:self action:@selector(showHide)];

        toolBar.items = @[nextItem, previousItem, spaceItem, doneItem];

        // 監聽鍵盤高度變化
        [[NSNotificationCenter defaultCenter]
            addObserver:self
               selector:@selector(keyboardFrameChange:)
                   name:UIKeyboardWillChangeFrameNotification
                 object:nil];

        currentField = nil;
    }
    return self;
}
三、顯示鍵盤時展示工具欄
- (void)showToolBar:(UITextField *)field {
    currentField = field;

    [UIView beginAnimations:nil context:nil];
    [UIView setAnimationDuration:0.25];
    CGFloat screenHeight = [[UIScreen mainScreen] bounds].size.height;
    CGFloat screenWidth  = [[UIScreen mainScreen] bounds].size.width;
    [toolBar setFrame:CGRectMake(0, screenHeight - 300, screenWidth, 44)];
    [UIView commitAnimations];
}
四、輸入框切換
- (void)showNext {
    NSInteger current = [fieldArray indexOfObject:currentField];
    if ((current + 1) < fieldArray.count) {
        UITextField *field = [fieldArray objectAtIndex:current + 1];
        [field becomeFirstResponder];   // 關鍵:讓下一個欄位取得焦點
    }
}

// 上一個的實作同理,注意邊界判斷不要越界
- (void)showPrevious {
    NSInteger current = [fieldArray indexOfObject:currentField];
    if (current > 0) {
        UITextField *field = [fieldArray objectAtIndex:current - 1];
        [field becomeFirstResponder];
    }
}
五、動態追蹤鍵盤高度
隨著 iOS 版本更新,鍵盤高度已不再是 iOS 5 時代固定的 216pt——加上中英切換、候選字列、內建表情鍵盤等,高度會有各種變化。因此必須監聽 UIKeyboardWillChangeFrameNotification,從通知中取出實際數值。
通知的 userInfo 是一個 NSDictionary,內容大致如下:
UIKeyboardAnimationCurveUserInfoKey   = 7;      // 動畫曲線類型
UIKeyboardAnimationDurationUserInfoKey = 0.25;  // 動畫持續時間
UIKeyboardBoundsUserInfoKey = NSRect: {{0, 0}, {375, 258}};

UIKeyboardCenterBeginUserInfoKey = NSPoint: {187.5, 796};  // 動畫起始中心點
UIKeyboardCenterEndUserInfoKey   = NSPoint: {187.5, 538};  // 動畫結束中心點

UIKeyboardFrameBeginUserInfoKey = NSRect: {{0, 667}, {375, 258}};  // 起始 frame
UIKeyboardFrameEndUserInfoKey   = NSRect: {{0, 409}, {375, 258}};  // 結束 frame

UIKeyboardIsLocalUserInfoKey = 1;   // 是否為本 App 的鍵盤
根據結束 frame 就能算出工具欄該放的位置:
- (void)keyboardFrameChange:(NSNotification *)notify {
    NSDictionary *dict = [notify userInfo];

    NSValue *endValue = [dict objectForKey:UIKeyboardFrameEndUserInfoKey];
    CGRect endFrame = [endValue CGRectValue];

    NSNumber *isShowValue = [dict objectForKey:UIKeyboardIsLocalUserInfoKey];
    BOOL isShowKeyboard = isShowValue.boolValue;

    [UIView beginAnimations:nil context:nil];
    [UIView setAnimationDuration:0.25];

    CGFloat screenHeight = [[UIScreen mainScreen] bounds].size.height;
    CGFloat screenWidth  = [[UIScreen mainScreen] bounds].size.width;

    if (isShowKeyboard) {
        // 鍵盤顯示:工具欄貼在鍵盤頂端
        [toolBar setFrame:CGRectMake(0, endFrame.origin.y - 44, screenWidth, 44)];
    } else {
        // 鍵盤隱藏:工具欄移出畫面
        [toolBar setFrame:CGRectMake(0, screenHeight, screenWidth, 44)];
    }

    [UIView commitAnimations];
}
六、使用方式
// 初始化並加入畫面
tool = [[UIKeyboardTool alloc] init];
tool.fieldArray = @[field, field1, field2];
[self.view addSubview:tool.toolBar];

// 在 textFieldDidBeginEditing 中展示
- (void)textFieldDidBeginEditing:(UITextField *)textField {
    [tool showToolBar:textField];
}
七、一個已知問題
從 iOS 9 開始,當鍵盤上方的 QuickType 候選列展開時,背景變成半透明。若工具欄位置沒有正確對齊到鍵盤「含候選列」的頂端,就會出現視覺割裂,而且該區域的按鈕此時點擊不生效。
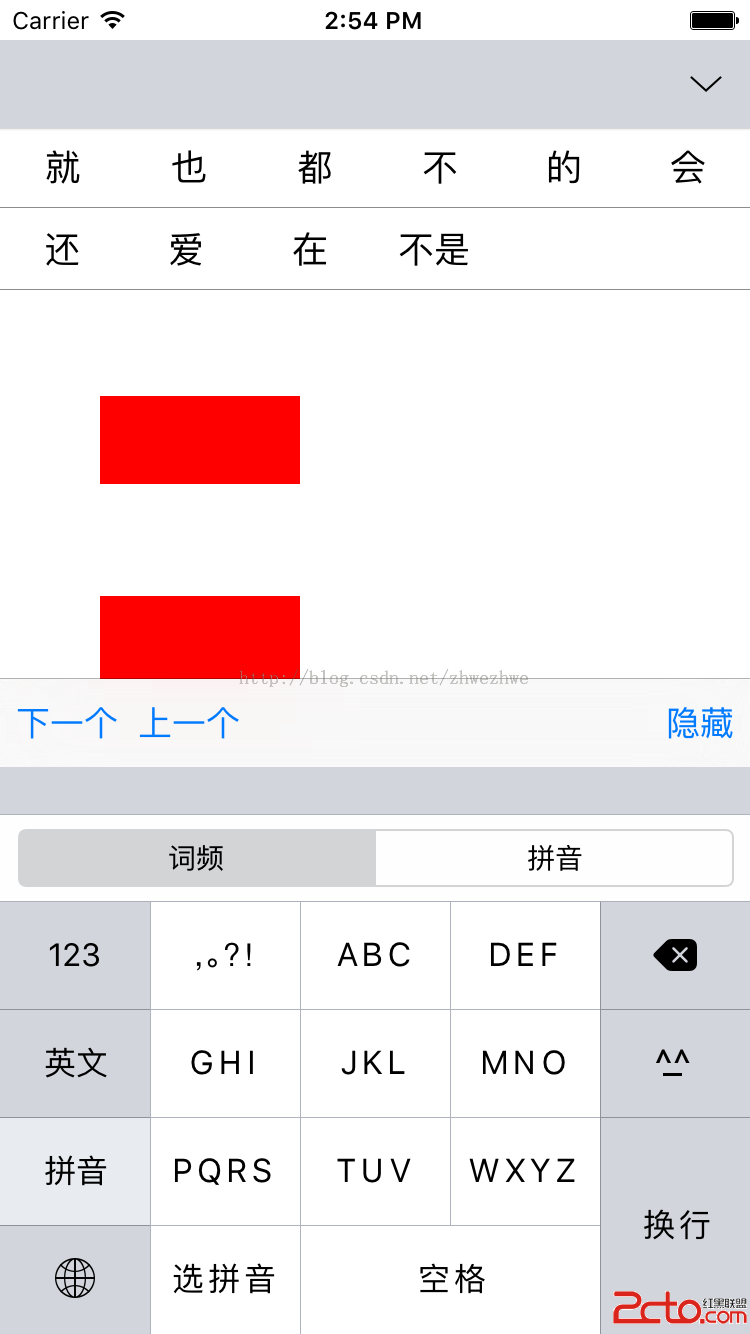
這類問題的根源是硬編碼了 300 這個高度。更穩健的做法是完全不寫死高度:一律從 UIKeyboardFrameEndUserInfoKey 取得實際 frame,用 endFrame.origin.y - toolBar.bounds.size.height 定位。同時把通知中的 duration 與 curve 一併取出套用,讓工具欄的移動與鍵盤完全同步,避免看起來一前一後。此外別忘了在 dealloc 中移除通知監聽,否則會有反覆註冊的風險。