
Quartz2D 繪圖(二):做一個會動的圓環下載進度條
編輯:iOS 開發綜合
進度條是少數「自己畫比找現成元件更省事」的例子。原理不難:畫一段圓弧,讓終點角度隨進度變化,弧長就自然對應百分比;中間再疊一個 label 顯示數字。
效果

思路
自訂一個 UIView 子類,覆寫 - (void)drawRect:(CGRect)rect,在其中完成繪圖。使用時只要建立這個子類的物件;若是在 storyboard 上放了一個 UIView,把它的 class 改成你的自訂類別名稱即可。
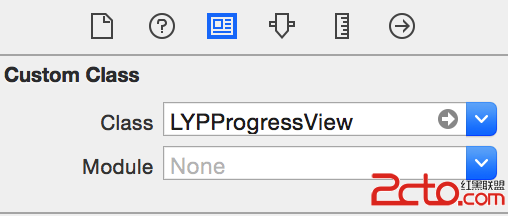
步驟一:宣告進度屬性
@property (nonatomic, assign) CGFloat progress;
步驟二:在 setter 裡觸發重繪
這是整個效果的關鍵。setNeedsDisplay 只是標記「這裡需要重畫」,真正的繪圖會在下一個循環由系統呼叫 drawRect: 完成——不要在 setter 裡直接畫。
- (void)setProgress:(CGFloat)progress {
    _progress = progress;
    [self setNeedsDisplay];
}
步驟三:核心的 drawRect:
- (void)drawRect:(CGRect)rect {
    // 半徑
    CGFloat radius = rect.size.width * 0.5;

    // 圓心
    CGPoint center = CGPointMake(radius, radius);

    // 起始角度:正上方(-90°,單位是弧度)
    CGFloat startAngle = - M_PI_2;

    // 終止角度:起始角 + 一圈 × 進度
    CGFloat endAngle = - M_PI_2 + 2 * M_PI * self.progress;

    UIBezierPath *path = [UIBezierPath bezierPathWithArcCenter:center
                                                        radius:radius - 5
                                                    startAngle:startAngle
                                                      endAngle:endAngle
                                                     clockwise:YES];
    [path stroke];
}
呼叫 stroke 後,弧線就會出現在圖層上。想改粗細或顏色,在 stroke 之前設定 path.lineWidth 與 [[UIColor xxx] set] 即可。
幾個實作要點
- 角度用弧度:
M_PI_2是 90°。-M_PI_2就是 12 點鐘方向,因為 iOS 的座標系 y 軸向下,負角度才會朝上。 - progress 要夾在 0~1:傳入 1.5 會畫出超過一圈的弧。建議在 setter 裡做
MAX(0, MIN(1, progress))保護。 - radius - 5 的用意:留一點內縮,避免線條粗度讓圓弧貼邊被裁掉。
- 底軌道:想畫出灰色的完整圓底,在進度弧之前先畫一次
endAngle = 2 * M_PI的完整圓並 stroke。 - 為什麼不用 layer 動畫:
strokeEnd是CAShapeLayer的 animatable 屬性,若想用 Core Animation 做流暢過渡,可以改用CAShapeLayer並動畫strokeEnd,效能會比反覆setNeedsDisplay更好。
中間的文字
圓心處的百分比數字,最簡單的做法是在 view 上放一個 UILabel 當子視圖,在 setProgress: 裡同步更新 label.text;若想完全自繪,則用 NSAttributedString 的 drawAtPoint:withAttributes: 在 drawRect: 中畫上去。
- 上一篇文章: 純程式碼打造自訂 UITableViewCell
- 下一篇文章: iOS 身份證號碼合法性驗證:加權演算法完整實作