
iOS 元件化:自訂 LTView 與 UIAlertView 的互動
編輯:iOS 開發綜合
把一段 UI 連同它的行為封裝成一個獨立的 UIView 子類,是讓程式碼保持整齊的關鍵習慣。這個範例做了兩件事:把 label 與輸入框封進 LTView,並示範如何從外部存取元件、以及如何讀取 UIAlertView 內建的輸入框。
LTView.h:對外暴露需要被存取的元件
判斷標準很實際:外部需要讀寫的,才放進 .h 當屬性;純內部的實作細節留在 .m。
#import <UIKit/UIKit.h>

@interface LTView : UIView

// 外部要修改 label 標題、要讀取輸入框內容,所以公開這兩個
@property (nonatomic, retain) UILabel     *myLabel;
@property (nonatomic, retain) UITextField *myTextField;

@end
LTView.m:把建立流程收攏到一個方法
#import "LTView.h"

@implementation LTView

- (instancetype)initWithFrame:(CGRect)frame {
    self = [super initWithFrame:frame];
    if (self) {
        [self createView];   // 模組化:建立 UI 的責任集中在一處
    }
    return self;
}

- (void)createView {
    self.myLabel = [[UILabel alloc] initWithFrame:CGRectMake(20, 20, 100, 30)];
    self.myLabel.backgroundColor = [UIColor yellowColor];
    [self addSubview:self.myLabel];
    [_myLabel release];

    self.myTextField = [[UITextField alloc] initWithFrame:CGRectMake(150, 20, 100, 40)];
    self.myTextField.backgroundColor = [UIColor cyanColor];
    [self addSubview:self.myTextField];

    self.myTextField.delegate = self;   // 自己幫自己處理 delegate
    [_myTextField release];
}

- (void)dealloc {
    [_myTextField release];
    [_myLabel release];
    [super dealloc];
}

// 按下 return 時收起鍵盤
- (BOOL)textFieldShouldReturn:(UITextField *)textField {
    [textField resignFirstResponder];
    return YES;
}

@end
AppDelegate:使用 LTView,並讀取 AlertView 的輸入框
#import "AppDelegate.h"
#import "LTView.h"

@interface AppDelegate () <UIAlertViewDelegate>
@property (nonatomic, retain) UIAlertView *alertView;
@end

@implementation AppDelegate

- (void)dealloc {
    [_window release];
    [super dealloc];
}

- (BOOL)application:(UIApplication *)application
    didFinishLaunchingWithOptions:(NSDictionary *)launchOptions {

    self.window = [[UIWindow alloc] initWithFrame:[[UIScreen mainScreen] bounds]];
    self.window.backgroundColor = [UIColor whiteColor];
    [self.window makeKeyAndVisible];
    [_window release];

    // 建立並顯示提示框
    self.alertView = [[UIAlertView alloc]
        initWithTitle:@"測試一下"
              message:@"看看效果"
             delegate:self
    cancelButtonTitle:@"取消"
    otherButtonTitles:@"確認", nil];
    [self.alertView show];

    // 讓 alert 內出現帳號/密碼輸入框
    self.alertView.alertViewStyle = UIAlertViewStyleLoginAndPasswordInput;

    // 建立自訂的 LTView
    LTView *view = [[LTView alloc]
        initWithFrame:CGRectMake(0, 0,
                                 self.window.frame.size.width,
                                 self.window.frame.size.height)];
    [self.window addSubview:view];
    [view release];

    // 從外部直接改內部元件的內容——這就是公開屬性的價值
    view.myLabel.text = @"賬號:";

    return YES;
}

- (void)alertView:(UIAlertView *)alertView clickedButtonAtIndex:(NSInteger)buttonIndex {
    NSLog(@"11");
    // 用 index 取出 alert 內建的輸入框
    UITextField *first = [alertView textFieldAtIndex:0];
    NSLog(@"%@", first.text);
}

@end
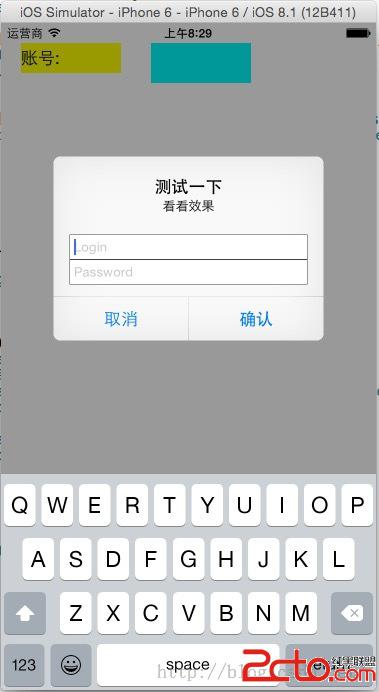
這個範例真正想傳達的三件事
- 元件自己管自己的 delegate:LTView 內部把
myTextField.delegate = self設好,外部使用者完全不需要知道這件事,這才是封裝該有的樣子。 - 公開屬性的判斷依據是「外部需不需要」,不是「能不能公開」。只被內部使用的 subview 應該留在 .m 的類別延伸裡。
- MRC 的手動記憶體管理:alloc 之後 addSubview 完成就 release,delegate 不 retain(避免循環引用)。這些在 ARC 下都由編譯器代勞。
現代寫法的替換建議
- UIAlertView 已於 iOS 9 被棄用,請改用
UIAlertController。它內建的addTextFieldWithConfigurationHandler:一樣能拿到輸入框,且支援 text field 的 delegate 與即時驗證。 - addSubview 後立刻 release 是 MRC 時代的 Necessary evil;ARC 專案請直接刪掉所有 retain/release/dealloc 裡的手動釋放。
- 屬性用 strong 取代 retain:兩者在物件型別上等價,但 strong 語意更清楚,也是 ARC 的標準寫法。