
UITableView 起步:分區、重用機制與代理方法全解析
編輯:iOS 開發綜合
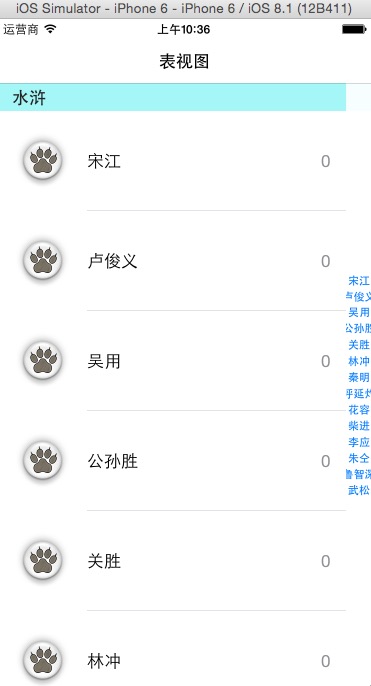
UITableView 是 iOS 列表界面的核心元件。要讓它正確顯示資料,必須理解兩組代理(datasource 與 delegate)、分區概念,以及最重要的 cell 重用機制。
建立表格並掛上代理
#import "MainViewController.h"
#import "SecondViewController.h"

@interface MainViewController () <UITableViewDataSource, UITableViewDelegate>
@property (nonatomic, retain) NSMutableArray *arr;
@end

@implementation MainViewController

- (void)dealloc {
    [_arr release];
    [super dealloc];
}

- (instancetype)initWithNibName:(NSString *)nibNameOrNil bundle:(NSBundle *)nibBundleOrNil {
    self = [super initWithNibName:nibNameOrNil bundle:nibBundleOrNil];
    if (self) {
        self.arr = [NSMutableArray arrayWithObjects:@"宋江", @"盧俊義", @"吳用", @"公孫勝",
                    @"關勝", @"林沖", @"秦明", @"呼延灼", @"花容", @"柴進",
                    @"李應", @"朱仝", @"魯智深", @"武松", nil];
    }
    return self;
}

- (void)viewDidLoad {
    [super viewDidLoad];
    self.view.backgroundColor = [UIColor yellowColor];
    self.navigationController.navigationBar.translucent = NO;
    self.navigationItem.title = @"表視圖";

    UITableView *tableView = [[UITableView alloc]
        initWithFrame:CGRectMake(0, 0, self.view.frame.size.width,
                                 self.view.frame.size.height - 64)
                style:UITableViewStylePlain];
    tableView.backgroundColor = [UIColor cyanColor];
    tableView.rowHeight = 100;          // 行高
    tableView.dataSource = self;        // 資料來源
    tableView.delegate   = self;        // 行為與互動
    [self.view addSubview:tableView];
    [tableView release];
}
必須實作的兩個方法
numberOfRowsInSection: 決定每個分區有幾列,cellForRowAtIndexPath: 決定每一列長什麼樣子。注意執行順序:系統會先問分區數量與每區列數,才開始逐列索取 cell。
#pragma mark - UITableViewDataSource

- (NSInteger)numberOfSectionsInTableView:(UITableView *)tableView {
    return 10;
}

- (NSInteger)tableView:(UITableView *)tableView
 numberOfRowsInSection:(NSInteger)section {
    // 奇數分區 5 列,偶數分區 10 列
    return (section % 2 == 1) ? 5 : 10;
}

- (NSString *)tableView:(UITableView *)tableView
 titleForHeaderInSection:(NSInteger)section {
    return @"水滸";
}

- (NSArray *)sectionIndexTitlesForTableView:(UITableView *)tableView {
    return self.arr;
}
Cell 重用:為什麼一定要用 dequeue
假設列表有一萬筆資料,若每次都 new 一萬個 cell,記憶體瞬間就被吃光。UITableView 的做法是維護一個「重用池」:cell 滑出螢幕後並不會被銷毀,而是回收進池子;下次需要新的 cell 時,先以重用識別碼到池中尋找閒置者,找到就直接覆寫內容,找不到才真正建立新的。
- (UITableViewCell *)tableView:(UITableView *)tableView
         cellForRowAtIndexPath:(NSIndexPath *)indexPath {

    static NSString *reuse = @"reuse";

    UITableViewCell *cell = [tableView dequeueReusableCellWithIdentifier:reuse];
    if (!cell) {
        cell = [[[UITableViewCell alloc] initWithStyle:UITableViewCellStyleValue1
                                      reuseIdentifier:reuse] autorelease];
    }

    cell.textLabel.text        = self.arr[indexPath.row];
    cell.detailTextLabel.text  = [NSString stringWithFormat:@"%ld", (long)indexPath.section];
    cell.imageView.image       = [UIImage imageNamed:@"scratch.png"];

    return cell;
}
系統內建的 UITableViewCellStyleValue1 提供了三個預設元件:textLabel、detailTextLabel 與 imageView,足以應付多數簡單列表。
處理點擊事件
#pragma mark - UITableViewDelegate

- (void)tableView:(UITableView *)tableView
didSelectRowAtIndexPath:(NSIndexPath *)indexPath {

    NSLog(@"section: %ld, row: %ld", (long)indexPath.section, (long)indexPath.row);
    NSLog(@"點擊項目:%@", self.arr[indexPath.row]);

    SecondViewController *secVC = [[SecondViewController alloc] init];
    [self.navigationController pushViewController:secVC animated:YES];
    [secVC release];
}
實作順序小結
- 建立 UITableView 並設定 frame、樣式與 rowHeight。
- 同時設定 dataSource 與 delegate 為 self。
- 實作 numberOfSectionsInTableView: 與 numberOfRowsInSection:。
- 在 cellForRowAtIndexPath: 中用 dequeueReusableCellWithIdentifier: 取得 cell。
- 在 didSelectRowAtIndexPath: 中處理導航或業務邏輯。