
iOS 進階元件之 tableViewController:城市列表分析
今天我們要做的是一個城市資訊的展示,先看看成果,相信會相當實用。
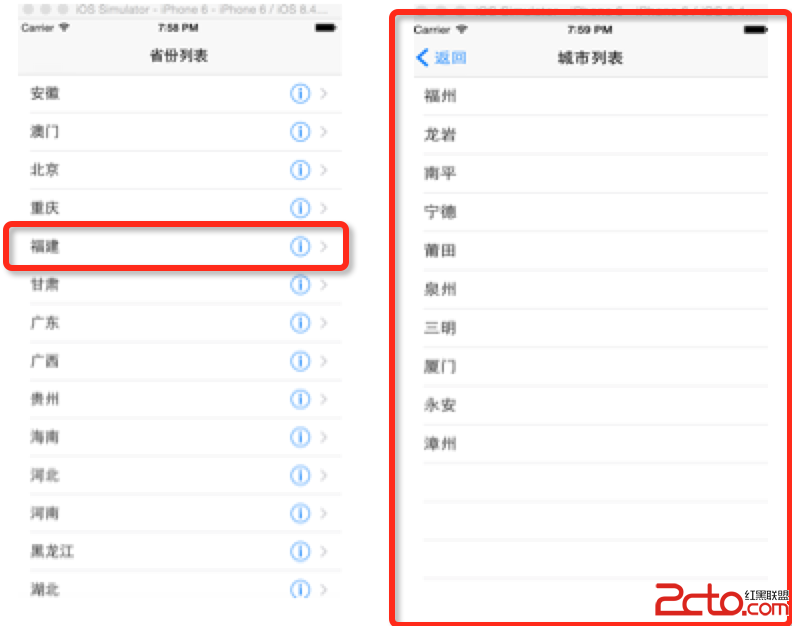
接下來簡要說明步驟。技術筆記寫得不多,我會盡量把細節描述清楚,若有不足之處還請指正。
首先建立一個新專案,把 storyboard 中的預設 viewController 刪除,同時把左側對應的 .h 和 .m 一併移除,因為這是一個專屬元件的 demo,這樣能避免一堆冗餘程式碼。接著建立 MainTableViewController(記得繼承自 UITableViewController),再建立 CitiesTableViewController 用來存放並顯示城市資訊。
在 storyboard 中把 Table View Controller 拖進專案,將它的 class 設為 MainTableViewController,這樣類別與視圖就關聯起來了。接著記得勾選啟動項,這代表 App 啟動時第一個顯示的畫面,否則會是黑屏。

同時把 provinces 和 cities 的 plist 都拉進專案,這裡不贅述。
先定義屬性並初始化資料,都是老套路:
//省份數組 @property (strong,nonatomic)NSArray *provinces; //城市字典 @property (strong,nonatomic)NSDictionary *cities;
- (void)viewDidLoad { [super viewDidLoad]; NSBundle *bundle = [NSBundle mainBundle]; self.provinces = [NSArray arrayWithContentsOfFile:[bundle pathForResource:@"provinces" ofType:@"plist"]]; self.cities = [NSDictionary dictionaryWithContentsOfFile:[bundle pathForResource:@"cities" ofType:@"plist"]]; }
接著設定資料來源,指定每個 section 的列數:
- (NSInteger)tableView:(UITableView *)tableView numberOfRowsInSection:(NSInteger)section { return self.provinces.count; }
然後設定 cell 顯示的內容:
- (UITableViewCell *)tableView:(UITableView *)tableView cellForRowAtIndexPath:(NSIndexPath *)indexPath { static NSString *CellIdentifier = @"myCell"; UITableViewCell *cell = [tableView dequeueReusableCellWithIdentifier:CellIdentifier]; if (cell == nil) { cell = [[UITableViewCell alloc]initWithStyle:UITableViewCellStyleDefault reuseIdentifier:CellIdentifier]; } [cell.textLabel setText:self.provinces[indexPath.row]]; return cell; }
接著要處理點擊某一列後,透過這資訊從城市字典中取出對應省份的城市陣列。這裡要做連線準備,並在 storyboard 中再建立一個 tableviewcontroller,把它的 class 關聯到 CitiesTableViewController。

對了,setCities 方法要在 CitiesTableViewController 中定義,這裡不重複。城市列表的資料來源如下:
- (NSInteger)tableView:(UITableView *)tableView numberOfRowsInSection:(NSInteger)section { return self.cities.count; }

上面的 @"myCity" 和先前的 @"myCell" 讓人疑惑,其實這是個細節:打開 storyboard,在 table view controller 下有 table view,再往下有一個 cell,在這裡為 cell 標記一個重用標識,就像取名字一樣。
僅做到這裡還不行,會遇到一個尷尬場面——點進某個省之後就無法返回了。這時需要另一個元件 Navigation Controller,把它拖進 storyboard 並刪除隨之產生的 view controller,在屬性中勾選 Is Initial View Controller,這樣原本省份 table view controller 前的箭頭就會跑到 Navigation Controller 上。

接著把 Navigation Controller 與 MainTableViewController 連起來(root view controller),而省份與城市之間的連線則選擇 Accessory Action 下的 push,這樣城市列表裡也會出現 Navigation Controller。

其餘美化與命名的操作就不再贅述,希望這個 demo 能對你的學習之路有所幫助。寫有態度的筆記,做有情懷的人!
- 上一篇文章: 淺談 iOS 打包(ipa 檔)流程
- 下一篇文章: iOS Couldn't update the Keychain Item 問題排查