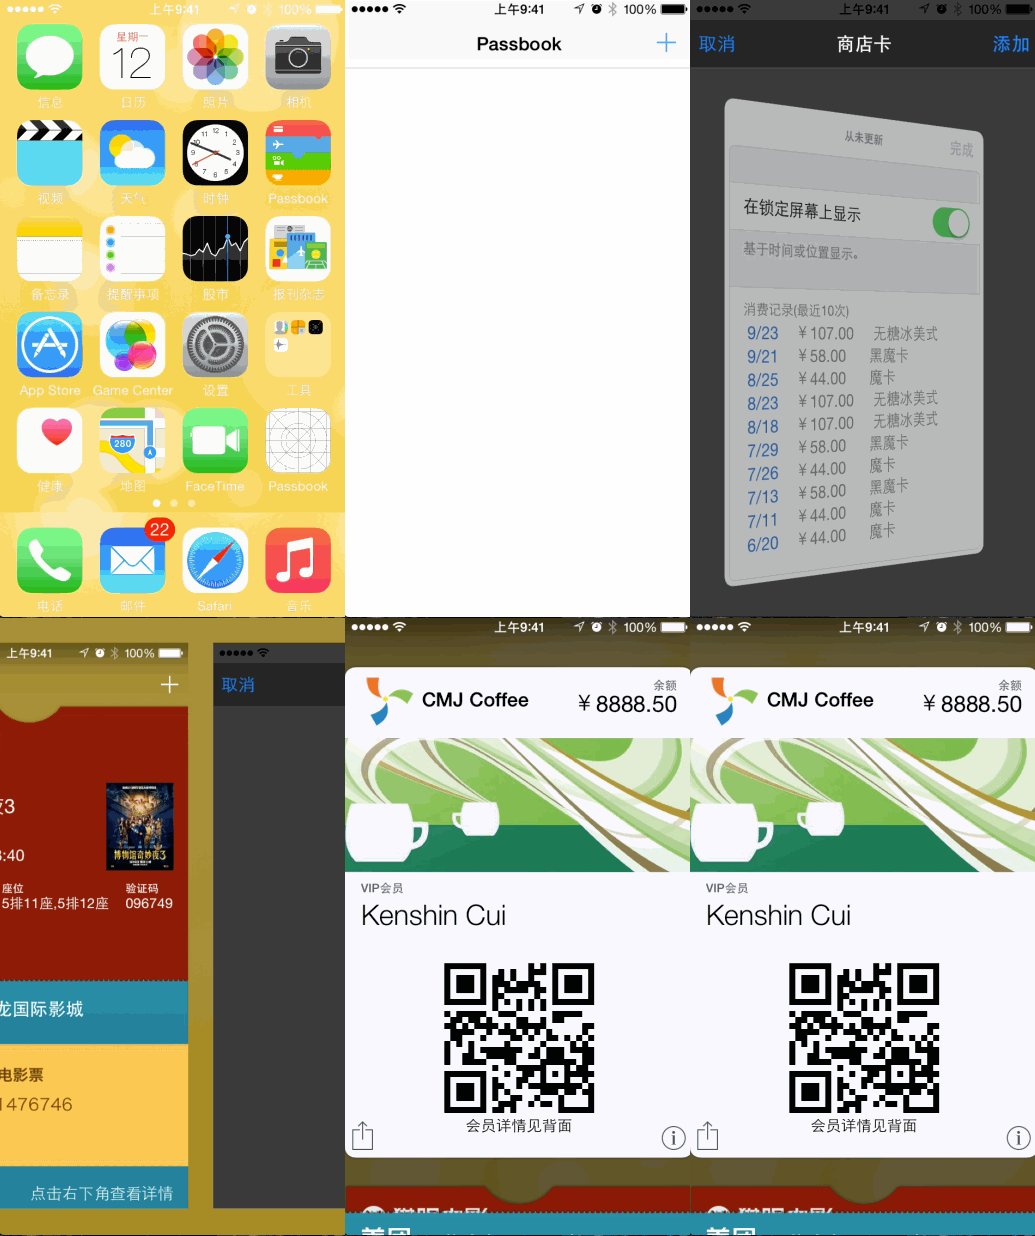
iOS 開發系列——通訊錄、藍牙、內購、Game Center、iCloud 與 Passbook 系統服務開發全解
實作 iOS 應用的過程中,幾乎一定會碰到「借力系統」的需求:讀取通訊錄、調用相機與藍牙、接入應用內購買、串接 Game Center、把資料同步到 iCloud,或是把票券塞進 Passbook。這些能力都由 Apple 提供的公開框架承接,但每一套框架的準備工作、權限模型與呼叫習慣差異不小。本文以實務視角,把這些系統服務的使用方式整理成一份可查閱的開發地圖。
- 調用系統應用與自訂 URL Scheme
- 使用系統服務:簡訊、郵件、通訊錄、藍牙、社群分享
- Game Center 排行榜與成就
- 應用內購買與廣告變現
- iCloud 文件與偏好設定同步
- Passbook 票券製作與加入
一、調用系統內建應用
很多時候我們只是想把使用者「送」到系統的電話、簡訊、郵件或瀏覽器 App,這件事不需要任何額外框架,只要透過 UIApplication 的 openURL: 搭配對應的 URL Scheme 即可。常見的協議如下:
撥打電話:tel: / tel://、telprompt: / telprompt://(撥號前先跳確認提示)
傳送簡訊:sms: / sms://
寄送郵件:mailto: / mailto://
開啟網頁:http: / https:
一個把上述行為包成通用方法的簡單範例:
// 打電話:telprompt 會先詢問使用者,tel 則直接撥出
- (IBAction)callClick:(UIButton *)sender {
    NSString *phoneNumber = @"18500138888";
    NSString *url = [NSString stringWithFormat:@"telprompt://%@", phoneNumber];
    [self openUrl:url];
}

// 傳送簡訊
- (IBAction)sendMessageClick:(UIButton *)sender {
    NSString *url = [NSString stringWithFormat:@"sms://%@", @"18500138888"];
    [self openUrl:url];
}

// 寄送郵件
- (IBAction)sendEmailClick:(UIButton *)sender {
    NSString *url = [NSString stringWithFormat:@"mailto://%@", @"kenshin@hotmail.com"];
    [self openUrl:url];
}

// 開啟瀏覽器
- (IBAction)browserClick:(UIButton *)sender {
    [self openUrl:@"https://www.cnblogs.com/kenshincui"];
}

#pragma mark - 私有方法
- (void)openUrl:(NSString *)urlStr {
    // 注意:// 可以省略,寫成 sms: 效果相同
    NSURL *url = [NSURL URLWithString:urlStr];
    UIApplication *application = [UIApplication sharedApplication];
    if (![application canOpenURL:url]) {
        NSLog(@"無法開啟 %@,請確認對應應用已安裝。", url);
        return;
    }
    [application openURL:url];
}
關鍵在於:openURL: 只認 URL Scheme,系統會依協議名稱決定要喚起哪個 App。同樣的手法也能用來喚起自家或第三方的應用,前提是被喚起方已經在 Info.plist 中註冊了 URL Types。

設定好 URL Types 之後,就能像開啟系統應用一樣跳轉到第三方應用,並在協議後方帶上參數:
- (IBAction)thirdPartyApplicationClick:(UIButton *)sender {
    NSString *url = @"cmj://myparams";
    [self openUrl:url];
}
參數會在被喚起應用的 AppDelegate 中接收到,你可以在這裡解析並決定後續行為:
- (BOOL)application:(UIApplication *)application openURL:(NSURL *)url
  sourceApplication:(NSString *)sourceApplication annotation:(id)annotation {
    NSString *str = [NSString stringWithFormat:@"url:%@, source:%@, params:%@",
                     url, sourceApplication, [url host]];
    NSLog(@"%@", str);
    return YES;   // 回傳是否接受這次喚起
}
二、使用系統服務
2.1 簡訊與郵件
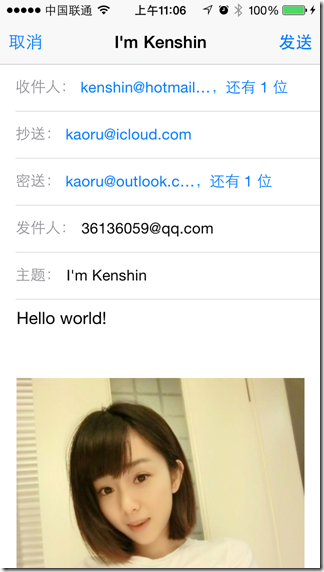
直接跳轉系統 App 雖然省事,但代價是自家應用會被切到背景,使用者發送完畢後不會自動回到你的介面。若希望整個流程留在 App 內,可以改用 MessageUI.framework,它提供了現成的簡訊與郵件編輯介面。
框架中的兩個核心類別分別是 MFMessageComposeViewController(簡訊)與 MFMailComposeViewController(郵件),兩者都繼承自 UINavigationController,用法幾乎一致。以簡訊為例,標準三步驟是:
- 建立
MFMessageComposeViewController物件。 - 設定收件人
recipients與本文body;若電信商支援,還可設定subject與attachments(先用canSendSubject、canSendAttachments判斷)。 - 設定
messageComposeDelegate並實作代理方法以取得發送結果。
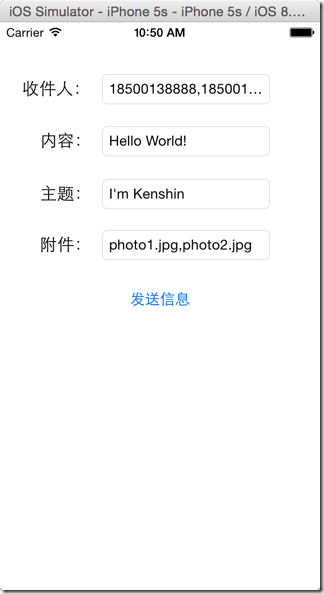
使用者在自己的介面填好內容後,點擊「發送」才會帶入系統編輯畫面,由使用者確認或繼續編輯。
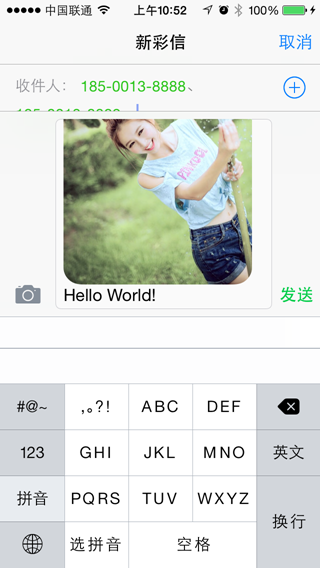
- (IBAction)sendMessageClick:(UIButton *)sender {
    if (![MFMessageComposeViewController canSendText]) { return; }

    MFMessageComposeViewController *messageController = [[MFMessageComposeViewController alloc] init];
    messageController.recipients = [self.receivers.text componentsSeparatedByString:@","];
    messageController.body = self.body.text;
    // 注意:不是 delegate,而是 messageComposeDelegate
    messageController.messageComposeDelegate = self;

    if ([MFMessageComposeViewController canSendSubject]) {
        messageController.subject = self.subject.text;
    }

    if ([MFMessageComposeViewController canSendAttachments]) {
        NSArray *attachments = [self.attachments.text componentsSeparatedByString:@","];
        [attachments enumerateObjectsUsingBlock:^(id obj, NSUInteger idx, BOOL *stop) {
            NSString *path = [[NSBundle mainBundle] pathForResource:obj ofType:nil];
            NSURL *url = [NSURL fileURLWithPath:path];
            // 也可改用 addAttachmentData:typeIdentifier:filename:
            [messageController addAttachmentURL:url withAlternateFilename:obj];
        }];
    }

    [self presentViewController:messageController animated:YES completion:nil];
}

#pragma mark - MFMessageComposeViewController 代理
- (void)messageComposeViewController:(MFMessageComposeViewController *)controller
                 didFinishWithResult:(MessageComposeResult)result {
    switch (result) {
        case MessageComposeResultSent:      NSLog(@"發送成功."); break;
        case MessageComposeResultCancelled: NSLog(@"取消發送."); break;
        default:                            NSLog(@"發送失敗."); break;
    }
    [self dismissViewControllerAnimated:YES completion:nil];
}
三個容易踩到的細節:
- 代理是透過
messageComposeDelegate指定的,因為delegate已被UINavigationController佔用。 - 新增附件時務必標明副檔名,否則接收端無法正確判讀檔案類型(例如 .jpg 圖片會打不開)。
- 無論成功、取消或失敗,
didFinishWithResult:都會被呼叫,實際狀態要從result判斷。
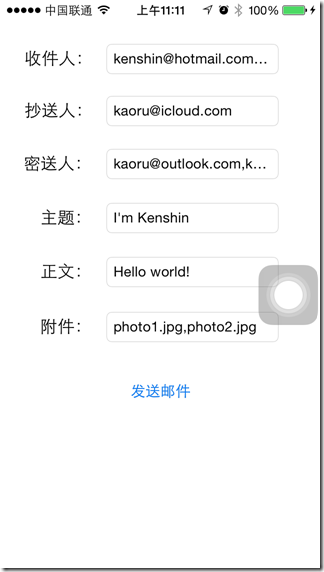
郵件部分幾乎是把上面流程照搬,只是多了抄送、密送與 HTML 本文、MIME 類型的設定:
- (IBAction)sendEmailClick:(UIButton *)sender {
    if (![MFMailComposeViewController canSendMail]) { return; }

    MFMailComposeViewController *mailController = [[MFMailComposeViewController alloc] init];
    mailController.mailComposeDelegate = self;   // 同樣不是 delegate
    [mailController setToRecipients:[self.toTecipients.text componentsSeparatedByString:@","]];
    if (self.ccRecipients.text.length > 0) {
        [mailController setCcRecipients:[self.ccRecipients.text componentsSeparatedByString:@","]];
    }
    if (self.bccRecipients.text.length > 0) {
        [mailController setBccRecipients:[self.bccRecipients.text componentsSeparatedByString:@","]];
    }
    [mailController setSubject:self.subject.text];
    [mailController setMessageBody:self.body.text isHTML:YES];

    if (self.attachments.text.length > 0) {
        NSArray *attachments = [self.attachments.text componentsSeparatedByString:@","];
        [attachments enumerateObjectsUsingBlock:^(id obj, NSUInteger idx, BOOL *stop) {
            NSString *file = [[NSBundle mainBundle] pathForResource:obj ofType:nil];
            NSData *data = [NSData dataWithContentsOfFile:file];
            [mailController addAttachmentData:data mimeType:@"image/jpeg" fileName:obj];
        }];
    }
    [self presentViewController:mailController animated:YES completion:nil];
}

- (void)mailComposeController:(MFMailComposeViewController *)controller
          didFinishWithResult:(MFMailComposeResult)result error:(NSError *)error {
    switch (result) {
        case MFMailComposeResultSent:      NSLog(@"發送成功."); break;
        case MFMailComposeResultSaved:     NSLog(@"已存為草稿."); break;
        case MFMailComposeResultCancelled: NSLog(@"取消發送."); break;
        default:                           NSLog(@"發送失敗."); break;
    }
    if (error) { NSLog(@"錯誤資訊:%@", error.localizedDescription); }
    [self dismissViewControllerAnimated:YES completion:nil];
}
2.2 通訊錄:AddressBook
iOS 的通訊錄存放在系統資料庫中,出於隱私設計,App 不能直接存取該資料庫,必須透過 AddressBook.framework 提供的 C 語言 API。這也意味著這套框架不受 ARC 管理,記憶體需要自己負責。
幾個必備的型別:
ABAddressBookRef:通訊錄物件本身。所有新增、刪除、修改都必須呼叫ABAddressBookSave()才會生效,這點與 Core Data 類似。ABRecordRef:通用記錄物件,可代表一位聯絡人(kABPersonType)或一個群組(kABGroupType),以ABRecordGetRecordType()判別,以ABRecordGetRecordID()取得唯一 ID。ABPersonRef/ABGroupRef:實務上多直接用型別為kABPersonType、kABGroupType的ABRecordRef代替。
操作記錄的常用函式:
ABPersonCreate():建立一筆聯絡人記錄。ABRecordCopyValue():讀取指定屬性。ABRecordCopyCompositeName():取得複合資訊(姓名、公司,或群組名稱)。ABRecordSetValue():設定屬性。單值屬性直接設定;多值屬性(例如多組電話)需先建立ABMutableMultiValueRef,以ABMultiValueAddValueAndLabel()逐筆加入,再整體寫回記錄。ABRecordRemoveValue():移除指定屬性。
由於聯絡人屬性非常多,實際開發時建議直接查 ABPerson.h 或官方文件的「Personal Information Properties」章節。
標準的存取流程:
ABAddressBookCreateWithOptions()建立通訊錄物件。ABAddressBookRequestAccessWithCompletion()取得使用者授權。- 以
ABAddressBookCopyArrayOfAllPeople()或ABAddressBookCopyPeopleWithName()查詢聯絡人。 - 顯示時用
ABRecord系列函式取值;修改後呼叫ABAddressBookSave()提交;刪除則用ABAddressBookRemoveRecord()後同樣要存檔。 - 新增不需查詢,直接
ABPersonCreate()→ 設定屬性 →ABAddressBookAddRecord()→ 存檔。
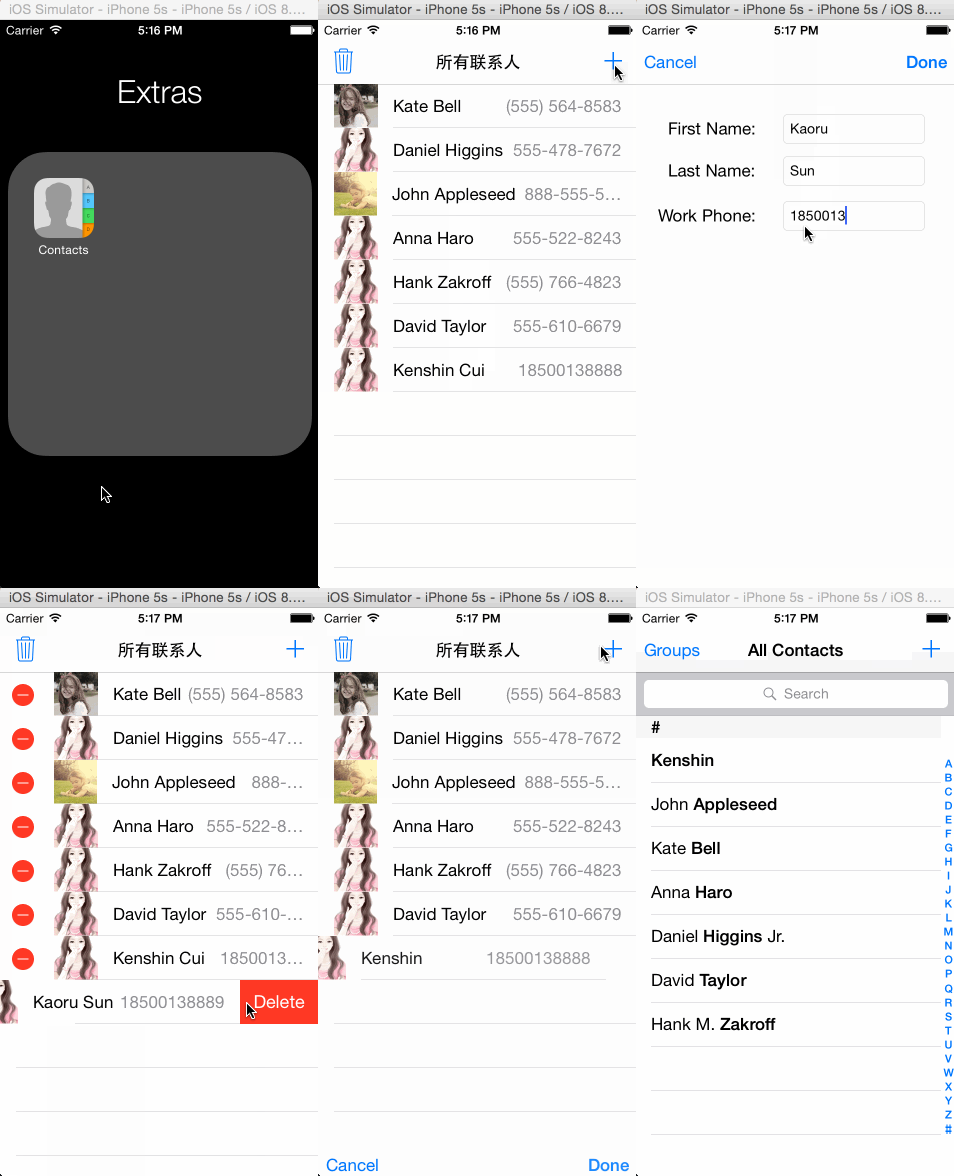
下面用一個 UITableViewController 模擬通訊錄的瀏覽、刪除與新增。主控制器:
// KCTableViewController.h
@protocol KCContactDelegate
- (void)editPersonWithFirstName:(NSString *)firstName lastName:(NSString *)lastName workNumber:(NSString *)workNumber;
- (void)cancelEdit;
@end

@interface KCContactTableViewController : UITableViewController
@end
// KCTableViewController.m(重點片段) @interface KCContactTableViewController ()@property (assign, nonatomic) ABAddressBookRef addressBook; @property (strong, nonatomic) NSMutableArray *allPerson; @property (assign, nonatomic) int isModify; // 1 表示修改,0 表示新增 @property (assign, nonatomic) UITableViewCell *selectedCell; @end @implementation KCContactTableViewController - (void)viewDidLoad { [super viewDidLoad]; [self requestAddressBook]; } // addressBook 在整個控制器生命週期內常駐,銷毀時需手動釋放 - (void)dealloc { if (self.addressBook != NULL) { CFRelease(self.addressBook); } } - (UITableViewCell *)tableView:(UITableView *)tableView cellForRowAtIndexPath:(NSIndexPath *)indexPath { static NSString *identityKey = @"myTableViewCellIdentityKey1"; UITableViewCell *cell = [tableView dequeueReusableCellWithIdentifier:identityKey]; if (cell == nil) { cell = [[UITableViewCell alloc] initWithStyle:UITableViewCellStyleValue1 reuseIdentifier:identityKey]; } ABRecordRef recordRef = (__bridge ABRecordRef)self.allPerson[indexPath.row]; // __bridge 轉換後不需自行釋放 cell.textLabel.text = (__bridge NSString *)ABRecordCopyValue(recordRef, kABPersonFirstNameProperty); // 電話屬於多值屬性,可能有多筆 ABMultiValueRef phoneNumbersRef = ABRecordCopyValue(recordRef, kABPersonPhoneProperty); if (ABMultiValueGetCount(phoneNumbersRef) > 0) { cell.detailTextLabel.text = (__bridge NSString *)ABMultiValueCopyValueAtIndex(phoneNumbersRef, 0); } if (ABPersonHasImageData(recordRef)) { NSData *imageData = (__bridge NSData *)ABPersonCopyImageData(recordRef); cell.imageView.image = [UIImage imageWithData:imageData]; } else { cell.imageView.image = [UIImage imageNamed:@"avatar"]; } cell.tag = ABRecordGetRecordID(recordRef); // 用 tag 保存記錄 ID return cell; } - (void)tableView:(UITableView *)tableView commitEditingStyle:(UITableViewCellEditingStyle)editingStyle forRowAtIndexPath:(NSIndexPath *)indexPath { if (editingStyle == UITableViewCellEditingStyleDelete) { ABRecordRef recordRef = (__bridge ABRecordRef)self.allPerson[indexPath.row]; [self removePersonWithRecord:recordRef]; [self.allPerson removeObjectAtIndex:indexPath.row]; [tableView deleteRowsAtIndexPaths:@[indexPath] withRowAnimation:UITableViewRowAnimationFade]; } } #pragma mark - 私有方法 - (void)requestAddressBook { self.addressBook = ABAddressBookCreateWithOptions(NULL, NULL); // 無論成功或失敗,block 都會被執行 ABAddressBookRequestAccessWithCompletion(self.addressBook, ^(bool granted, CFErrorRef error) { if (!granted) { NSLog(@"未取得通訊錄存取權限!"); } [self initAllPerson]; }); } - (void)initAllPerson { if (ABAddressBookGetAuthorizationStatus() != kABAuthorizationStatusAuthorized) { NSLog(@"尚未取得通訊錄授權!"); return; } CFArrayRef allPeople = ABAddressBookCopyArrayOfAllPeople(self.addressBook); self.allPerson = (__bridge NSMutableArray *)allPeople; CFRelease(allPeople); } - (void)removePersonWithRecord:(ABRecordRef)recordRef { ABAddressBookRemoveRecord(self.addressBook, recordRef, NULL); ABAddressBookSave(self.addressBook, NULL); // 刪除後記得提交 } - (void)removePersonWithName:(NSString *)personName { CFArrayRef recordsRef = ABAddressBookCopyPeopleWithName(self.addressBook, (__bridge CFStringRef)personName); CFIndex count = CFArrayGetCount(recordsRef); for (CFIndex i = 0; i < count; i++) { ABRecordRef recordRef = CFArrayGetValueAtIndex(recordsRef, i); ABAddressBookRemoveRecord(self.addressBook, recordRef, NULL); } ABAddressBookSave(self.addressBook, NULL); CFRelease(recordsRef); } - (void)modifyPersonWithRecordID:(ABRecordID)recordID firstName:(NSString *)firstName lastName:(NSString *)lastName workNumber:(NSString *)workNumber { ABRecordRef recordRef = ABAddressBookGetPersonWithRecordID(self.addressBook, recordID); ABRecordSetValue(recordRef, kABPersonFirstNameProperty, (__bridge CFTypeRef)firstName, NULL); ABRecordSetValue(recordRef, kABPersonLastNameProperty, (__bridge CFTypeRef)lastName, NULL); ABMutableMultiValueRef multiValueRef = ABMultiValueCreateMutable(kABStringPropertyType); ABMultiValueAddValueAndLabel(multiValueRef, (__bridge CFTypeRef)workNumber, kABPersonPhoneWorkLabel, NULL); ABRecordSetValue(recordRef, kABPersonPhoneProperty, multiValueRef, NULL); ABAddressBookSave(self.addressBook, NULL); CFRelease(multiValueRef); } - (void)addPersonWithFirstName:(NSString *)firstName lastName:(NSString *)lastName workNumber:(NSString *)workNumber { ABRecordRef recordRef = ABPersonCreate(); ABRecordSetValue(recordRef, kABPersonFirstNameProperty, (__bridge CFTypeRef)firstName, NULL); ABRecordSetValue(recordRef, kABPersonLastNameProperty, (__bridge CFTypeRef)lastName, NULL); ABMutableMultiValueRef multiValueRef = ABMultiValueCreateMutable(kABStringPropertyType); ABMultiValueAddValueAndLabel(multiValueRef, (__bridge CFTypeRef)workNumber, kABWorkLabel, NULL); ABRecordSetValue(recordRef, kABPersonPhoneProperty, multiValueRef, NULL); ABAddressBookAddRecord(self.addressBook, recordRef, NULL); ABAddressBookSave(self.addressBook, NULL); CFRelease(multiValueRef); CFRelease(recordRef); } @end
新增/編輯畫面透過代理把結果回傳給列表控制器:
// KCAddPersonViewController.h @interface KCAddPersonViewController : UIViewController @property (assign, nonatomic) int recordID; // 不為 0 代表修改,否則為新增 @property (strong, nonatomic) NSString *firstNameText; @property (strong, nonatomic) NSString *lastNameText; @property (strong, nonatomic) NSString *workPhoneText; @property (strong, nonatomic) iddelegate; @end // KCAddPersonViewController.m - (IBAction)cancelClick:(UIBarButtonItem *)sender { [self.delegate cancelEdit]; [self dismissViewControllerAnimated:YES completion:nil]; } - (IBAction)doneClick:(UIBarButtonItem *)sender { [self.delegate editPersonWithFirstName:self.firstName.text lastName:self.lastName.text workNumber:self.workPhone.text]; [self dismissViewControllerAnimated:YES completion:nil]; }
幾點 C 語言框架的通用經驗:
1. 以 Ref 結尾的型別本身就是指標,宣告時不要再加「*」。
2. 方法名含 copy、create、new、retain 所產生的物件,用完要對應 Release,例如
ABPersonCreate()之後以CFRelease()釋放。3. Objective-C 與 Core Foundation 之間轉換時加上
__bridge,轉換後的物件交給 ARC 管理即可。4. Apple 的 C 框架有固定命名慣例:型別 XxxRef 的操作多對應 Xxx 前綴的函式,例如
ABRecordSetValue()。
2.3 通訊錄:AddressBookUI
AddressBook 的優點是控制精細,缺點是 C API 繁瑣。若只是想看、新增、挑選聯絡人,Apple 另外提供了 AddressBookUI.framework,內含現成的控制器:
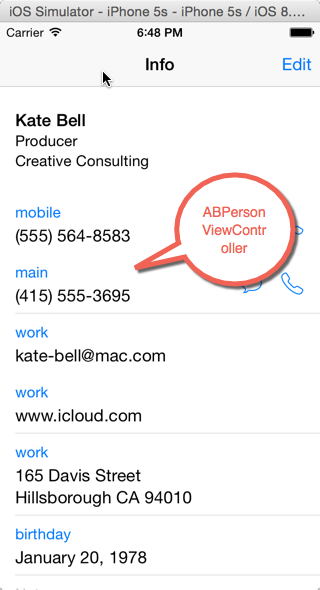
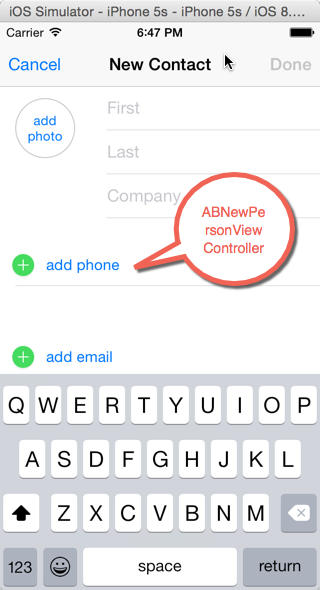
- ABPersonViewController:檢視聯絡人(可開啟編輯),需設定
displayedPerson。 - ABNewPersonViewController:新增聯絡人。
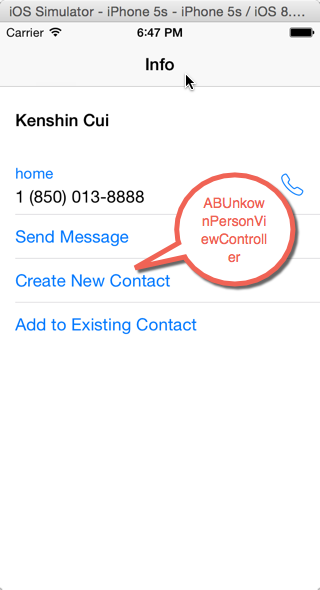
- ABUnknownPersonViewController:顯示尚未存入通訊錄的未知聯絡人,同樣需設定
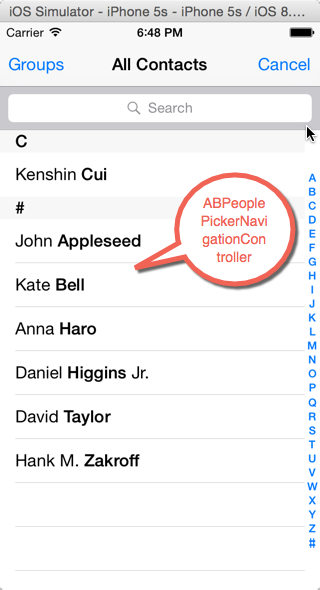
displayedPerson。 - ABPeoplePickerNavigationController:挑選聯絡人,性質等同
UIImagePickerController。
前三個都繼承 UIViewController,實務上必須包一層 UINavigationController,否則會缺少「完成/取消」按鈕而無法操作。新增與修改的實際寫入邏輯由控制器內部完成,你只需要處理關閉動作,並在代理方法中取得結果。各控制器的代理重點:
personViewController:shouldPerformDefaultActionForPerson:property:identifier::點選某個聯絡人屬性時觸發,回傳YES執行系統預設行為(例如撥號),NO則自行處理。newPersonViewController:didCompleteWithNewPerson::按下完成或取消都會觸發;person為 NULL 代表取消。此方法被呼叫時存檔已完成,不需自己儲存。unknownPersonViewController:didResolveToPerson::未知聯絡人被儲存時呼叫。peoplePickerNavigationController:didSelectPerson:與...didSelectPerson:property:identifier::前者實作後,後者不會被呼叫,且使用者只能選到聯絡人層級、無法進入細節頁;兩者互斥,需依需求擇一。peoplePickerNavigationControllerDidCancel::按下取消。
// 新增聯絡人
- (IBAction)addPersonClick:(UIButton *)sender {
    ABNewPersonViewController *newPersonController = [[ABNewPersonViewController alloc] init];
    newPersonController.newPersonViewDelegate = self;
    // 一定要包導航控制器,否則沒有「完成/取消」按鈕
    UINavigationController *nav = [[UINavigationController alloc] initWithRootViewController:newPersonController];
    [self presentViewController:nav animated:YES completion:nil];
}

// 顯示未知聯絡人
- (IBAction)unknownPersonClick:(UIButton *)sender {
    ABUnknownPersonViewController *unknownController = [[ABUnknownPersonViewController alloc] init];
    ABRecordRef recordRef = ABPersonCreate();
    ABRecordSetValue(recordRef, kABPersonFirstNameProperty, @"Kenshin", NULL);
    ABRecordSetValue(recordRef, kABPersonLastNameProperty, @"Cui", NULL);
    ABMultiValueRef multiValueRef = ABMultiValueCreateMutable(kABStringPropertyType);
    ABMultiValueAddValueAndLabel(multiValueRef, @"18500138888", kABHomeLabel, NULL);
    ABRecordSetValue(recordRef, kABPersonPhoneProperty, multiValueRef, NULL);

    unknownController.displayedPerson = recordRef;
    unknownController.unknownPersonViewDelegate = self;
    unknownController.allowsActions = YES;
    unknownController.allowsAddingToAddressBook = YES;

    CFRelease(multiValueRef);
    CFRelease(recordRef);

    UINavigationController *nav = [[UINavigationController alloc] initWithRootViewController:unknownController];
    [self presentViewController:nav animated:YES completion:nil];
}

// 檢視既有聯絡人
- (IBAction)showPersonClick:(UIButton *)sender {
    ABPersonViewController *personController = [[ABPersonViewController alloc] init];
    ABAddressBookRef addressBook = ABAddressBookCreateWithOptions(NULL, NULL);
    personController.displayedPerson = ABAddressBookGetPersonWithRecordID(addressBook, 1);
    personController.personViewDelegate = self;
    personController.allowsActions = YES;
    personController.allowsEditing = YES;
    // personController.displayedProperties = @[@(kABPersonFirstNameProperty)]; // 可限制顯示欄位
    UINavigationController *nav = [[UINavigationController alloc] initWithRootViewController:personController];
    [self presentViewController:nav animated:YES completion:nil];
}

// 挑選聯絡人
- (IBAction)selectPersonClick:(UIButton *)sender {
    ABPeoplePickerNavigationController *picker = [[ABPeoplePickerNavigationController alloc] init];
    picker.peoplePickerDelegate = self;
    [self presentViewController:picker animated:YES completion:nil];
}

#pragma mark - 代理
- (void)newPersonViewController:(ABNewPersonViewController *)newPersonView
         didCompleteWithNewPerson:(ABRecordRef)person {
    if (person) {
        NSLog(@"%@ 已儲存.", (__bridge NSString *)ABRecordCopyCompositeName(person));
    } else {
        NSLog(@"點擊了取消.");
    }
    [self dismissViewControllerAnimated:YES completion:nil];
}

- (BOOL)personViewController:(ABPersonViewController *)personViewController
shouldPerformDefaultActionForPerson:(ABRecordRef)person property:(ABPropertyID)property
                    identifier:(ABMultiValueIdentifier)identifier {
    NSLog(@"選擇屬性:%i", property);
    return NO;   // 改為自訂行為
}
2.4 藍牙
低功耗藍牙(BLE)普及之後,多數行動裝置都具備藍牙 4.0,功耗大幅降低,iBeacon 這類定位技術也完全建立在藍牙之上。但 iOS 對權限管控嚴格,不像 Android 可以自由做檔案傳輸(除非越獄)。常用的三套框架:
- GameKit.framework:iOS 7 之前的藍牙通訊方案,現已標記為過期,但仍有大量舊專案沿用。
- MultipeerConnectivity.framework:iOS 7 起提供,用以取代 GameKit。
- CoreBluetooth.framework:功能最完整,要求裝置支援藍牙 4.0。
前兩者上手容易,但限制明顯:僅支援 iOS 裝置之間傳輸、內容限於沙盒或相簿中由使用者挑選的檔案,而且 GameKit 只能在同一個 App 之間溝通。CoreBluetooth 擺脫了這些束縛,可與 Android、Windows Phone 或其他藍牙 4.0 裝置互通,因此成為智能家居、無線支付等場景的首選。
GameKit
這個框架原本為遊戲設計,因為點對點傳輸是遊戲常見需求,才內建了藍牙模組。它只暴露兩個關鍵類別:
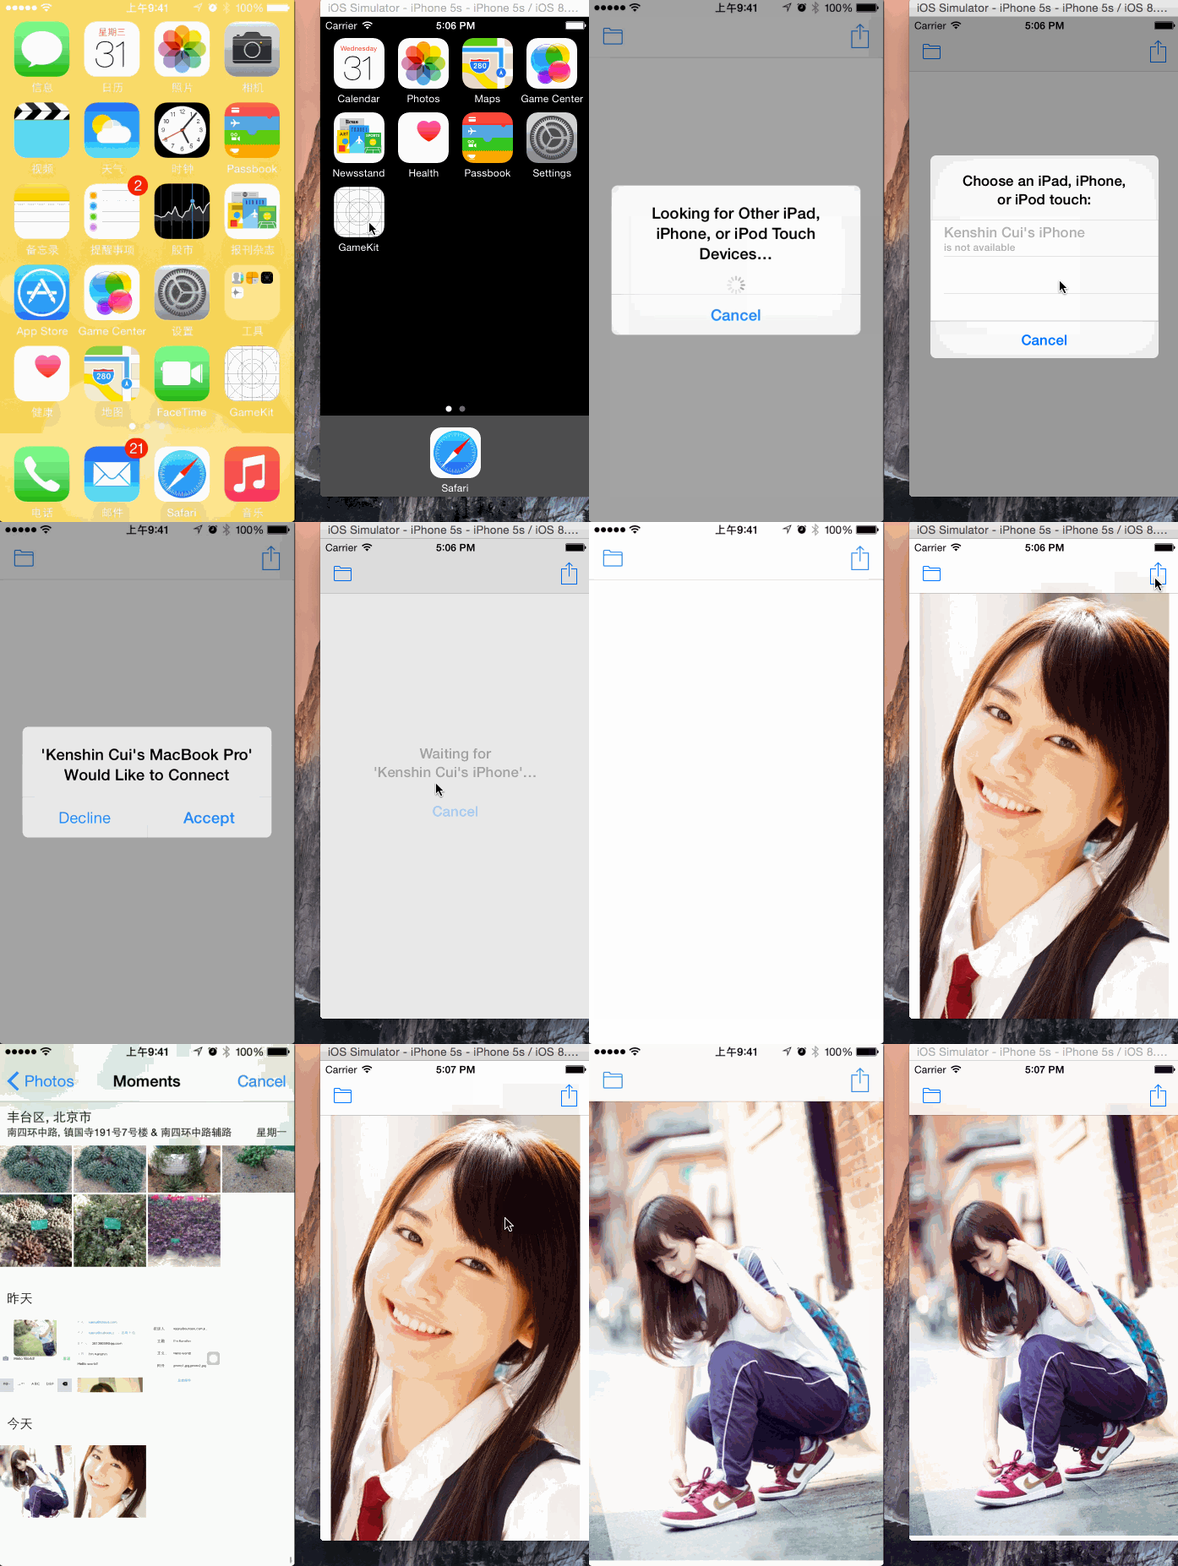
GKPeerPickerController:負責藍牙裝置搜尋與配對的視圖控制器。A 端呼叫 show 後會出現搜尋畫面,發現同樣在搜尋的 B 端即可發起連接,B 端詢問使用者同意後完成配對。
GKSession:連線工作階段,用於收發資料。配對成功後,代理方法會把 session 交給開發者。
- (void)viewDidLoad {
    [super viewDidLoad];
    GKPeerPickerController *pickerController = [[GKPeerPickerController alloc] init];
    pickerController.delegate = self;
    [pickerController show];
}

- (IBAction)sendClick:(UIBarButtonItem *)sender {
    NSData *data = UIImagePNGRepresentation(self.imageView.image);
    NSError *error = nil;
    [self.session sendDataToAllPeers:data withDataMode:GKSendDataReliable error:&error];
    if (error) { NSLog(@"傳送發生錯誤:%@", error.localizedDescription); }
}

#pragma mark - GKPeerPickerController 代理
- (void)peerPickerController:(GKPeerPickerController *)picker
              didConnectPeer:(NSString *)peerID toSession:(GKSession *)session {
    self.session = session;
    NSLog(@"已連接:%@", peerID);
    // 設定資料接收的處理者(相當於代理)
    [self.session setDataReceiveHandler:self withContext:nil];
    [picker dismiss];
}

#pragma mark - 資料接收
- (void)receiveData:(NSData *)data fromPeer:(NSString *)peer
          inSession:(GKSession *)session context:(void *)context {
    UIImage *image = [UIImage imageWithData:data];
    self.imageView.image = image;
    UIImageWriteToSavedPhotosAlbum(image, nil, nil, nil);
}
注意 A、B 兩端必須執行同一支程式,GameKit 不支援跨應用傳輸。
MultipeerConnectivity
MultipeerConnectivity 不只支援藍牙,而是把 Wi-Fi、P2P Wi-Fi 與藍牙個人網路統一封裝,讓開發者用一套 API 處理近場溝通,不必依賴網路服務,也不必限定同一個 App。
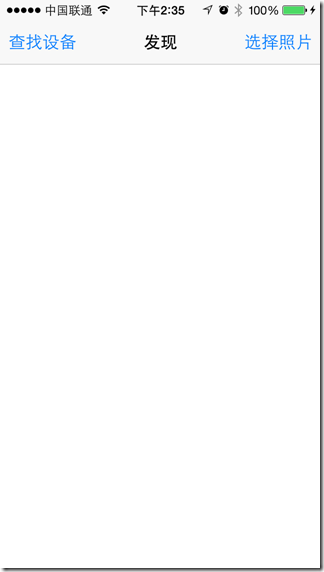
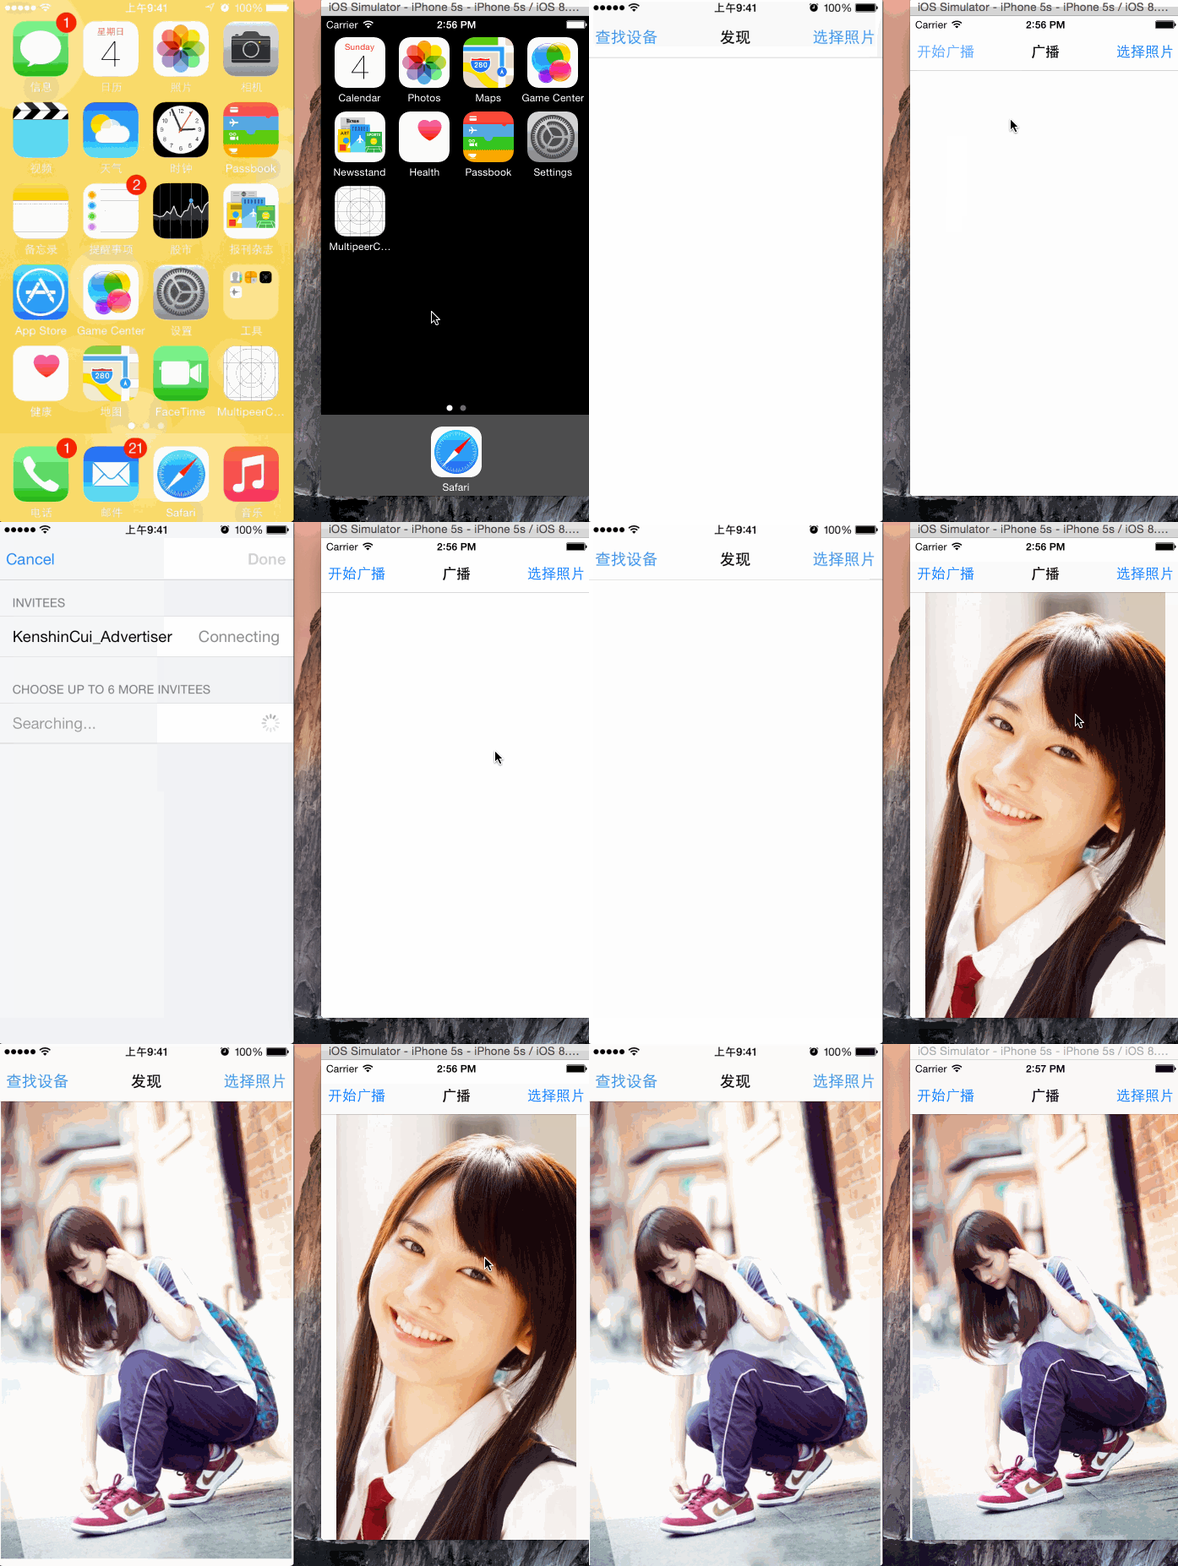
理解它要先掌握兩個概念:廣播(Advertising)與發現(Discovering),本質上是 Client-Server 模式。以 A、B 為例,B 作為廣播端發布服務,A 作為發現端搜尋並發起連接,B 同意後即可雙向傳輸。實務上同一台裝置常同時扮演兩種角色。
A. 廣播端
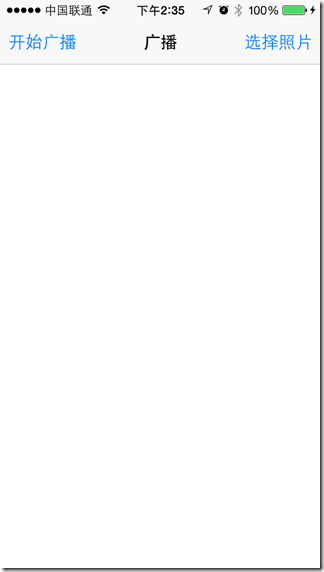
不論角色,每台裝置都需要一個 MCPeerID 作為識別(可帶 displayName 供對方辨識),並建立一個 MCSession 用於收發。狀態透過 session:peer:didChangeState: 追蹤,資料透過 session:didReceiveData:fromPeer: 接收,發送則呼叫 sendData:toPeers:withMode:error:。發布服務使用 MCAdvertiserAssistant,初始化時關聯 session,呼叫 start 後即可被周邊發現;已連接的裝置可從 session 的 connectedPeers 取得。
B. 發現端
同樣需要 MCPeerID 與 MCSession,另外用 MCBrowserViewController 呈現可連接與已連接的裝置(等同 GameKit 的 GKPeerPickerController);若想自訂 UI,也可自行實作瀏覽器。
// 廣播端
- (void)viewDidLoad {
    [super viewDidLoad];
    MCPeerID *peerID = [[MCPeerID alloc] initWithDisplayName:@"KenshinCui_Advertiser"];
    _session = [[MCSession alloc] initWithPeer:peerID];
    _session.delegate = self;
    _advertiserAssistant = [[MCAdvertiserAssistant alloc] initWithServiceType:@"cmj-stream"
                                                               discoveryInfo:nil session:_session];
    _advertiserAssistant.delegate = self;
}

- (IBAction)advertiserClick:(UIBarButtonItem *)sender {
    [self.advertiserAssistant start];
}

- (void)session:(MCSession *)session peer:(MCPeerID *)peerID didChangeState:(MCSessionState)state {
    switch (state) {
        case MCSessionStateConnected:   NSLog(@"連接成功."); break;
        case MCSessionStateConnecting:  NSLog(@"正在連接..."); break;
        default:                        NSLog(@"連接失敗."); break;
    }
}

- (void)session:(MCSession *)session didReceiveData:(NSData *)data fromPeer:(MCPeerID *)peerID {
    UIImage *image = [UIImage imageWithData:data];
    [self.photo setImage:image];
    UIImageWriteToSavedPhotosAlbum(image, nil, nil, nil);
}

- (void)imagePickerController:(UIImagePickerController *)picker
didFinishPickingMediaWithInfo:(NSDictionary *)info {
    UIImage *image = [info objectForKey:UIImagePickerControllerOriginalImage];
    [self.photo setImage:image];
    NSError *error = nil;
    [self.session sendData:UIImagePNGRepresentation(image)
                   toPeers:[self.session connectedPeers]
                  withMode:MCSessionSendDataUnreliable error:&error];
    [self.imagePickerController dismissViewControllerAnimated:YES completion:nil];
}
// 發現端
- (void)viewDidLoad {
    [super viewDidLoad];
    MCPeerID *peerID = [[MCPeerID alloc] initWithDisplayName:@"KenshinCui"];
    _session = [[MCSession alloc] initWithPeer:peerID];
    _session.delegate = self;
}

- (IBAction)browserClick:(UIBarButtonItem *)sender {
    _browserController = [[MCBrowserViewController alloc] initWithServiceType:@"cmj-stream" session:self.session];
    _browserController.delegate = self;
    [self presentViewController:_browserController animated:YES completion:nil];
}

- (void)browserViewControllerDidFinish:(MCBrowserViewController *)browserViewController {
    [self.browserController dismissViewControllerAnimated:YES completion:nil];
}

- (void)session:(MCSession *)session peer:(MCPeerID *)peerID didChangeState:(MCSessionState)state {
    if (state == MCSessionStateConnected) {
        [self.browserController dismissViewControllerAnimated:YES completion:nil];
    }
}
兩端初始化時都指定了服務型別 cmj-stream,這是唯一識別碼。命名可依官方建議自訂,但要盡量表達服務用途;關鍵是雙方必須一致,否則發現端永遠找不到該服務。
CoreBluetooth
GameKit 與 MultipeerConnectivity 都僅限 iOS 裝置互連,CoreBluetooth 則從 iOS 6 起開放,完全基於 BLE 4.0 且支援非 iOS 裝置,因此橫跨室內定位、無線支付、智能家居等應用。
它採用中央設備(Central)—外圍設備(Peripheral)的設計:
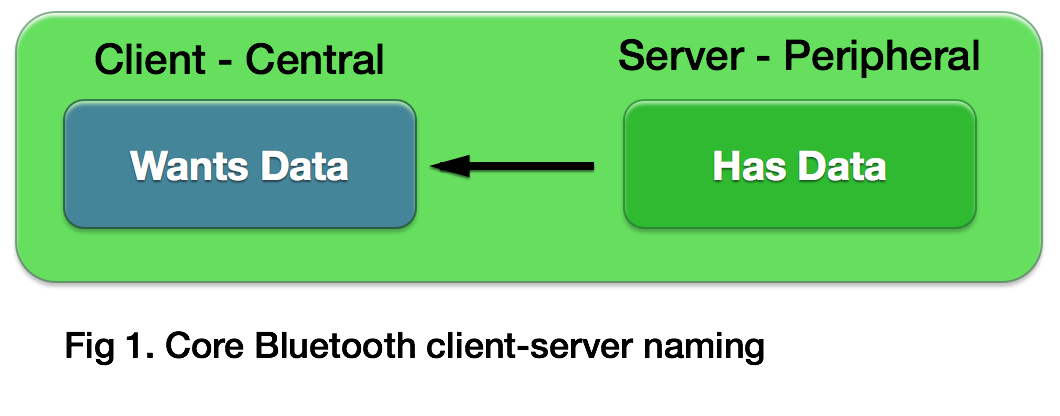
CBPeripheralManager:外圍設備,負責發布並廣播服務、產生與保存資料。CBCentralManager:中央設備,掃描並使用外圍設備的資料。
兩者溝通的橋樑是服務 CBService 與特徵 CBCharacteristic,各以 CBUUID 唯一識別,一個服務可包含多個特徵:
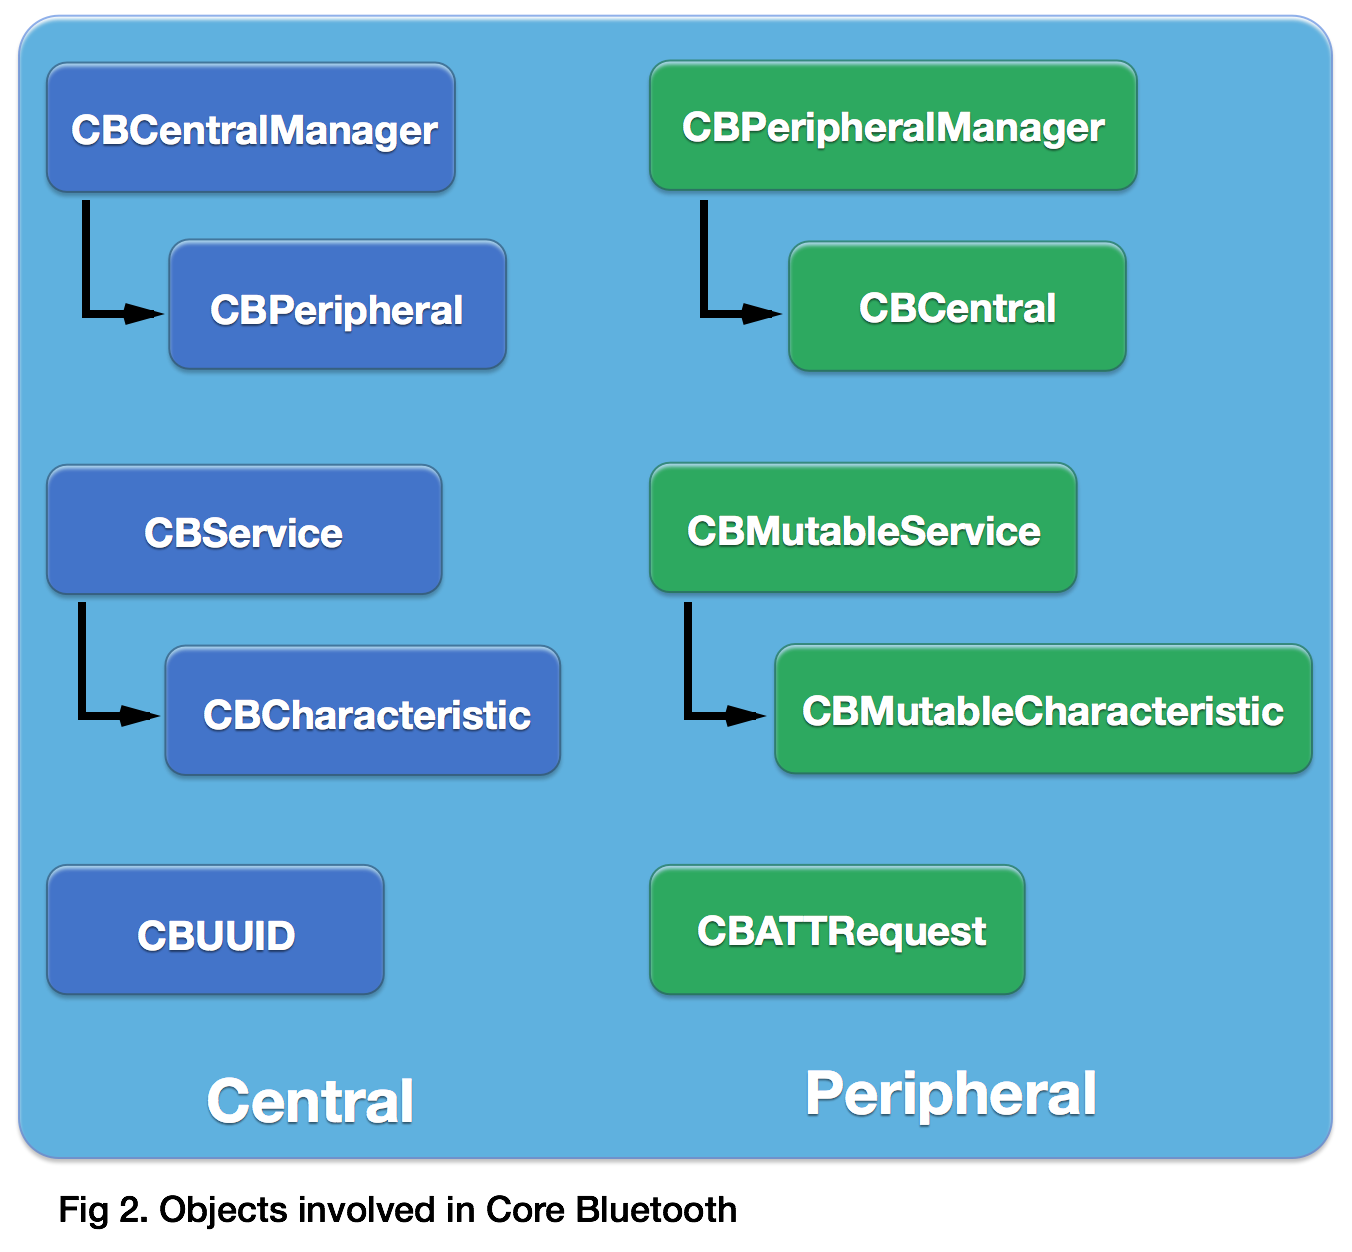
一台 iOS 裝置可以同時是中央或外圍設備,但不能同時擔任兩者。此外 BLE 的連接不需使用者手動確認,這與前兩套框架不同,因為 BLE 的應用情境早已超出「兩台裝置共享資源」。特別提醒:iPhone 4 以下不支援 BLE,iOS 7/8 模擬器也無法模擬 BLE。
A. 外圍設備的建立步驟:
- 建立
CBPeripheralManager並設定代理。 - 建立特徵與服務並加入外圍設備。
- 呼叫
startAdvertising:開始廣播。 - 與中央設備互動。
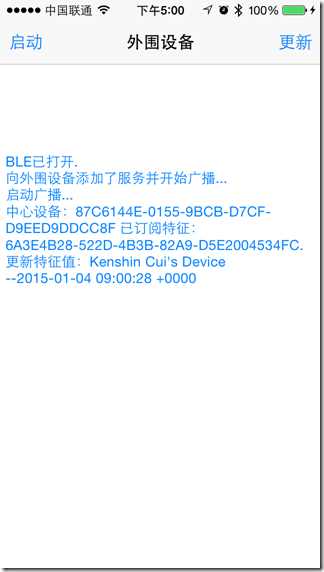
#define kPeripheralName @"Kenshin Cui's Device"
#define kServiceUUID      @"C4FB2349-72FE-4CA2-94D6-1F3CB16331EE"
#define kCharacteristicUUID @"6A3E4B28-522D-4B3B-82A9-D5E2004534FC"

- (IBAction)startClick:(UIBarButtonItem *)sender {
    _peripheralManager = [[CBPeripheralManager alloc] initWithDelegate:self queue:nil];
}

- (IBAction)transferClick:(UIBarButtonItem *)sender {
    [self updateCharacteristicValue];
}

#pragma mark - CBPeripheralManager 代理
- (void)peripheralManagerDidUpdateState:(CBPeripheralManager *)peripheral {
    if (peripheral.state == CBPeripheralManagerStatePoweredOn) {
        [self setupService];
    } else {
        NSLog(@"此裝置不支援 BLE 或未開啟藍牙,無法作為外圍設備.");
    }
}

- (void)peripheralManager:(CBPeripheralManager *)peripheral
             didAddService:(CBService *)service error:(NSError *)error {
    if (error) { return; }
    NSDictionary *dic = @{CBAdvertisementDataLocalNameKey: kPeripheralName};
    [self.peripheralManager startAdvertising:dic];
}

// 中央設備訂閱特徵後
- (void)peripheralManager:(CBPeripheralManager *)peripheral central:(CBCentral *)central
didSubscribeToCharacteristic:(CBCharacteristic *)characteristic {
    if (![self.centralM containsObject:central]) {
        [self.centralM addObject:central];
    }
}

#pragma mark - 私有方法
- (void)setupService {
    // 1. 建立特徵:properties 決定可通知/可讀/可寫
    CBUUID *characteristicUUID = [CBUUID UUIDWithString:kCharacteristicUUID];
    CBMutableCharacteristic *characteristicM =
        [[CBMutableCharacteristic alloc] initWithType:characteristicUUID
                                          properties:CBCharacteristicPropertyNotify
                                               value:nil
                                        permissions:CBAttributePermissionsReadable];
    self.characteristicM = characteristicM;

    // 2. 建立服務並掛上特徵
    CBMutableService *serviceM = [[CBMutableService alloc] initWithType:[CBUUID UUIDWithString:kServiceUUID]
                                                              primary:YES];
    [serviceM setCharacteristics:@[characteristicM]];

    // 3. 加入外圍設備(加入後才會觸發 didAddService,進而開始廣播)
    [self.peripheralManager addService:serviceM];
}

- (void)updateCharacteristicValue {
    NSString *valueStr = [NSString stringWithFormat:@"%@ --%@", kPeripheralName, [NSDate date]];
    NSData *value = [valueStr dataUsingEncoding:NSUTF8StringEncoding];
    [self.peripheralManager updateValue:value forCharacteristic:self.characteristicM onSubscribedCentrals:nil];
}
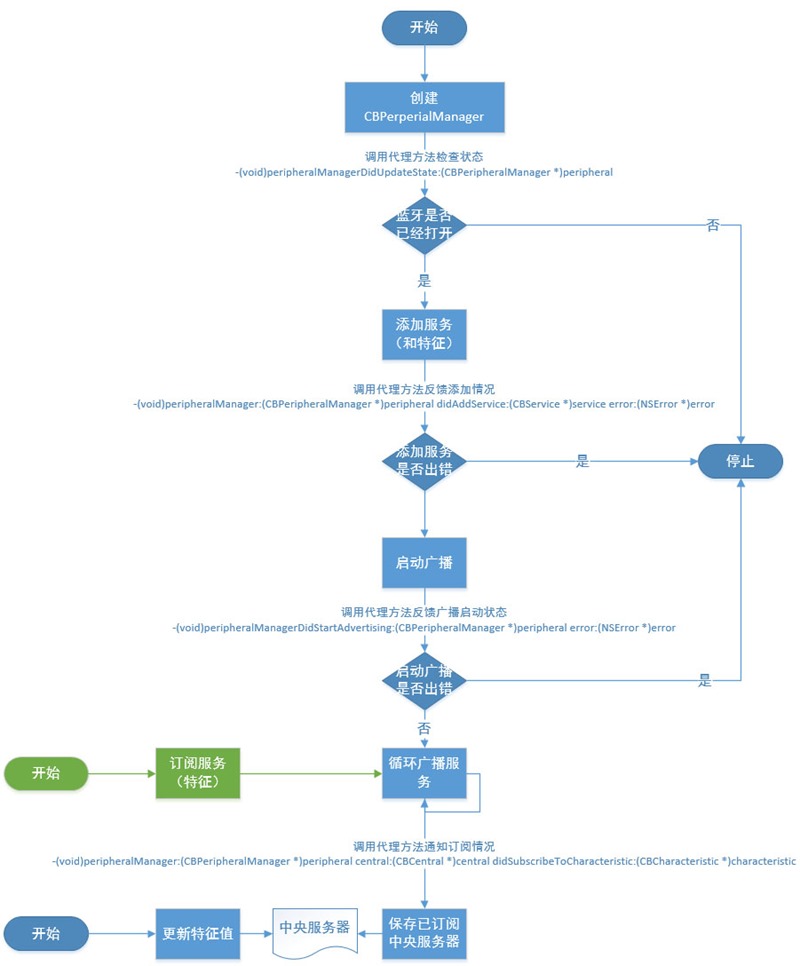
整體流程如下(藍色為外圍設備操作,綠色為中央設備操作):
B. 中央設備的建立步驟:
- 建立
CBCentralManager並設定代理。 - 掃描外圍設備,找到可用者即連線並保存。
- 查找服務與特徵,取得可用特徵後讀取資料。
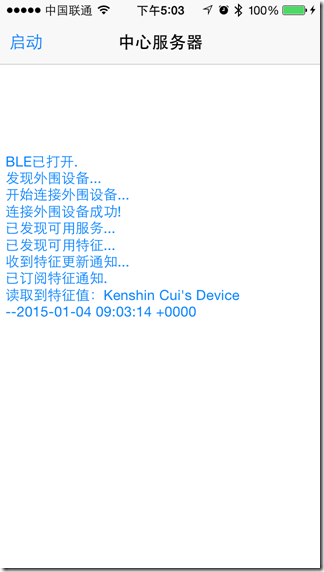
- (IBAction)startClick:(UIBarButtonItem *)sender {
    _centralManager = [[CBCentralManager alloc] initWithDelegate:self queue:nil];
}

#pragma mark - CBCentralManager 代理
- (void)centralManagerDidUpdateState:(CBCentralManager *)central {
    if (central.state == CBPeripheralManagerStatePoweredOn) {
        [central scanForPeripheralsWithServices:nil
                                       options:@{CBCentralManagerScanOptionAllowDuplicatesKey: @YES}];
    }
}

- (void)centralManager:(CBCentralManager *)central
 didDiscoverPeripheral:(CBPeripheral *)peripheral
     advertisementData:(NSDictionary *)advertisementData RSSI:(NSNumber *)RSSI {
    [self.centralManager stopScan];
    if (peripheral) {
        // 務必強引用,否則 peripheral 會立刻被回收,連線回呼永遠不會觸發
        if (![self.peripherals containsObject:peripheral]) {
            [self.peripherals addObject:peripheral];
        }
        [self.centralManager connectPeripheral:peripheral options:nil];
    }
}

- (void)centralManager:(CBCentralManager *)central didConnectPeripheral:(CBPeripheral *)peripheral {
    peripheral.delegate = self;
    [peripheral discoverServices:@[[CBUUID UUIDWithString:kServiceUUID]]];
}

#pragma mark - CBPeripheral 代理
- (void)peripheral:(CBPeripheral *)peripheral didDiscoverServices:(NSError *)error {
    CBUUID *serviceUUID = [CBUUID UUIDWithString:kServiceUUID];
    CBUUID *characteristicUUID = [CBUUID UUIDWithString:kCharacteristicUUID];
    for (CBService *service in peripheral.services) {
        if ([service.UUID isEqual:serviceUUID]) {
            [peripheral discoverCharacteristics:@[characteristicUUID] forService:service];
        }
    }
}

- (void)peripheral:(CBPeripheral *)peripheral didDiscoverCharacteristicsForService:(CBService *)service
             error:(NSError *)error {
    CBUUID *characteristicUUID = [CBUUID UUIDWithString:kCharacteristicUUID];
    for (CBCharacteristic *characteristic in service.characteristics) {
        if ([characteristic.UUID isEqual:characteristicUUID]) {
            // 訂閱通知;若只需一次性讀取,改用 readValueForCharacteristic:
            [peripheral setNotifyValue:YES forCharacteristic:characteristic];
        }
    }
}

// 訂閱狀態更新
- (void)peripheral:(CBPeripheral *)peripheral
didUpdateNotificationStateForCharacteristic:(CBCharacteristic *)characteristic error:(NSError *)error {
    if (characteristic.isNotifying && characteristic.properties == CBCharacteristicPropertyNotify) {
        NSLog(@"已訂閱特徵通知.");
    }
}

// 特徵值更新(訂閱後對方更新,或主動讀取完成)
- (void)peripheral:(CBPeripheral *)peripheral
didUpdateValueForCharacteristic:(CBCharacteristic *)characteristic error:(NSError *)error {
    if (characteristic.value) {
        NSString *value = [[NSString alloc] initWithData:characteristic.value encoding:NSUTF8StringEncoding];
        NSLog(@"讀取到特徵值:%@", value);
    }
}
流程圖如下:
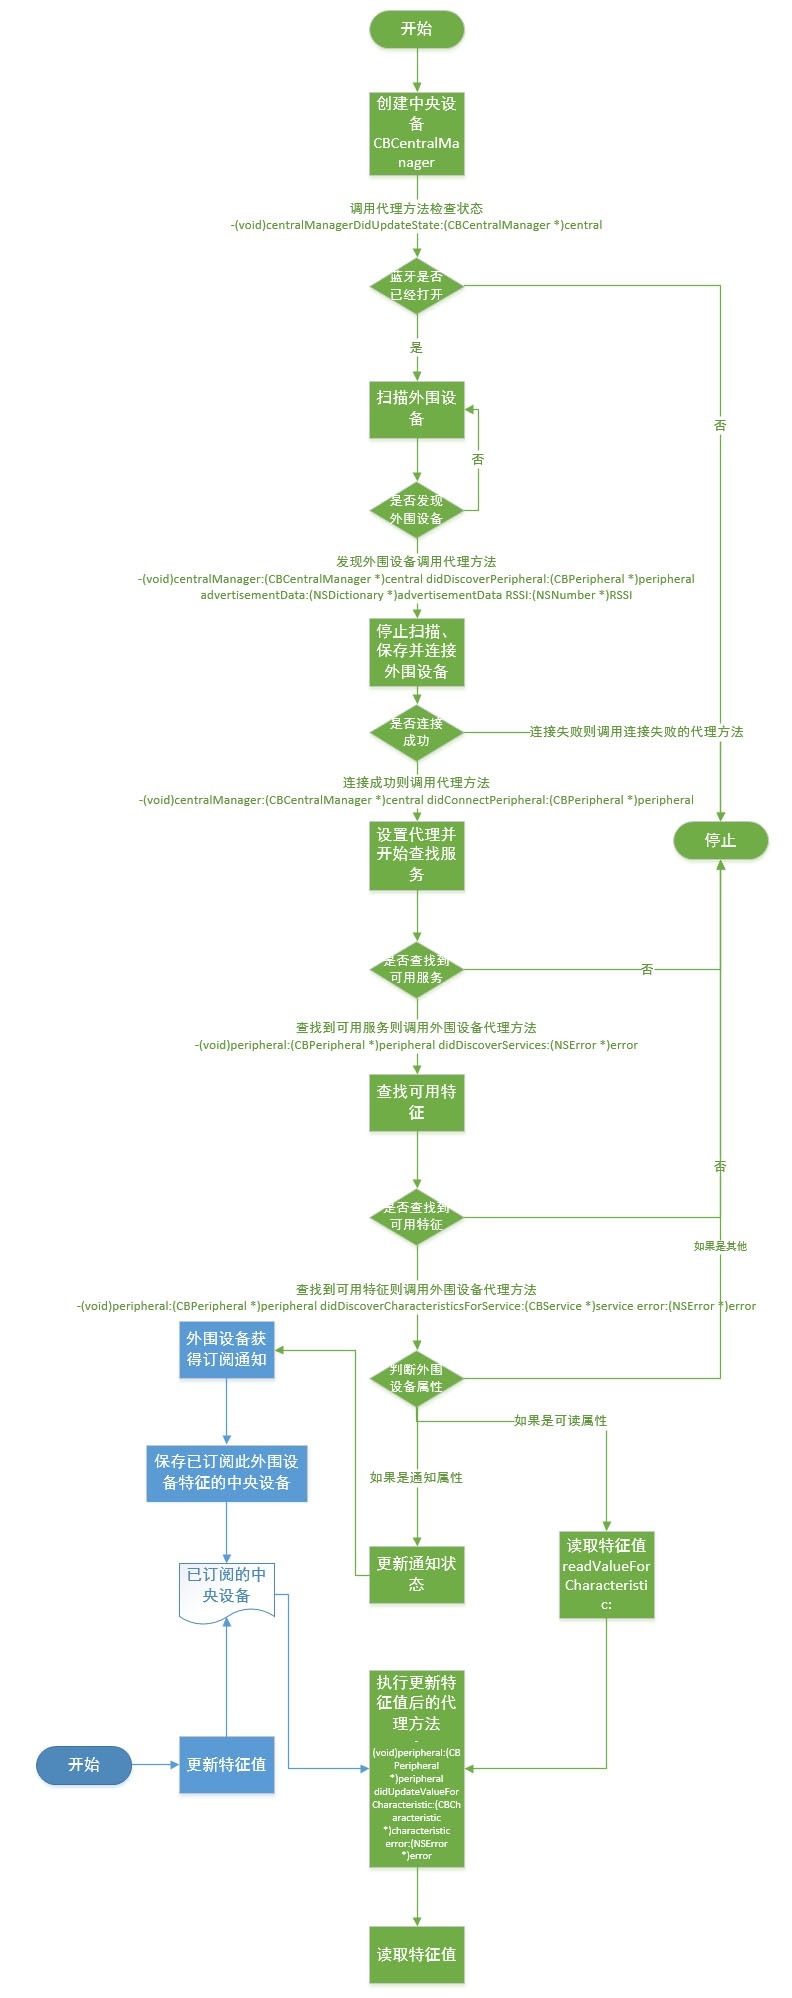
把這兩支程式分別跑在兩台支援 BLE 的 iOS 裝置上,外圍設備一更新特徵值,中央設備就能立刻收到。更重要的是,CoreBluetooth 也能與任何遵循 BLE 規範的第三方裝置溝通,這正是它成為當前主流藍牙開發方案的原因。
註:本節部分圖片來自網路,版權屬原作者所有。
2.5 社群分享
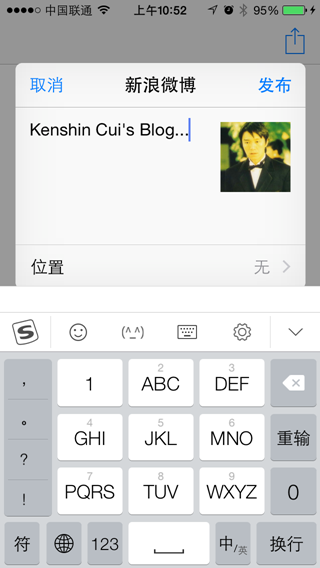
從 iOS 6 起,Apple 內建了 Social.framework,幾行程式就能完成分享。以分享到新浪微博為例,流程是:建立編輯控制器 → 帶入內容 → 設定完成回呼 → 呈現。
- (void)shareToSina {
    if (![SLComposeViewController isAvailableForServiceType:SLServiceTypeSinaWeibo]) {
        NSLog(@"新浪微博服務不可用.");
        return;
    }
    SLComposeViewController *composeController =
        [SLComposeViewController composeViewControllerForServiceType:SLServiceTypeSinaWeibo];
    [composeController setInitialText:@"Kenshin Cui's Blog..."];
    [composeController addImage:[UIImage imageNamed:@"stevenChow"]];
    [composeController addURL:[NSURL URLWithString:@"https://www.cnblogs.com/kenshincui"]];

    __block SLComposeViewController *blockController = composeController;
    composeController.completionHandler = ^(SLComposeViewControllerResult result) {
        if (result == SLComposeViewControllerResultDone) { NSLog(@"開始發送..."); }
        [blockController dismissViewControllerAnimated:YES completion:nil];
    };
    [self presentViewController:composeController animated:YES completion:nil];
}
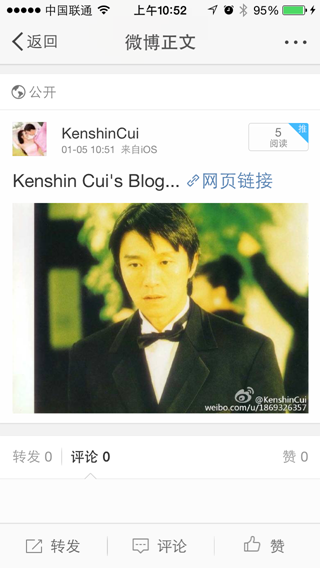
發送成功後:
開發者不必理解各平台的分享細節,只要透過 ServiceType 切換 Facebook、Twitter、新浪微博、騰訊微博即可。至於用哪個帳號發送,則來自系統「設定」中的社群帳號設定:
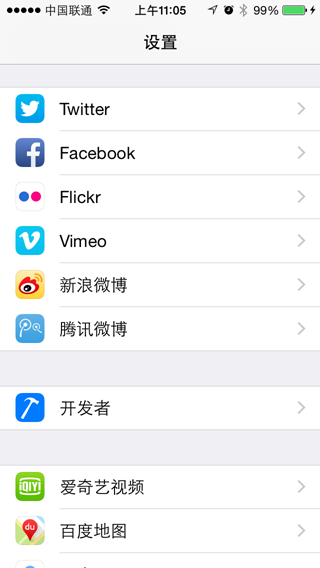
必須先在這裡登入帳號,Social 框架才知道要委派給誰。若需要分享到微信、人人、豆瓣等更多國內平台,實務上會改用第三方元件,例如友盟社群元件、ShareSDK 或百度社群分享元件,因為自行對接各家 SDK 的成本太高。以友盟為例,整合三步驟:
- 申請友盟帳號並建立應用取得 AppKey。
- 下載 SDK(下載時可勾選需要的分享服務)並加入專案。
- 在程式中設定 AppKey,並到各平台申請對應的 AppId/AppSecret。
- (IBAction)shareClick:(UIBarButtonItem *)sender {
    // 微信好友、朋友圈、收藏、QQ 空間等,都必須先在各平台完成設定才會出現在分享列表
    // [UMSocialWechatHandler setWXAppId:@"wx30dbea5d5a258ed3" appSecret:@"..." url:@"https://www.cmj.com/social-UM"];

    [UMSocialSnsService presentSnsIconSheetView:self
                                        appKey:@"54aa0a0afd98c5209f000efa"
                                    shareText:@"Kenshin Cui's Blog..."
                                   shareImage:[UIImage imageNamed:@"stevenChow"]
                              shareToSnsNames:@[UMShareToSina, UMShareToTencent, UMShareToRenren, UMShareToDouban]
                                     delegate:self];
}

- (void)didFinishGetUMSocialDataInViewController:(UMSocialResponseEntity *)response {
    if (response.responseCode == UMSResponseCodeSuccess) { NSLog(@"分享成功"); }
}
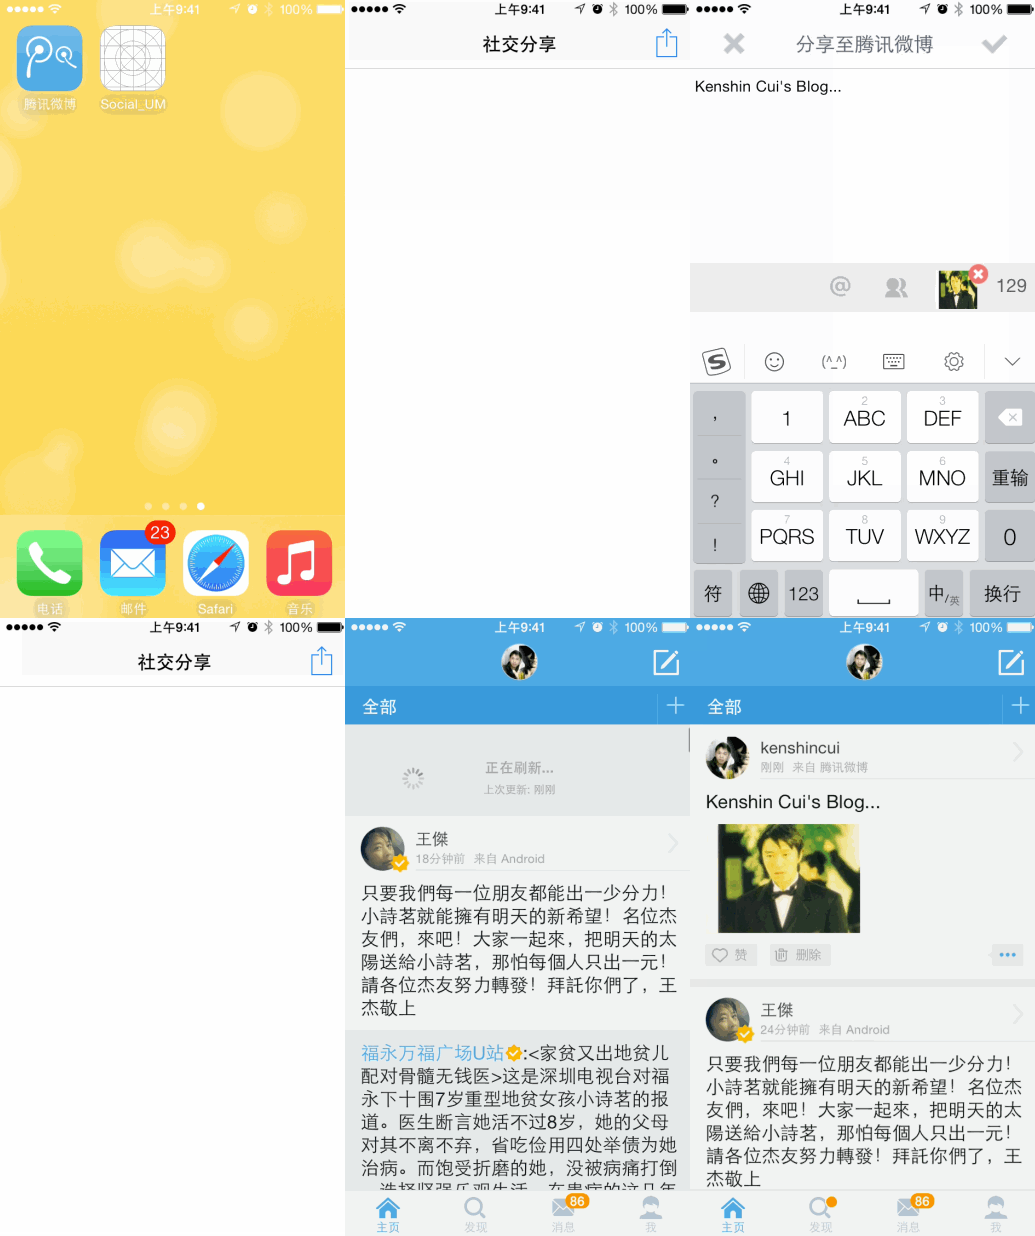
首次使用某個分享服務時,需要輸入帳號完成授權才能分享。
三、Game Center
Game Center 是 Apple 的線上多人遊戲社交網絡,可邀請好友對戰、記錄成績、展示排行榜並頒發成就。由於管控嚴格,動工前必須完成一連串準備(以下以真機為例,模擬器可略過 Provisioning Profile 設定):
- 在開發者中心建立支援 Game Center 的 App ID,指定 Bundle ID(例如
com.cmjstudio.kctest)。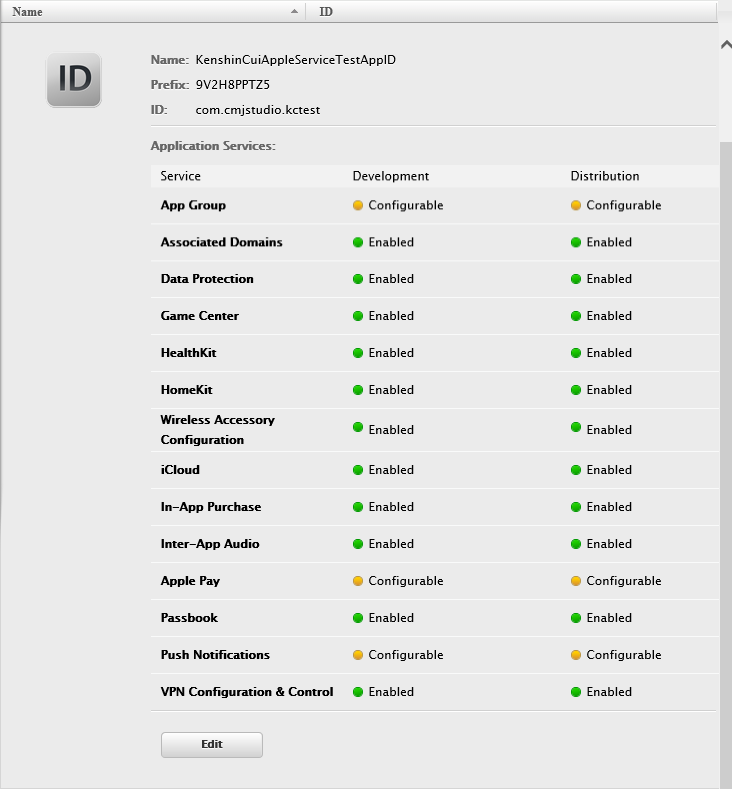
- 以此 Bundle ID 建立開發者描述檔並匯入裝置,建立時記得選擇支援 Game Center 的 App ID。
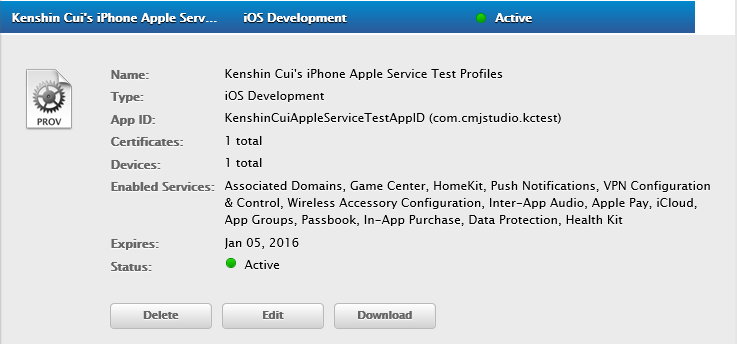
- 在 iTunes Connect 建立應用(此處假設名為 KCTest,一款足球競技遊戲),「套裝 ID」填上述 Bundle ID 完成關聯,此應用不需提交。
- 在 iTunes Connect 的「使用者與職能」中建立沙盒測試帳號;測試階段只有沙盒帳號能登入 Game Center。
- 設定 Game Center:顯示名稱假設為「CMJ」,新增一個排行榜 ID「Goals」(進球數)與兩個成就 ID「AdidasGoldBall」、「AdidasGoldBoot」(點數 80、100)。
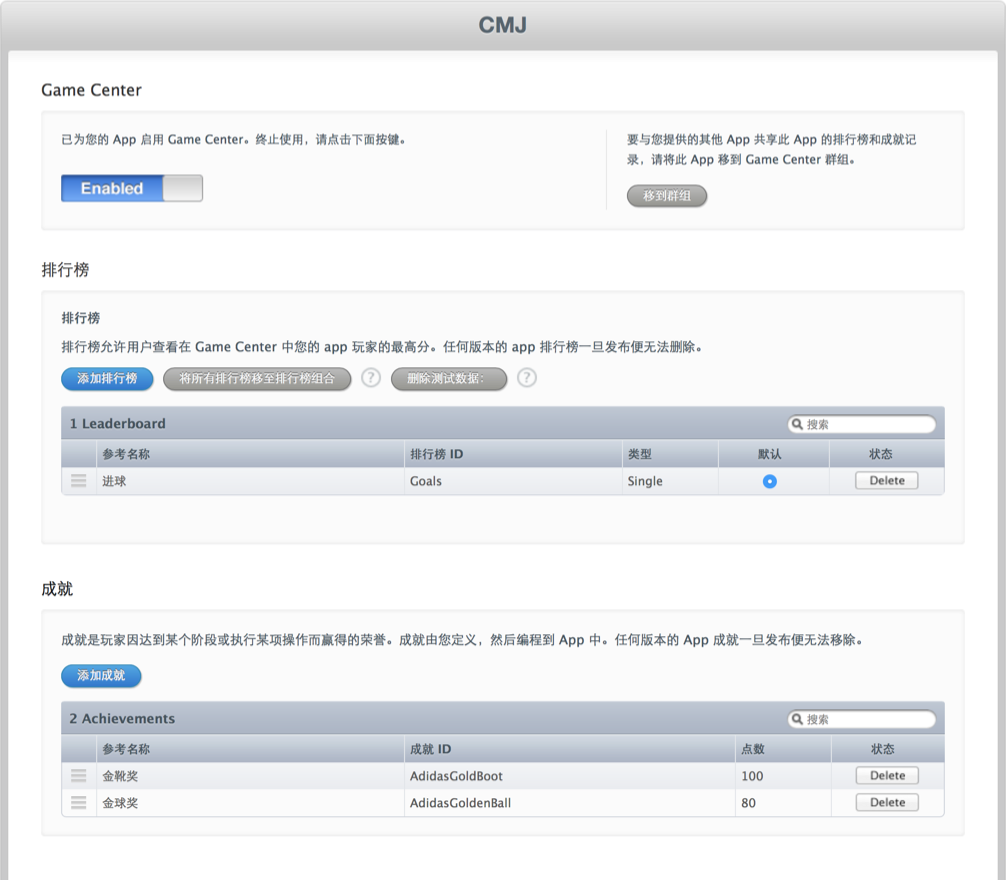
- 在 iOS「設定」中允許 Game Center 使用沙盒,否則真機無法除錯(模擬器不需此設定)。
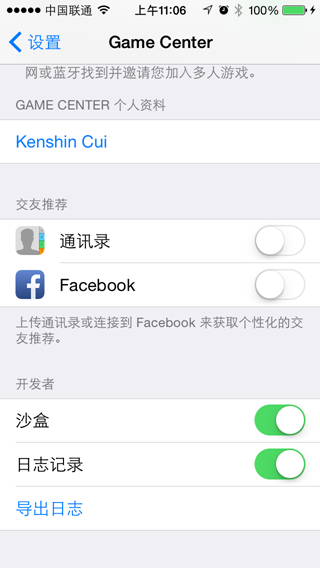
Game Center 開發使用 GameKit 框架,常用類別:
- GKLocalPlayer:本地玩家;
GKPlayer則代表連線玩家。為了讓離線使用者也能遊玩,通常以 GKLocalPlayer 為主。 - GKScore:管理積分,例如設定與回報分數。
- GKLeaderboard:排行榜,用於載入排行、設定預設榜、載入榜面圖等。
- GKAchievement:成就,用於載入、回報與重設進度。
- GKAchievementDescription:成就描述,含標題、達成前後說明、是否可重複取得等。
- GKGameCenterViewController:系統內建的排行榜/成就檢視控制器,不想自繪時可直接採用。
以下範例同時示範兩種做法:直接呼叫系統的 GKGameCenterViewController,以及自行透過 API 讀取資料後自繪介面。
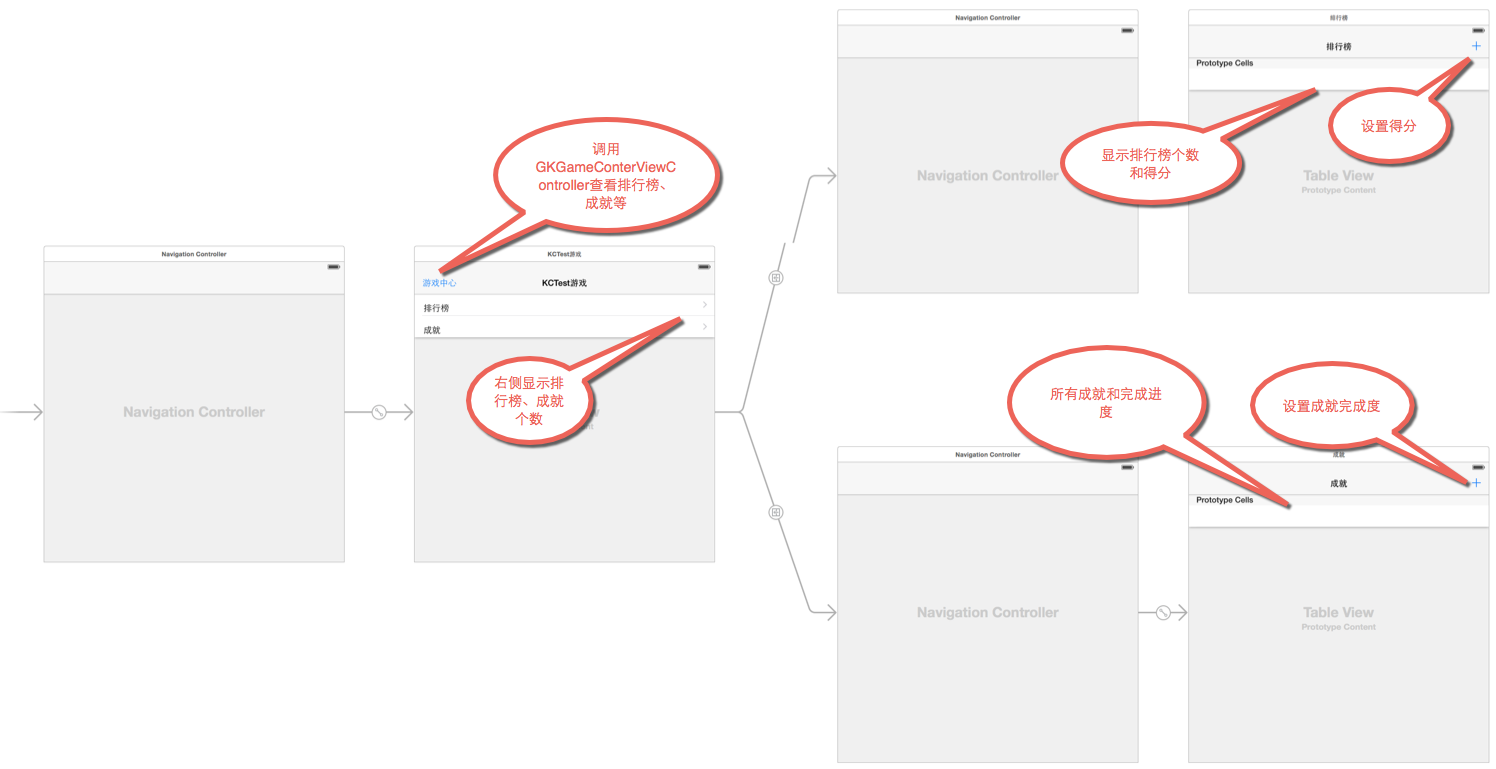
1. 主視圖控制器
以 loadLeaderboardsWithCompletionHandler: 載入所有排行榜。要注意此時各排行榜的 scores 還是空的,必須再對每個榜呼叫一次 loadScoresWithCompletionHandler:。成就方面,loadAchievementsWithCompletionHandler: 只能取回完成度不為 0 的紀錄;若需要全部成就(含未完成),要改用 GKAchievementDescription 的 loadAchievementDescriptionsWithCompletionHandler:,再逐一載入成就圖片。
- (void)viewDidLoad {
    [super viewDidLoad];
    [self authorize];
}

// 檢查授權,未登入則彈出 Game Center 登入頁
- (void)authorize {
    GKLocalPlayer *localPlayer = [GKLocalPlayer localPlayer];
    [localPlayer setAuthenticateHandler:^(UIViewController *controller, NSError *error) {
        if ([[GKLocalPlayer localPlayer] isAuthenticated]) {
            [self setupUI];
        } else {
            // 若在「設定」中未允許沙盒,controller 會是 nil
            [self presentViewController:controller animated:YES completion:nil];
        }
    }];
}

- (void)setupUI {
    [GKLeaderboard loadLeaderboardsWithCompletionHandler:^(NSArray *leaderboards, NSError *error) {
        self.leaderboards = leaderboards;
        self.leaderboardLabel.text = [NSString stringWithFormat:@"%i", leaderboards.count];
        // 只有呼叫 loadScores 之後,榜內的 scores 才有值
        [leaderboards enumerateObjectsUsingBlock:^(id obj, NSUInteger idx, BOOL *stop) {
            [(GKLeaderboard *)obj loadScoresWithCompletionHandler:^(NSArray *scores, NSError *error) {}];
        }];
    }];

    // 注意:這裡只能取到完成度不為 0 的成就
    [GKAchievement loadAchievementsWithCompletionHandler:^(NSArray *achievements, NSError *error) {
        self.achievements = achievements;
        self.achievementLable.text = [NSString stringWithFormat:@"%i", achievements.count];

        [GKAchievementDescription loadAchievementDescriptionsWithCompletionHandler:^(NSArray *descriptions, NSError *error) {
            self.achievementDescriptions = descriptions;
            _achievementImages = [NSMutableDictionary dictionary];
            [descriptions enumerateObjectsUsingBlock:^(id obj, NSUInteger idx, BOOL *stop) {
                GKAchievementDescription *description = obj;
                [description loadImageWithCompletionHandler:^(UIImage *image, NSError *error) {
                    [_achievementImages setObject:image forKey:description.identifier];
                }];
            }];
        }];
    }];
}

// 直接叫出系統的 Game Center 畫面
- (void)viewGameCenter {
    if (![GKLocalPlayer localPlayer].isAuthenticated) { return; }
    GKGameCenterViewController *gameCenterController = [[GKGameCenterViewController alloc] init];
    gameCenterController.gameCenterDelegate = self;
    [self presentViewController:gameCenterController animated:YES completion:nil];
}

- (void)gameCenterViewControllerDidFinish:(GKGameCenterViewController *)gameCenterViewController {
    [gameCenterViewController dismissViewControllerAnimated:YES completion:nil];
}
2. 排行榜控制器
以 GKScore 回報分數,每個 GKScore 都必須設定 value,並以 identifier 對應 iTunes Connect 中的排行榜 ID:
#define kLeaderboardIdentifier1 @"Goals"

- (IBAction)addScoreClick:(UIBarButtonItem *)sender {
    [self addScoreWithIdentifier:kLeaderboardIdentifier1 value:100];
}

- (void)addScoreWithIdentifier:(NSString *)identifier value:(int64_t)value {
    if (![GKLocalPlayer localPlayer].isAuthenticated) { return; }
    GKScore *score = [[GKScore alloc] initWithLeaderboardIdentifier:identifier];
    score.value = value;
    // 非同步提交,且支援離線提交
    [GKScore reportScores:@[score] withCompletionHandler:^(NSError *error) {
        if (error) { NSLog(@"保存積分失敗:%@", error.localizedDescription); }
    }];
}
3. 成就控制器
#define kAchievementIdentifier1 @"AdidasGoldenBall"
#define kAchievementIdentifier2 @"AdidasGoldBoot"

- (IBAction)addAchievementClick:(UIBarButtonItem *)sender {
    [self addAchievementWithIdentifier:kAchievementIdentifier1];
}

- (void)addAchievementWithIdentifier:(NSString *)identifier {
    if (![GKLocalPlayer localPlayer].isAuthenticated) { return; }
    GKAchievement *achievement = [[GKAchievement alloc] initWithIdentifier:identifier];
    achievement.percentComplete = 100;   // 100 代表達成
    [GKAchievement reportAchievements:@[achievement] withCompletionHandler:^(NSError *error) {
        if (error) { NSLog(@"保存成就失敗:%@", error.localizedDescription); }
    }];
}
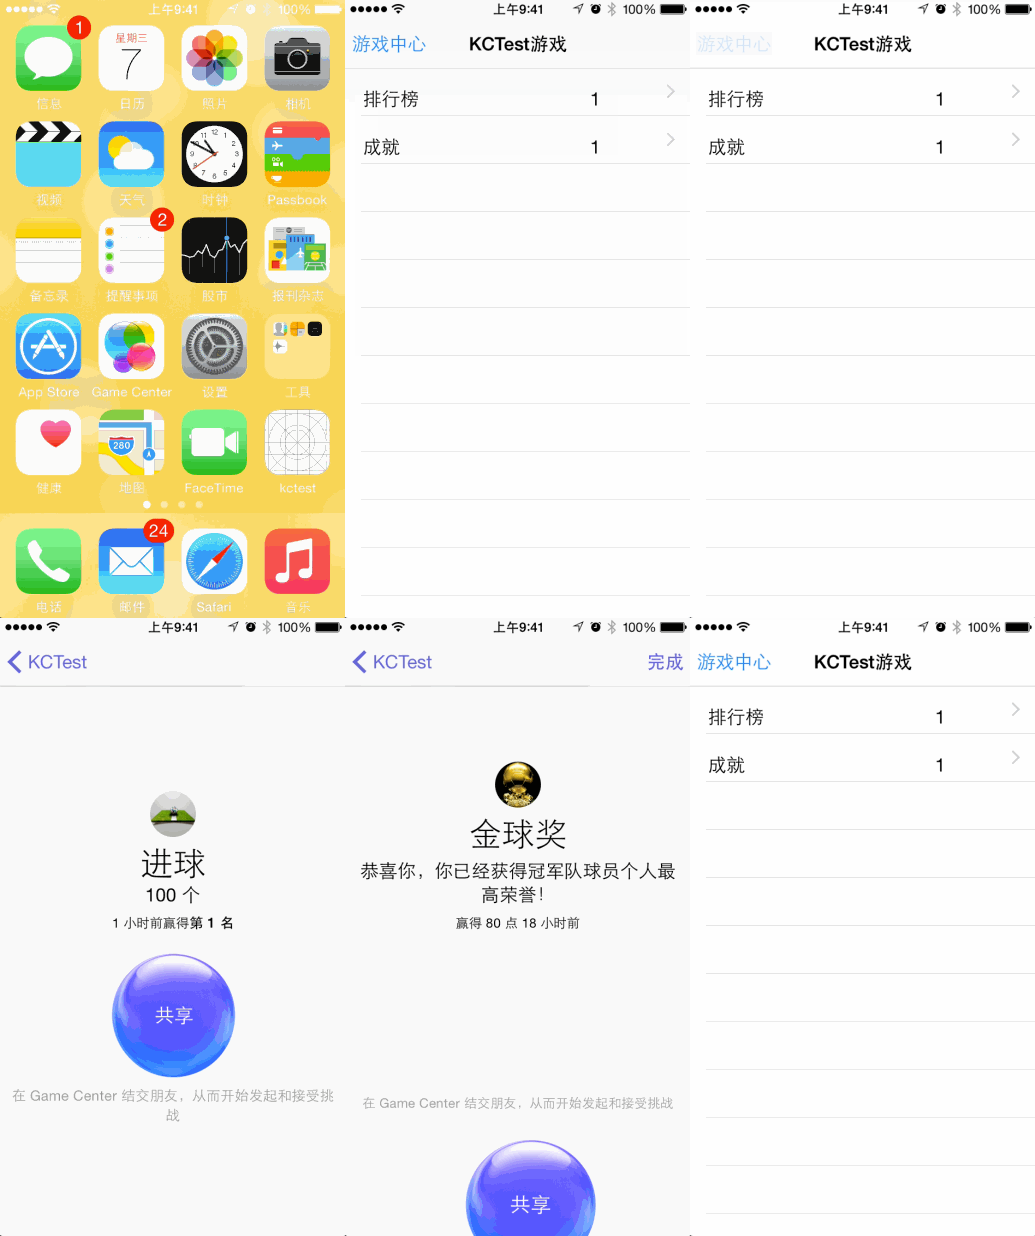
首次遊玩時因尚未授權,系統會提示登入 Game Center。
四、應用內購買
iOS 開發的三種主要收入來源是賣應用、內購與廣告。由於國內使用者較少直接付費下載,內購與廣告往往是主要收入。內購由 Apple 統一管帳,準備工作與 Game Center 類似(以真機為例):
- 前四步與 Game Center 幾乎相同,只是勾選的服務改為 In-App Purchase。
- 在 iTunes Connect 設定「App 內購買項目」。以前述足球遊戲為例,設計三種道具:「強力手套」(增強防禦)、「金球」(提升金球率)屬非消耗品,「能量瓶」(補充體力)屬消耗品。
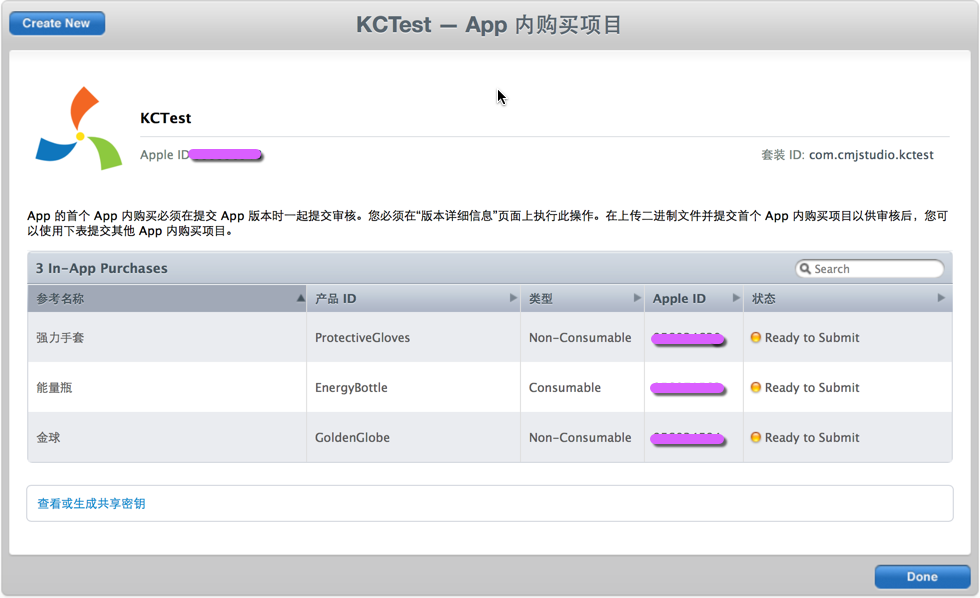
- 在「協議、稅務和銀行業務」中加入 iOS Paid Applications 協議並完成設定、等待審核通過;未完成這步,App 內抓不到可購買商品。
- 在 iOS「設定 → iTunes Store 與 App Store」中改用沙盒帳號登入或保持登出,切勿使用真實帳號,否則測試購買不會成功(模擬器不需此設定)。
- 確認 App 的 Bundle ID 與 iTunes Connect 中一致即可開始開發。
內購使用 StoreKit.framework,核心類別:
- SKProduct:可購買商品,
productIdentifier對應 iTunes Connect 的產品 ID。不建議自行初始化,應透過請求取得,以免拿到無效商品。 - SKProductRequest:商品請求,於
productsRequest:didReceiveResponse:中取得可用商品。 - SKPayment:付款單,保存商品 ID 與數量;若需修改數量則用
SKMutablePayment。 - SKPaymentQueue:交易佇列,把 SKPayment 加入即會向 Apple 送出交易。狀態不是透過代理,而是透過交易觀察者(
addTransactionObserver)。 - SKPaymentTransaction:單筆交易,於
paymentQueue:updatedTransactions:中回傳。 - SKStoreProductViewController:在 App 內展示另一個 App 的商店頁面,常用於引導評價。
完整流程:
- 以
SKProductRequest依 Bundle ID 向 App Store 撈取商品清單(商品 ID 可放 plist 或資料庫)。 - 在
productsRequest:didReceiveResponse:中從response.products取得可用商品。 - 為
SKPaymentQueue設定交易觀察者,於paymentQueue:updatedTransactions:中處理各狀態。 - 使用者選定商品後建立
SKPayment並加入佇列,即觸發購買。 - 系統彈出確認框引導完成交易,最終回呼觀察者並帶回本次所有交易物件。
- 交易完成後應做憑證驗證,避免越獄環境偽造回應。Apple 提供驗證端點,把憑證(iOS 7 之後交易成功會存於沙盒)傳過去即可取得交易狀態與明細,再依狀態、Bundle ID、Product ID 判別真偽。
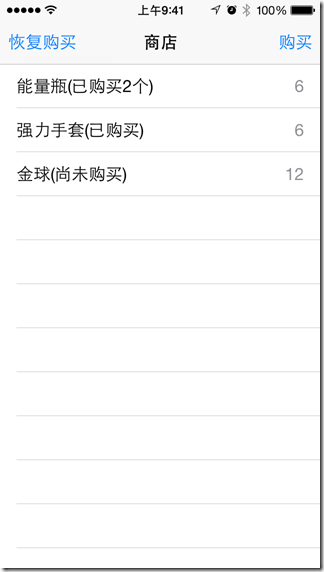
- 非消耗品需支援「恢復購買」:呼叫
restoreCompletedTransactions,恢復後同樣透過觀察者回呼;若沒有可恢復項目則不會觸發。
#define kAppStoreVerifyURL @"https://buy.itunes.apple.com/verifyReceipt"
#define kSandboxVerifyURL  @"https://sandbox.itunes.apple.com/verifyReceipt"
#define kProductID1 @"ProtectiveGloves"   // 強力手套,非消耗品
#define kProductID2 @"GoldenGlobe"        // 金球,非消耗品
#define kProductID3 @"EnergyBottle"       // 能量瓶,消耗品

- (void)viewDidLoad {
    [super viewDidLoad];
    [self loadProducts];
    [self addTransactionObjserver];
}

#pragma mark - SKProductsRequest 代理
- (void)productsRequest:(SKProductsRequest *)request didReceiveResponse:(SKProductsResponse *)response {
    _products = [NSMutableDictionary dictionary];
    [response.products enumerateObjectsUsingBlock:^(id obj, NSUInteger idx, BOOL *stop) {
        SKProduct *product = obj;
        [_products setObject:product forKey:product.productIdentifier];
    }];
    [self.tableView reloadData];   // 非同步載入,回來後刷新
}

#pragma mark - 私有方法
- (void)addTransactionObjserver {
    [[SKPaymentQueue defaultQueue] addTransactionObserver:self];
}

- (void)loadProducts {
    NSSet *sets = [NSSet setWithObjects:kProductID1, kProductID2, kProductID3, nil];
    SKProductsRequest *productRequest = [[SKProductsRequest alloc] initWithProductIdentifiers:sets];
    productRequest.delegate = self;
    [productRequest start];
}

- (void)purchaseProduct:(SKProduct *)product {
    if (![SKPaymentQueue canMakePayments]) { NSLog(@"此裝置不支援購買."); return; }
    SKPayment *payment = [SKPayment paymentWithProduct:product];
    [[SKPaymentQueue defaultQueue] addPayment:payment];
}

- (void)restoreProduct {
    [[SKPaymentQueue defaultQueue] restoreCompletedTransactions];   // 一次恢復全部非消耗品
}

#pragma mark - 交易觀察者
- (void)paymentQueue:(SKPaymentQueue *)queue updatedTransactions:(NSArray *)transactions {
    [transactions enumerateObjectsUsingBlock:^(id obj, NSUInteger idx, BOOL *stop) {
        SKPaymentTransaction *paymentTransaction = obj;
        switch (paymentTransaction.transactionState) {
            case SKPaymentTransactionStatePurchased: {
                [self verifyPurchaseWithPaymentTransaction];
                [queue finishTransaction:paymentTransaction];
                break;
            }
            case SKPaymentTransactionStateRestored: {
                [[NSUserDefaults standardUserDefaults] setBool:YES
                                                        forKey:paymentTransaction.payment.productIdentifier];
                [queue finishTransaction:paymentTransaction];
                [self.tableView reloadData];
                break;
            }
            case SKPaymentTransactionStateFailed: {
                if (paymentTransaction.error.code == SKErrorPaymentCancelled) { NSLog(@"取消購買."); }
                break;
            }
            default: break;
        }
    }];
}

#pragma mark - 憑證驗證
- (void)verifyPurchaseWithPaymentTransaction {
    NSURL *receiptUrl = [[NSBundle mainBundle] appStoreReceiptURL];
    NSData *receiptData = [NSData dataWithContentsOfURL:receiptUrl];
    NSString *receiptString = [receiptData base64EncodedStringWithOptions:NSDataBase64EncodingEndLineWithLineFeed];
    NSString *bodyString = [NSString stringWithFormat:@"{ \"receipt-data\" : \"%@\" }", receiptString];
    NSData *bodyData = [bodyString dataUsingEncoding:NSUTF8StringEncoding];

    NSURL *url = [NSURL URLWithString:kSandboxVerifyURL];
    NSMutableURLRequest *requestM = [NSMutableURLRequest requestWithURL:url];
    requestM.HTTPBody = bodyData;
    requestM.HTTPMethod = @"POST";

    NSError *error = nil;
    NSData *responseData = [NSURLConnection sendSynchronousRequest:requestM returningResponse:nil error:&error];
    if (error) { return; }

    NSDictionary *dic = [NSJSONSerialization JSONObjectWithData:responseData options:NSJSONReadingAllowFragments error:nil];
    if ([dic[@"status"] intValue] == 0) {
        NSDictionary *dicInApp = [dic[@"receipt"][@"in_app"] firstObject];
        NSString *productIdentifier = dicInApp[@"product_id"];
        NSUserDefaults *defaults = [NSUserDefaults standardUserDefaults];
        if ([productIdentifier isEqualToString:kProductID3]) {
            // 消耗品累加數量
            int purchasedCount = [defaults integerForKey:productIdentifier];
            [defaults setInteger:(purchasedCount + 1) forKey:productIdentifier];
        } else {
            [defaults setBool:YES forKey:productIdentifier];
        }
        [self.tableView reloadData];
        // 實務上此處應把購買紀錄回報到自家伺服器
    }
}
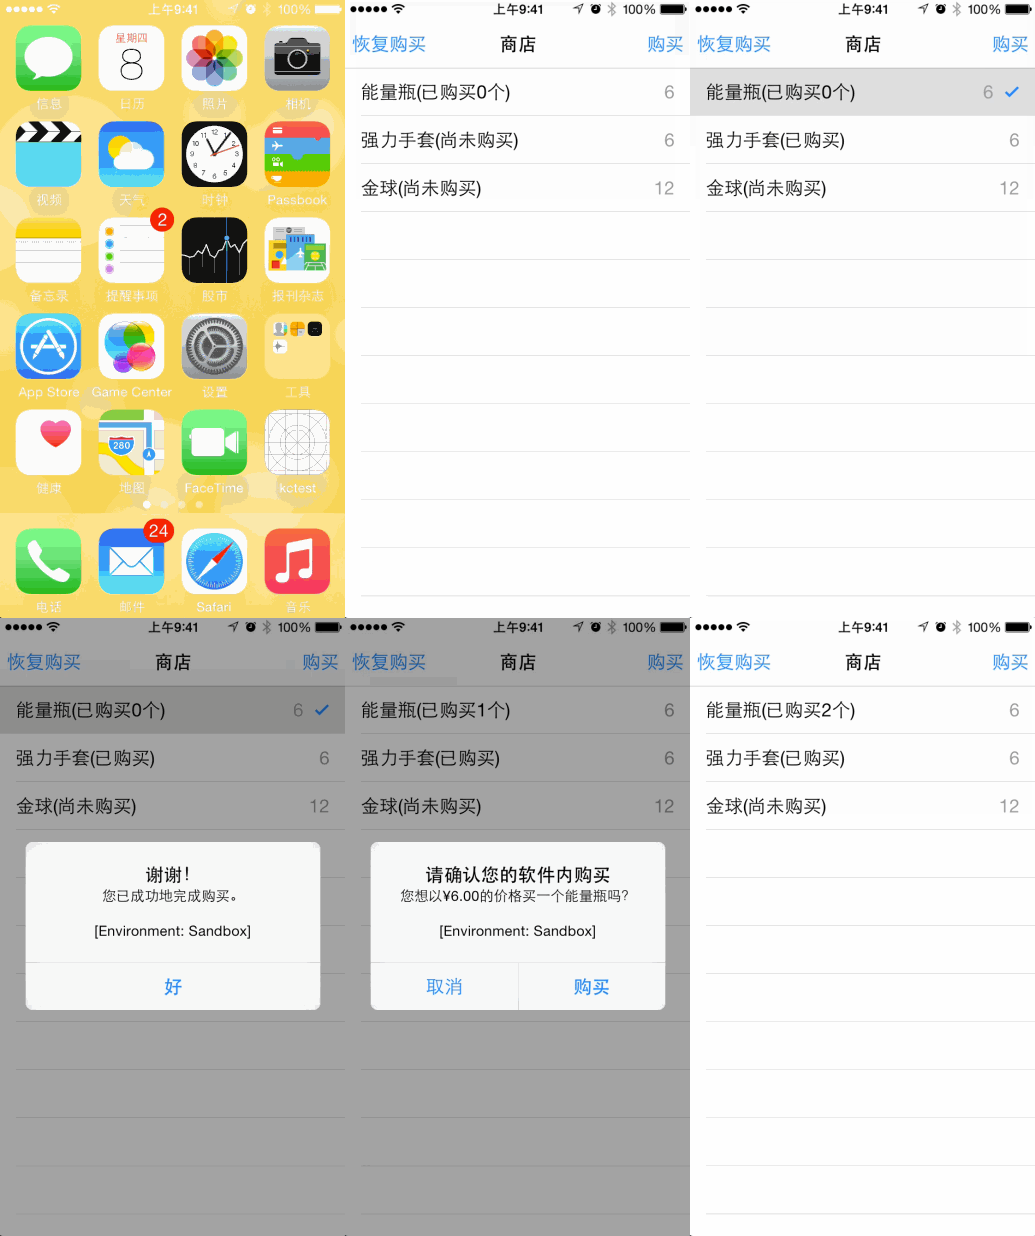
下圖是「卸載後重新安裝、點擊恢復購買」的執行結果(卸載前已購買「強力手套」):
延伸:廣告
另一條收入來源是廣告,iOS 上常見的選擇是 Apple iAd 與 Google AdMob。iAd 的整合相當簡單:引入 iAd.framework、放一個 ADBannerView,並在代理中監聽點擊、於載入失敗時隱藏控件。
- (void)viewDidLoad {
    [super viewDidLoad];
    self.advertiseBanner.delegate = self;
}

- (void)bannerViewDidLoadAd:(ADBannerView *)banner { NSLog(@"廣告載入完成."); }

- (BOOL)bannerViewActionShouldBegin:(ADBannerView *)banner willLeaveApplication:(BOOL)willLeave {
    return YES;   // 回傳 NO 則不展開全螢幕廣告
}

- (void)bannerViewActionDidFinish:(ADBannerView *)banner { NSLog(@"廣告已關閉."); }

- (void)bannerView:(ADBannerView *)banner didFailToReceiveAdWithError:(NSError *)error {
    self.advertiseBanner.hidden = YES;
}

五、iCloud
iCloud 讓使用者把通訊錄、備忘錄、郵件、照片、音樂、影片備份到雲端並在多台 Apple 裝置間共享,換機時登入 Apple ID 即可同步。對開發者而言,iCloud 開放了两類儲存:使用者文件與應用資料,以及應用偏好設定(Key-Value Store)。
準備工作(以真機為例):
- 建立 App ID 並啟用 iCloud 服務、產生描述檔。iCloud 等服務在建立 App ID 時 Bundle ID 可用萬用字元。
- 在 Xcode 專案的 Capabilities 中開啟 iCloud,示範中同時勾選「Key-value store」與「iCloud Documents」。
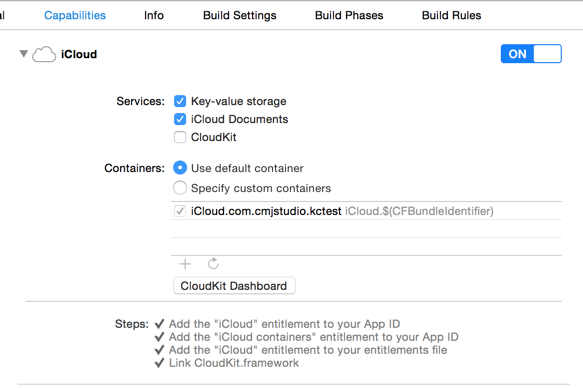
- 專案會自動產生
kctest.entitlements,其中記錄文件容器與鍵值儲存容器的識別碼。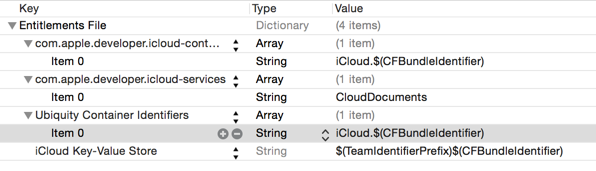
- 無論真機或模擬器,都必須在 iOS「設定」中登入 iCloud 帳號(不必是沙盒帳號)。
A. 文件儲存
以 UIDocument 為核心,所有新增、修改、讀取、刪除都基於一個雲端 URL,對開發者而言沒有本地與雲端之分。這個 URL 由 NSFileManager 的 URLForUbiquityContainerIdentifier: 取得,參數傳 nil 代表第一個容器;實際識別碼可在 entitlements 的 Ubiquity Container Identifiers 中找到(例如 iCloud.com.cmjstudio.kctest)。常用方法:
saveToURL:forSaveOperation:completionHandler::存檔(新增或覆寫由 saveOperation 決定)。openWithCompletionHandler::開啟文件。
刪除 iCloud 文件不是 UIDocument 的工作,而是用
NSFileManager的removeItemAtURL:error:。
因為各類文件的序列化方式不同,UIDocument 刻意不提供統一儲存格式,而是要求子類覆寫兩個方法:contentsForType:error:(存檔時呼叫,把資料轉為 NSData 或 NSFileWrapper)與 loadFromContents:ofType:error:(讀檔時呼叫,做反向轉換)。
// KCDocument.m
- (id)contentsForType:(NSString *)typeName error:(NSError **)outError {
    if (self.data) { return [self.data copy]; }
    return [NSData data];
}

- (BOOL)loadFromContents:(id)contents ofType:(NSString *)typeName error:(NSError **)outError {
    self.data = [contents copy];
    return YES;
}
若要列出雲端文件清單,則使用 NSMetadataQuery,並把 searchScopes 設為 NSMetadataQueryUbiquitousDocumentScope 以限定查詢範圍,還可用謂詞過濾關鍵字,查詢結果透過通知回傳。
下面實作一個类似 OneNote 的雲端筆記本,支援新增、編輯、儲存、讀取與刪除。
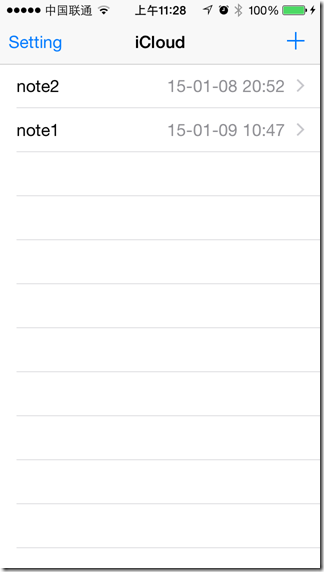
#define kContainerIdentifier @"iCloud.com.cmjstudio.kctest"

#pragma mark - 屬性
- (NSMetadataQuery *)dataQuery {
    if (!_dataQuery) {
        _dataQuery = [[NSMetadataQuery alloc] init];
        _dataQuery.searchScopes = @[NSMetadataQueryUbiquitousDocumentsScope];
        // 查詢狀態透過通知回報
        [[NSNotificationCenter defaultCenter] addObserver:self selector:@selector(metadataQueryFinish:)
                                                    name:NSMetadataQueryDidFinishGatheringNotification object:_dataQuery];
        [[NSNotificationCenter defaultCenter] addObserver:self selector:@selector(metadataQueryFinish:)
                                                    name:NSMetadataQueryDidUpdateNotification object:_dataQuery];
    }
    return _dataQuery;
}

#pragma mark - 私有方法
- (NSURL *)getUbiquityFileURL:(NSString *)fileName {
    NSURL *url = [[NSFileManager defaultManager] URLForUbiquityContainerIdentifier:kContainerIdentifier];
    url = [url URLByAppendingPathComponent:@"Documents"];
    return [url URLByAppendingPathComponent:fileName];
}

- (void)addDocument:(NSString *)fileName {
    fileName = [NSString stringWithFormat:@"%@.txt", fileName];
    NSURL *url = [self getUbiquityFileURL:fileName];
    KCDocument *document = [[KCDocument alloc] initWithFileURL:url];
    [document saveToURL:url forSaveOperation:UIDocumentSaveForCreating completionHandler:^(BOOL success) {
        if (success) {
            [self loadDocuments];
            [self.tableView reloadData];
            self.document = document;
            [self performSegueWithIdentifier:@"noteDetail" sender:self];
        }
    }];
}

- (void)loadDocuments { [self.dataQuery startQuery]; }

- (void)metadataQueryFinish:(NSNotification *)notification {
    self.files = [NSMutableDictionary dictionary];
    [self.dataQuery.results enumerateObjectsUsingBlock:^(id obj, NSUInteger idx, BOOL *stop) {
        NSMetadataItem *item = obj;
        NSString *fileName = [item valueForAttribute:NSMetadataItemFSNameKey];
        NSDate *date = [item valueForAttribute:NSMetadataItemFSContentChangeDateKey];
        NSDateFormatter *formatter = [[NSDateFormatter alloc] init];
        formatter.dateFormat = @"YY-MM-dd HH:mm";
        [self.files setObject:[formatter stringFromDate:date] forKey:fileName];
    }];
    [self.tableView reloadData];
}

- (void)removeDocument:(NSString *)fileName {
    NSURL *url = [self getUbiquityFileURL:fileName];
    NSError *error = nil;
    [[NSFileManager defaultManager] removeItemAtURL:url error:&error];
    [self.files removeObjectForKey:fileName];
}
進入詳情頁後即可讀寫筆記內容,並可選擇離開時自動儲存:
#define kSettingAutoSave @"com.cmjstudio.kctest.settings.autosave"

- (void)viewDidLoad {
    [super viewDidLoad];
    [self setupUI];
}

- (void)viewWillDisappear:(BOOL)animated {
    [super viewWillDisappear:animated];
    // 依 iCloud 偏好設定決定是否自動儲存
    BOOL autoSave = [[NSUbiquitousKeyValueStore defaultStore] boolForKey:kSettingAutoSave];
    if (autoSave) { [self saveDocument]; }
}

- (void)setupUI {
    UIBarButtonItem *item = [[UIBarButtonItem alloc] initWithBarButtonSystemItem:UIBarButtonSystemItemSave
                                                                        target:self action:@selector(saveDocument)];
    self.navigationItem.rightBarButtonItem = item;

    [self.document openWithCompletionHandler:^(BOOL success) {
        if (success) {
            self.textView.text = [[NSString alloc] initWithData:self.document.data encoding:NSUTF8StringEncoding];
        }
    }];
}

- (void)saveDocument {
    NSData *data = [self.textView.text dataUsingEncoding:NSUTF8StringEncoding];
    self.document.data = data;
    [self.document saveToURL:self.document.fileURL
           forSaveOperation:UIDocumentSaveForOverwriting
          completionHandler:^(BOOL success) { NSLog(@"保存成功!"); }];
}
B. 偏好設定儲存
相比文件儲存,Key-Value Store 簡單得多。entitlements 中只有一個 Key-Value Store,透過 NSUbiquitousKeyValueStore 的 defaultStore 取得,用法幾乎與 NSUserDefaults 相同,變動時可透過 NSUbiquitousKeyValueStoreDidChangeExternallyNotification 獲得通知。這對同時開發 iPhone 版與 iPad 版的應用特別有用:一邊改了設定,另一邊自動跟著變。
#define kSettingAutoSave @"com.cmjstudio.kctest.settings.autosave"

- (void)setupUI {
    NSUbiquitousKeyValueStore *defaults = [NSUbiquitousKeyValueStore defaultStore];
    self.autoSaveSetting.on = [defaults boolForKey:kSettingAutoSave];
    [[NSNotificationCenter defaultCenter] addObserver:self selector:@selector(keyValueStoreChange:)
                                                name:NSUbiquitousKeyValueStoreDidChangeExternallyNotification
                                              object:defaults];
}

- (IBAction)autoSaveClick:(UISwitch *)sender {
    NSUbiquitousKeyValueStore *defaults = [NSUbiquitousKeyValueStore defaultStore];
    [defaults setBool:sender.on forKey:kSettingAutoSave];
    [defaults synchronize];
}
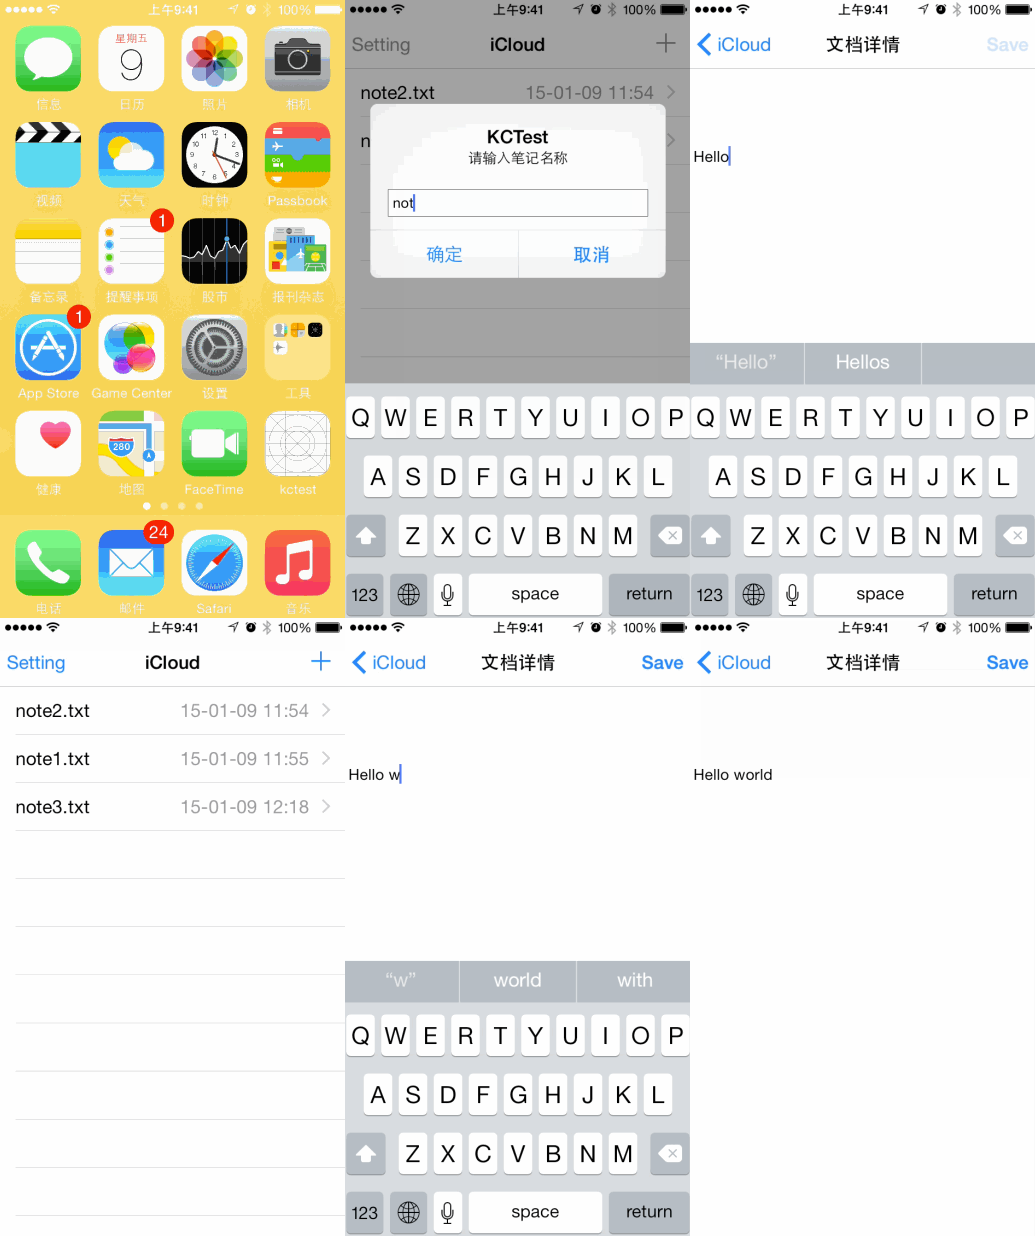
寫入 iCloud 的文件與偏好設定都是先落地到本地,再由背景 daemon 同步到雲端;讀寫到的都是本地同步副本,不一定是雲端上的即時狀態。
六、Passbook
Passbook 是 Apple 用來管理登機證、會員卡、電影票、優惠券的工具,就像一個數位卡包。與實體票券最大的差異是 Pass 可以動態更新:提醒即將到期、依地理位置主動彈出、消費後由店員掃描核銷等。Apple 把票券分為五類:
- 登機證(Boarding pass)
- 優惠券(Coupon)
- 活動票券/入場券(Event ticket)
- 購物卡/點數卡(Store Card)
- 一般票券(Generic pass)
分類一方面是因為功能與承載資訊不同,另一方面是為了統一視覺設計:
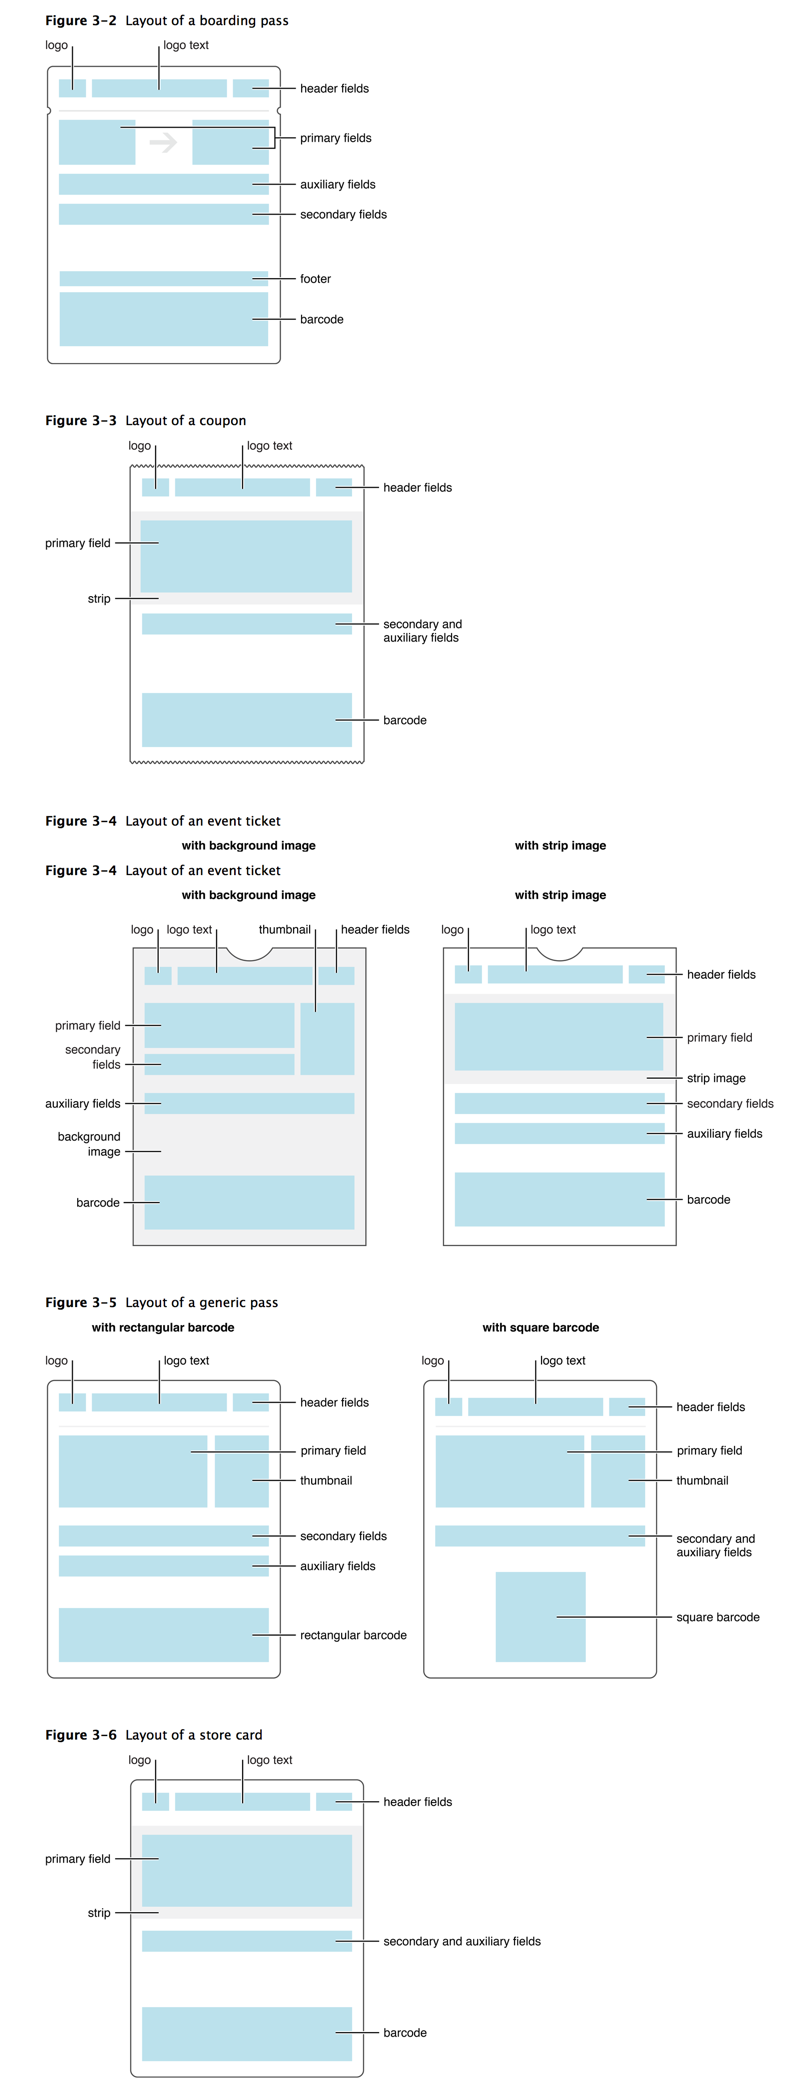
所謂一個 Pass,其實就是一個 .pkpass 檔,本質上是一個有固定目錄結構的 Zip 壓縮包:
Pass Package
├── icon.png / icon@2x.png
├── logo.png / logo@2x.png
├── thumbnail.png / thumbnail@2x.png
├── background.png / background@2x.png
├── strip.png / strip@2x.png
├── manifest.json
├── pass.json
├── signature
└── xx.lproj/pass.strings(在地化字串)
除了圖片素材,最關鍵的是三個檔案:
1. pass.json —— 描述 Pass 的版面、配色與文字內容。幾個關鍵欄位:
passTypeIdentifier:Pass 的唯一識別碼,需在開發者中心建立,且必須以「pass」開頭,例如pass.com.cmjstudio.mypassbook。teamIdentifier:團隊識別碼,可在開發者中心的帳戶資訊中找到 Team ID。barcode:條碼/QR Code 的內容、格式與編碼設定。locations:相關地理位置資訊。
2. manifest.json —— 記錄除自身與 signature 以外所有檔案的 SHA-1 摘要,可用 openssl sha1 [檔案路徑] 產生。
3. signature —— 簽名檔。由於雜湊演算法是公開的,光有 manifest 無法證明 Pass 未被竄改,因此必須用私鑰簽名,再由 Passbook 以憑證驗證。
實務上 Pass 幾乎都由後端動態產生:例如訂了電影票才有一組動態優惠碼,不可能預先手工打包。真正的流程是伺服器即時生成 .pkpass 並回傳給 App。以下仍用手工方式示範一次,理解之後要在伺服器端自動化並不困難。
準備工作:
- 在開發者中心新增 Pass Type ID(此處為
pass.com.cmjstudio.mypassbook),並據此建立 Passbook 憑證(在鑰匙串以「從憑證頒發機構要求憑證」產生 CSR,上傳後下載憑證並匯入)。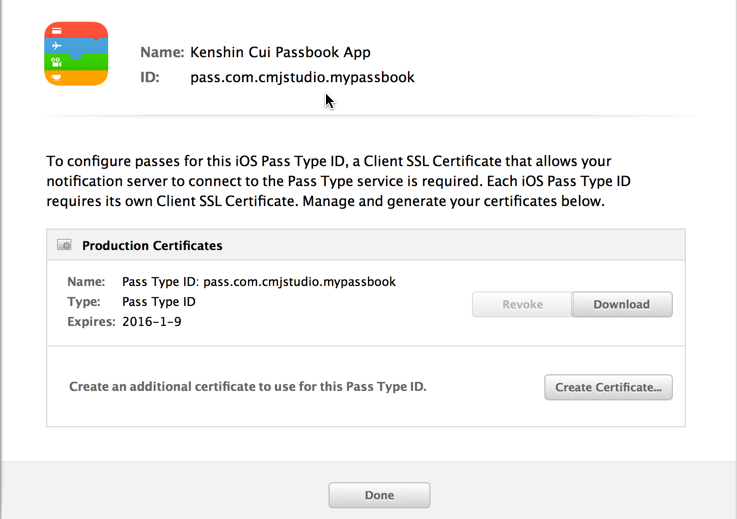
- 在 Xcode 的 Targets → Capabilities 啟用 Passbook。若勾選「Allow all team pass types」,pass.json 中的 passTypeIdentifier 與 teamIdentifier 可為任何團隊;此處選擇「Allow subset of pass types」沿用自己建立的 Pass Type。
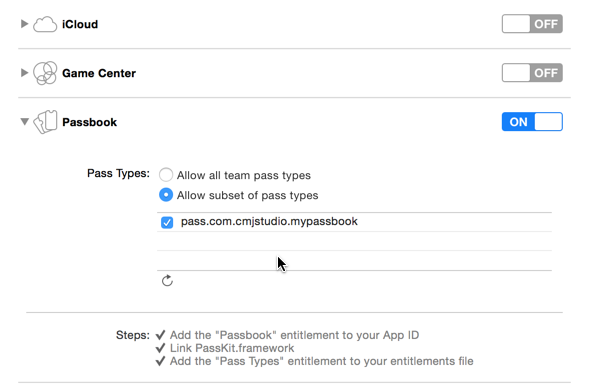
接著製作 Pass:
- 依票券類型準備圖片素材(以 Store Card 為例,需要 icon、logo、strip 三組)。
- 撰寫 pass.json:
{ "formatVersion": 1, "passTypeIdentifier": "pass.com.cmjstudio.mypassbook", "serialNumber": "54afe978584e3", "teamIdentifier": "JB74M3J7RY", "authenticationToken": "bc83dde3304d766d5b1aea631827f84c", "barcode": { "message": "userName KenshinCui", "altText": "會員詳情見背面", "format": "PKBarcodeFormatQR", "messageEncoding": "iso-8859-1" }, "locations": [ { "longitude": -122.3748889, "latitude": 37.6189722 }, { "longitude": -122.03118, "latitude": 37.33182 } ], "organizationName": "CMJ Coffee", "logoText": "CMJ Coffee", "foregroundColor": "rgb(2,2,4)", "backgroundColor": "rgb(244,244,254)", "storeCard": { "headerFields": [ { "key": "date", "label": "餘額", "value": "¥8888.50" } ], "secondaryFields": [ { "key": "more", "label": "VIP 會員", "value": "Kenshin Cui" } ], "backFields": [ { "key": "records", "label": "消費記錄(最近 10 次)", "value": "..." }, { "key": "phone", "label": "聯絡方式", "value": "4008-888-88" }, { "key": "terms", "label": "會員規則", "value": "..." }, { "key": "support", "label": "技術支援", "value": "https://www.cmjstudio.com" } ] }, "labelColor": "rgb(87,88,93)" } - 計算各檔案雜湊並產生 manifest.json:
{ "pass.json": "3292f96c4676aefe7122abb47f86be0d95a6faaf", "icon@2x.png": "83438c13dfd7c4a5819a12f6df6dc74b71060289", "icon.png": "83438c13dfd7c4a5819a12f6df6dc74b71060289", "logo@2x.png": "83438c13dfd7c4a5819a12f6df6dc74b71060289", "logo.png": "83438c13dfd7c4a5819a12f6df6dc74b71060289", "strip@2x.png": "885ff9639c90147a239a7a77e7adc870d5e047e2", "strip.png": "885ff9639c90147a239a7a77e7adc870d5e047e2" } - 產生 signature 檔:
a. 從鑰匙串匯出 Pass Type 憑證為 .p12(假設密碼 456789),存為mypassbook.p12(注意是匯出憑證本身,而非其下的私鑰)。
b. 找到「Apple Worldwide Developer Relations Certification Authority」憑證,匯出為AWDRCA.pem。
c. 轉出不含私鑰的憑證:openssl pkcs12 -in mypassbook.p12 -clcerts -nokeys -out mypassbook.pem -passin pass:456789
d. 轉出私鑰:openssl pkcs12 -in mypassbook.p12 -nocerts -out mypassbookkey.pem -passin pass:456789 -passout pass:123456
e. 產生簽名:openssl smime -binary -sign -certfile AWDRCA.pem -signer mypassbook.pem \ -inkey mypassbookkey.pem -in manifest.json -out signature -outform DER
- 把圖片、pass.json、manifest.json 與 signature 打包成
mypassbook.pkpass:zip -r mypassbook.pkpass manifest.json pass.json signature \ logo.png logo@2x.png icon.png icon@2x.png strip.png strip@2x.png
打包完成後可在 Mac 上直接預覽:
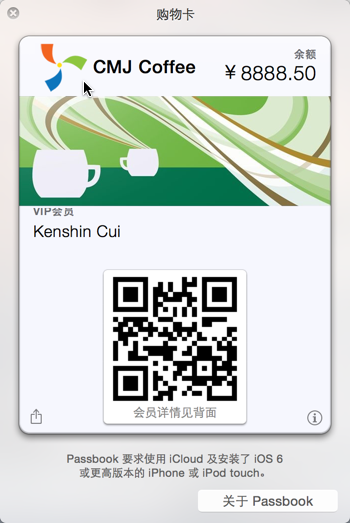
要把 Pass 加進 Passbook,使用 PassKit.framework。以下把打包好的 Pass 放在 Bundle 中做示範(實務上會改為從伺服器下載):
- (PKPass *)pass {
    if (!_pass) {
        NSString *passPath = [[NSBundle mainBundle] pathForResource:@"mypassbook.pkpass" ofType:nil];
        NSData *passData = [NSData dataWithContentsOfFile:passPath];
        NSError *error = nil;
        _pass = [[PKPass alloc] initWithData:passData error:&error];
        if (error) { return nil; }   // Pass 不合法就無法加入
    }
    return _pass;
}

- (PKAddPassesViewController *)addPassesController {
    if (!_addPassesController) {
        _addPassesController = [[PKAddPassesViewController alloc] initWithPass:self.pass];
        _addPassesController.delegate = self;
    }
    return _addPassesController;
}

- (void)addPass {
    if (![PKAddPassesViewController canAddPasses]) { return; }
    [self presentViewController:self.addPassesController animated:YES completion:nil];
}

- (void)addPassesViewControllerDidFinish:(PKAddPassesViewController *)controller {
    [self.addPassesController dismissViewControllerAnimated:YES completion:nil];
    // 加入成功後可直接跳到 Passbook 檢視
    [[UIApplication sharedApplication] openURL:self.pass.passURL];
}