
UICollectionView 完全入門:從協議方法到自訂 Cell 實作
UICollectionView 與 UICollectionViewController 這兩個類別是 iOS 6 才引進的新 API,專門用來展示集合視圖。它的布局比 TableView 靈活得多,能輕鬆實現多列排列,用法則與 UITableView、UITableViewController 頗為相似。
使用 UICollectionView 時,必須實作三個協議:UICollectionViewDataSource、UICollectionViewDelegate,以及 UICollectionViewDelegateFlowLayout。
下面先列出一些常用方法(僅列出常見的,其餘可查閱相關 API):
#pragmamark--UICollectionViewDataSource //定義展示的UICollectionViewCell的個數- -(NSInteger)collectionView:(UICollectionView*)collectionViewnumberOfItemsInSection:(NSInteger)section
- {
- return30;
- }
- -(NSInteger)numberOfSectionsInCollectionView:(UICollectionView*)collectionView
- {
- return1;
- }
- -(UICollectionViewCell*)collectionView:(UICollectionView*)collectionViewcellForItemAtIndexPath:(NSIndexPath*)indexPath
- {
- staticNSString*CellIdentifier=@"GradientCell";
- UICollectionViewCell*cell=[collectionViewdequeueReusableCellWithReuseIdentifier:CellIdentifierforIndexPath:indexPath];
- cell.backgroundColor=[UIColorcolorWithRed:((10*indexPath.row)/255.0)green:((20*indexPath.row)/255.0)blue:((30*indexPath.row)/255.0)alpha:1.0f];
- returncell;
- }
- //定義每個UICollectionView的大小
- -(CGSize)collectionView:(UICollectionView*)collectionViewlayout:(UICollectionViewLayout*)collectionViewLayoutsizeForItemAtIndexPath:(NSIndexPath*)indexPath
- {
- returnCGSizeMake(96,100);
- }
- -(UIEdgeInsets)collectionView:(UICollectionView*)collectionViewlayout:(UICollectionViewLayout*)collectionViewLayoutinsetForSectionAtIndex:(NSInteger)section
- {
- returnUIEdgeInsetsMake(5,5,5,5);
- }
- //UICollectionView被選中時調用的方法
- -(void)collectionView:(UICollectionView*)collectionViewdidSelectItemAtIndexPath:(NSIndexPath*)indexPath
- {
- UICollectionViewCell*cell=(UICollectionViewCell*)[collectionViewcellForItemAtIndexPath:indexPath];
- cell.backgroundColor=[UIColorwhiteColor];
- }
- -(BOOL)collectionView:(UICollectionView*)collectionViewshouldSelectItemAtIndexPath:(NSIndexPath*)indexPath
- {
- returnYES;
- }
下面透過一個具體範例來說明。(此例來源於網路,因是經由第三方轉載而來,無法取得原始連結,還請見諒。)
iOS CollectionView 的問世可說是一大福音,從此再也不用拿 TableView 硬湊複雜的多欄表格了。它的用法與 Table 類似,只是 Cell 必須自己添加,沒有預設樣板。
由於 CollectionView 沒有內建的 Cell 布局,所以一般來說,自訂會更方便快捷。
一、自訂 Cell
1、新建類別 CollectionCell,繼承自 UICollectionViewCell
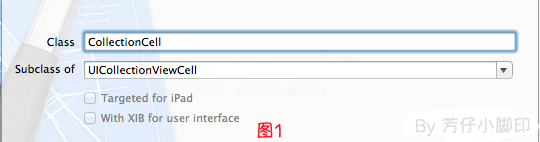
2、新建 Xib,命名為 CollectionCell.xib

a. 選中 CollectionCell.xib,刪掉預設的 View,從控件庫中拖一個 Collection View Cell(圖 3)到畫布上,並將大小設為 95*116;

b. 選中剛剛添加的 Cell,將類別名稱改為 CollectionCell,如圖 4

c. 在 CollectionCell.xib 的 CollectionCell 中添加一個 ImageView 與一個 Label(圖 5)

d. 建立映射,圖 6、圖 7


e. 選中 CollectionCell.m,重寫 init 方法
- -(id)initWithFrame:(CGRect)frame
- {
- self=[superinitWithFrame:frame];
- if(self)
- {
- //初始化時加載collectionCell.xib文件
- NSArray*arrayOfViews=[[NSBundlemainBundle]loadNibNamed:@"CollectionCell"owner:selfoptions:nil];
- //如果路徑不存在,returnnil
- if(arrayOfViews.count<1)
- {
- returnnil;
- }
- //如果xib中view不屬於UICollectionViewCell類,returnnil
- if(![[arrayOfViewsobjectAtIndex:0]isKindOfClass:[UICollectionViewCellclass]])
- {
- returnnil;
- }
- //加載nib
- self=[arrayOfViewsobjectAtIndex:0];
- }
- returnself;
- }
f. 選中 CollectionCell.xib,將其 identifier 修改為 CollectionCell。
二、定義 UICollectionView;
1、拖動一個 Collection View 到指定 ViewController 的 View 上
2、連線 dataSource 與 delegate,並建立映射,命名為 CollectionView
3、選中 CollectionView 的標尺,把 Cell Size 的 Width 與 Height 改成與自訂 Cell 一致的 95*116,圖 8

4、選中 CollectionView 的屬性,可修改其設定,比如是垂直滑動還是水平滑動,選擇 Vertical 或 Horizontal
5、選中 CollectionViewCell,修改 Class,讓它繼承自 CollectionCell

6、在 ViewDidLoad 方法中聲明 Cell 的類別。這句若不聲明,將導致無法加載、程式崩潰,務必在 ViewDidLoad 中加入。其中 CollectionCell 就是這個 Cell 的識別標識(前幾步已經定義過了)。
- [self.collectionViewregisterClass:[CollectionCellclass]forCellWithReuseIdentifier:@"CollectionCell"];
7、在 ViewController.h 中聲明代理:
@interface ViewController:UIViewController
8、在 .m 檔中實作代理方法
- //每個section的item個數
- -(NSInteger)collectionView:(UICollectionView*)collectionViewnumberOfItemsInSection:(NSInteger)section
- {
- return12;
- }
- -(UICollectionViewCell*)collectionView:(UICollectionView*)collectionViewcellForItemAtIndexPath:(NSIndexPath*)indexPath
- {
- CollectionCell*cell=(CollectionCell*)[collectionViewdequeueReusableCellWithReuseIdentifier:@"CollectionCell"forIndexPath:indexPath];
- //圖片名稱
- NSString*imageToLoad=[NSStringstringWithFormat:@"%d.png",indexPath.row];
- //加載圖片
- cell.imageView.image=[UIImageimageNamed:imageToLoad];
- //設置label文字
- cell.label.text=[NSStringstringWithFormat:@"{%ld,%ld}",(long)indexPath.row,(long)indexPath.section];
- returncell;
- }
9、效果如圖 10

點擊某項後的跳轉事件與 UITableView 類似,實作代理方法
- -(void)collectionView:(UICollectionView*)collectionViewdidSelectItemAtIndexPath:(NSIndexPath*)indexPath
即可,這裡就不再贅述。
- 上一篇文章: iOS GPUImage 導入工程與圖片渲染使用完整教程
- 下一篇文章: MJRefresh 使用指南:一行代碼搞定下拉與上拉刷新