
iOS 列表實戰:Cell 分割線自定義與六個高頻坑位解法
做過列表頁的人大概都遇過這幾件事:分割線左側莫名其妙空出一截、想換個顏色卻改不動、只想要一條上邊線或者下邊線、tableHeaderView 高度死活不跟著變、點擊高亮顏色在 iOS 9 之後失效、UILabel 尾部的空格被系統偷偷吃掉。本文把這些問題一次講清楚。
一、分割線顯示不全
系統默認的 separator 會跟隨 Cell 的 layoutMargins,而 Cell 的摳摏又受 tableView 影響,於是左邊就空出了一段。
方案一:把邊距全部歸零
- (void)viewDidLayoutSubviews {
    if ([_listTableView respondsToSelector:@selector(setSeparatorInset:)]) {
        [_listTableView setSeparatorInset:UIEdgeInsetsZero];
    }
    if ([_listTableView respondsToSelector:@selector(setLayoutMargins:)]) {
        [_listTableView setLayoutMargins:UIEdgeInsetsZero];
    }
}

- (void)tableView:(UITableView *)tableView
  willDisplayCell:(UITableViewCell *)cell
forRowAtIndexPath:(NSIndexPath *)indexPath {
    if ([cell respondsToSelector:@selector(setLayoutMargins:)]) {
        [cell setLayoutMargins:UIEdgeInsetsZero];
    }
    if ([cell respondsToSelector:@selector(setSeparatorInset:)]) {
        [cell setSeparatorInset:UIEdgeInsetsZero];
    }
}
之所以要做 respondsToSelector 判斷,是為了兼容 iOS 8 之前的系統——那時這兩個方法還不存在。
方案二:乾脆自己畫
當需求變成「只要上邊線」「顏色和系統不一樣」「線寬要 0.5pt」時,系統 separator 就力不從心了。此時關掉系統分割線,在自定義 Cell 裡重寫 drawRect::
_tableView.separatorStyle = UITableViewCellSeparatorStyleNone;

#pragma mark - 繪製 Cell 分割線
- (void)drawRect:(CGRect)rect {
    CGContextRef context = UIGraphicsGetCurrentContext();
    CGContextSetFillColorWithColor(context, [UIColor clearColor].CGColor);
    CGContextFillRect(context, rect);

    UIColor *lineColor = [UIColor colorWithRed:198/255.0
                                        green:198/255.0
                                         blue:198/255.0
                                        alpha:1];

    // 上分割線
    CGContextSetStrokeColorWithColor(context, lineColor.CGColor);
    CGContextStrokeRect(context, CGRectMake(0, 0, rect.size.width, 1));

    // 下分割線
    CGContextSetStrokeColorWithColor(context, lineColor.CGColor);
    CGContextStrokeRect(context, CGRectMake(0, rect.size.height, rect.size.width, 1));
}
自己畫的好處是完全可控:位置、粗細、顏色、只畫一邊,全憑一句話。實戰中也可以用一個 0.5pt 高的 UIView 拼在 Cell 底部,實現更簡單且效能更好。
二、tableHeaderView 高度不跟著變
把一個 view 設成 tableHeaderView 之後,單純改它的 frame 是沒用的——tableView 不會主動去適應新的高度。要告訴它「header 變了」,只需在改完 frame 後重新賦值一次:
[webView sizeToFit];
CGRect newFrame = headerView.frame;
newFrame.size.height = newFrame.size.height + webView.frame.size.height;
headerView.frame = newFrame;
[self.tableView setTableHeaderView:headerView];   // 關鍵在最後這一句
如果覺得高度突變太生硬,可以包一層動畫:
[self.tableView beginUpdates];
[self.tableView setTableHeaderView:headerView];
[self.tableView endUpdates];
典型場景是 header 裡嵌了一個自適應高度的 WebView,內容載入完成後需要撐開整個 header。
三、iOS 9 之後自定義 Cell 選中背景色
單純設置 cell.backgroundColor 或 contentView.backgroundColor 在選中時並不生效,正確做法是提供一個 selectedBackgroundView:
cell.selectedBackgroundView = [[UIView alloc] initWithFrame:cell.frame];
cell.selectedBackgroundView.backgroundColor = COLOR_BACKGROUNDVIEW;
四、預設選中某一行
二級聯動菜單裡經常需要進入頁面就預選中第一行。注意 selectRowAtIndexPath: 只會改變視覺狀態,不會觸發代理方法,所以要手動補一次調用:
- (void)customAtIndex:(UITableView *)tableView {
    [tableView selectRowAtIndexPath:[NSIndexPath indexPathForRow:0 inSection:0]
                           animated:NO
                     scrollPosition:UITableViewScrollPositionNone];

    if ([tableView isEqual:_mainIndustryTableView]) {
        [self tableView:tableView
    didSelectRowAtIndexPath:[NSIndexPath indexPathForItem:0 inSection:0]];
    }
}
這樣一來,右側列表的初始數據也能跟著左側的預選項一起加載。
五、UILabel 尾隨空格失效
從 iOS 7 開始,UILabel 會自動剝除 text 兩端的空白字元,不只是半角空格和製表符,全角空格(\u3000)以及多餘的換行符(\r、\n)也在清理範圍之內。這帶來了兩個常見困擾。
需求一:用換行製造兩倍行距
想讓上下兩段文字之間空出兩行,iOS 7 之前的做法是每個換行符後面補一個空格:
lbl.text = @"aaaaaaa\n\u0020\n\u0020bbbbbb";iOS 7 之後必須再加上以下兩行,否則整段會被壓縮:
lbl.numberOfLines = 0;                        // 0 表示行數不限
lbl.lineBreakMode = UILineBreakModeWordWrap;  // 允許換行,可選
需求二:讓右對齊的文本離邊界遠一點
iOS 7 之前直接在文本後拼一個空格即可。iOS 7 之後這招失效,可以重寫 drawTextInRect:,把繪製區域的寬度縮掉半個字號:
// MyLabel.m
@implementation MyLabel

- (void)drawTextInRect:(CGRect)rect {
    // 將繪製 Rect 的寬度縮短半個字體寬度
    return [super drawTextInRect:CGRectMake(rect.origin.x,
                                            rect.origin.y,
                                            rect.size.width - self.font.pointSize / 2,
                                            rect.size.height)];
}

@end
當然,如果只是為了視覺上留白,在右側墊一個空 view 或調整 label 的 frame 往往更省事。
附:UILabel 會自動清除的 Unicode 空白字元包括 \u0009、\u000A、\u000D、\u0020、\u0085、\u00A0、\u1680、\u180E、\u2000 至 \u200B 區間、\u2028、\u2029、\u202F、\u205F 以及 \u3000。
六、自定義左滑刪除按鈕的背景與文字顏色
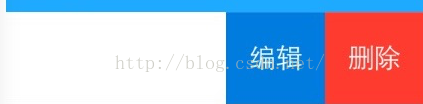
系統預設的滑動操作只有一個紅色的「刪除」,想加多個按鈕或換顏色,需要用 iOS 8 之後提供的 UITableViewRowAction:
// iOS 8 之前需要實現這個方法,之後可以省略
- (void)tableView:(UITableView *)tableView
commitEditingStyle:(UITableViewCellEditingStyle)editingStyle
forRowAtIndexPath:(NSIndexPath *)indexPath {
    editingStyle = UITableViewCellEditingStyleDelete;
}

- (NSArray *)tableView:(UITableView *)tableView
editActionsForRowAtIndexPath:(NSIndexPath *)indexPath {

    UITableViewRowAction *deleteAction =
        [UITableViewRowAction rowActionWithStyle:UITableViewRowActionStyleDestructive
                                          title:@"刪除"
                                        handler:^(UITableViewRowAction *action,
                                                  NSIndexPath *indexPath) {
            NSLog(@"點擊刪除");
        }];

    UITableViewRowAction *editAction =
        [UITableViewRowAction rowActionWithStyle:UITableViewRowActionStyleNormal
                                         title:@"編輯"
                                       handler:^(UITableViewRowAction *action,
                                                 NSIndexPath *indexPath) {
        }];
    editAction.backgroundColor = [UIColor colorWithRed:0
                                                green:124/255.0
                                                 blue:223/255.0
                                                alpha:1];

    return @[deleteAction, editAction];
}
Style 決定按鈕的預設配色(Destructive 為紅、Normal 為灰),但都可以通過 backgroundColor 覆寫。返回的數組順序即按鈕從右到左的排列順序。
小結
這幾個問題看起來瑣碎,實則幾乎每個列表頁都會遇到。整理成一句話:系統組件能用屬性解決的就不要動手畫,屬性解決不了(自定義樣式、精確控制)再換成自繪;涉及「高度變了要通知容器」的場景,記得重新賦值或走 begin/endUpdates;而任何涉及 iOS 版本變化的行為,都要先確認自己最低支持到哪個系統版本。