
iOS 日誌全攻略:從 NSLog 底層到瀏覽器即時看 log
平時寫程式為了除錯,總會塞進大量 NSLog(或其他日誌框架,例如大名鼎鼎的 CocoaLumberjack)。但我們對 NSLog 究竟了解多少?Xcode 是怎麼攔到這些輸出的?能不能自己寫程式把裝置上所有 log 讀出來?這些訊息最後落在哪裡?
NSLog 到底寫到哪去了
NSLog 是個 C 函數,宣告如下:
void NSLog(NSString *format, ...);
官方說明是 Logs an error message to the Apple System Log facility.,也就是把訊息寫到標準 error 輸出。它內部其實呼叫的是 ASL(Apple System Log,蘋果自實作的一套日誌介面)的 API。在 iOS 真機上,ASL 記錄的日誌會被快取在一個檔案裡,直到裝置重開機。
這套 ASL API 宣告在 asl.h 中,可以用來撈取指定的日誌資料。
那麼 NSLog 預設寫入的是哪個檔案?答案是系統的 /var/log/syslog。沒越獄的機器自然看不到這個檔案。我拿越獄過的手機,用 iTools 這類工具把它匯出驗證:
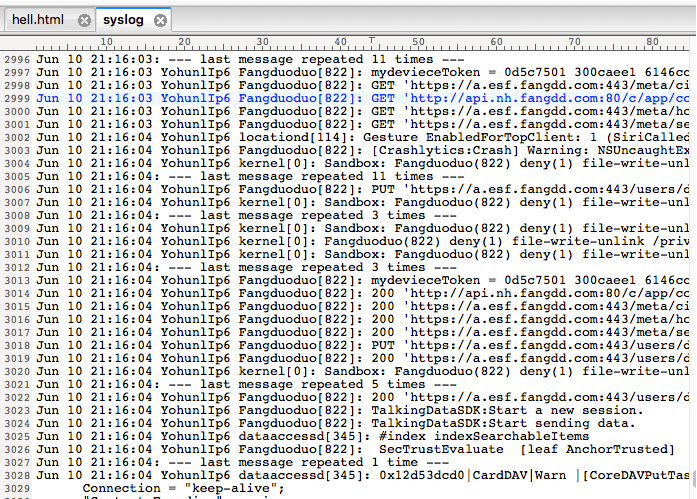
可以清楚看到,裝置上所有 App 的 NSLog 全都寫進同一個檔案。
標準 err 控制台與檔案描述符
既然要寫檔,就一定有檔案句柄。C 語言提供三個預設串流:
#define stdin  __stdinp
#define stdout __stdoutp
#define stderr __stderrp
對應到 iOS 系統層級則是:
#define STDIN_FILENO  0   /* standard input file descriptor */
#define STDOUT_FILENO 1   /* standard output file descriptor */
#define STDERR_FILENO 2   /* standard error file descriptor */
NSLog 走的是 STDERR_FILENO。用 C 語言的 fprintf 就能驗證:
NSLog(@"ViewController viewDidLoad");
fprintf(stderr, "%s\n", "ViewController viewDidLoad222");
Xcode 控制台輸出:
2016-06-15 12:57:17.286 TestNSlog[68073:1441419] ViewController viewDidLoad
ViewController viewDidLoad222
差別一覽無遺:fprintf 不會像 NSLog 那樣在內部呼叫 ASL,因此不會附加時間、程序名、程序 ID,也不會自動換行。
把 NSLog 重定向到檔案
既然輸出目標是 stderr,依照 Unix 的知識,我們可以重定向這個串流,讓 NSLog 直接寫進檔案:
// 重定向到 App 的 Documents 目錄
NSArray *paths = NSSearchPathForDirectoriesInDomains(NSDocumentDirectory, NSUserDomainMask, YES);
NSString *documentsPath = [paths objectAtIndex:0];
NSString *loggingPath = [documentsPath stringByAppendingPathComponent:@"/mylog.log"];

freopen([loggingPath cStringUsingEncoding:NSASCIIStringEncoding], "a+", stderr);
呼叫 freopen 之後,後續的 NSLog 就不會再出現在 Xcode 控制台,而是直接寫進 mylog.log。在模擬器上,用終端機的 tail -f mylog.log 就能即時監看,內容跟 Xcode 輸出視窗所見無異;再搭配 grep 做即時過濾,在成千上萬行日誌裡快速定位目標會輕鬆很多。
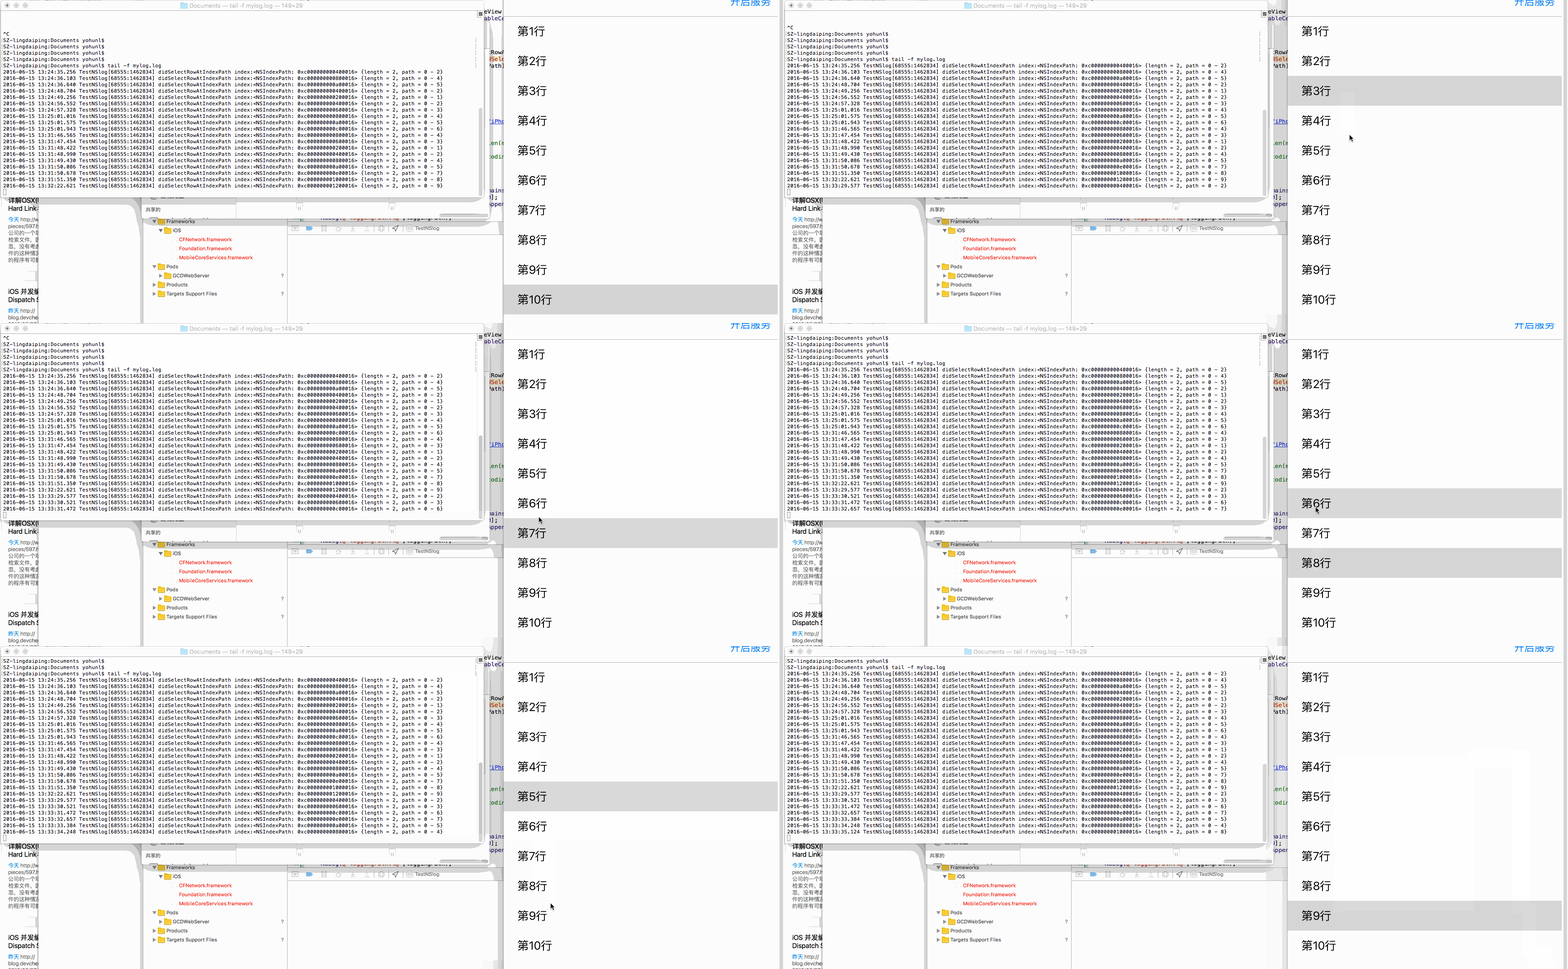
真機上的價值更明顯:重定向後的檔案位於沙盒內,我們可以在 App 裡寫一段程式把它回傳。遠端使用者遇到問題時把日誌寄回來,排查線索就有著落了。
也可以搭配 iTunes 檔案共享:
在 Info.plist 中加入
UIFileSharingEnabled並設為 YES,把要共享的檔案放進 Documents 目錄。裝置連上電腦後,iTunes 9.1 以上會在該 App 的頁面顯示 File Sharing 區塊,使用者即可把檔案拖進拖出。
實務上通常會做一個開關來控制是否啟用重定向。問題來了:freopen 之後,怎麼改回來?
FILE *freopen(const char *filename, const char *mode, FILE *stream);
要還原,就得知道 stderr 原本指向哪裡。很遺憾,這件事跨平台各不相同,而 iOS 的沙盒機制讓我們無法直接引用沙盒外的路徑。freopen 在這裡無能為力,只能改用 Unix 的 dup 與 dup2:
// iOS 上可用的做法:先備份,再重定向,最後還原
int originH1 = dup(STDERR_FILENO);

FILE *myFile = freopen([loggingPath cStringUsingEncoding:NSASCIIStringEncoding], "a+", stderr);
// ……此時所有 NSLog 都寫進檔案了……

// 還原
dup2(originH1, STDERR_FILENO);
其他捕獲 STDERR_FILENO 的方式
方式一:dup2 + NSNotificationCenter
- (void)redirectSTD:(int)fd {
    NSPipe *pipe = [NSPipe pipe];
    NSFileHandle *pipeReadHandle = [pipe fileHandleForReading];
    int pipeFileHandle = [[pipe fileHandleForWriting] fileDescriptor];

    dup2(pipeFileHandle, fd);

    [[NSNotificationCenter defaultCenter] addObserver:self
                                            selector:@selector(redirectNotificationHandle:)
                                                name:NSFileHandleReadCompletionNotification
                                              object:pipeReadHandle];
    [pipeReadHandle readInBackgroundAndNotify];
}

- (void)redirectNotificationHandle:(NSNotification *)nf {
    NSData *data = [[nf userInfo] objectForKey:NSFileHandleNotificationDataItem];
    NSString *str = [[NSString alloc] initWithData:data encoding:NSUTF8StringEncoding];
    // 這裡可以做任何想做的事:塞進 UITextView、寫入另一個檔案……
    [[nf object] readInBackgroundAndNotify];
}
使用時機呼叫 [self redirectSTD:STDERR_FILENO]; 即可。
方式二:GCD dispatch source
- (dispatch_source_t)_startCapturingWritingToFD:(int)fd {
    int fildes[2];
    pipe(fildes);              // [0] 讀取端,[1] 寫入端
    dup2(fildes[1], fd);       // 把寫入端複製到 fd 上
    close(fildes[1]);
    fd = fildes[0];

    char *buffer = malloc(1024);
    NSMutableData *data = [[NSMutableData alloc] init];
    fcntl(fd, F_SETFL, O_NONBLOCK);

    dispatch_source_t source = dispatch_source_create(
        DISPATCH_SOURCE_TYPE_READ, fd, 0,
        dispatch_get_global_queue(DISPATCH_QUEUE_PRIORITY_HIGH, 0));

    dispatch_source_set_cancel_handler(source, ^{ free(buffer); });

    dispatch_source_set_event_handler(source, ^{
        @autoreleasepool {
            while (1) {
                ssize_t size = read(fd, buffer, 1024);
                if (size <= 0) break;
                [data appendBytes:buffer length:size];
                if (size < 1024) break;
            }
            NSString *aString = [[NSString alloc] initWithData:data encoding:NSUTF8StringEncoding];
            // 讀到日誌了,接著做你想做的事
        }
    });

    dispatch_resume(source);
    return source;
}
使用時務必自行保留回傳的 dispatch_source_t,否則它一被釋放,你的日誌流也就斷了。
用 ASL 讀取日誌:非侵入式做法
前面幾種方式本質上都是重定向,一旦改道,NSLog 就不再寫入系統 syslog,自然也就無法用 ASL 介面讀到這些資料了。那有沒有不重定向也能讀全部日誌的方法?有,直接查 ASL:
+ (NSMutableArray<SystemLogMessage *> *)allLogMessagesForCurrentProcess {
    asl_object_t query = asl_new(ASL_TYPE_QUERY);

    // 只撈目前程序的訊息。真機上預設就會過濾,模擬器則必須明確指定
    NSString *pidString = [NSString stringWithFormat:@"%d", [[NSProcessInfo processInfo] processIdentifier]];
    asl_set_query(query, ASL_KEY_PID, [pidString UTF8String], ASL_QUERY_OP_EQUAL);

    aslresponse response = asl_search(NULL, query);
    aslmsg aslMessage = NULL;
    NSMutableArray *logMessages = [NSMutableArray array];

    while ((aslMessage = asl_next(response))) {
        [logMessages addObject:[SystemLogMessage logMessageFromASLMessage:aslMessage]];
    }
    asl_release(response);
    return logMessages;
}

// 從 aslmsg 中取出需要的欄位
+ (instancetype)logMessageFromASLMessage:(aslmsg)aslMessage {
    SystemLogMessage *logMessage = [[SystemLogMessage alloc] init];

    const char *timestamp = asl_get(aslMessage, ASL_KEY_TIME);
    if (timestamp) {
        NSTimeInterval timeInterval = [@(timestamp) integerValue];
        const char *nanoseconds = asl_get(aslMessage, ASL_KEY_TIME_NSEC);
        if (nanoseconds) {
            timeInterval += [@(nanoseconds) doubleValue] / NSEC_PER_SEC;
        }
        logMessage.timeInterval = timeInterval;
        logMessage.date = [NSDate dateWithTimeIntervalSince1970:timeInterval];
    }

    const char *sender = asl_get(aslMessage, ASL_KEY_SENDER);
    if (sender) {
        logMessage.sender = @(sender);
    }

    const char *messageText = asl_get(aslMessage, ASL_KEY_MSG);
    if (messageText) {
        logMessage.messageText = @(messageText);   // NSLog 寫入的正文
    }

    const char *messageID = asl_get(aslMessage, ASL_KEY_MSG_ID);
    if (messageID) {
        logMessage.messageID = [@(messageID) longLongValue];
    }
    return logMessage;
}
ASL 的最大優點是非侵入:不更動任何串流,因此不影響 Xcode 控制台的輸出。它的角色更像「讀取資料庫」——只取資料,不動原始檔案。
在 App 內嵌一個小型 HTTP 服務器
上述做法在平時還是不夠便利。如果測試時手邊沒有 Xcode,卻想直接看日誌,那該有多好?把 ASL 與一個小型 web server 結合,就能實現「用瀏覽器即時監看 log」。
HTTP server 的選擇上,CocoaHTTPServer 已多年未更新,不建議再用;GCDWebServer 作者持續維護、效能也不錯,下面的示範就採用它。
#define kMinRefreshDelay 500   // 毫秒

@interface HttpServerLogger ()
@property (nonatomic, strong) GCDWebServer *webServer;
@end

@implementation HttpServerLogger

+ (instancetype)shared {
    static dispatch_once_t onceToken;
    static HttpServerLogger *shared;
    dispatch_once(&onceToken, ^{ shared = [HttpServerLogger new]; });
    return shared;
}

- (GCDWebServer *)webServer {
    if (!_webServer) {
        _webServer = [[GCDWebServer alloc] init];
        __weak __typeof__(self) weakSelf = self;

        [_webServer addDefaultHandlerForMethod:@"GET"
                                 requestClass:[GCDWebServerRequest class]
                                 processBlock:^GCDWebServerResponse *(GCDWebServerRequest *request) {
            return [weakSelf createResponseBody:request];
        }];
        NSLog(@"Visit %@ in your web browser", _webServer.serverURL);
    }
    return _webServer;
}

- (void)startServer {
    [self.webServer startWithPort:8080 bonjourName:nil];
}

- (void)stopServer {
    [_webServer stop];
    _webServer = nil;
}

// 把日誌組裝成 HTML 回給瀏覽器
- (GCDWebServerDataResponse *)createResponseBody:(GCDWebServerRequest *)request {
    NSString *path = request.path;
    NSDictionary *query = request.query;
    NSMutableString *string;

    if ([path isEqualToString:@"/"]) {
        string = [[NSMutableString alloc] init];
        [string appendString:@"<!DOCTYPE html><html lang=\"en\">"];
        [string appendString:@"<head><meta charset=\"utf-8\"></head>"];
        [string appendFormat:@"<title>%s[%i]</title>", getprogname(), getpid()];
        [string appendString:@"<style>
body { margin: 0px; font-family: Courier, monospace; font-size: 0.8em; }
table { width: 100%; border-collapse: collapse; }
tr { vertical-align: top; }
tr:nth-child(odd) { background-color: #eeeeee; }
td { padding: 2px 10px; }
#footer { text-align: center; margin: 20px 0px; color: darkgray; }
.error { color: red; font-weight: bold; }
</style>"];
        [string appendFormat:@"<script type=\"text/javascript\">
var refreshDelay = %i;
var footerElement = null;
function updateTimestamp() {
    var now = new Date();
    footerElement.innerHTML = \"Last updated on \" + now.toLocaleDateString() + \" \" + now.toLocaleTimeString();
}
function refresh() {
    var timeElement = document.getElementById(\"maxTime\");
    var maxTime = timeElement.getAttribute(\"data-value\");
    timeElement.parentNode.removeChild(timeElement);

    var xmlhttp = new XMLHttpRequest();
    xmlhttp.onreadystatechange = function() {
        if (xmlhttp.readyState == 4) {
            if (xmlhttp.status == 200) {
                var contentElement = document.getElementById(\"content\");
                contentElement.innerHTML = contentElement.innerHTML + xmlhttp.responseText;
                updateTimestamp();
                setTimeout(refresh, refreshDelay);
            } else {
                footerElement.innerHTML = \"<span class=\\\"error\\\">Connection failed! Reload page to try again.</span>\";
            }
        }
    };
    xmlhttp.open(\"GET\", \"/log?after=\" + maxTime, true);
    xmlhttp.send();
}
window.onload = function() {
    footerElement = document.getElementById(\"footer\");
    updateTimestamp();
    setTimeout(refresh, refreshDelay);
}
</script>", kMinRefreshDelay];
        [string appendString:@"</head><body>"];
        [string appendString:@"<table><tbody id=\"content\">"];
        [self _appendLogRecordsToString:string afterAbsoluteTime:0.0];
        [string appendString:@"</tbody></table>"];
        [string appendString:@"<div id=\"footer\"></div></body></html>"];
    } else if ([path isEqualToString:@"/log"] && query[@"after"]) {
        string = [[NSMutableString alloc] init];
        double time = [query[@"after"] doubleValue];
        [self _appendLogRecordsToString:string afterAbsoluteTime:time];
    } else {
        string = [@" <html><body><p>無數據</p></body></html>" mutableCopy];
    }

    if (string == nil) string = [@"" mutableCopy];
    return [GCDWebServerDataResponse responseWithHTML:string];
}

- (void)_appendLogRecordsToString:(NSMutableString *)string afterAbsoluteTime:(double)time {
    __block double maxTime = time;
    NSArray<SystemLogMessage *> *allMsg = [SystemLogManager allLogAfterTime:time];
    [allMsg enumerateObjectsUsingBlock:^(SystemLogMessage * _Nonnull obj, NSUInteger idx, BOOL * _Nonnull stop) {
        NSString *formattedMessage = [self displayedTextForLogMessage:obj];
        [string appendFormat:@"<tr>%@</tr>", formattedMessage];
        if (obj.timeInterval > maxTime) maxTime = obj.timeInterval;
    }];
    [string appendFormat:@"<tr id=\"maxTime\" data-value=\"%f\"></tr>", maxTime];
}

- (NSString *)displayedTextForLogMessage:(SystemLogMessage *)msg {
    return [NSString stringWithFormat:@"<td>%@</td> <td>%@</td> <td>%@</td>",
            [SystemLogMessage logTimeStringFromDate:msg.date], msg.sender, msg.messageText];
}

@end
啟動服務後,在同一個區域網路內用瀏覽器開啟 https://機器IP:8080 就能看到日誌,而且頁面會每隔半秒自動拉取增量資料。
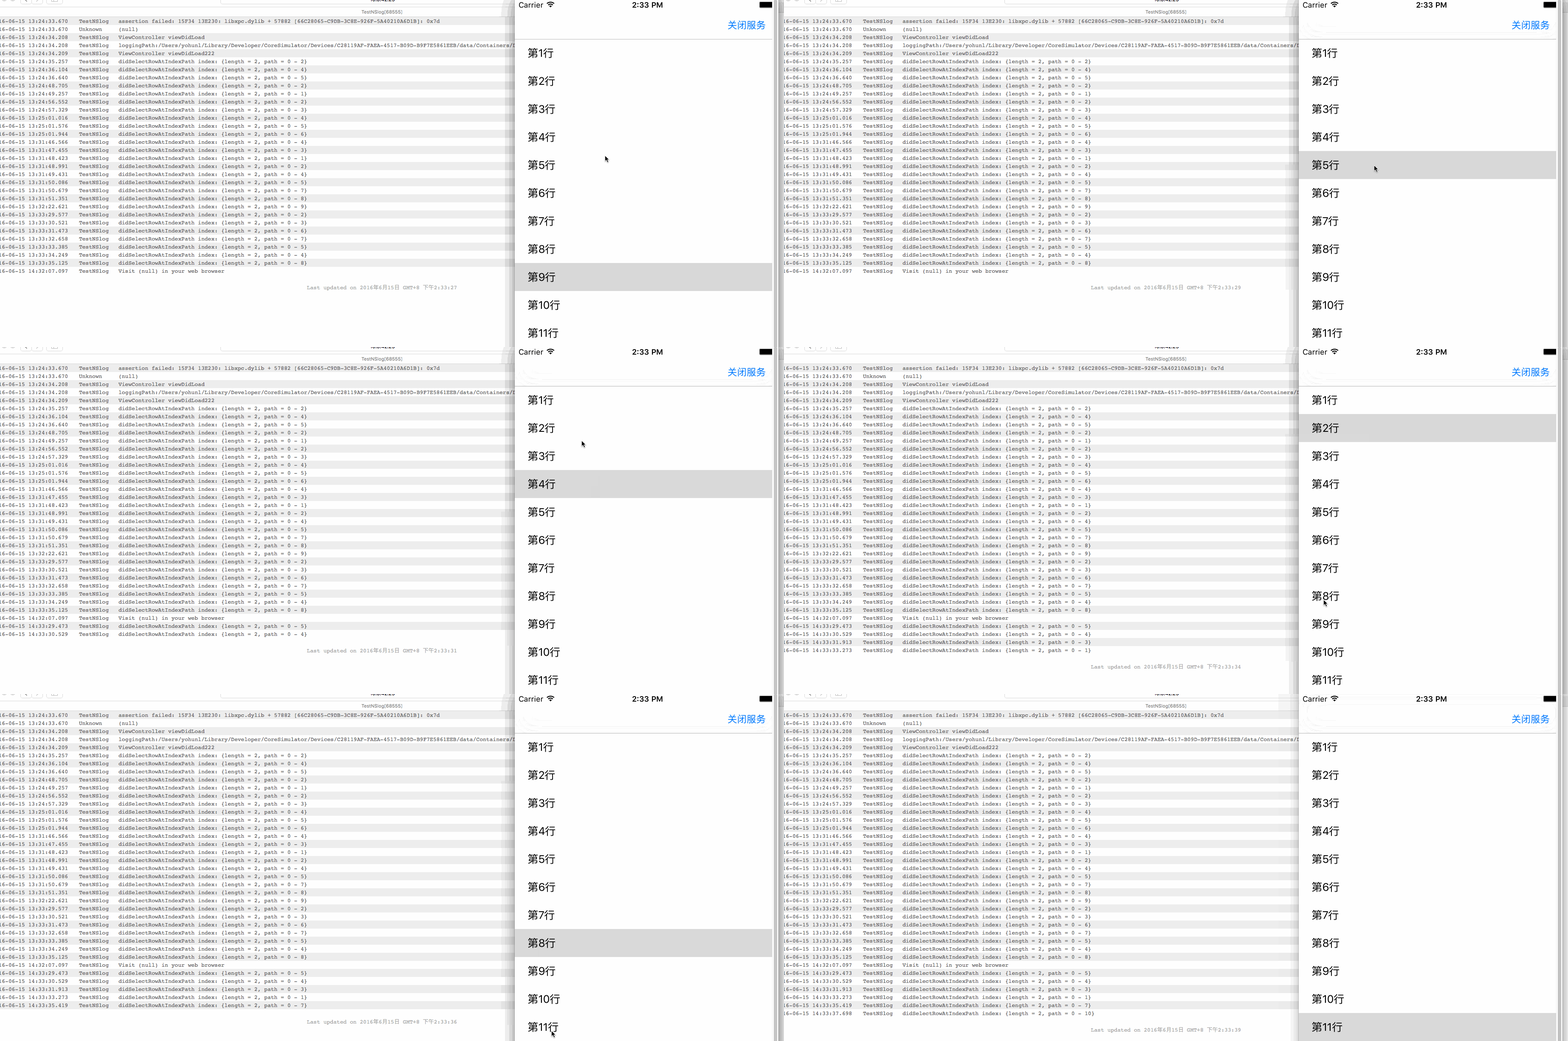
值得一看的第三方日誌方案
- CocoaLumberjack:最廣為人知的日誌框架。
- XLFacility:本地存檔、重定向、web 服務都實作了,本文 Demo 的重要參考。
- CCLogSystem。
- CleanroomASLswift:ASL 的 Swift 封裝。
- CocoaHTTPServer / GCDWebServer:輕量的 iOS 與 Mac HTTP server。
最後提醒一個現實問題:從 iOS 10 起,蘋果已將 ASL 標記為棄用,新的 os_log / OSLog 框架成為官方建議。上面的 ASL 讀取邏輯在舊版系統上依然可用,但若是新專案,建議把日誌輸出改走 os_log,並以檔案重定向或自訂 Logger 作為收集手段,以免日後系統更新時踩到相容性問題。