
iOS 開發實戰筆記:電子書模組的設計與踩坑紀錄
一、前言
從這篇開始,我在部落格新增一個「工作專案」專欄,用來整理真實專案裡遇到的開發難點與解法。第一篇記錄的是電子書模組。
二、需求梳理
一級頁面:側滑選單、書籍列表、上拉載入。
二級頁面:頁首書籍資訊、書籍簡介、評價列表、評價彈窗、底部下載/閱讀按鈕。
下載管理頁:已下載書籍清單,支援側滑刪除。
閱讀頁:PDF 自適應螢幕尺寸、翻頁、進度記憶。
三、一級頁面實作
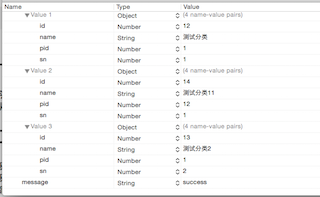
後端回傳的選單資料是「父類+子類」的扁平結構,需要在前端重組成多層次的資料源。做法是先依 pid 拆分父子兩組,各自排序後再逐一對應組裝:
NSMutableArray *allArrM = [NSMutableArray array];
NSMutableArray *childArrM = [NSMutableArray array];
for (BookMenuEntity *menu in result) {
    if ([menu.pid isEqual:@1]) {
        [allArrM addObject:menu];   // 父類
    } else {
        [childArrM addObject:menu]; // 子類
    }
}
NSSortDescriptor *allSn = [[NSSortDescriptor alloc] initWithKey:@"sn" ascending:YES];
NSArray *newAllResult = [allArrM sortedArrayUsingDescriptors:@[allSn]];
NSSortDescriptor *childSn = [[NSSortDescriptor alloc] initWithKey:@"sn" ascending:YES];
NSArray *childResult = [childArrM sortedArrayUsingDescriptors:@[childSn]];
側滑選單與遮罩


因為選單彈出時要讓書籍列表(UICollectionViewController)無法操作,所以額外加了一層半透明遮罩,並在遮罩上綁定單擊手勢以收起選單:
backView = [[UIView alloc] initWithFrame:CGRectMake(0, HEADER, self.view.frame.size.width, self.view.frame.size.height)];
backView.backgroundColor = [UIColor colorWithRed:0 green:0 blue:0 alpha:0.3];
[self.tabBarController.view addSubview:backView];

tapGesture = [[UITapGestureRecognizer alloc] initWithTarget:self action:@selector(tapGestureAction:)];
[tapGesture setNumberOfTapsRequired:1];
[backView addGestureRecognizer:tapGesture];

view = [[UIView alloc] initWithFrame:CGRectMake(0, HEADER, self.view.frame.size.width / 2.5, backView.frame.size.height)];
view.backgroundColor = [UIColor blackColor];
view.alpha = 0.7;
[view addSubview:self.menuTableView];
[self.tabBarController.view addSubview:view];

backView.hidden = YES;
view.hidden = YES;
踩到的坑:選單一開始能正常加到 tabBarController.view 上,但 push 到二級頁面後就加不上去(present 出來的頁面卻可以)。解法是強制把遮罩移到最上層:
[self.tabBarController.view bringSubviewToFront:backView];
[self.tabBarController.view bringSubviewToFront:view];
選單點擊的三個需求:點誰誰變紅(父類也可被選中並載入資料);已選中者再次點擊不重新請求;點擊某個父類時,其他父類的子選單要全部收起。實作上用兩個陣列分別記錄「展開/收合狀態」與「是否被選中」,預設全為收起、第一個父類為選中。
另一個坑:選單牽涉大量資料與多次表格刷新,很容易陣列越界。解法是在 reloadData 之前先判空,並設法刪除重複的 reload 呼叫(原本有四處,最後精簡到兩處)。
書籍列表的版面配置

cell 間距怎麼調都怪,關鍵在於別忘了 minimumInteritemSpacing 這個屬性,同時要實作 UICollectionViewDelegateFlowLayout 代理:
UICollectionViewFlowLayout *flowLayout = [[UICollectionViewFlowLayout alloc] init];
[flowLayout setScrollDirection:UICollectionViewScrollDirectionVertical];
self.collectionView.collectionViewLayout = flowLayout;
flowLayout.minimumInteritemSpacing = 12.5;

- (CGSize)collectionView:(UICollectionView *)collectionView layout:(UICollectionViewLayout *)layout sizeForItemAtIndexPath:(NSIndexPath *)indexPath {
    return CGSizeMake(90, 202);
}

- (UIEdgeInsets)collectionView:(UICollectionView *)collectionView layout:(UICollectionViewLayout *)layout insetForSectionAtIndex:(NSInteger)section {
    return UIEdgeInsetsMake(10, 12.5, 10, 12.5);
}
簡介預設顯示三行,但文字不足時要如何讓內容貼齊左上角?記得設定 NSLineBreakByWordWrapping,並在字串尾端補上換行符即可撐出高度。
至於介面主色,直接寫死 RGB 值最省事:
_introduceLabel.textColor = [UIColor colorWithRed:0/255.0f green:178/255.0f blue:238/255.0f alpha:1.0];
四、二級頁面實作


公司專案統一用 AutoLayout 佈局。最棘手的是「評價內容高度自適應」進而帶動「cell 高度自適應」。解法是在 layoutSubviews 中先用 boundingRect 量出文字實際高度,再回寫給高度約束:
- (void)layoutSubviews {
    CGSize size = [_review_content.text boundingRectWithSize:CGSizeMake(300, 1000)
                                                     options:NSStringDrawingTruncatesLastVisibleLine | NSStringDrawingUsesLineFragmentOrigin
                                                  attributes:@{NSFontAttributeName:[UIFont systemFontOfSize:13.0]}
                                                     context:nil].size;
    _reviewLabelHeight.constant = size.height;
}

評價彈窗的做法同樣是加一層背景 View 到 self.view,再掛上單擊手勢關閉。
兩個實用技巧:UITextView 沒有 placeholder 屬性,可以在上方疊一個 Label,並在 textViewDidBeginEditing 中將它隱藏;至於判斷使用者是否只輸入空白,可用 whitespaceAndNewlineCharacterSet 做 trim 後再檢查長度。
五、下載管理頁


書名高度自適用的處理方式同前。側滑刪除則實作兩個必要代理方法,並記得把「刪除」的按鈕標題本地化:
- (BOOL)tableView:(UITableView *)tableView canEditRowAtIndexPath:(NSIndexPath *)indexPath {
    return YES;
}

- (void)tableView:(UITableView *)tableView commitEditingStyle:(UITableViewCellEditingStyle)editingStyle forRowAtIndexPath:(NSIndexPath *)indexPath {
    if (editingStyle == UITableViewCellEditingStyleDelete) {
        DownBookInfoEntity *listModel = self.downloadArrM[indexPath.row];
        [DAO_DownBook deleteBookInfoWithBookID:(NSString *)listModel.ID];
        NSString *bookUrl = [NSString stringWithFormat:@"%@%@", Host1, listModel.file];
        NSString *path = [MANAGER_FILE.CSDownloadPath stringByAppendingPathComponent:
                          [NSString stringWithFormat:@"file/%@", [bookUrl lastPathComponent]]];
        [MANAGER_FILE deleteFolderPath:path];
        [self.downloadArrM removeObjectAtIndex:indexPath.row];
        [tableView deleteRowsAtIndexPaths:@[indexPath] withRowAnimation:UITableViewRowAnimationFade];
    }
}

- (NSString *)tableView:(UITableView *)tableView titleForDeleteConfirmationButtonForRowAtIndexPath:(NSIndexPath *)indexPath {
    return @"刪除";
}

六、PDF 閱讀器
閱讀頁的做法很單純:把一個 UIScrollView 加到控制器上,再把自訂的 PDF 繪製 View 放進 ScrollView。這樣一來寬高完全交給系統自適應,不必手動計算。
pdf = CGPDFDocumentCreateWithURL((CFURLRef)url);
pageCount = (int)CGPDFDocumentGetNumberOfPages(pdf);
- (void)drawInContext:(CGContextRef)context atPageNo:(int)page_no {
    CGContextSetRGBFillColor(context, 1.0, 1.0, 1.0, 1.0);
    CGContextFillRect(context, self.bounds);
    CGContextTranslateCTM(context, 0.0, self.bounds.size.height);
    CGContextScaleCTM(context, 1.0, -1.0);
    if (self.pageNO == 0) self.pageNO = 1;
    CGPDFPageRef page = CGPDFDocumentGetPage(self.pdfDocument, self.pageNO);
    CGContextSaveGState(context);
    CGAffineTransform pdfTransform = CGPDFPageGetDrawingTransform(page, kCGPDFCropBox, self.bounds, 0, true);
    CGContextConcatCTM(context, pdfTransform);
    CGContextDrawPDFPage(context, page);
    CGContextRestoreGState(context);
}
七、其他累積:網路層
專案早期使用 ASIHttpRequest 作為網路請求的第三方庫,它同時支援 GET、POST 與斷點下載,寫起來相當直覺。下載時只要指定「最終存放路徑」與「暫存檔路徑」,並開啟背景續傳即可:
- (void)downloadFile:(NSString *)urlStr withType:(int)type finishCallbackBlock:(void (^)(BOOL result))block {
    ASIHTTPRequest *request = [[ASIHTTPRequest alloc] initWithURL:[NSURL URLWithString:urlStr]];
    NSString *filename = [urlStr lastPathComponent];
    NSString *savePath = [MANAGER_FILE.CSDownloadPath stringByAppendingPathComponent:[NSString stringWithFormat:@"file/%@", filename]];
    NSString *tempPath = [MANAGER_FILE.CSDownloadPath stringByAppendingPathComponent:[NSString stringWithFormat:@"temp/%@", filename]];
    [request setDownloadDestinationPath:savePath];
    [request setTemporaryFileDownloadPath:tempPath];
    [request setShouldContinueWhenAppEntersBackground:YES];
    [request setDownloadProgressDelegate:self];
    [request setCompletionBlock:^{
        if ([MANAGER_FILE fileExists:savePath]) block(YES); else block(NO);
    }];
    [request setFailedBlock:^{ block(NO); }];
    [request startAsynchronous];
}
GET 請求的關鍵在於針對 HTTP 狀態碼分流處理,例如 404 代表資源不存在、500 代表伺服器異常、200 才回傳資料:
- (void)doGetJson:(NSString *)urlstr withCompletionBlock:(GetBackBlock)completionBlock withFailBlock:(GetFailBlock)failBlock {
    ASIHTTPRequest *request = [[ASIHTTPRequest alloc] initWithURL:[NSURL URLWithString:urlstr]];
    [request startAsynchronous];
    __block ASIHTTPRequest *_request = request;
    [request setCompletionBlock:^{
        switch ([_request responseStatusCode]) {
            case 404:
            case 500:
                failBlock([_request error]);
                break;
            case 200:
                completionBlock([_request responseData]);
                break;
            default:
                failBlock([_request error]);
                break;
        }
    }];
    [request setFailedBlock:^{ failBlock([_request error]); }];
}
POST 則改用 ASIFormDataRequest,記得先 buildPostBody 再啟動;回呼統一切回主執行緒並加上短暫延遲,可避免 UI 更新與畫面卸載互相打架。
- (void)doPostJson:(PostModel *)model withSuccessBlock:(GetBackBlock)successBlock withFailBlock:(GetFailBlock)failBlock {
    ASIFormDataRequest *request = [[ASIFormDataRequest alloc] initWithURL:
        [NSURL URLWithString:[model.urlStr stringByAddingPercentEscapesUsingEncoding:NSUTF8StringEncoding]]];
    [request setRequestMethod:@"POST"];
    for (NSString *key in [model.params allKeys]) {
        [request setPostValue:[model.params objectForKey:key] forKey:key];
    }
    [request buildPostBody];
    [request startAsynchronous];
    __block ASIFormDataRequest *_request = request;
    [request setCompletionBlock:^{
        dispatch_after(dispatch_time(DISPATCH_TIME_NOW, (int64_t)(0.2f * NSEC_PER_SEC)), dispatch_get_main_queue(), ^{
            BLOCK_SUCCESS([_request responseData]);
        });
    }];
    [request setFailedBlock:^{
        dispatch_after(dispatch_time(DISPATCH_TIME_NOW, (int64_t)(0.2f * NSEC_PER_SEC)), dispatch_get_main_queue(), ^{
            BLOCK_FAILURE([_request error]);
        });
    }];
}
回顧整個電子書模組,真正的成本不在功能本身,而在版面自適應、選單狀態管理與列表刷新時機這幾個細節上。