
iOS 資料持久化之三:屬性列表(Property List)完整用法
iOS 提供 plist(屬性列表)格式的檔案作為輕量級資料儲存方案。它有個限制值得先記住:只能保存 NSDictionary、NSArray、NSString、NSNumber、Boolean、NSData、NSDate 這幾種類型。資料存成 plist 之後,可以直接用 NSDictionary 與 NSArray 讀回來,不需要自己解析。
一、用 NSUserDefaults 實作持久化
NSUserDefaults 底層就是 plist。它實際存放的位置在沙盒的 Library/Preferences 目錄下(關於沙盒目錄結構可參考資料持久化系列的其他文章)。使用上主要就是存與讀。
取得實例:
+ (NSUserDefaults *)standardUserDefaults;寫入資料的方法:
- (void)setObject:(nullable id)value forKey:(NSString *)defaultName;
- (void)setInteger:(NSInteger)value forKey:(NSString *)defaultName;
- (void)setFloat:(float)value forKey:(NSString *)defaultName;
- (void)setDouble:(double)value forKey:(NSString *)defaultName;
- (void)setBool:(BOOL)value forKey:(NSString *)defaultName;
- (void)setURL:(nullable NSURL *)url forKey:(NSString *)defaultName;
讀取資料的方法:
- (nullable id)objectForKey:(NSString *)defaultName;
- (nullable NSString *)stringForKey:(NSString *)defaultName;
- (nullable NSArray *)arrayForKey:(NSString *)defaultName;
- (nullable NSDictionary<NSString *, id> *)dictionaryForKey:(NSString *)defaultName;
- (nullable NSData *)dataForKey:(NSString *)defaultName;
- (nullable NSArray<NSString *> *)stringArrayForKey:(NSString *)defaultName;
- (NSInteger)integerForKey:(NSString *)defaultName;
- (float)floatForKey:(NSString *)defaultName;
- (double)doubleForKey:(NSString *)defaultName;
- (BOOL)boolForKey:(NSString *)defaultName;
- (nullable NSURL *)URLForKey:(NSString *)defaultName;
刪除資料:
- (void)removeObjectForKey:(NSString *)defaultName;手動觸發保存:
- (BOOL)synchronize;註:若不主動呼叫 synchronize,系統也會自動保存,只是時機不固定。
實務上通常會包成兩個便利方法:
// 儲存 id 類型資料
+ (void)setValue:(id)value andKey:(NSString *)key {
    NSUserDefaults *userDefaults = [NSUserDefaults standardUserDefaults];
    [userDefaults setObject:value forKey:key];
    [userDefaults synchronize];
}

// 取值
+ (NSString *)getValueByKey:(NSString *)key {
    NSUserDefaults *settings = [NSUserDefaults standardUserDefaults];
    NSString *value = [settings objectForKey:key];
    return value;
}
二、手動新增 plist 檔
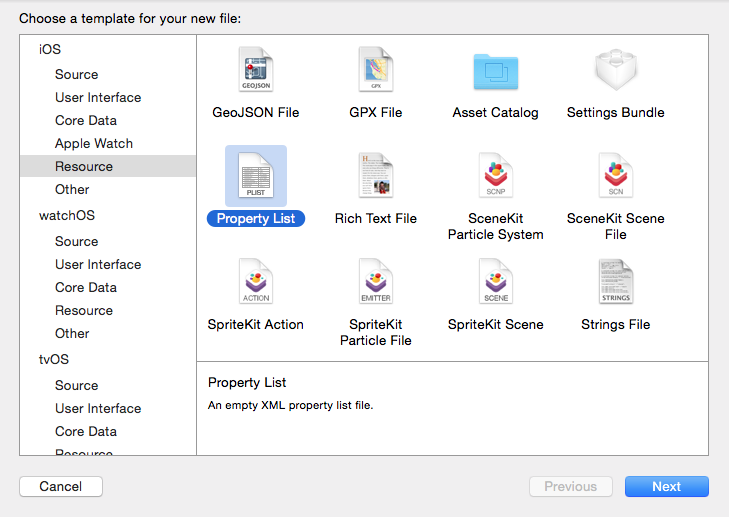
建立方式:New File → Resource → Property List。
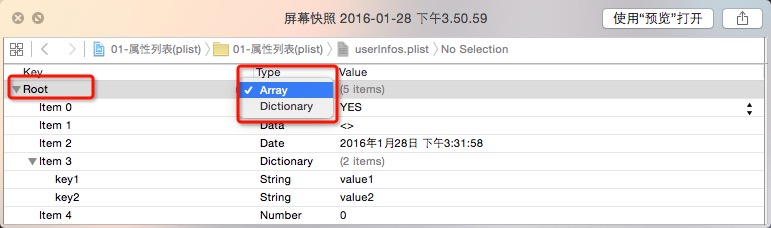
要注意 plist 的根節點只能是 NSArray 或 NSDictionary:
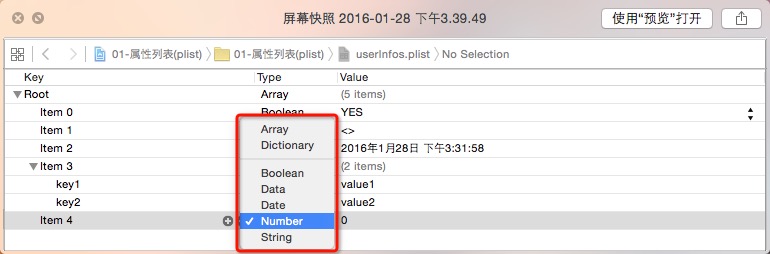
讀取時,依根節點類型選擇對應的 API:
// 1. 取得檔案路徑(Resource 為檔名、Type 為格式)
NSString *filePath = [[NSBundle mainBundle] pathForResource:@"userInfos" ofType:@"plist"];

// 2. 依根節點類型取出資料
// 根節點為 NSArray
NSArray *infos = [NSArray arrayWithContentsOfFile:filePath];
NSLog(@"%@", infos);

// 根節點為 NSDictionary
NSDictionary *infoDic = [NSDictionary dictionaryWithContentsOfFile:filePath];
NSLog(@"%@", infoDic);
三、直接把資料寫入 plist 檔
既然 NSUserDefaults 本質上就是靠 plist 檔來做屬性持久化,我們也可以自己建立一個 plist 檔來達到同樣目的。
NSArray *path = NSSearchPathForDirectoriesInDomains(NSDocumentDirectory,
                                                   NSUserDomainMask, YES);
NSString *docPath = [path objectAtIndex:0];
NSString *myFile = [docPath stringByAppendingPathComponent:@"test.plist"];

NSMutableDictionary *contentDic;

// 判斷本地是否已有該 plist
if ([[NSFileManager defaultManager] fileExistsAtPath:myFile] == NO) {
    NSFileManager *fm = [NSFileManager defaultManager];
    [fm createFileAtPath:myFile contents:nil attributes:nil]; // 建立檔案
    contentDic = [[NSMutableDictionary alloc] init];
} else {
    contentDic = [[NSMutableDictionary alloc] initWithContentsOfFile:myFile];
}

// 讀寫操作
[contentDic setObject:@"1234" forKey:@"passWord"];

// 把修改後的資料寫回檔案
[contentDic writeToFile:myFile atomically:YES];
四、總結與適用時機
plist 的讀寫效率不錯,但它每次存取都得把全部資料讀出、再整份寫回,因此只適合小量資料。
實務上的判斷可以這樣看:幾個設定項目、使用者偏好、小型的清單資料,用 NSUserDefaults 或獨立 plist 檔最省事;一旦資料量成長到成百上千筆,或需要查詢、排序、增量更新,就該改用 Core Data 或 SQLite。把大資料硬塞進 plist,除了效能低落,還有整份寫入失敗導致資料全損的風險。
另外提醒兩點:plist 不適合存放敏感資訊(例如密碼、權杖),這類資料應放進 Keychain;而寫入 atomically:YES 雖比直接覆寫安全,仍不等於交易保證,重要資料建議搭配備援機制。
- 上一篇文章: iOS 可執行檔瘦身實錄:從編譯選項到冗餘程式碼的七個著力點
- 下一篇文章: iOS 相簿照片讀取與 Cell 展示實作