
iOS 接入 QQ 分享:分享對象類型、回調監聽與踩坑總結
相比微信,企鵝的 SDK 接入歷史更長,坑也更有「年代感」——從「未注冊」報錯到 iOS 9 白名單,再到分享後不跳轉,每一步都可能卡住。本文以新聞鏈接分享為例,把整個流程與常見錯誤碼整理清楚。
示例項目地址:https://github.com/zhonggaorong/QQLoginDemo
一、三個高頻問題與解法
問題 1:一直提示「未注冊」(EQQAPIAPPNOTREGISTED)
原因是沒有在合適的時機初始化 TencentOAuth。最穩妥的做法是在 App 啟動時就完成初始化:
- (BOOL)application:(UIApplication *)application
    didFinishLaunchingWithOptions:(NSDictionary *)launchOptions {
    [[TencentOAuth alloc] initWithAppId:TENCENT_CONNECT_APP_KEY andDelegate:self];
    return YES;
}
問題 2:分享後不跳轉到 QQ
需要在 openURL 中把回調交給 SDK 處理,注意 URL 前綴判斷:
- (BOOL)application:(UIApplication *)application
            openURL:(NSURL *)url
  sourceApplication:(NSString *)sourceApplication
         annotation:(id)annotation {
    if ([url.absoluteString hasPrefix:[NSString stringWithFormat:@"tencent%@", TENCENT_CONNECT_APP_KEY]]) {
        [QQApiInterface handleOpenURL:url delegate:self];
        return [TencentOAuth HandleOpenURL:url];
    }
    return YES;
}
問題 3:iOS 9 白名單不全
iOS 9 之後,App 要查詢其他 App 是否安裝,必須在 Info.plist 的 LSApplicationQueriesSchemes 中聲明對應的 URL Scheme。QQ 相關的 scheme 數量不少,建議一次配齊:
<key>LSApplicationQueriesSchemes</key>
<array>
    <string>mqqapi</string>
    <string>mqq</string>
    <string>mqqOpensdkSSoLogin</string>
    <string>mqqconnect</string>
    <string>mqqopensdkdataline</string>
    <string>mqqopensdkgrouptribeshare</string>
    <string>mqqopensdkfriend</string>
    <string>mqqopensdkapi</string>
    <string>mqqopensdkapiV2</string>
    <string>mqqopensdkapiV3</string>
    <string>mqzoneopensdk</string>
    <string>wtloginmqq</string>
    <string>wtloginmqq2</string>
    <string>mqqwpa</string>
    <string>mqzone</string>
    <string>mqzonev2</string>
    <string>mqzoneshare</string>
    <string>wtloginqzone</string>
    <string>mqzonewx</string>
    <string>mqzoneopensdkapiV2</string>
    <string>mqzoneopensdkapi19</string>
    <string>mqzoneopensdkapi</string>
    <string>mqzoneopensdk</string>
</array>
二、可用的分享對象類型
QQ SDK 的分享內容通過不同的 QQApiObject 子類描述:
- QQApiTextObject:文本對象
- QQApiURLObject:URL 對象類型
- QQApiExtendObject:擴展數據類型
- QQApiImageObject:圖片對象
- QQApiImageArrayForQZoneObject:圖片數組對象,用於分享到空間的「說說」路徑;數組為空時默認走文本說說
- QQApiVideoForQZoneObject:視頻對象(空間)
- QQApiWebImageObject:網絡圖片對象
- QQApiFileObject:本地文件對象
- QQApiAudioObject:音頻 URL 對象
- QQApiVideoObject:視頻 URL 對象
- QQApiNewsObject:新聞鏈接對象
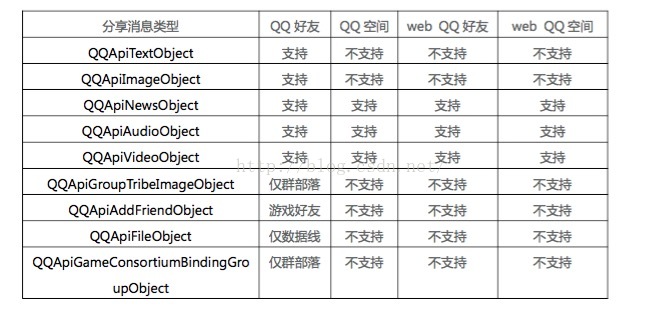
不同對象類型在「好友」與「空間」中的支持程度並不一致,接入前建議對照下圖確認權限:
三、分享核心代碼(以新聞鏈接為例)
- (void)shareNewsToQQ {
    NSURL *url = [NSURL URLWithString:@"https://www.baidu.com"];
    NSURL *preimageUrl = [NSURL URLWithString:@"https://example.com/preview.png"];

    QQApiNewsObject *newsObj = [QQApiNewsObject objectWithURL:url
                                                       title:@"測試分享"
                                                 description:@"分享內容------新聞URL對象分享"
                                             previewImageURL:preimageUrl];

    // 所有分享對象都要封裝成 SendMessageToQQReq
    SendMessageToQQReq *req = [SendMessageToQQReq reqWithContent:newsObj];
    QQApiSendResultCode sent = [QQApiInterface sendReq:req];

    // 註冊代理以接收分享結果
    AppDelegate *appdelegate = (AppDelegate *)[UIApplication sharedApplication].delegate;
    appdelegate.qqDelegate = self;

    NSLog(@"QQApiSendResultCode = %d", sent);
    [self handleSendResult:sent];
}
返回值枚舉含義如下:
EQQAPISENDSUCESS = 0                       操作成功
EQQAPIQQNOTINSTALLED = 1                   沒有安裝 QQ
EQQAPIQQNOTSUPPORTAPI = 2                  API 不支持
EQQAPIMESSAGETYPEINVALID = 3               參數類型錯誤
EQQAPIMESSAGECONTENTNULL = 4               內容為空
EQQAPIMESSAGECONTENTINVALID = 5            內容不合法
EQQAPIAPPNOTREGISTED = 6                   應用未注冊
EQQAPIAPPSHAREASYNC = 7                    異步分享
EQQAPIQQNOTSUPPORTAPI_WITH_ERRORSHOW = 8   不支持且需展示錯誤
EQQAPISENDFAILD = -1                       發送失敗
EQQAPIQZONENOTSUPPORTTEXT = 10000          空間不支持 text 類型
EQQAPIQZONENOTSUPPORTIMAGE = 10001         空間不支持 image 類型
EQQAPIVERSIONNEEDUPDATE = 10002            當前 QQ 版本過低
針對不同返回碼給出提示,能顯著降低用戶困惑:
- (void)handleSendResult:(QQApiSendResultCode)sendResult {
    NSString *message = nil;
    switch (sendResult) {
        case EQQAPIAPPNOTREGISTED:
            message = @"App 未注冊"; break;
        case EQQAPIMESSAGECONTENTINVALID:
        case EQQAPIMESSAGECONTENTNULL:
        case EQQAPIMESSAGETYPEINVALID:
            message = @"發送參數錯誤"; break;
        case EQQAPIQQNOTINSTALLED:
            message = @"未安裝手機 QQ"; break;
        case EQQAPIQQNOTSUPPORTAPI:
            message = @"當前 QQ 版本不支持該接口"; break;
        case EQQAPISENDFAILD:
            message = @"發送失敗"; break;
        case EQQAPIVERSIONNEEDUPDATE:
            message = @"當前 QQ 版本太低,需要更新"; break;
        case EQQAPIQZONENOTSUPPORTTEXT:
            message = @"空間不支持純文本分享"; break;
        case EQQAPIQZONENOTSUPPORTIMAGE:
            message = @"空間不支持單圖分享"; break;
        default:
            return;
    }
    UIAlertController *alert = [UIAlertController alertControllerWithTitle:@"提示"
                                                                  message:message
                                                           preferredStyle:UIAlertControllerStyleAlert];
    [alert addAction:[UIAlertAction actionWithTitle:@"我知道了" style:UIAlertActionStyleDefault handler:nil]];
    [self presentViewController:alert animated:YES completion:nil];
}
四、如何監聽分享是否真正成功
sendReq: 的返回值只表示請求是否被接受,真正的分享結果要靠 AppDelegate 的 onResp: 回調:
- (void)onResp:(QQBaseResp *)resp {
    NSLog(@"----resp %@", resp);
    if ([resp.class isSubclassOfClass:[SendMessageToQQResp class]]) {
        if (_qqDelegate && [_qqDelegate respondsToSelector:@selector(shareSuccssWithQQCode:)]) {
            SendMessageToQQResp *msg = (SendMessageToQQResp *)resp;
            NSLog(@"result=%@ errorDescription=%@", msg.result, msg.errorDescription);
            [_qqDelegate shareSuccssWithQQCode:[msg.result integerValue]];
        }
    }
}
對應的協議定義與回調實現:
@protocol QQShareDelegate <NSObject>
- (void)shareSuccssWithQQCode:(NSInteger)code;
@end

// 頁面中
/* 返回碼對照:
 *  0   成功
 * -1   參數錯誤
 * -2   該群不在自己的群列表裡
 * -3   上傳圖片失敗
 * -4   用戶取消
 * -5   客戶端內部錯誤
 */
- (void)shareSuccssWithQQCode:(NSInteger)code {
    NSString *message = (code == 0) ? @"分享成功" : @"分享失敗";
    UIAlertController *alert = [UIAlertController alertControllerWithTitle:@"提示"
                                                                  message:message
                                                           preferredStyle:UIAlertControllerStyleAlert];
    [alert addAction:[UIAlertAction actionWithTitle:@"確定" style:UIAlertActionStyleDefault handler:nil]];
    [self presentViewController:alert animated:YES completion:nil];
}
五、順帶說一下 QQ 登錄
登錄流程比分享多幾個回調,但結構清晰:授權 → 拿 accessToken → 拉用戶信息。
- (IBAction)loginAction:(id)sender {
    _tencentOAuth = [[TencentOAuth alloc] initWithAppId:APP_ID andDelegate:self];
    // 權限常量可在 sdkdef.h 中查詢
    _permissionArray = [NSMutableArray arrayWithObjects:kOPEN_PERMISSION_GET_SIMPLE_USER_INFO, nil];
    [_tencentOAuth authorize:_permissionArray inSafari:NO];
}

- (void)tencentDidLogin {
    if (_tencentOAuth.accessToken) {
        // 調用後 SDK 會自動回調 getUserInfoResponse:
        [_tencentOAuth getUserInfo];
    } else {
        NSLog(@"accessToken 獲取失敗");
    }
}

- (void)tencentDidNotLogin:(BOOL)cancelled {
    NSLog(cancelled ? @"用戶主動取消登錄" : @"其他原因導致登錄失敗");
}

- (void)tencentDidNotNetWork {
    NSLog(@"網絡不可用");
}

- (void)getUserInfoResponse:(APIResponse *)response {
    // 拿到 jsonResponse 後與自己的服務端對接
    NSLog(@"response %@", response.jsonResponse);
}
SDK 還提供了增量授權與重新授權的協議方法(tencentNeedPerformIncrAuth:withPermissions:、tencentNeedPerformReAuth:、tencentDidUpdate:、tencentFailedUpdate:)。如果應用涉及需要用戶信息的高敏感接口,建議實現增量授權流程,並在 tencentDidUpdate: 中同步更新本地保存的 token 與 openid——一旦 openid 變更,此前緩存的用戶資料需要重新拉取。
小結
QQ 分享的三個關鍵點:啟動時初始化 TencentOAuth、openURL 中同時交給 QQApiInterface 和 TencentOAuth 處理、白名單配齊。剩下就是根據返回碼做好用戶提示——「未注冊」「未安裝」「版本過低」這幾種情況,用戶自己是解決不了的,必須靠提示引導。
- 上一篇文章: iOS 接入微信分享:好友分享與朋友圈分享完整實現
- 下一篇文章: iOS 讀取並解析 CSV 文件:從沙盒到數組的完整實現