
iOS 製作 Framework 並引入到工程中
Framework 常識
除了靜態庫 .a 和動態庫 .dylib 之外,蘋果平台(Mac OS / iOS)還提供了一種名為 Framework 的打包方式。Framework 本質上是一種組織形式,它把庫的二進制文件、頭文件以及相關資源文件打包到一起,方便管理與分發,這樣 Xcode 就能很輕易地將其集成到你的工程裡。
在 iOS 8 之前,iOS 平台並不支持自定義的動態 Framework,開發者能用的 Framework 只有蘋果自家的 UIKit.Framework、Foundation.Framework 等。這種限制大概是出於安全考慮。換個角度看,由於 iOS 應用都運行在沙盒中,不同程序之間無法共享代碼,而動態下載代碼又被蘋果明令禁止,動態庫的優勢根本無從發揮,實際上也就沒有存在的必要了。
正因上述限制,開發者想在 iOS 平台共享代碼,唯一選擇就是打包成靜態庫 .a 文件並附上頭文件(例如微信的 SDK)。但這種方式不夠方便,使用起來也頗為繁瑣,大家更希望能像 Framework 那樣,直接丟進工程就能用。於是社區裡出現了各種「奇技淫巧」,讓 Xcode 也能構建出 iOS 可用的 Framework,並且衍生出了「偽」(Fake)Framework 和「真」(Real)Framework 的區別。
iOS 8 / Xcode 6 推出之後,iOS 平台終於加入了對動態庫的支持。iOS 8 為什麼要支持動態庫?很大程度上就是因為 Extension 的出現。Extension 和 App 是兩個獨立的可執行文件,卻又需要共享代碼,這時動態庫的支持就成了必需。不過,這種動態 Framework 與系統的 UIKit.Framework 仍有很大差別:系統的 Framework 無需拷貝到目標程序中,而我們自己做的 Framework 哪怕是動態的,最後也仍然要拷貝進 App 裡(App 和 Extension 共享同一個 Bundle),因此蘋果又把它稱為 Embedded Framework。
系統會在需要時把 framework 載入內存,多個應用可以同時使用同一個 framework。這種機制讓你的代碼易於共享、便於在多個工程中復用,還能隱藏實現細節、精確控制對外公開的頭文件。
需要注意的是,蘋果平台靜態庫與動態庫的概念與其他平台並不完全相同。
靜態庫:鏈接時會完整地拷貝進可執行文件,被多次使用就會產生多份冗餘拷貝。
動態庫:鏈接時不復制,程序運行時由系統動態加載到內存供調用,系統只加載一次,多個程序共用,從而節省內存。
一句話總結:二者的本質區別就在於加載時機和加載次數的不同。
framework 分為真機—Debug(調試)版、真機—Release(發布)版、模擬器—Debug 版、模擬器—Release 版;開發中一般都打包 Release 版本,把真機和模擬器版本合並後對外提供。(注意:debug 和 release 要與引入 framework 的工程相對應)
在項目開發過程中,比如兩個公司之間做業務合作,不可能把源代碼直接發給對方,這時就可以把私密內容打包成 framework,對方只能調用接口,而無從得知內部的實現細節。
製作 framework
步驟
1. 新建工程
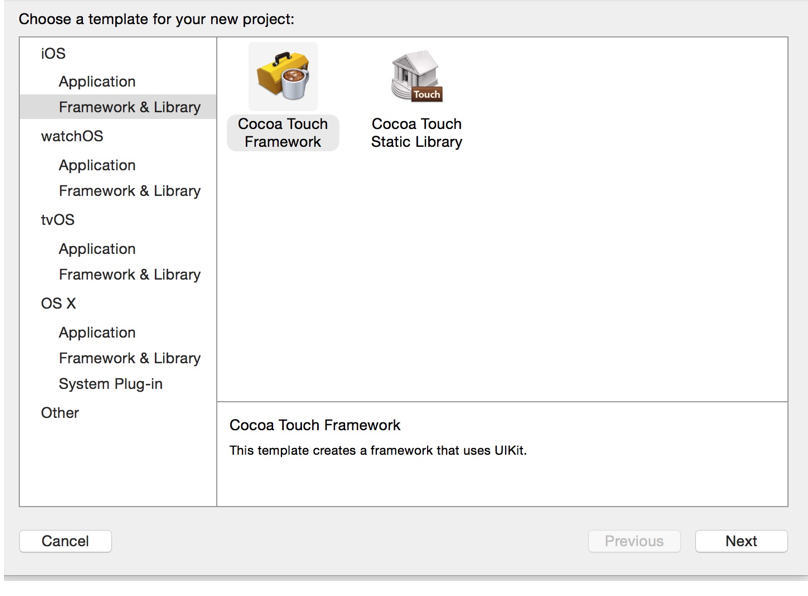
選擇左邊那個 Framework,右邊那個則是創建 .a 靜態庫的。
2. 創建接口代碼

在工程中創建類,寫一些開放給外部使用的接口。
第一個類做點簡單的加法,需要公開的 api 就寫在 h 文件裡。
// // Compute.h // FrameworkTest // // Created by yxhe on 16/7/6. // Copyright ? 2016年 yxhe. All rights reserved. // #import @interface Compute : NSObject - (NSInteger)addNumber:(NSInteger)a withNumber:(NSInteger)b; @end
// // Compute.m // FrameworkTest // // Created by yxhe on 16/7/6. // Copyright ? 2016年 yxhe. All rights reserved. // #import "Compute.h" @implementation Compute - (NSInteger)addNumber:(NSInteger)a withNumber:(NSInteger)b { return a + b; } @end
第二個類,負責打印
// // Print.h // FrameworkTest // // Created by yxhe on 16/7/6. // Copyright ? 2016年 yxhe. All rights reserved. // #import @interface Print : NSObject - (void)printWords:(NSString *)words; @end
// // Print.m // FrameworkTest // // Created by yxhe on 16/7/6. // Copyright ? 2016年 yxhe. All rights reserved. // #import "Print.h" @implementation Print - (void)printWords:(NSString *)words { NSLog(@"%@", words); } @end
最後,在自動生成的導出頭文件裡,把這兩個類的 h 文件都 import 進去。
// // FrameworkTest.h // FrameworkTest // // Created by yxhe on 16/7/6. // Copyright ? 2016年 yxhe. All rights reserved. // #import //! Project version number for FrameworkTest. FOUNDATION_EXPORT double FrameworkTestVersionNumber; //! Project version string for FrameworkTest. FOUNDATION_EXPORT const unsigned char FrameworkTestVersionString[]; // In this header, you should import all the public headers of your framework using statements like #import <frameworktest publicheader.h=""> #import <frameworktest compute.h=""> #import <frameworktest print.h=""> </frameworktest></frameworktest></frameworktest>
3. 修改 Build Settings


在 TARGETS 中進行相应設置。
4. 設置 Headers

把需要公開調用的頭文件放到 Public 裡,需要隱藏的則放到 Private 裡。
5. 打包 framework
選擇一個模擬器,編譯工程(Command + B);
選擇一個真機或 Generic Device(建議),再編譯一次工程(Command + B);
然後在 Finder 中找到 .framework 文件。
生成成功後,工程目錄裡的 product 會從紅色變為正常顏色。
你會看到它分成了「模擬器」和「真機」兩個文件夾,此時就可以把這兩個 .framework 分別引入到對應的模擬器或真機項目中使用了。
6. 合並 framework
通過終端命令,把兩個 framework 合為一個同時支持模擬器和真機的通用 framework。
打開控制台,輸入:
lipo -create iphoneos下frameworkTest的路徑 simulator下frameworkTest的路徑 -output 新的路徑,這樣就完成了模擬器和真機版本的合並,新路徑下的frameworkTest就是你合並後的文件,將這個文件名字改成和你未合並之前的Test一樣的名字,放到framework文件夾下,替換掉原來的frameworkTest文件。
以我這裡為例:
lipo -create /Users/yxhe/Library/Developer/Xcode/DerivedData/FrameworkTest-gajdcpnghsabghalspugjmolohhd/Build/Products/Debug-iphoneos/FrameworkTest.framework/FrameworkTest /Users/yxhe/Library/Developer/Xcode/DerivedData/FrameworkTest-gajdcpnghsabghalspugjmolohhd/Build/Products/Debug-iphonesimulator/FrameworkTest.framework/FrameworkTest -output /Users/yxhe/Library/Developer/Xcode/DerivedData/FrameworkTest-gajdcpnghsabghalspugjmolohhd/Build/Products/FrameworkTest
在目標文件夾裡找到那個 FrameworkTest 文件,拖進真機的 .framework 文件夾裡替換掉原來的,這樣真機的 .framework 就能當作 universal 的 framework 使用了。
小貼士
合並還有另一種方法——創建 Aggregate 並跑腳本,我沒試成功,就不展開了。帶有圖片資源的,需要把圖片打包成 Bundle 文件,和 framework 一起拷貝到相應項目中。公開的類中如果引用了 private 的類,打包後對外調用會報錯找不到那個 private 類,可以把那個 private 的 .h 放到 Private 裡。
使用 framework
引用系統 framework
1)選中項目名稱
2)選中 TARGETS
3)選中 Build Phases
4)在 Link Binary With Libraries 中添加
5)點擊「+」號,加入所需的系統 .framework 文件
6)引入頭文件即可
引用第三方 framework
步驟
這裡以之前創建的 framework 為例進行測試。
1)從 Finder 裡直接把 .framework 文件拖進工程目錄中

2)在 Link Binary With Libraries 中添加該 framework

一般拖進去之後,系統會自動幫你添加。
注意:如果是 Dynamic Library 形式的 framework,還需要添加到 Embedded Frameworks。
3)在項目中引入頭文件即可。
測試結果
目錄結構

代碼寫法:
// // ViewController.m // FrameWorkUseTest // // Created by yxhe on 16/7/6. // Copyright ? 2016年 yxhe. All rights reserved. // #import "ViewController.h" // 引入framework的頭文件 #import <frameworktest compute.h=""> #import <frameworktest print.h=""> @interface ViewController () @end @implementation ViewController - (IBAction)onClick:(id)sender { Compute *compute = [[Compute alloc] init]; NSInteger sum = [compute addNumber:7 withNumber:5]; Print *print = [[Print alloc] init]; [print printWords:[NSString stringWithFormat:@"7 + 5 = %ld", (long)sum]]; _numberLabel.text = [NSString stringWithFormat:@"7 + 5 = %ld", (long)sum]; } - (void)viewDidLoad { [super viewDidLoad]; // Do any additional setup after loading the view, typically from a nib. } - (void)didReceiveMemoryWarning { [super didReceiveMemoryWarning]; // Dispose of any resources that can be recreated. } @end </frameworktest></frameworktest>
在模擬器和 iPhone 6s 真機上都測試成功。

源代碼
csdn:diy 的 framework
github:diy 的 framework
- 上一篇文章: iOS 多線程之 GCD:隊列、同步異步、通信與進階 API
- 下一篇文章: iOS 獲取設備信息的常用方法