
iOS 根據屏幕寬度自適應分布按鈕的兩種思路
編輯:iOS 開發綜合
標籤按鈕的自動排版有兩種常見思路:一種依「內容長度」決定換行位置,另一種依「螢幕寬度」等分欄位。以下用程式碼分別實作。
Demo 下載:https://github.com/MinLee6/buttonShow.git
方式一:根據具體內容變化
先量出每個按鈕文字的寬度,再依容器寬度判斷是否換行——放不下就把目前這行記下來,重新開一行。
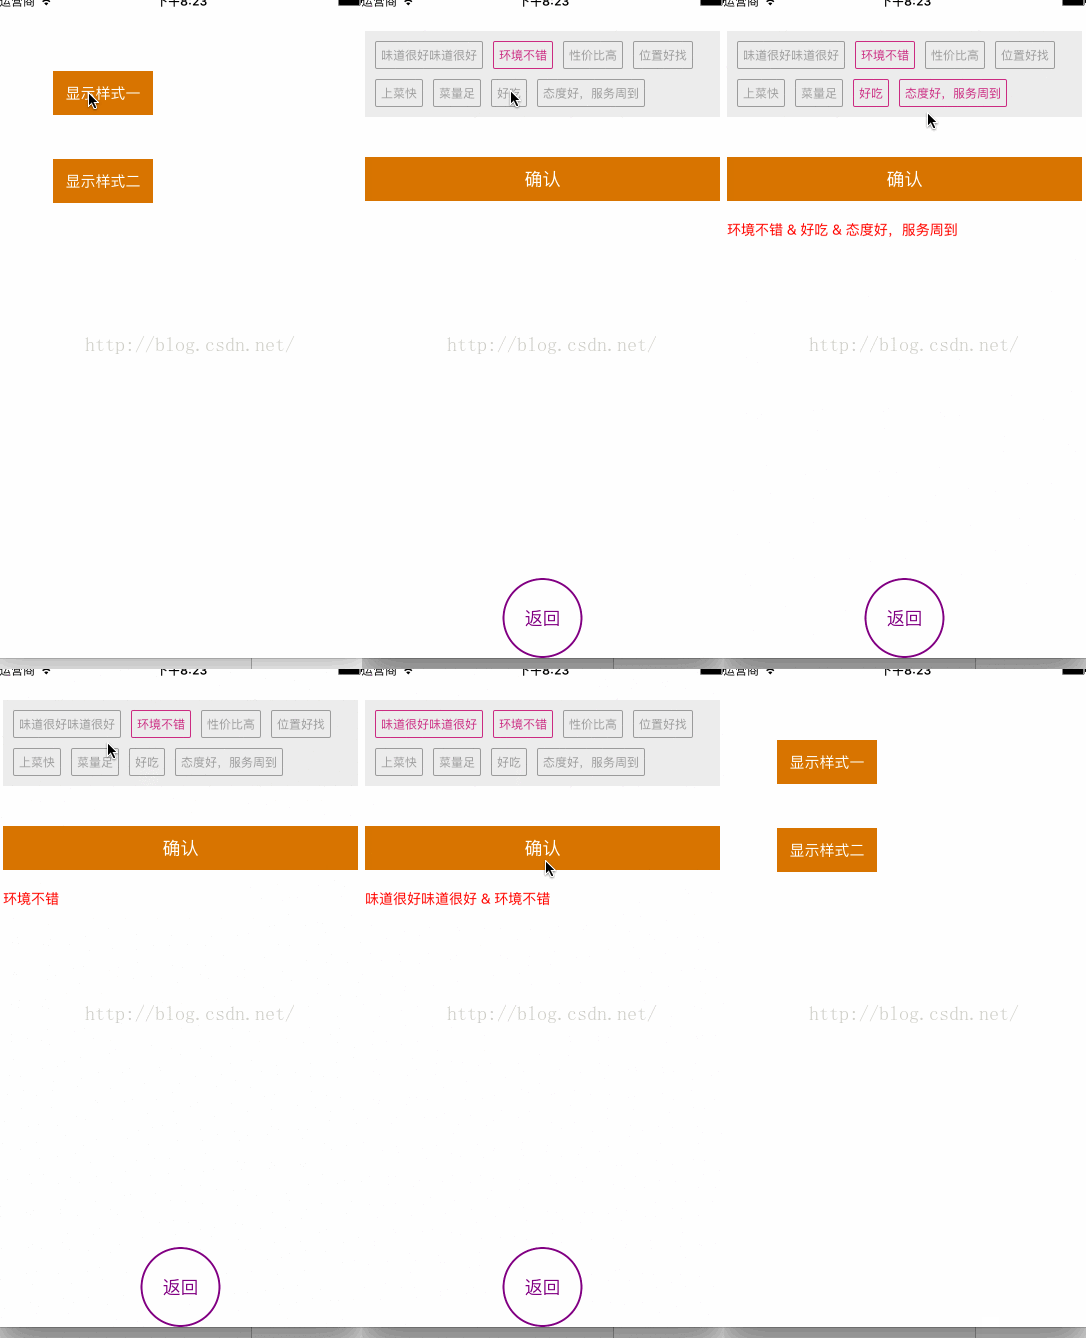
#import "StyleOneViewController.h"
#import "UIViewExt.h"

// 每列間隔
#define KViewMargin 10
// 每行按鈕高度
#define KVieH 28
#define KscreenW [UIScreen mainScreen].bounds.size.width
#define Color(R,G,B) [UIColor colorWithRed:R/255.0 green:G/255.0 blue:B/255.0 alpha:1.0]

@interface StyleOneViewController ()

/** 存放按鈕的 view */
@property (nonatomic, strong) UIView *btnsView;
/** 按鈕上的文字 */
@property (nonatomic, strong) NSMutableArray *btnMsgArrays;
@property (nonatomic, strong) NSMutableArray *btnIDArrays;
/** 所有按鈕 */
@property (nonatomic, strong) NSMutableArray *allBtnArrays;
/** 服務器提供按鈕標籤 */
@property (nonatomic, strong) NSArray *tagInfoArray;
/** 確認按鈕 */
@property (nonatomic, strong) UIButton *sureButton;
/** 展示選中文字的 label */
@property (nonatomic, strong) UILabel *showLabel;

@end

@implementation StyleOneViewController

- (void)viewDidLoad {
    [super viewDidLoad];
    self.view.backgroundColor = [UIColor whiteColor];
    [self getTagMsg];
}

#pragma mark - 取得標籤資料
- (void)getTagMsg {
    self.btnMsgArrays  = [NSMutableArray array];
    self.btnIDArrays   = [NSMutableArray array];
    _allBtnArrays      = [NSMutableArray array];

    // 模擬服務器返回的資料
    self.tagInfoArray = @[
        @{@"id": @"1", @"tagmsg": @"味道很好味道很好"},
        @{@"id": @"1", @"tagmsg": @"環境不錯"},
        @{@"id": @"1", @"tagmsg": @"性價比高"},
        @{@"id": @"1", @"tagmsg": @"位置好找"},
        @{@"id": @"1", @"tagmsg": @"上菜快"},
        @{@"id": @"1", @"tagmsg": @"菜量足"},
        @{@"id": @"1", @"tagmsg": @"好吃"},
        @{@"id": @"1", @"tagmsg": @"態度好,服務周到"}
    ];

    // 挨個賦值
    for (NSDictionary *dict in self.tagInfoArray) {
        [self.btnIDArrays  addObject:dict[@"id"]];
        [self.btnMsgArrays addObject:dict[@"tagmsg"]];
    }

    [self createBtns];
}

#pragma mark - 創建按鈕
- (void)createBtns {
    self.btnsView = [[UIView alloc] initWithFrame:
                        CGRectMake(KViewMargin, 40,
                                   KscreenW - 2 * KViewMargin, 40)];
    self.btnsView.backgroundColor = Color(237, 237, 237);
    [self.view addSubview:self.btnsView];

    /** 數組存放適配屏幕大小的每行按鈕個數 */
    NSArray *indexbtns = [self returnBtnsForRowAndCol];

    // 統計按鈕容器的高度
    CGFloat btnViewHeight = indexbtns.count * (KVieH + KViewMargin) + 10;
    self.btnsView.height = btnViewHeight;

    NSInteger count = 0;

    // 循環創建按鈕
    for (int row = 0; row < indexbtns.count; row++) {
        CGFloat x = KViewMargin;
        CGFloat y = 10 + row * (KViewMargin + KVieH);
        NSInteger colCount = [indexbtns[row] integerValue];

        for (int col = 0; col < colCount; col++) {
            NSString *title = self.btnMsgArrays[count];
            CGFloat width = [self returnBtnWithWithStr:title];

            UIButton *btn = [UIButton buttonWithType:UIButtonTypeCustom];
            btn.frame = CGRectMake(x, y, width, KVieH);
            btn.tag = [self.btnIDArrays[count] integerValue];
            btn.titleLabel.font = [UIFont systemFontOfSize:12];
            [btn setTitle:title forState:UIControlStateNormal];
            [btn setTitleColor:[UIColor darkGrayColor] forState:UIControlStateNormal];

            btn.layer.borderColor = Color(156, 156, 156).CGColor;
            btn.layer.borderWidth = 1;
            btn.layer.cornerRadius = 2;

            [btn addTarget:self action:@selector(btnClick:)
          forControlEvents:UIControlEventTouchUpInside];

            [self.btnsView addSubview:btn];
            [self.allBtnArrays addObject:btn];

            // 下一個按鈕的起始 x
            x = CGRectGetMaxX(btn.frame) + KViewMargin;
            count++;
        }
    }

    // 確認按鈕
    self.sureButton = [UIButton buttonWithType:UIButtonTypeCustom];
    self.sureButton.frame = CGRectMake(KViewMargin,
                                       CGRectGetMaxY(self.btnsView.frame) + 20,
                                       80, 30);
    [self.sureButton setTitle:@"確認" forState:UIControlStateNormal];
    [self.sureButton setTitleColor:[UIColor whiteColor] forState:UIControlStateNormal];
    self.sureButton.backgroundColor = Color(202, 48, 130);
    self.sureButton.layer.cornerRadius = 4;
    self.sureButton.clipsToBounds = YES;
    [self.sureButton addTarget:self action:@selector(showSelectedClick:)
              forControlEvents:UIControlEventTouchUpInside];
    [self.view addSubview:self.sureButton];
}

#pragma mark - 計算每行能放幾個按鈕
- (NSMutableArray *)returnBtnsForRowAndCol {
    NSMutableArray *indexbtns = [NSMutableArray array];
    NSMutableArray *tmpbtns   = [NSMutableArray array];

    CGFloat allWidth = 0.0;   // 當前行已用寬度
    NSInteger countW = 0;     // 當前行按鈕數量

    for (int j = 0; j < self.btnMsgArrays.count; j++) {
        CGFloat width = [self returnBtnWithWithStr:self.btnMsgArrays[j]];

        // 加上間距後若超出容器寬度,就換行
        if (allWidth + width + KViewMargin > KscreenW - 2 * KViewMargin) {
            NSInteger lastNum = [[tmpbtns lastObject] integerValue];
            [indexbtns addObject:@(lastNum)];
            [tmpbtns removeAllObjects];

            allWidth = 0.0;
            countW = 0;
            j -= 1;          // 當前按鈕改到下一行重新計算
        } else {
            allWidth += width + KViewMargin;
            countW += 1;
            [tmpbtns addObject:@(countW)];
        }
    }

    // 收尾:最後一行
    if (tmpbtns.count != 0) {
        NSInteger lastNum = [[tmpbtns lastObject] integerValue];
        [indexbtns addObject:@(lastNum)];
    }

    return indexbtns;
}

#pragma mark - 計算文字寬度
- (CGFloat)returnBtnWithWithStr:(NSString *)str {
    NSDictionary *attributes = @{NSFontAttributeName: [UIFont systemFontOfSize:12]};
    CGSize size = [str boundingRectWithSize:CGSizeMake(100, MAXFLOAT)
                                    options:NSStringDrawingUsesFontLeading
                                 attributes:attributes
                                    context:nil].size;
    return size.width + 12;      // 左右各留一點內距
}

#pragma mark - 按鈕點擊事件
- (void)btnClick:(UIButton *)btn {
    btn.selected = !btn.selected;
    btn.layer.borderColor = btn.isSelected
        ? Color(202, 48, 130).CGColor
        : Color(156, 156, 156).CGColor;
}

- (void)showSelectedClick:(UIButton *)btn {
    NSMutableArray *strArray = [NSMutableArray array];
    for (UIButton *item in self.allBtnArrays) {
        if (item.isSelected) {
            [strArray addObject:item.currentTitle];
        }
    }
    NSString *str = [strArray componentsJoinedByString:@" & "];

    UIFont *font = [UIFont systemFontOfSize:14];
    CGFloat strH = [str boundingRectWithSize:CGSizeMake(KscreenW - 2 * KViewMargin, MAXFLOAT)
                                     options:NSStringDrawingUsesLineFragmentOrigin
                                  attributes:@{NSFontAttributeName: font}
                                     context:nil].size.height;

    if (!self.showLabel) {
        UILabel *label = [[UILabel alloc] initWithFrame:
            CGRectMake(KViewMargin,
                       CGRectGetMaxY(self.sureButton.frame) + 20,
                       KscreenW - 2 * KViewMargin, strH)];
        label.font = font;
        label.textColor = [UIColor redColor];
        label.numberOfLines = 0;
        self.showLabel = label;
        [self.view addSubview:label];
    }

    self.showLabel.text = str;
    self.showLabel.height = strH;
}

@end
方式二:根據屏幕寬度等分
如果希望版面整齊、每行固定幾欄,就不必量文字寬度,直接把可用寬度除以欄數即可。這種排版視覺上更規律,也很適合做成標籤選單。
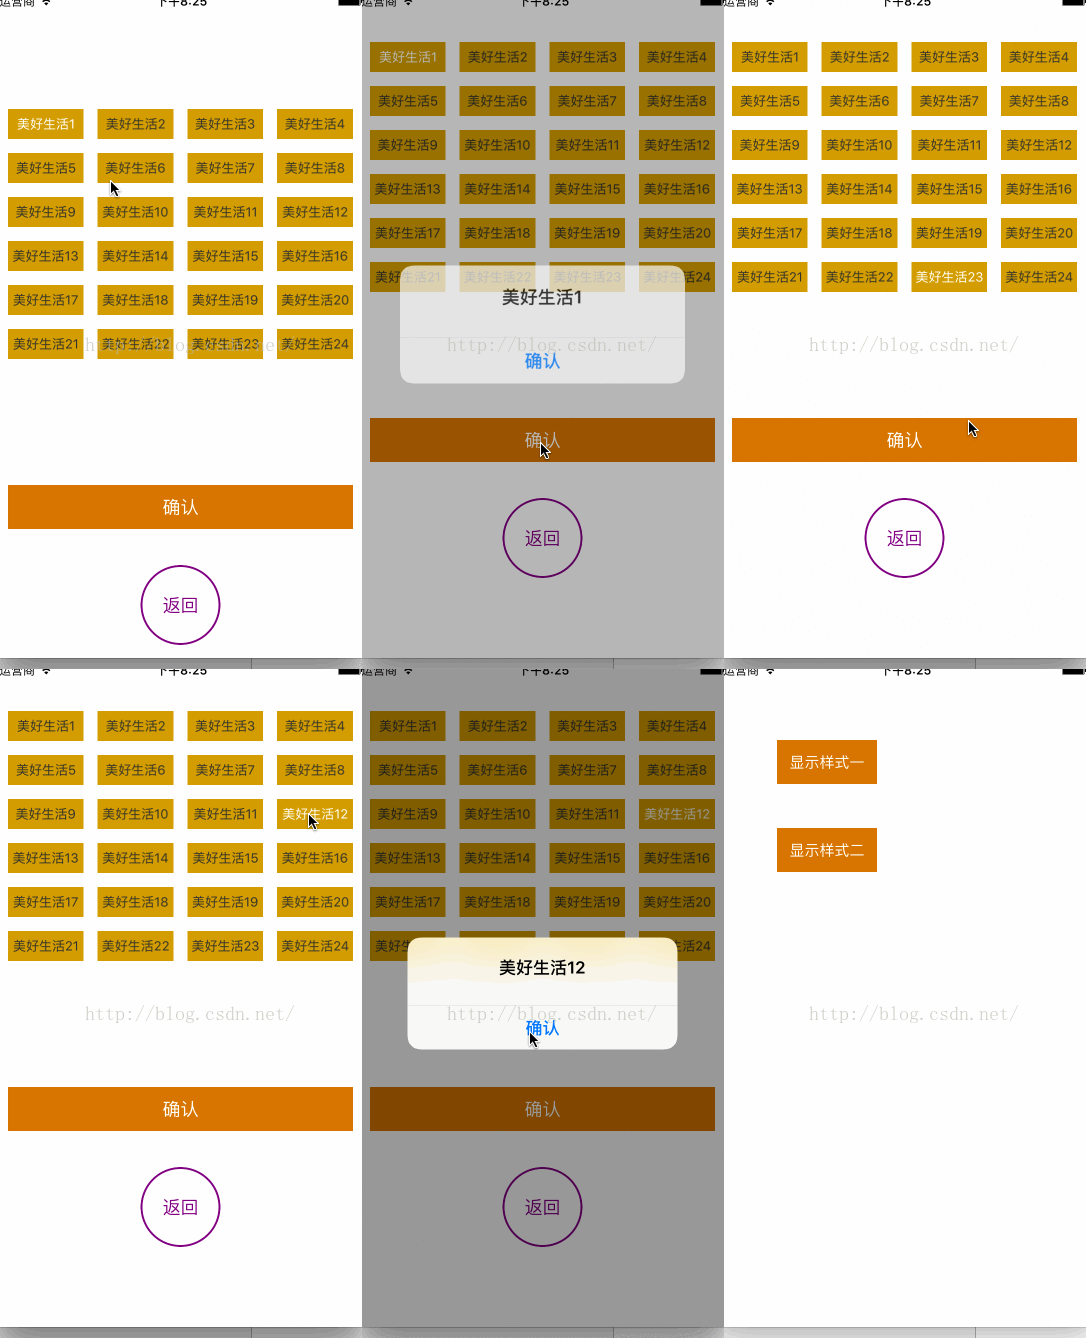
#import "StyleTwoViewController.h"
#import "UIViewExt.h"

#define kTagMargin  14
#define kCellMargin 15
#define kScreenWidth [UIScreen mainScreen].bounds.size.width
#define Color(R,G,B) [UIColor colorWithRed:R/255.0 green:G/255.0 blue:B/255.0 alpha:1.0]

@interface StyleTwoViewController ()

/** 按鈕集合 */
@property (nonatomic, strong) NSMutableArray *btnsArray;
/** 按鈕文字 */
@property (nonatomic, strong) NSArray *tagsArray;
/** 默認選中的按鈕 */
@property (nonatomic, strong) UIButton *selectedBtn;

@end

@implementation StyleTwoViewController

- (void)viewDidLoad {
    [super viewDidLoad];
    self.view.backgroundColor = [UIColor whiteColor];
    [self getTagMsg];
}

- (void)getTagMsg {
    _btnsArray = [NSMutableArray array];

    NSMutableArray *tags = [NSMutableArray array];
    for (int i = 1; i <= 24; i++) {
        [tags addObject:[NSString stringWithFormat:@"美好生活%d", i]];
    }
    _tagsArray = tags;

    [self createTagSqures:tags];
}

#pragma mark - 創建方塊
- (void)createTagSqures:(NSArray *)tags {
    // 一行最多 4 個
    NSInteger maxCols = 4;

    // 計算單個按鈕的寬高
    CGFloat totalWidth = kScreenWidth - 2 * kCellMargin - (maxCols - 1) * kTagMargin;
    CGFloat btnWidth  = totalWidth / maxCols;
    CGFloat btnHeight = 30;

    for (NSInteger i = 0; i < tags.count; i++) {
        NSInteger row = i / maxCols;
        NSInteger col = i % maxCols;

        UIButton *btn = [UIButton buttonWithType:UIButtonTypeCustom];
        btn.frame = CGRectMake(kCellMargin + col * (btnWidth + kTagMargin),
                               40 + row * (btnHeight + kTagMargin),
                               btnWidth,
                               btnHeight);
        btn.tag = i + 10;
        btn.adjustsImageWhenHighlighted = NO;
        btn.titleLabel.textAlignment = NSTextAlignmentCenter;
        [btn setTitle:tags[i] forState:UIControlStateNormal];
        [btn setTitleColor:[UIColor darkGrayColor] forState:UIControlStateNormal];

        btn.layer.borderColor = Color(211, 211, 211).CGColor;
        btn.layer.borderWidth = 2;
        btn.layer.cornerRadius = 4;
        btn.clipsToBounds = YES;

        [btn addTarget:self action:@selector(tagClick:)
      forControlEvents:UIControlEventTouchUpInside];

        [self.view addSubview:btn];
        [self.btnsArray addObject:btn];

        // 第一個為默認選中項
        if (i == 0) {
            self.selectedBtn = btn;
            self.selectedBtn.backgroundColor = Color(214, 214, 214);
        }
    }
}

#pragma mark - 單選切換
- (void)tagClick:(UIButton *)sender {
    if (sender == self.selectedBtn) return;

    self.selectedBtn.backgroundColor = [UIColor clearColor];
    sender.backgroundColor = Color(214, 214, 214);
    self.selectedBtn = sender;
}

@end
兩種方式怎麼選
- 依內容排版:適合標籤文字長度差異大、希望緊湊配置、不想浪費空間的場景(例如評價標籤)。
- 依寬度等分:適合文字長度接近、追求視覺對齊整齊的場景(例如分類篩選列)。
兩者共同的關鍵是:先算好寬高與間距,再統一由座標計算決定 frame,避免邊寫邊硬編數字。若使用 Auto Layout,也可以改用 CollectionView 搭配自訂 Layout 來達到同樣效果。
- 上一篇文章: iOS 鍵值觀察 KVO 實例詳解:從基本流程到進階用法
- 下一篇文章: iOS 多線程開發筆記:術語、方案與實務注意事項