
iOS 繪圖利器 UIBezierPath 完全指南
編輯:iOS 開發綜合
概述
UIBezierPath 用來描述一條由直線與曲線組成的路徑,並把它渲染到自定義視圖上。使用時只需要聲明路徑的形狀——直線、貝塞爾曲線、矩形、橢圓、圓弧,然後調用系統方法描邊或填充即可。
它位於 UIKit 中,本質是對 Core Graphics 裡 CGPathRef 的面向對象封裝,日常需求基本都能覆蓋。
注意:所有繪畫代碼都寫在自定義視圖的
drawRect:方法裡。
- (void)drawRect:(CGRect)rect {
    // 繪畫邏輯
}
一、初始化:直接得到一個成形圖形
// 空路徑
UIBezierPath *path = [UIBezierPath bezierPath];

// 矩形
UIBezierPath *path = [UIBezierPath bezierPathWithRect:CGRectMake(20, 20, 200, 100)];

// 內切於矩形的橢圓
UIBezierPath *path = [UIBezierPath bezierPathWithOvalInRect:CGRectMake(20, 20, 200, 100)];

// 圓角矩形,半徑超過短邊一半時按一半計算
UIBezierPath *path = [UIBezierPath bezierPathWithRoundedRect:CGRectMake(20, 20, 200, 100)
                                               cornerRadius:30];

// 可指定哪幾個角是圓角
UIBezierPath *path = [UIBezierPath bezierPathWithRoundedRect:CGRectMake(20, 20, 200, 100)
                                            byRoundingCorners:UIRectCornerAllCorners
                                                  cornerRadii:CGSizeMake(30, 50)];

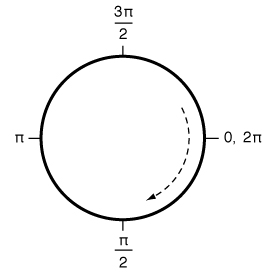
// 圓弧:圓心、半徑、起止弧度、是否順時針
UIBezierPath *path = [UIBezierPath bezierPathWithArcCenter:CGPointMake(100, 100)
                                                    radius:50
                                                startAngle:0
                                                  endAngle:M_PI
                                                 clockwise:YES];
二、構造路徑:一筆一筆畫出來
UIBezierPath *path = [UIBezierPath bezierPath];

// 移動當前點
[path moveToPoint:CGPointMake(20, 20)];

// 直線段
[path addLineToPoint:CGPointMake(100, 100)];

// 圓弧段
[path addArcWithCenter:CGPointMake(60, 20)
                radius:40
            startAngle:0
              endAngle:M_PI
             clockwise:YES];

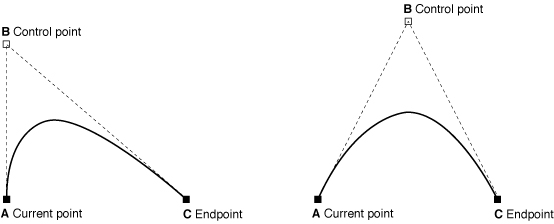
// 二次貝塞爾曲線:一個控制點
[path addQuadCurveToPoint:CGPointMake(100, 20)
              controlPoint:CGPointMake(100, 60)];

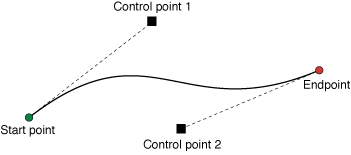
// 三次貝塞爾曲線:兩個控制點
[path addCurveToPoint:CGPointMake(100, 20)
         controlPoint1:CGPointMake(30, 60)
         controlPoint2:CGPointMake(100, 100)];
二次曲線的效果:
三次曲線的效果:
三、讀取路徑信息
// 是否為空。注意:只 moveToPoint 也算「非空」
BOOL empty = path.empty;

// 能包住所有路徑點(含控制點)的最小矩形
CGRect bounds = path.bounds;

// 當前所在點
CGPoint current = path.currentPoint;

// 是否包含某個點
BOOL contains = [path containsPoint:CGPointMake(20, 30)];
四、路徑操作
[path closePath];                    // 用直線閉合起點與終點,並把當前點更新為起點
[path removeAllPoints];              // 清空所有點
[path appendPath:anotherPath];       // 拼接另一條路徑
UIBezierPath *reversed = [path bezierPathByReversingPath];  // 得到反向路徑
五、繪製
[path fill];    // 填充封閉區域。開放子路徑會被自動閉合,填充不含線條本身
[path fillWithBlendMode:kCGBlendModeNormal alpha:0.8];   // 指定混合模式填充
[path stroke];  // 沿路徑描邊
[path strokeWithBlendMode:kCGBlendModeNormal alpha:0.8]; // 指定混合模式描邊
六、繪畫屬性
path.lineWidth = 10;                                  // 線寬

[[UIColor orangeColor] setFill];                      // 填充色
[[UIColor orangeColor] setStroke];                    // 描邊色

// 線端樣式(僅對開放路徑的起點與終點生效)
// Butt:正好結束於精確位置(默認)
// Round:圓頭,超出半個線寬
// Square:方頭,超出半個線寬
path.lineCapStyle = kCGLineCapButt;

// 轉角樣式:Miter 尖角(默認)、Round 圓角、Bevel 斜角
path.lineJoinStyle = kCGLineJoinMiter;
七、二維形變
// 對所有點做仿射變換,立即生效且不可逆
[path applyTransform:CGAffineTransformMakeTranslation(20, 20)];
平移加縮放組合使用,可以先把圖形按小坐標設計好,再整體放大搬到目標位置,這在寫圖標類繪圖時特別省事。
八、綜合示例:仿今日頭條下拉動畫
CGAffineTransform transform = CGAffineTransformMakeTranslation((self.bounds.size.width - 50 * 5) / 2, 100);
transform = CGAffineTransformScale(transform, 5, 5);

// 外框
UIBezierPath *path1 = [UIBezierPath bezierPathWithRoundedRect:CGRectMake(0, 0, 50, 50)
                                                 cornerRadius:10];
[path1 applyTransform:transform];
[[UIColor colorWithRed:198/255.0f green:198/255.0f blue:198/255.0f alpha:1.0f] setStroke];
[path1 stroke];

// 圖標主體
UIBezierPath *path2 = [UIBezierPath bezierPathWithRect:CGRectMake(7, 10, 14, 12)];
[path2 applyTransform:transform];
[[UIColor colorWithRed:224/255.0f green:224/255.0f blue:224/255.0f alpha:1.0f] setFill];
[path2 fill];

UIBezierPath *path3 = [UIBezierPath bezierPathWithRect:CGRectMake(7, 10, 14, 12)];
[path3 applyTransform:transform];
[[UIColor colorWithRed:189/255.0f green:189/255.0f blue:189/255.0f alpha:1.0f] setStroke];
[path3 stroke];

// 右側三條短橫
NSArray *ys = @[@10, @16, @22];
for (NSNumber *y in ys) {
    UIBezierPath *p = [UIBezierPath bezierPath];
    [p moveToPoint:CGPointMake(28, y.floatValue)];
    [p addLineToPoint:CGPointMake(43, y.floatValue)];
    [p applyTransform:transform];
    [[UIColor colorWithRed:153/255.0f green:153/255.0f blue:153/255.0f alpha:1.0f] setStroke];
    [p stroke];
}

// 下方兩條長橫
ys = @[@28, @34, @40];
for (NSNumber *y in ys) {
    UIBezierPath *p = [UIBezierPath bezierPath];
    [p moveToPoint:CGPointMake(7, y.floatValue)];
    [p addLineToPoint:CGPointMake(43, y.floatValue)];
    [p applyTransform:transform];
    [p stroke];
}
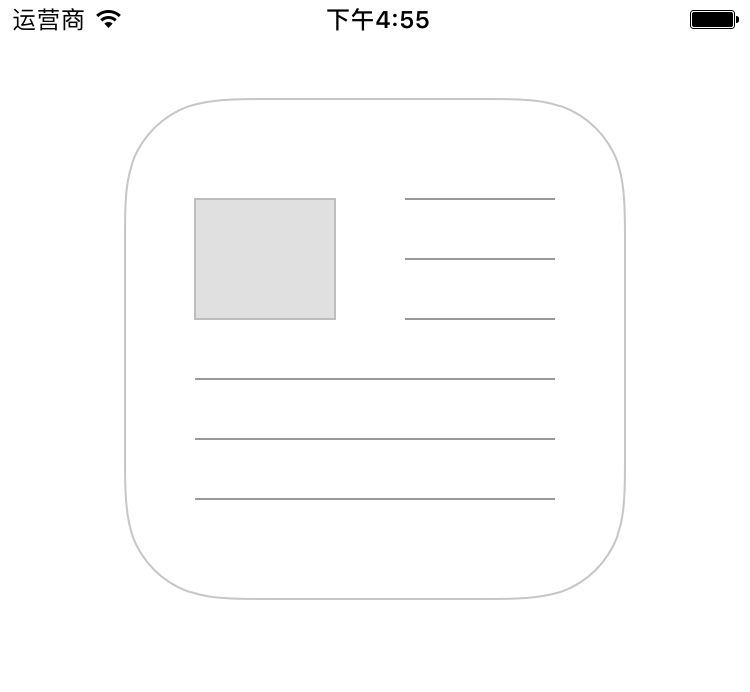
這個例子把「小坐標設計 + 仿射變換放大 + 多路徑分層填色」三個技巧串了起來,是理解 UIBezierPath 很好的起點。掌握了路徑構造與繪畫屬性,複雜圖標基本都能純代碼畫出來,省掉大量切圖資源。