
Apple Pay 開發實戰:打造順暢的 App 內支付體驗
(原文:Apple Pay 作者:Jack Flintermann 譯者:Alili)
決定要網購的瞬間,總會浮現一種現代人特有的焦慮:「我的信用卡在哪?卡號是多少?我真的需要這個東西嗎?」在 iOS 裝置上購物時,這種感覺會被放大——你大概沒帶信用卡,而一手拿卡、一手在小小的螢幕上敲入 16 位數字,這件事的難度大概只有體操選手和太空人適合表演。
如果你是一位開發者,而你的 App 收信用卡付款,這個摩擦點會直接反映在轉換率與營收上。Apple Pay 改變了這一切。雖然媒體的目光多集中在實體店的 NFC 付款,但對 iOS 開發者而言,App 內的支付體驗同樣迎來了一次升級機會。
提醒:若你在 App 中販售的是電子內容或虛擬貨幣,必須使用內購而非 Apple Pay(見 App Store Review Guidelines 第 11.2 節)。Apple Pay 適用於實體商品與服務。
取得 Apple 商戶 ID
在動手之前,你必須先註冊一個 Apple Merchant ID;而在此之前,你得先選定一家支付服務商來處理信用卡交易。Apple 在 Apple Pay 開發者頁面提供了推薦名單(本文作者任職的 Stripe 也在其中,但文中程式碼不依賴任何特定廠商)。流程大致如下:
- 到 Developer Center 的 Certificates, Identifiers, and Profiles 建立新的 Merchant ID。
- 前往 Certificates 建立新的 Apple Pay 憑證,這需要上傳 CSR(憑證簽章請求)。串接金流服務時,對方通常會提供 CSR;若自行產生,後續將無法解密,需重新生成。
- 在 Xcode 的 Capabilities 中開啟 Apple Pay,並選擇剛才建立的 Merchant ID。
建立第一筆交易
Apple Pay 僅支援相容的裝置(iPhone 6/6 Plus、iPad mini 3、iPad Air 2),且必須完成上述授權設定才能在 App 中測試。若想在模擬器上模擬,GitHub 上有可模擬刷卡資訊的測試庫。
準備好之後,先確認裝置支援與使用者是否已加入卡片:
let paymentNetworks = [PKPaymentNetworkAmex, PKPaymentNetworkMasterCard, PKPaymentNetworkVisa]

if PKPaymentAuthorizationViewController.canMakePaymentsUsingNetworks(paymentNetworks) {
    // Apple Pay 可用
} else {
    // 顯示自有的信用卡表單
}
接著建立 PKPaymentRequest,描述你要向使用者收取的費用。以美國境內交易為例:
let request = PKPaymentRequest()
request.supportedNetworks = [PKPaymentNetworkAmex, PKPaymentNetworkMasterCard, PKPaymentNetworkVisa]
request.countryCode = "US"
request.currencyCode = "USD"
request.merchantIdentifier = "#替換為你的 Apple Merchant ID#"
request.merchantCapabilities = .Capability3DS
再用 paymentSummaryItem 描述實際購買內容。它是一個 PKPaymentSummaryItem 陣列,每項包含標籤與金額,效果就像收據上的行項目。
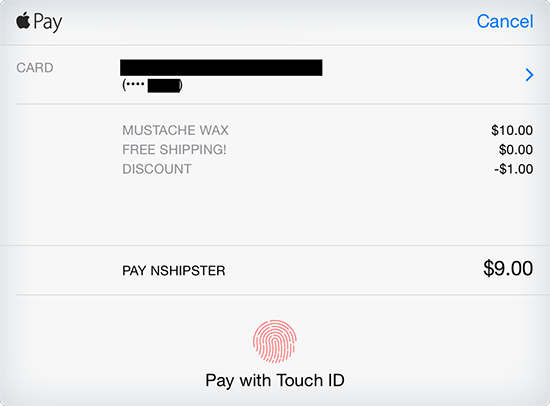
let wax = PKPaymentSummaryItem(label: "Mustache Wax", amount: NSDecimalNumber(string: "10.00"))
let discount = PKPaymentSummaryItem(label: "Discount", amount: NSDecimalNumber(string: "-1.00"))
let totalAmount = wax.amount.decimalNumberByAdding(discount.amount)
                            .decimalNumberByAdding(shipping.amount)
let total = PKPaymentSummaryItem(label: "NSHipster", amount: totalAmount)
request.paymentSummaryItems = [wax, discount, shipping, total]
單項金額可以是零或負數(用於折抵、優惠券),但總額必須大於零。這裡的 shipping 是 PKShippingMethod,繼承自 PKPaymentSummaryItem,後面會詳談。
最後用 request 建立 PKPaymentAuthorizationViewController 並呈現:
let viewController = PKPaymentAuthorizationViewController(paymentRequest: request)
viewController.delegate = self
presentViewController(viewController, animated: true, completion: nil)
幾個細節值得注意:
- 這個視圖控制器並不佔滿整個螢幕,背景仍是你自己的 App 內容。
- 所有文字會自動大寫。
- 最後一行與其餘部分以分隔線隔開,用來顯示總金額;標籤會自動在前面加上「PAY」,因此通常填公司名稱。
- 整個 UI 由 Remote View Controller 呈現,除了透過 PKPaymentRequest 傳入的內容,你無法以其他方式修改它的外觀。
PKPaymentAuthorizationViewControllerDelegate
要接收付款結果,需實作兩個必要方法:
- (void)paymentAuthorizationViewController:(PKPaymentAuthorizationViewController *)controller
                       didAuthorizePayment:(PKPayment *)payment
                                completion:(void (^)(PKPaymentAuthorizationStatus))completion;

- (void)paymentAuthorizationViewControllerDidFinish:(PKPaymentAuthorizationViewController *)controller;
整個交易流程是這樣的:
- 呈現如上所述的 PKPaymentAuthorizationViewController。
- 使用者以 Touch ID 確認購買(若連續失敗三次,可改輸入密碼)。
- 指紋圖示轉為帶有「Processing」字樣的轉圈動畫。
- 你的代理收到
paymentAuthorizationViewController:didAuthorizePayment:completion:回呼。 - App 與金流服務商異步溝通完成收款,依結果呼叫
PKPaymentAuthorizationStatus.Success或.Failure。 - 系統播放成功或失敗的動畫;成功時使用者會收到 Passbook 的通知。
- 代理收到
paymentAuthorizationViewControllerDidFinish:,由你負責關閉支付頁。

// MARK: - PKPaymentAuthorizationViewControllerDelegate

func paymentAuthorizationViewController(controller: PKPaymentAuthorizationViewController!,
                                       didAuthorizePayment payment: PKPayment!,
                                                  completion: ((PKPaymentAuthorizationStatus) -> Void)!) {
    // 呼叫金流商的 SDK 完成收款
    // 完成後呼叫 completion(PKPaymentAuthorizationStatus.Success)
}

func paymentAuthorizationViewControllerDidFinish(controller: PKPaymentAuthorizationViewController!) {
    dismissViewControllerAnimated(true, completion: nil)
}
其中 processPayment 屬於你自己的程式碼,透過金流商的 SDK 完成實際交易。
動態運費與金額
若使用者購買實體商品,你大概需要提供多種配送選項。在 PKPaymentRequest 中設定 shippingMethods,再實作代理方法 paymentAuthorizationViewController:didSelectShippingMethod:completion: 回應選擇,透過異步回呼更新 PKPaymentSummaryItem 陣列。
var paymentRequest: PKPaymentRequest {
    let request = ... // 同前初始化
    let freeShipping = PKShippingMethod(label: "Free Shipping", amount: NSDecimalNumber(string: "0"))
    freeShipping.identifier = "freeshipping"
    freeShipping.detail = "Arrives in 6-8 weeks"

    let expressShipping = PKShippingMethod(label: "Express Shipping", amount: NSDecimalNumber(string: "10.00"))
    expressShipping.identifier = "expressshipping"
    expressShipping.detail = "Arrives in 2-3 days"

    request.shippingMethods = [freeShipping, expressShipping]
    request.paymentSummaryItems = paymentSummaryItemsForShippingMethod(freeShipping)
    return request
}

func paymentSummaryItemsForShippingMethod(shipping: PKShippingMethod) -> ([PKPaymentSummaryItem]) {
    let wax = PKPaymentSummaryItem(label: "Mustache Wax", amount: NSDecimalNumber(string: "10.00"))
    let discount = PKPaymentSummaryItem(label: "Discount", amount: NSDecimalNumber(string: "-1.00"))
    let totalAmount = wax.amount.decimalNumberByAdding(discount.amount)
                            .decimalNumberByAdding(shipping.amount)
    let total = PKPaymentSummaryItem(label: "NSHipster", amount: totalAmount)
    return [wax, discount, shipping, total]
}

// MARK: - PKPaymentAuthorizationViewControllerDelegate

func paymentAuthorizationViewController(controller: PKPaymentAuthorizationViewController!,
                                  didSelectShippingMethod shippingMethod: PKShippingMethod!,
                                                           completion: ((PKPaymentAuthorizationStatus, [AnyObject]!) -> Void)!) {
    completion(PKPaymentAuthorizationStatus.Success, paymentSummaryItemsForShippingMethod(shippingMethod))
}
使用者選擇免運或快遞時,總金額會相應調整。
依地址計算運費
更進一步,可以讓使用者自選配送地址,再動態計算運費。首先在 PKPaymentRequest 設定 requiredShippingAddressFields,可任意組合 email、電話與地址;若你只需要聯絡方式(例如寄送收據的 email),這個欄位也很好用。
設定後,支付介面會出現「配送地址」區塊供使用者挑選已存地址。每次選擇都會觸發 paymentAuthorizationViewController:didSelectShippingAddress:completion:,你需要在其中計算費用並呼叫帶三個參數的 completion:
- 結果狀態:成功用
PKPaymentAuthorizationStatus.Success;連線失敗用.Failure;若該郵遞區號無法配送,回傳InvalidShippingPostalAddress。 - PKShippingMethods 陣列:該地址可用的配送方式。
- PKPaymentSummaryItems 陣列:含新配送方式的最新金額。
作者搭了一個查詢運費的簡易 EasyPost API 後端,原始碼在 https://github.com/jflinter/example-shipping-api 。以下是以 Alamofire 呼叫的範例:
import AddressBook
import PassKit
import Alamofire

func addressesForRecord(record: ABRecord) -> [[String: String]] {
    var addresses: [[String: String]] = []
    let values: ABMultiValue = ABRecordCopyValue(record, kABPersonAddressProperty).takeRetainedValue()
    // 逐一取出地址欄位
    return addresses
}

func fetchShippingMethodsForAddress(address: [String: String],
                                 completion: ([PKShippingMethod]?) -> Void) {
    let parameters = [
        "street":  address[kABPersonAddressStreetKey] ?? "",
        "city":    address[kABPersonAddressCityKey] ?? "",
        "state":   address[kABPersonAddressStateKey] ?? "",
        "zip":     address[kABPersonAddressZIPKey] ?? "",
        "country": address[kABPersonAddressCountryKey] ?? ""
    ]
    Alamofire.request(.GET, "https://example.com", parameters: parameters)
        .responseJSON { (_, _, JSON, _) in
            if let rates = JSON as? [[String: String]] {
                let shippingMethods = map(rates) { (rate) -> PKShippingMethod in
                    let identifier = rate["id"]
                    let carrier = rate["carrier"] ?? "Unknown Carrier"
                    let service = rate["service"] ?? "Unknown Service"
                    let amount = NSDecimalNumber(string: rate["amount"])
                    let arrival = rate["formatted_arrival_date"] ?? "Unknown Arrival"

                    let shippingMethod = PKShippingMethod(label: "\(carrier) \(service)", amount: amount)
                    shippingMethod.identifier = identifier
                    shippingMethod.detail = arrival
                    return shippingMethod
                }
                completion(shippingMethods)
            }
        }
}
對應的代理實作:
func paymentAuthorizationViewController(controller: PKPaymentAuthorizationViewController!,
                                 didSelectShippingAddress record: ABRecord!,
                                                          completion: ((PKPaymentAuthorizationStatus, [AnyObject]!, [AnyObject]!) -> Void)!) {
    if let address = addressesForRecord(record).first {
        fetchShippingMethodsForAddress(address) { (shippingMethods) in
            switch shippingMethods?.count {
                case .None:
                    completion(PKPaymentAuthorizationStatus.Failure, nil, nil)
                case .Some(0):
                    completion(PKPaymentAuthorizationStatus.InvalidShippingPostalAddress, nil, nil)
                default:
                    completion(PKPaymentAuthorizationStatus.Success, shippingMethods,
                               self.paymentSummaryItemsForShippingMethod(shippingMethods!.first!))
            }
        }
    } else {
        completion(PKPaymentAuthorizationStatus.Failure, nil, nil)
    }
}

使用者最終選擇的地址與配送方式,會作為 PKPayment 的屬性出現在 didAuthorizePayment:completion: 中。
完整原始碼:https://github.com/jflinter/ApplePayExample
Apple Pay 對外公開的 API 並不多,但可發揮的空間很廣。你能自訂結帳流程,甚至設計出让使用者免註冊帳號就能購買的路徑。隨著支援的 App 與裝置持續增加,它很可能成為 iOS 上最普遍的支付方式之一。
(本文由 CocoaChina 組織翻譯,譯文權利歸譯者所有,未經允許禁止轉載。)