
iOS 自定義轉場動畫實戰:打造屬於你的 Segue 與 Unwind
(原文:A Beginner's Guide to Animated Custom Segues in iOS 8 作者:Gabriel Theodoropoulos 譯者:ztdj121)
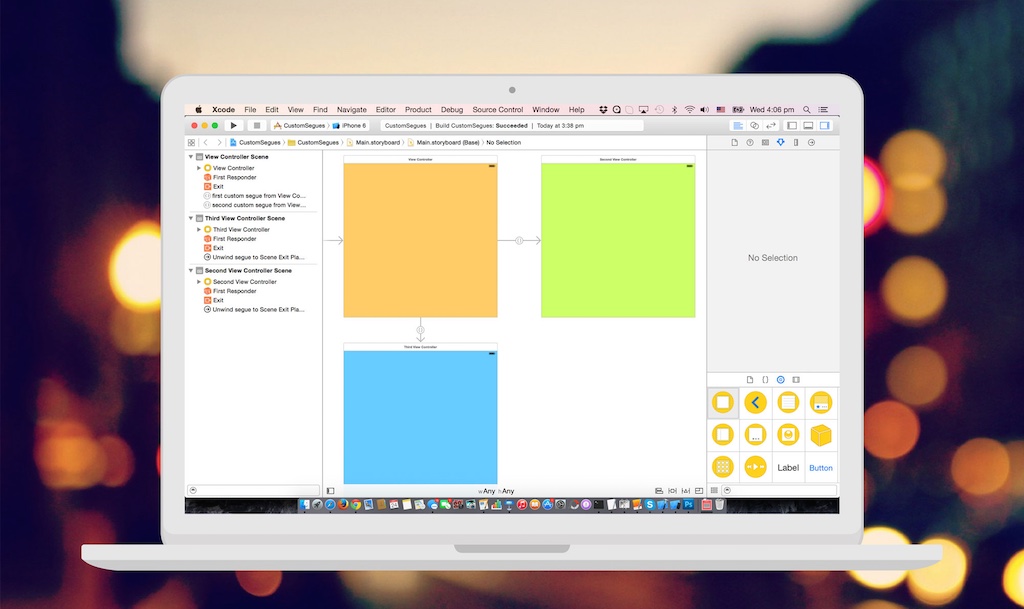
iOS 5 問世時,Apple 為介面設計帶來了一套全新思路:Storyboard。在它之前,每個視圖控制器通常搭配一個 Interface Builder 檔案(nib 或 xib),規則單純——每個控制器的介面在自己的 nib 裡設計,所有 nib 合起來構成整個 App 的畫面。這樣做有好處,它逼你把注意力集中在單一介面上;但也有代價:檔案數量迅速膨胀,最後你幾乎看不見整體樣貌。
Storyboard 出現後,這些問題都成了過去式,並很快被開發者社群廣泛採用。相比舊做法,它有三個明顯優勢:
- 整個介面設計集中在一個檔案裡,專案檔案總數大幅下降(大型專案尤其有感)。你仍然可以搭配額外的 nib 來做輔助視圖。
- 你能即時看見 App 的畫面與流轉路徑。
- 視圖控制器之間的切換——設計上的術語叫 scene(場景)——以及切換如何發生,都在 Storyboard 中被明確定義並清楚呈現。
而串起這些場景的轉換,我們一般稱之為 segue(轉場)。
轉場與 App 的導航邏輯關係密切,因為它規範了一個畫面切到另一個畫面的所有細節:要不要動畫、哪一種動畫、轉換時要做哪些準備。實務上它還常被用來把資料傳給下一個視圖控制器。
從程式碼角度看,場景是 UIStoryboardSegue 的物件,這個類別同樣自 iOS 5 起登場。與多數類別不同,你不能自行建立它,只能在轉場即將發生時提供設定。UIKit 內建了幾種帶預設過場動畫的轉場,包含 push segue(搭配導航控制器)、modal segue(可選動畫風格)與 popover segue。但當預設選項不夠用時,你就得自己實作 custom segue。
好消息是,自定義轉場一點也不難,它用的都是標準 iOS 開發技術:繼承 UIStoryboardSegue,重寫 perform 方法,把動畫邏輯寫進去即可。至於「如何觸發」與「如何返回」,同樣由你以標準手法補上。
這篇教學會帶你從零打造一個示範 App,把自定義轉場與解除轉場(unwind segue)的每個環節都走一遍。掌握這項技巧,不只讓你的 App 互動更順手,也能在眾多作品中做出辨識度。
示範 App 要做什麼
這次我們不從範本專案開始,而是從空白一路建起來。原因是這個題目會大量用到 Interface Builder,按部就班做一遍,你才看得清每個細節。
目標很單純:一個含三個視圖控制器的 App,也就是三個場景、三個類別。第一個由 Xcode 自動產生,另外兩個由我們新增。自定義轉場負責第一個 ↔ 第二個,以及第一個 ↔ 第三個;第二與第三個之間不做任何關聯。
因為每個轉場都要能「去」也能「回」,所以一共需要四個類別:兩個負責正向轉換的自定義動畫,兩個負責返回(也就是解除轉場)。解除轉場的細節後面會詳談,現在只要記住它是用來回到上一個視圖控制器的轉場。
視圖控制器本身沒什麼好設定的:各放一個 label 標明身分,背景色各不相同,方便一眼看出轉換是否生效(是的,這會是個五顏六色的 App)。第一、第二個控制器另外多一個 label,用來顯示從別的控制器傳來的訊息。
觸發方式如下:
- 第一個 → 第二個:向上滑動;返回:向下滑動。
- 第一個 → 第三個:點擊按鈕;返回:向上滑動。
動畫長什麼樣子,直接看示範比較快。
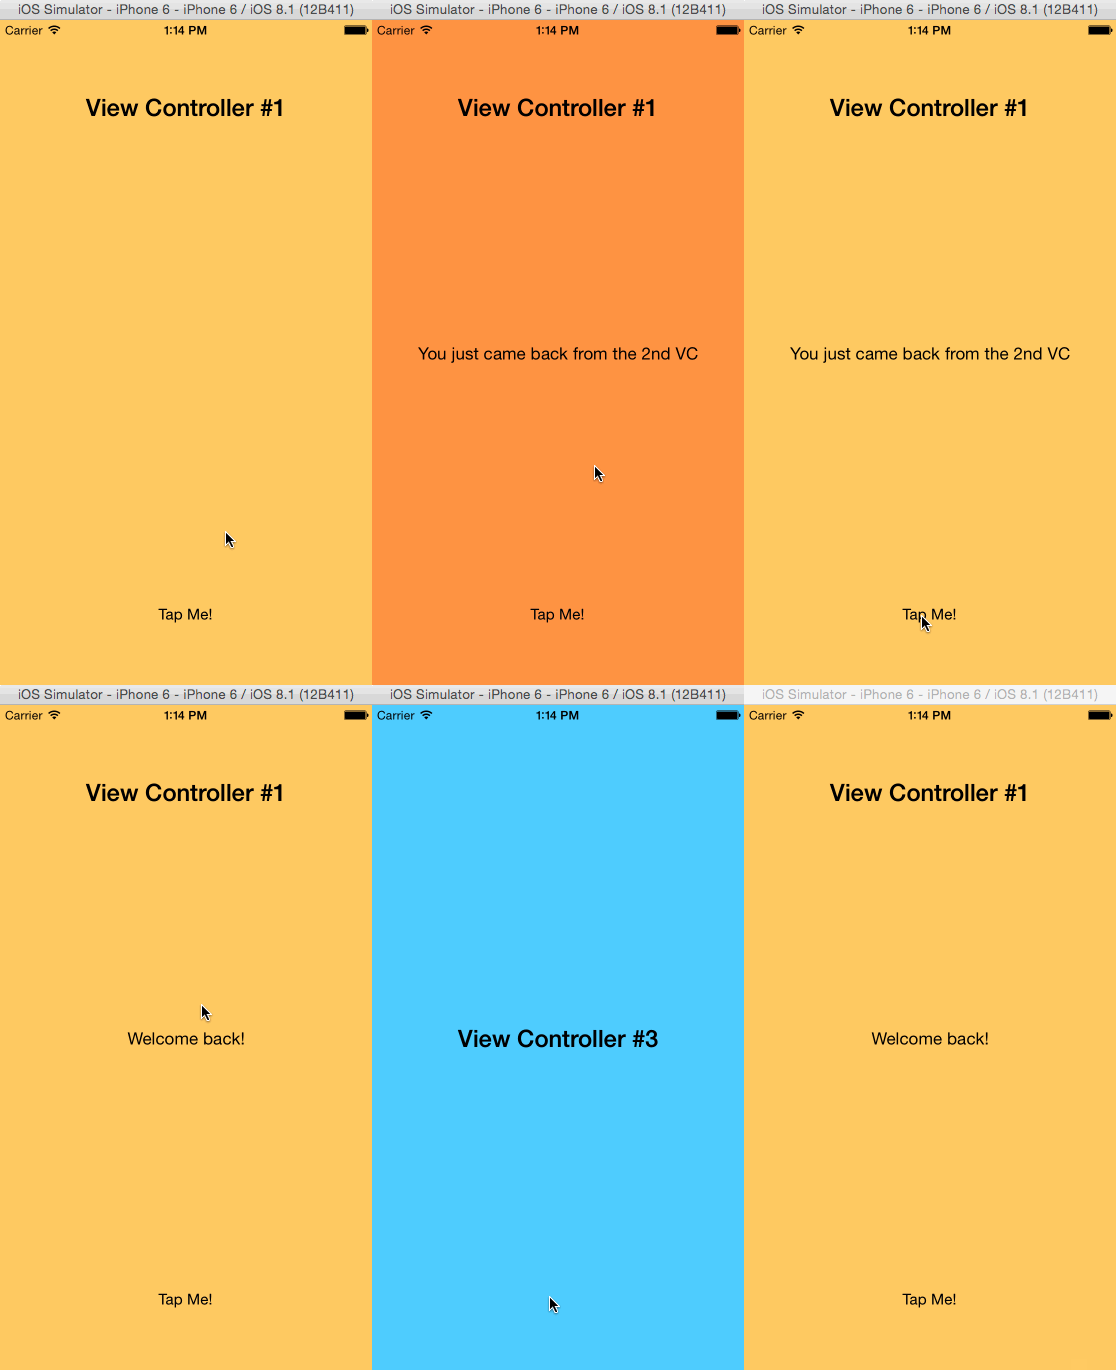
要提醒的是,自定義轉場的動畫完全自由——示範用的效果只是起點,你大可換成自己想要的表現。
建立專案
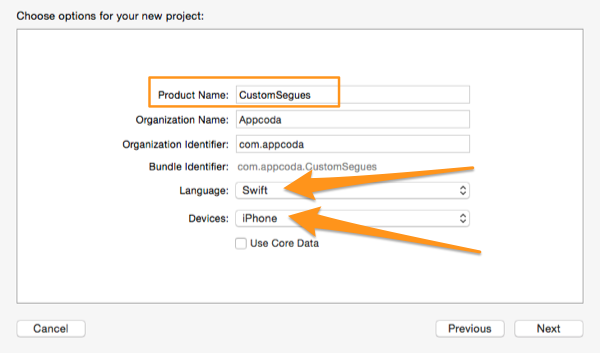
開啟 Xcode 建立新專案,範本選 Single View Application,Product Name 取名 CustomSegues,語言選 Swift,裝置選 iPhone。
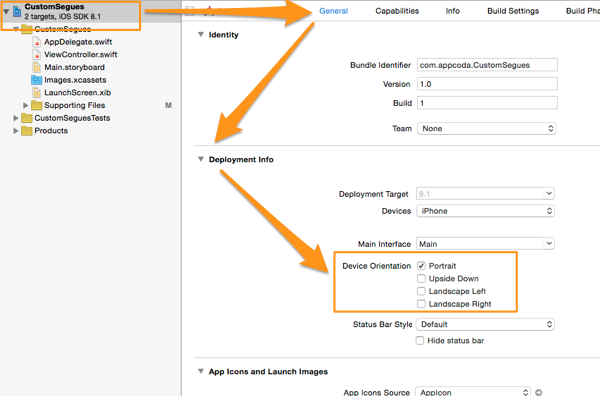
接著選擇存放路徑並產生出專案。回到專案設定的 General 分頁,在 Deployment Info 中取消 Landscape Left 與 Landscape Right,只留 Portrait。若要在 iOS 8 之前的裝置測試,可自由調降 deployment target(但實務上不建議跑在 iOS 8 以下)。
初始介面設定
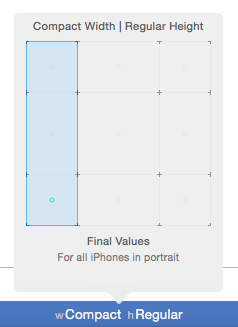
打開 Main.storyboard 讓 Interface Builder 顯示出來。第一步請把尺寸類別切到 Compact Width 與 Regular Height,讓畫面符合 iPhone 比例。
設定第一個視圖控制器
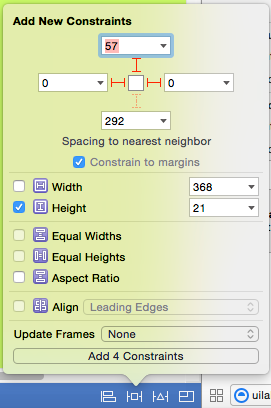
畫布上 Xcode 已經預置一個場景,就從它開始。放入兩個 UILabel,第一個的屬性如下:
- Frame: X=16, Y=77, W=368, H=21
- Font: System Bold,Size 24
- Text: View Controller #1
- 對齊方式:Center
並加上上下左右的約束條件。
第二個 label:
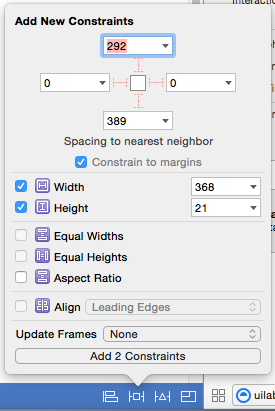
- Frame: X=16, Y=390, W=368, H=21
- Text: 留空
- 對齊方式:Center
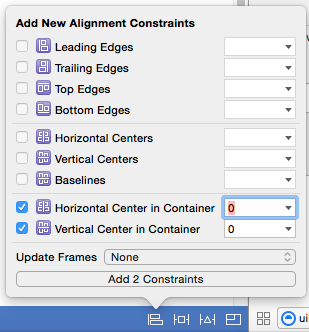
約束加上 Horizontal Center in Container、Vertical Center in Container,以及寬與高。
再放一個 UIButton:Frame 為 X=169, Y=712, W=62, H=30,Title 設為 Tap Me!,文字顏色黑色。約束只要點右下角的 constraint 按鈕,選 Add Missing Constraints 即可。
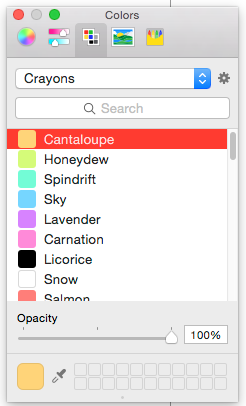
最後替視圖換個背景色:開啟 Attributes Inspector 的背景色下拉選單,選 Other…,在色彩選擇器中切到蠟筆調色板挑一個柔和的顏色。
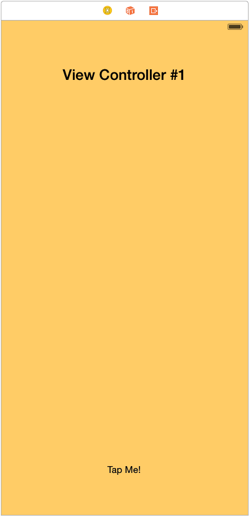
第一個場景完成後大致如下:
設定第二個視圖控制器
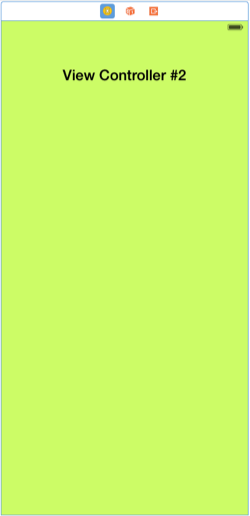
從物件庫拖一個新的 view controller 到畫布,同樣放兩個 label、套用相同屬性與約束,唯一差異是第一個 label 的文字改成 View Controller #2!。接著把背景色換成 Honeydew。
此時 Xcode 會警告兩個視圖控制器之間沒有 segue,別急,馬上就處理。
設定第三個視圖控制器
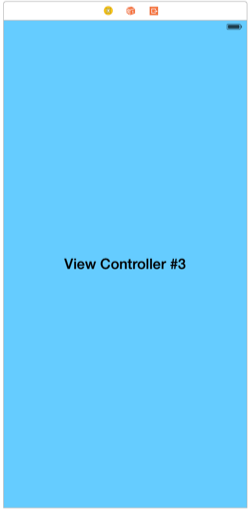
再拖一個視圖控制器進來,這次只放一個 label,屬性比照前兩者的第一個 label,但 Y 值改為 389、文字改為 View Controller #3!。約束比照前兩者的第二個 label(水平居中、垂直居中、寬高固定),讓它正好落在畫面中央。背景色選 sky。
新增視圖控制器類別
每個場景都要有一個對應類別。第一個已經是 Xcode 產生的 ViewController,另外兩個得自己建。
透過 File > New > File…,選 iOS 的 Source 分類下的 Cocoa Touch Class,Subclass of 填 UIViewController,名稱分別設為 SecondViewController 與 ThirdViewController,語言維持 Swift。
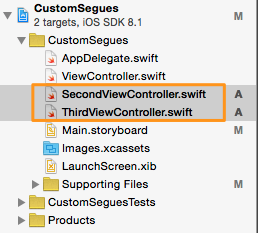
接著在 ViewController.swift 與 SecondViewController.swift 中各自宣告一個稍後要用的 IBOutlet:
@IBOutlet weak var lblMessage: UILabel!
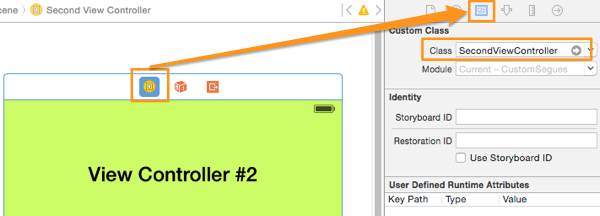
回到 Storyboard,選取第二個場景(綠色),點一下場景上方的視圖控制器圖示,在 Identity Inspector 的 Custom Class 中把 Class 設為 SecondViewController。
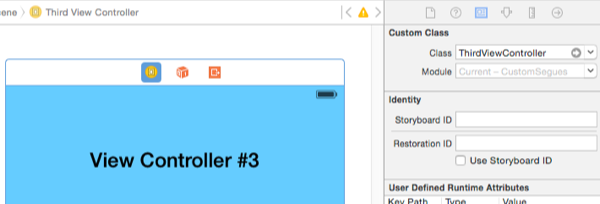
第三個場景(藍色)同樣操作,設為 ThirdViewController。
最後把兩個 IBOutlet 接上線。從第一個場景(橘色)開始,按住 Ctrl 從視圖控制器拖到場景中的第二個 label,在彈出視窗中選擇 lblMessage。
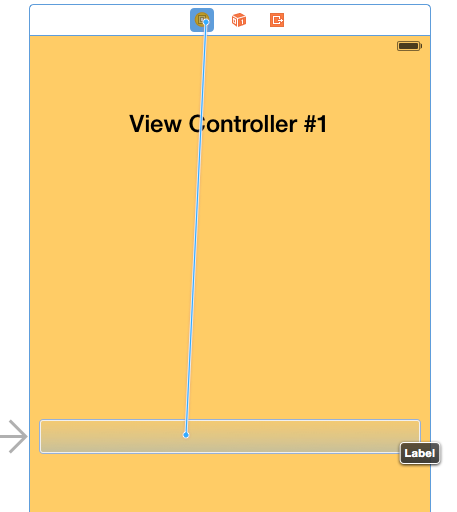
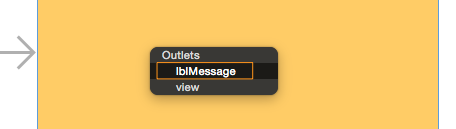
第二個場景也做同樣的連接。
新增自定義轉場類別
自定義轉場的本質就是繼承 UIStoryboardSegue 並實作 perform,所以先把四個類別都建好。新增方式與前面相同,但記得兩件事:範本一律選 Cocoa Touch Class,Subclass of 填 UIStoryboardSegue。四個檔案命名如下:
- FirstCustomSegue
- FirstCustomSegueUnwind
- SecondCustomSegue
- SecondCustomSegueUnwind
建立第一個自定義轉場
先在 Storyboard 裡把轉場連起來。打開文件大綱,選取 ViewController 場景中的 ViewController 物件。

按住 Ctrl 把它拖到 SecondViewController 場景。
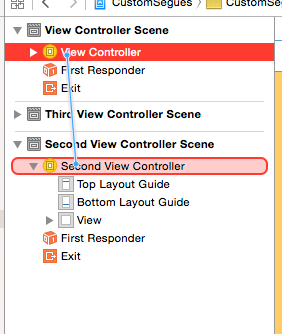
在彈出的清單中選擇 custom,畫布上立刻會出現一條連接兩個場景的線。
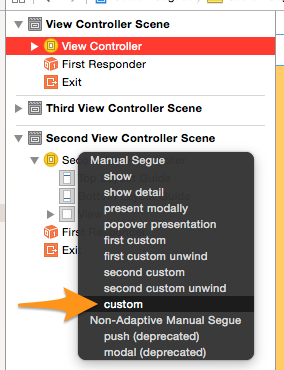
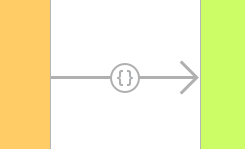
選取這條轉場,在 Attributes Inspector 中設定兩件事:Identifier 設為 idFirstSegue(務必確認不同轉場不會用到相同識別碼),Segue Class 設為 FirstCustomSegue。
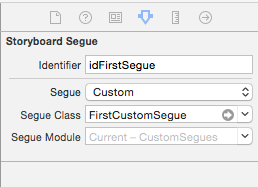
實作第一個轉場
自定義轉場的核心概念是「操作兩個視圖控制器的 view」:先設定目標視圖的起始狀態並手動塞進 App 的 window,接著用動畫把它移到終點,同時讓來源視圖離開畫面。動畫結束後,新的視圖控制器就直接呈現給使用者。
這裡的示範效果是:第一個視圖往上滑出,第二個視圖緊跟其後推上來,兩者之間不留縫隙。
打開 FirstCustomSegue.swift,重寫 perform:
override func perform() {
    // 先把來源與目標視圖存成區域變數
    var firstVCView = self.sourceViewController.view as UIView!
    var secondVCView = self.destinationViewController.view as UIView!

    // 取得螢幕尺寸
    let screenWidth = UIScreen.mainScreen().bounds.size.width
    let screenHeight = UIScreen.mainScreen().bounds.size.height

    // 把目標視圖放在螢幕下方、當前視圖的正後方
    secondVCView.frame = CGRectMake(0.0, screenHeight, screenWidth, screenHeight)

    // 取得 key window,把目標視圖插到來源視圖之上
    let window = UIApplication.sharedApplication().keyWindow
    window?.insertSubview(secondVCView, aboveSubview: firstVCView)

    // 執行動畫
    UIView.animateWithDuration(0.4, animations: { () -> Void in
        firstVCView.frame = CGRectOffset(firstVCView.frame, 0.0, -screenHeight)
        secondVCView.frame = CGRectOffset(secondVCView.frame, 0.0, -screenHeight)
    }) { (Finished) -> Void in
        self.sourceViewController.presentViewController(
            self.destinationViewController as UIViewController,
            animated: false, completion: nil)
    }
}
所謂的「移動」其實就是改 frame。動畫的最後一個閉包用來正式呈現目標視圖控制器——少了這步,畫面會停在半途。
觸發轉場
回到 ViewController.swift,在 viewDidLoad 中註冊一個向上滑動的手勢:
override func viewDidLoad() {
    // ...
    var swipeGestureRecognizer: UISwipeGestureRecognizer =
        UISwipeGestureRecognizer(target: self, action: "showSecondViewController")
    swipeGestureRecognizer.direction = UISwipeGestureRecognizerDirection.Up
    self.view.addGestureRecognizer(swipeGestureRecognizer)
}

func showSecondViewController() {
    self.performSegueWithIdentifier("idFirstSegue", sender: self)
}
我們是透過 identifier 找到轉場的。現在可以Run 了——你會發現能滑到第二個畫面,但回不去。正常,因為解除轉場還沒寫。
解除轉場(Unwind Segue)
自定義轉場幾乎一定是成對出現的:去程與回程。解除轉場的設定稍微繁瑣一點,但沒有超出標準技術範疇。兩點先記住:
- 解除轉場通常伴隨一般的自定義轉場一起存在。
- 解除轉場同樣要重寫
perform並套用自定義邏輯,而且回程動畫不必與去程相同。
實作分四步:
- 建立一個 IBAction 方法,在解除轉場被觸發時可選擇性地執行程式碼。方法名稱自訂、內容可留空,但至少得有一個,否則 Storyboard 無法完成連接。
- 在 Interface Builder 中建立解除轉場並設定。
- 在
UIStoryboardSegue子類別中重寫perform,寫入一般邏輯。 - 實作
UIViewController提供的特定方法,讓系統知道要執行解除轉場。
先把第一步做完。在 ViewController.swift 中加入:
@IBAction func returnFromSegueActions(sender: UIStoryboardSegue) { }
參數型別是 UIStoryboardSegue,這個細節請記好。
接著回到 Storyboard。檢查 SecondViewController 場景的物件,你會找到一個名為 Exit 的物件——這就是解除轉場的入口。
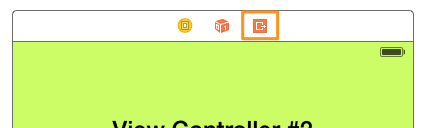
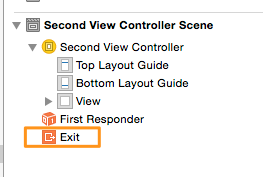
按住 Ctrl 從 SecondViewController 物件拖到 Exit,彈出視窗會列出剛才定義的 IBAction 方法,選取它。
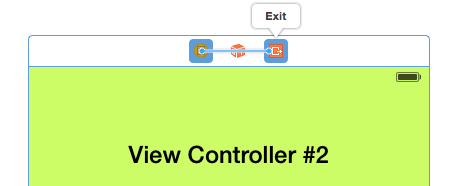
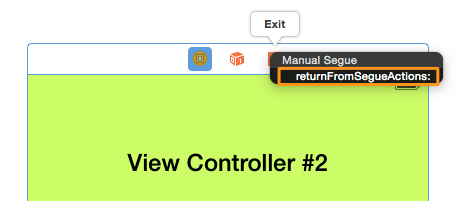
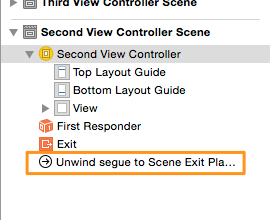
解除轉場建立後可在文件大綱中看到,選取它並把 Identifier 設為 idFirstSegueUnwind。
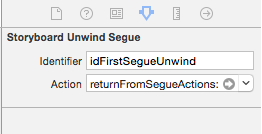
現在寫動畫。打開 FirstCustomSegueUnwind.swift:
override func perform() {
    // 注意此時來源是 SecondViewController,目標是 ViewController
    var secondVCView = self.sourceViewController.view as UIView!
    var firstVCView = self.destinationViewController.view as UIView!
    let screenHeight = UIScreen.mainScreen().bounds.size.height

    let window = UIApplication.sharedApplication().keyWindow
    window?.insertSubview(firstVCView, aboveSubview: secondVCView)

    UIView.animateWithDuration(0.4, animations: { () -> Void in
        firstVCView.frame = CGRectOffset(firstVCView.frame, 0.0, screenHeight)
        secondVCView.frame = CGRectOffset(secondVCView.frame, 0.0, screenHeight)
    }) { (Finished) -> Void in
        self.sourceViewController.dismissViewControllerAnimated(false, completion: nil)
    }
}
這次兩個視圖一起往下方移動,動畫結束後讓第二個視圖控制器直接關閉。
最後一個標準方法是 segueForUnwindingToViewController。在 ViewController.swift 中實作:
override func segueForUnwindingToViewController(toViewController: UIViewController,
    fromViewController: UIViewController, identifier: String?) -> UIStoryboardSegue? {
    if let id = identifier {
        if id == "idFirstSegueUnwind" {
            let unwindSegue = FirstCustomSegueUnwind(identifier: id,
                source: fromViewController, destination: toViewController,
                performHandler: { () -> Void in })
            return unwindSegue
        }
    }
    return super.segueForUnwindingToViewController(toViewController,
        fromViewController: fromViewController, identifier: identifier)
}
三個參數分別是:目前顯示、要消失的控制器(fromViewController);要顯示的目標控制器(toViewController);以及轉場識別碼(identifier)。邏輯很直白——用 identifier 比對,符合就回傳自訂的解除轉場物件,否則交給 super。
最後在 SecondViewController.swift 補上觸發手勢(向下滑動)與對應方法:
override func viewDidLoad() {
    // ...
    var swipeGestureRecognizer: UISwipeGestureRecognizer =
        UISwipeGestureRecognizer(target: self, action: "showFirstViewController")
    swipeGestureRecognizer.direction = UISwipeGestureRecognizerDirection.Down
    self.view.addGestureRecognizer(swipeGestureRecognizer)
}

func showFirstViewController() {
    self.performSegueWithIdentifier("idFirstSegueUnwind", sender: self)
}
在解除轉場中執行動作
前面那個空的 returnFromSegueActions(sender:) 現在可以填內容了。示範做法是:把第一個視圖控制器的背景變紅,再用動畫回復原狀。這個效果在真實 App 裡沒什麼意義,但很適合觀察解除轉場的執行時機。
@IBAction func returnFromSegueActions(sender: UIStoryboardSegue) {
    if sender.identifier == "idFirstSegueUnwind" {
        let originalColor = self.view.backgroundColor
        self.view.backgroundColor = UIColor.redColor()
        UIView.animateWithDuration(1.0, animations: { () -> Void in
            self.view.backgroundColor = originalColor
        })
    }
}
在視圖控制器之間傳遞資料
自定義轉場有兩件事要顧好:一是轉換效果要對使用者友善,二是轉場前後的資料交換。
先在 SecondViewController.swift 宣告一個屬性:
var message: NSString!
接著在 ViewController.swift 中用標準的 prepareForSegue 傳值:
override func prepareForSegue(segue: UIStoryboardSegue, sender: AnyObject?) {
    if segue.identifier == "idFirstSegue" {
        let secondViewController = segue.destinationViewController as SecondViewController
        secondViewController.message = "Hello from the 1st View Controller"
    }
}
接收端在 SecondViewController 的 viewDidLoad 中把它顯示出來:
override func viewDidLoad() {
    // ...
    lblMessage.text = message
}
反向傳值同樣在 SecondViewController 中實作 prepareForSegue:
override func prepareForSegue(segue: UIStoryboardSegue, sender: AnyObject?) {
    if segue.identifier == "idFirstSegueUnwind" {
        let firstViewController = segue.destinationViewController as ViewController
        firstViewController.lblMessage.text = "You just came back from the 2nd VC"
    }
}
這裡直接存取了 ViewController 的 label——這是另一種做法。兩種情况的共同前提都是:透過 segue 物件取得目標視圖控制器。
建立第二個自定義轉場
前面談的概念已經涵蓋了自定義轉場的方方面面,但再多做一個會更好消化,也能看到不同效果。
回到 Main.storyboard,按住 Ctrl 從 ViewController 物件拖到 ThirdViewController 物件,會出現一條藍色連接線。
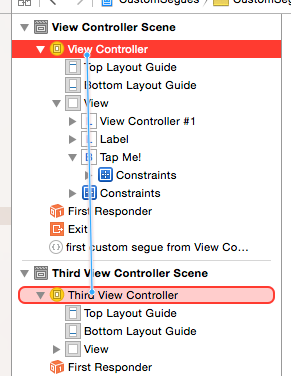
在彈出視窗中選 custom,確認畫布上出現新轉場。
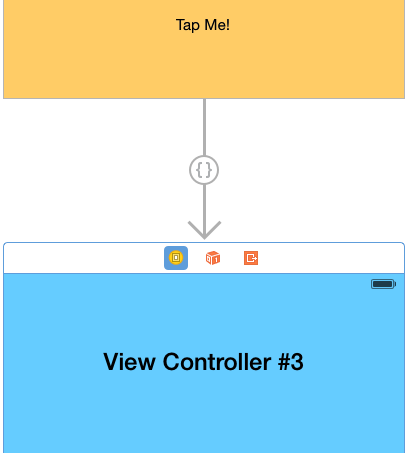
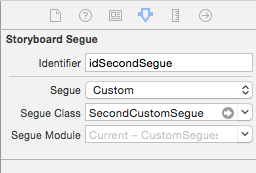
選取轉場,在 Attributes Inspector 中把 Identifier 設為 idSecondSegue,Segue Class 設為 SecondCustomSegue。
實作第二個轉場
這次要的效果是縮放:第一個視圖縮小消失,第三個視圖從極小放大到正常尺寸。
override func perform() {
    var firstVCView = sourceViewController.view as UIView!
    var thirdVCView = destinationViewController.view as UIView!

    let window = UIApplication.sharedApplication().keyWindow
    window?.insertSubview(thirdVCView, belowSubview: firstVCView)

    // 目標視圖初始為極小狀態
    thirdVCView.transform = CGAffineTransformScale(thirdVCView.transform, 0.001, 0.001)

    UIView.animateWithDuration(0.5, animations: { () -> Void in
        firstVCView.transform = CGAffineTransformScale(thirdVCView.transform, 0.001, 0.001)
    }) { (Finished) -> Void in
        UIView.animateWithDuration(0.5, animations: { () -> Void in
            thirdVCView.transform = CGAffineTransformIdentity
        }, completion: { (Finished) -> Void in
            firstVCView.transform = CGAffineTransformIdentity
            self.sourceViewController.presentViewController(
                self.destinationViewController as UIViewController,
                animated: false, completion: nil)
        })
    }
}
這裡刻意不縮到零,因為零就完全沒有視覺效果了;一個極小的值剛剛好。兩個動畫串接執行:先把來源視圖縮小,再把目標視圖放大。
接著觸發它。ViewController.swift 中加入 IBAction:
@IBAction func showThirdViewController(sender: AnyObject) {
    self.performSegueWithIdentifier("idSecondSegue", sender: self)
}
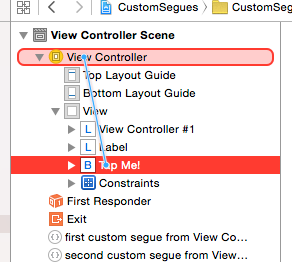
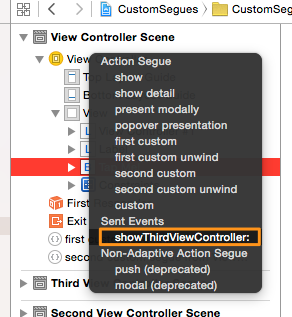
回到 Storyboard,按住 Ctrl 從場景中的按鈕拖到 ViewController 物件,在彈出視窗的 Sent Events 區塊中選擇這個 IBAction。
第二個解除轉場
因為 returnFromSegueActions(sender:) 已經寫好了,這次可以直接跳到 Storyboard。在 ThirdViewController 場景中,按住 Ctrl 從 ThirdViewController 物件拖到 Exit,選擇該方法。
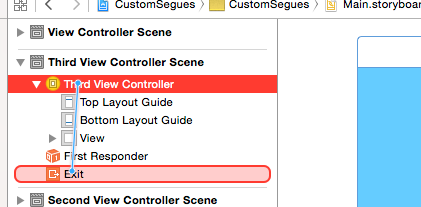
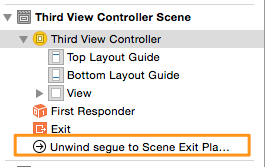
選取新建立的解除轉場,把 Identifier 設為 idSecondSegueUnwind。
回程我們做一個稍微複雜的效果:第三個視圖縮小並往螢幕上方移動,第一個視圖同時放大並從下方進場填滿畫面。
override func perform() {
    var firstVCView = destinationViewController.view as UIView!
    var thirdVCView = sourceViewController.view as UIView!
    let screenHeight = UIScreen.mainScreen().bounds.size.height

    firstVCView.frame = CGRectOffset(firstVCView.frame, 0.0, screenHeight)
    firstVCView.transform = CGAffineTransformScale(firstVCView.transform, 0.001, 0.001)

    let window = UIApplication.sharedApplication().keyWindow
    window?.insertSubview(firstVCView, aboveSubview: thirdVCView)

    UIView.animateWithDuration(0.5, animations: { () -> Void in
        thirdVCView.transform = CGAffineTransformScale(thirdVCView.transform, 0.001, 0.001)
        thirdVCView.frame = CGRectOffset(thirdVCView.frame, 0.0, -screenHeight)
        firstVCView.transform = CGAffineTransformIdentity
        firstVCView.frame = CGRectOffset(firstVCView.frame, 0.0, -screenHeight)
    }) { (Finished) -> Void in
        self.sourceViewController.dismissViewControllerAnimated(false, completion: nil)
    }
}
接著在 ViewController.swift 的 segueForUnwindingToViewController 中多比對一組識別碼:
override func segueForUnwindingToViewController(toViewController: UIViewController,
    fromViewController: UIViewController, identifier: String?) -> UIStoryboardSegue? {
    if let id = identifier {
        if id == "idFirstSegueUnwind" {
            // ... 回傳 FirstCustomSegueUnwind
        } else if id == "idSecondSegueUnwind" {
            let unwindSegue = SecondCustomSegueUnwind(identifier: id,
                source: fromViewController, destination: toViewController,
                performHandler: { () -> Void in })
            return unwindSegue
        }
    }
    return super.segueForUnwindingToViewController(toViewController,
        fromViewController: fromViewController, identifier: identifier)
}
最後在 ThirdViewController.swift 註冊向上滑動手勢並實作觸發方法:
override func viewDidLoad() {
    // ...
    var swipeGestureRecognizer: UISwipeGestureRecognizer =
        UISwipeGestureRecognizer(target: self, action: "showFirstViewController")
    swipeGestureRecognizer.direction = UISwipeGestureRecognizerDirection.Up
    self.view.addGestureRecognizer(swipeGestureRecognizer)
}

func showFirstViewController() {
    self.performSegueWithIdentifier("idSecondSegueUnwind", sender: self)
}
順手在 returnFromSegueActions 補一個 else 分支,讓回程時顯示訊息:
@IBAction func returnFromSegueActions(sender: UIStoryboardSegue) {
    if sender.identifier == "idFirstSegueUnwind" {
        // ... 背景色動畫
    } else {
        self.lblMessage.text = "Welcome back!"
    }
}
運行與驗收
示範 App 至此完成,可以開始測試。有不清楚的地方,建議直接改改參數、換換動畫,動手做一遍比讀十遍有用。
總結
回頭看整個流程,你會發現自定義轉場真的不難:繼承一個類別、重寫一個方法、補上觸發手勢與解除轉場的標準環節,就足夠撐起流暢且具辨識度的畫面切換。好的轉場動畫能顯著提升使用體驗,也是讓 App 從一堆作品中脫穎而出的低成本手段。
示範裡的動畫刻意保持簡單,目的是讓你把每個知識點都看清楚;真正的創意留給你發揮。祝你玩得開心,也歡迎分享你的成果。
本文由 CocoaChina 組織翻譯,譯文權利歸譯者所有,未經允許禁止轉載。