
用 xib 開發介面的六種加載方式與實踐總結
純用程式碼寫介面,有時會拖慢開發效率。對於一些通用而簡單的介面(例如 App 的設定頁),就很適合改用 xib 來開發。本文將系統性地梳理 xib 的原理與多種加載方式,並附上完整的實踐範例。
一、關於 xib
1. xib 與 nib
xib 檔可以被 Xcode 編譯成 nib 檔。xib 本質上是一個 XML 檔,而 nib 則是編譯後的二進位檔,它把視圖等控件物件封裝了起來;當程式運行時,這些物件便會被啟動。
由於 xib 本質上是 XML 檔,你可以用 vim 或 cat 指令直接查看,例如:
$ cat ~/Desktop/JLN-1_xib/JLN-1_xib/GrayViewController.xib
nib 檔則可以在程式的 Build 目錄下找到。
2. xib 檔的若干屬性
xib 檔有以下幾個重要屬性:
xib 檔名
File's Owner
xib 檔中視圖的 Class
xib 檔中視圖的 Outlet 指向
從哪裡加載 xib、加載 xib 中的哪個視圖,都能依據這幾個屬性推斷出來。
二、Demo 實踐
1. 加載 File's Owner 為 nil 的視圖
BlueView.xib

MainViewController.m
... @property (strong, nonatomic) UIView *blueView; ... - (void)loadBlueViewFromXIB { // BlueView.xib 的 File's Owner 為 nil NSArray *views = [[NSBundle mainBundle] loadNibNamed:@"BlueView" owner:nil options:nil]; self.blueView = views[0]; // 從 xib 加載進來的 View 大小是確定的,但它在父視圖中的位置是不確定的 // 此外,視圖中的子視圖也是原封不動地 Load 進來的 CGRect rect = _blueView.frame; rect.origin.x += 37.5f; rect.origin.y += 80.0f; _blueView.frame = rect; [self.view addSubview:_blueView]; }結論:
File's Owner 為 nil 的 xib 檔中的視圖屬於通用視圖,可在工程中重複使用。
從 xib 加載進來的 View 大小是確定的,但它在父視圖中的位置並不確定,需要開發者自行指定。
視圖中的所有子視圖會被原封不動地加載進來。
2. 加載 File's Owner 為 self 的視圖

MainViewController.m
... @property (weak, nonatomic) IBOutlet UIView *greenView; ... - (void)loadGreenViewFromXIB { // GreenView.xib 的 File's Owner 設為 self,並建立了一個從該 xib 的 View 到 self 的 IBOutlet greenView [[NSBundle mainBundle] loadNibNamed:@"GreenView" owner:self options:nil]; // 只要 self 主動調用 Load XIB 的方法,self 持有的 IBOutlet 指向的視圖就會被初始化 // 這裡不需要通過 views[0] 的方式存取視圖 CGRect rect = _greenView.frame; rect.origin.x = _blueView.frame.origin.x; rect.origin.y = _blueView.frame.origin.y + 80.0f; _greenView.frame = rect; [self.view addSubview:_greenView]; }結論:
File's Owner 不為 nil 的 xib 檔中的視圖屬於專用視圖,不應在工程中被重複使用。
只要 self 主動調用 loadNibNamed:owner:options: 方法,self 持有的 IBOutlet 指向的視圖就會被初始化。
存取 xib 中的視圖時,不用 views[0] 的方式,而是透過 IBOutlet 類型的 property 進行存取。
3. 加載 File's Owner 為特定類的視圖
RedView.xib

RedViewOwner.h
@interface RedViewOwner : NSObject @property (strong, nonatomic) IBOutlet UIView *redView; @end
MainViewController.m
... @property (strong, nonatomic) RedViewOwner *redViewOwner; ... - (void)loadRedViewFromXIB { // RedView.xib 的 File's Owner 是 RedViewOwner 類的實例,並建立了一個從該 xib 的 View 到 RedViewOwner 實例的 IBOutlet // 只要通過 _redViewOwner 主動調用 Load XIB 的方法,該 IBOutlet 指向的視圖就會被初始化 self.redViewOwner = [RedViewOwner new]; [[NSBundle mainBundle] loadNibNamed:@"RedView" owner:_redViewOwner options:nil]; UIView *redView = _redViewOwner.redView; CGRect rect = redView.frame; rect.origin.x = _greenView.frame.origin.x; rect.origin.y = _greenView.frame.origin.y + 80.0f; redView.frame = rect; [self.view addSubview:redView]; }結論:
File's Owner 類可以封裝視圖中的各種邏輯,而不僅僅是提供視圖內容。
只要透過 File's Owner 類主動調用 loadNibNamed:owner:options: 方法,該 IBOutlet 指向的視圖就會被初始化。
4. 加載檔名與視圖類名一致的視圖(File's Owner 為 nil)
YellowView.xib

YellowView.h/m
@interface YellowView : UIView + (instancetype)viewFromNIB; @property (weak, nonatomic) IBOutlet UILabel *titleLabel; @end @implementation YellowView // Convenience Method + (instancetype)viewFromNIB { // 加載 xib 中的視圖,其中 xib 檔名和本類類名必須一致 // 這個 xib 檔的 File's Owner 必須為空 // 這個 xib 檔必須只擁有一個視圖,並且該視圖的 class 為本類 NSArray *views = [[NSBundle mainBundle] loadNibNamed:NSStringFromClass([self class]) owner:nil options:nil]; return views[0]; } - (void)awakeFromNib { // 視圖內容布局 self.backgroundColor = [UIColor yellowColor]; self.titleLabel.textColor = [UIColor whiteColor]; } @endMainViewController.m
... @property (strong, nonatomic) YellowView *yellowView; ... - (void)loadYellowViewFromXIB { // 說明見 YellowView.m 的 viewFromNIB 方法 self.yellowView = [YellowView viewFromNIB]; CGRect rect = _yellowView.frame; UIView *redView = _redViewOwner.redView; rect.origin.x = redView.frame.origin.x; rect.origin.y = redView.frame.origin.y + 80.0f; _yellowView.frame = rect; [self.view addSubview:_yellowView]; }結論:
這裡的 viewFromNIB 方法只是對 loadNibNamed:owner:options: 的一個簡單封裝,使用時需滿足以下條件:
- xib 檔名和本類類名必須一致;
- 這個 xib 檔的 File's Owner 必須為空;
- 這個 xib 檔必須只擁有一個視圖,並且該視圖的 class 為本類。
5. 透過 UIViewController 的 initWithNibName:bundle: 加載 xib 中的視圖
BlackView.xib

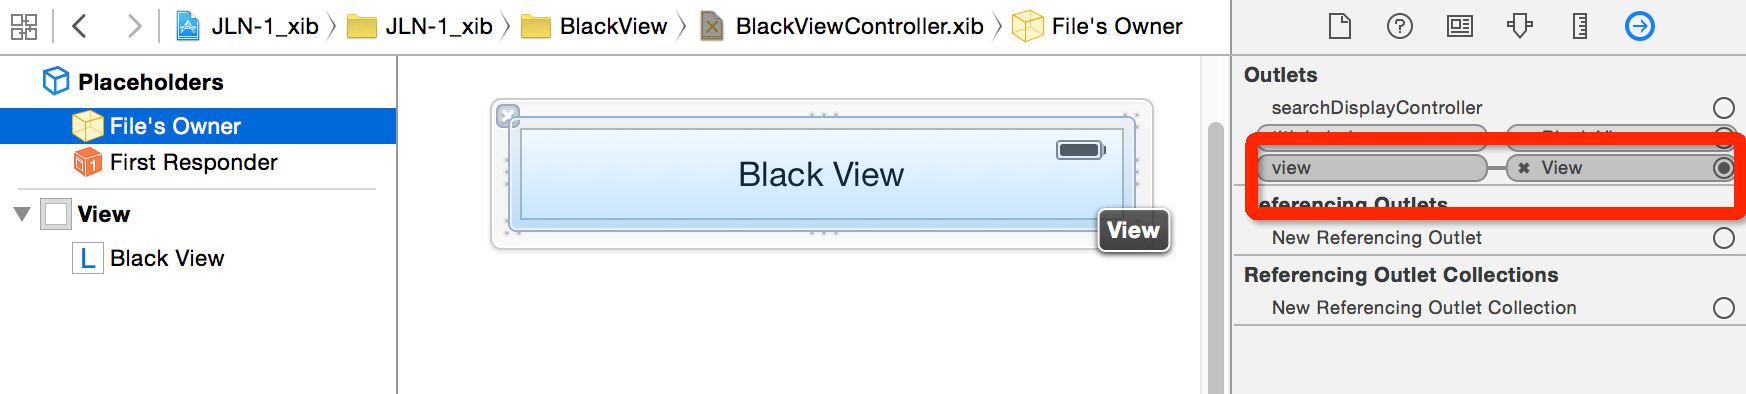
如果 BlackViewController 類希望 self.view 就是 xib 檔中的 View,可以在 Connections 頁中建立 view → File's Owner 的 Outlet,如下圖:
BlackViewController.h/m
@interface BlackViewController : UIViewController @property (weak, nonatomic) IBOutlet UILabel *titleLabel; // Convenience Method + (instancetype)viewControllerFromNIB; @end @implementation BlackViewController - (void)viewDidLoad { [super viewDidLoad]; self.view.backgroundColor = [UIColor blackColor]; self.titleLabel.textColor = [UIColor whiteColor]; } + (instancetype)viewControllerFromNIB { return [[BlackViewController alloc] initWithNibName:NSStringFromClass([self class]) bundle:[NSBundle mainBundle]]; } - (void)didReceiveMemoryWarning { [super didReceiveMemoryWarning]; // Dispose of any resources that can be recreated. } @endMainViewController.m
... @property (strong, nonatomic) BlackViewController *blackViewController; ... - (void)loadBlackViewFromXIB { self.blackViewController = [[BlackViewController alloc] initWithNibName:@"BlackViewController" bundle:[NSBundle mainBundle]]; // 或使用 Conveniece Method,但要求 xib 檔名和 View Controller 類名一致 // self.blackViewController = [BlackViewController viewControllerFromNIB]; UIView *blackView = _blackViewController.view; CGRect rect = blackView.frame; rect.origin.x = _yellowView.frame.origin.x; rect.origin.y = _yellowView.frame.origin.y + 80.0f; blackView.frame = rect; [self.view addSubview:blackView]; }結論:
把 xib 的 File's Owner 設為一個 UIViewController 子類,就能將這個 xib 檔的視圖展示與外部響應事件(例如點擊按鈕觸發的事件、視圖的手勢事件等)全部封裝在一個 View Controller 中。如果把按鈕的點擊事件封裝在一個 UIView 類裡,似乎有破壞 MVC 模式之嫌,因此最好把 xib 的 File's Owner 設為一個 UIViewController 子類,該類可以透過 addChildViewController 方法被加到現有的 View Controller 上;若只是希望加載視圖,則可以透過 viewcontroller.view 來存取。
如果希望 ViewControllerA 加載並響應 aXIBView 中的按鈕點擊事件,就必須建立一個 aXIBView 到 ViewControllerA 的 IBAction。若 ViewControllerA 需要擁有兩個以上這樣的 XIB,它就會變得非常龐大;此時可以為每個 XIB 各設一個 View Controller,再讓 ViewControllerA 去加載這些 Child View Controllers,如此一來便能將事件響應職責與視圖描繪工作分派給專門的子控制器,在縮小 ViewControllerA 體積的同時,也提升了各個 xib 的可複用性。
這裡的 viewControllerFromNIB 方法其實就是 initWithNibName:bundle: 的一個簡單封裝,要求 xib 的 File's Owner 設為本類。
6. 透過 UIViewController+NIB 加載 xib 中的 View Controller 類及其視圖
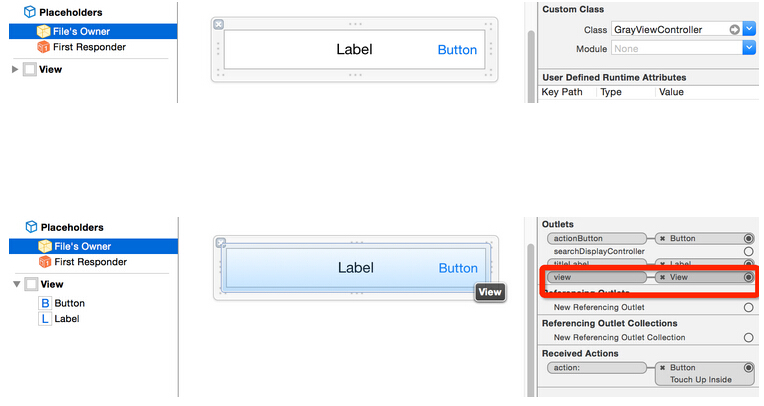
GrayView.xib
UIViewController+NIB.h/m
@interface UIViewController (NIB) // 要求 xib 檔名和 View Controller 類名一致 + (instancetype)loadFromNib; @end @implementation UIViewController (NIB) + (instancetype)loadFromNib { // [self class] 會由調用的類決定 Class controllerClass = [self class]; NSLog(@"class = %@", controllerClass); return [[controllerClass alloc] initWithNibName:NSStringFromClass(controllerClass) bundle:[NSBundle mainBundle]]; } @endGrayViewController.h/m
@interface GrayViewController : UIViewController @property (weak, nonatomic) IBOutlet UILabel *titleLabel; @property (weak, nonatomic) IBOutlet UIButton *actionButton; @end @implementation GrayViewController - (void)viewDidLoad { [super viewDidLoad]; self.view.backgroundColor = [UIColor grayColor]; self.titleLabel.text = @"Gray View"; self.titleLabel.textColor = [UIColor whiteColor]; self.titleLabel.textAlignment = NSTextAlignmentCenter; self.titleLabel.font = [UIFont systemFontOfSize:8.5f]; [self.actionButton setTitle:@"action" forState:UIControlStateNormal]; [self.actionButton setTitleColor:[UIColor whiteColor] forState:UIControlStateNormal]; } - (void)didReceiveMemoryWarning { [super didReceiveMemoryWarning]; // Dispose of any resources that can be recreated. } // 推薦從 XIB 檔中加載 View Controller 的方法,這種方法可以將 XIB 檔中的視圖和其按鈕響應事件全部封裝在 GrayViewController // 如果 GrayViewController 的按鈕響應事件由 MainViewController 作出響應,那麼二者的耦合度就過高 // 建議: // 單純的通用 View 展示,使用從 xib 檔加載視圖的方法,File's Owner 設為 nil // 特定擁有者的 View 展示,從 xib 檔加載視圖時,File's Owner 設為擁有者 // 如果視圖中有按鈕響應事件,或其它可以和用戶交互的事件,建議採用從 XIB 檔中加載 View Controller 的方法,這樣可以封裝 UI 展示和交互事件 - (IBAction)action:(id)sender { NSLog(@"action"); } @endMainViewController.m
... @property (strong, nonatomic) GrayViewController *grayViewController; ... - (void)loadGrayViewFromXIB { self.grayViewController = [GrayViewController loadFromNib]; UIView *grayView = _grayViewController.view; UIView *blackView = _blackViewController.view; CGRect rect = grayView.frame; rect.origin.x = blackView.frame.origin.x; rect.origin.y = blackView.frame.origin.y + 80.0f; grayView.frame = rect; [self.view addSubview:grayView]; }結論:
這裡我專門寫了一個 UIViewController+NIB 的 category,只需呼叫 loadFromNib 類方法就能加載 xib 中的視圖。要求:xib 檔的 File's Owner 必須設為對應的 View Controller 類。
三、總結
寫介面時把 xib 與程式碼混用,能有效提升效率;而對 xib 的運用,主要體現在它的專用性與通用性上。
對於一些專門的介面,例如 App 的設定頁,純用程式碼難免浪費時間,此時就可以透過 xib 拖控件的方式來定制。這個 xib 專用於某一個介面,目的是提高效率。
對於一些通用的控件甚至介面,例如一個很漂亮但實現起來非常複雜的按鈕,此時就可以透過加載 xib 中的視圖來快速添加。這個 xib 為所有視圖共用,目的是提高可複用性。
對於通用的 xib:
如果 xib 只是單純的介面展示,那麼 File's Owner 可以隨意設定。
如果 xib 中包含了按鈕、手勢等使用者輸入事件,那麼 File's Owner 最好設為 UIViewController 類的子類。
四、自問自答
以前使用 xib 時一直有個疑問:xib 中可以有多個視圖控件,但從 xib 加載出來的是一個陣列,那麼該怎麼確定哪個物件對應哪個控件呢?
我們來實際驗證一下。PurpleView.xib
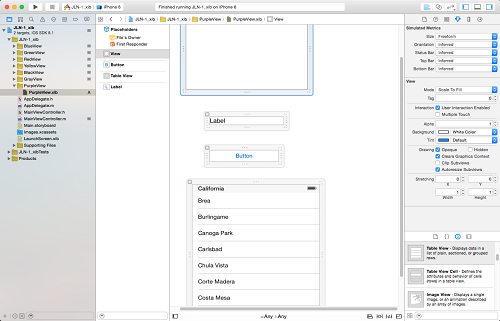
隨便在 xib 檔裡加了幾個視圖,接下來把它們加載出來看看:
MainViewController.m
- (void)logViewsFromXIB { NSLog(@"%s begin", __func__); NSArray *views = [[NSBundle mainBundle] loadNibNamed:@"PurpleView" owner:nil options:nil]; for (int i = 0; i < views.count; i++) { id obj = views[i]; NSLog(@"%d : %@", i, [obj class]); } NSLog(@"%s end", __func__); }控制台輸出如下:
2015-01-09 15:03:06.629 JLN-1_xib[3139:121677] -[MainViewController logViewsFromXIB] begin 2015-01-09 15:03:06.635 JLN-1_xib[3139:121677] 0 : UIView 2015-01-09 15:03:06.635 JLN-1_xib[3139:121677] 1 : UIButton 2015-01-09 15:03:06.636 JLN-1_xib[3139:121677] 2 : UITableView 2015-01-09 15:03:06.636 JLN-1_xib[3139:121677] 3 : UILabel 2015-01-09 15:03:06.636 JLN-1_xib[3139:121677] -[MainViewController logViewsFromXIB] end
結論:從 xib 加載出來的 views 陣列中,視圖物件的排列順序,和 xib scene 中的物件排列順序一致(其實就是 XML 檔中元素的排序而已),如下圖:
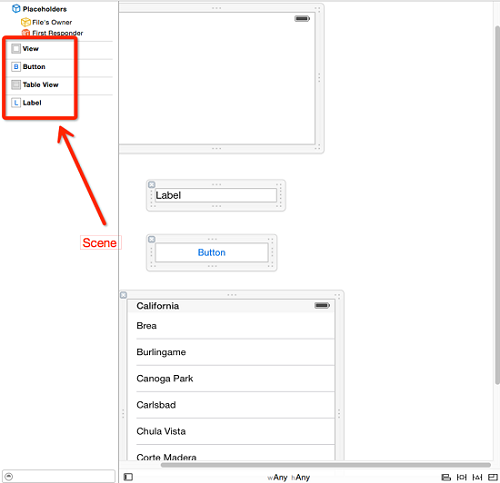
你可以把它們打亂後重新運行程式,對照查看結果。
參考資料:https://www.ifun.cc/blog/2014/02/22/ioskai-fa-zhi-xibji-qiao-jie-shao/