
Realm 數據庫入門實戰:用 Swift 從零做一個物種記錄 App

本教程將帶你認識 Realm 這款移動數據庫引擎,並在 Swift 中完成一次完整的增刪改查實踐。
Realm 是什麼
Realm 是一款跨平台移動數據庫引擎,2014 年 7 月正式發布,定位是專為移動應用設計的數據持久化解決方案。
它接入項目的成本極低,插入、查詢等最常用操作往往一行代碼就能搞定。
需要澄清一個常見誤解:Realm 並不是對 Core Data 的封裝,也不是建在 SQLite 之上。它擁有自研的存儲引擎,建庫與查詢效率都很可觀。也正因引擎自持,同一套 Realm 可以在 iOS 與 Android 之間無縫共用,並分別提供 Swift、Objective-C 與 Java 的 SDK。
大量開發者的實際體驗是:Realm 比 SQLite 和 Core Data 快得多。以「按前綴模糊查詢並排序」這個需求為例,兩邊的代碼量差距相當直觀。
Core Data 版本:
// Core Data
let fetchRequest = NSFetchRequest(entityName: "Specimen")
let predicate = NSPredicate(format: "name BEGINSWITH [c]%@", searchString)
fetchRequest.predicate = predicate

let sortDescriptor = NSSortDescriptor(key: "name", ascending: true)
fetchRequest.sortDescriptors = [sortDescriptor]

let error = NSError()
let results = managedObjectContext?.executeFetchRequest(fetchRequest, error: error)
Realm 版本:
// Realm
let predicate = NSPredicate(format: "name BEGINSWITH [c]%@", searchString)
let specimens = Specimen.objectsWithPredicate(predicate)
    .arraySortedByProperty("name", ascending: true)
簡潔本身就是一種生產力:代碼好讀,也就好寫、好維護。
綜合來看,選它的理由大致有三:
- 跨平台:如今很少有應用只做 iOS。為兩個平台各搞一套數據庫並不合理,而 Realm 讓 iOS 與 Android 無需關心對方的內部架構,各自調用提供的 API 即可完成數據交換,真正做到「一套數據庫,兩端無縫銜接」。
- 簡單易用:Core Data 與 SQLite 龐雜的概念和樣板代碼足以勸退新手,Realm 則大幅壓低了學習成本,讓應用能更早用上本地存儲。
- 可視化:官方提供了輕量的數據庫查看工具,可以直接瀏覽庫中內容並執行簡單的增刪操作。很多時候我們引入數據庫,本來就是為了給用戶做一個「知識庫」。
接下來,我們會在 iOS 平台上完整走一遍:導入框架、建立數據模型、執行查詢與增刪改,並把已有數據可視化地檢查出來。
提示:原文寫於 2014 年,Realm 迭代很快,因此本教程不局限於原文內容,而是結合當時的版本做了相應調整。
項目背景
假設你在西雙版納自然保護區找到一份「監測員」的工作,職責是記錄這個「動植物王國」中各物種的相關信息:種群數量、分佈區域、年齡結構等等。
理想情況是配一名助手幫你記錄,但保護區沒有多餘人手(主要是沒預算)。於是我們決定自己做一個虛擬助手——一個名為「物種監測」的 App,隨手就能把發現記錄下來。
在 Xcode 中打開起始項目。此時 MapKit 已經配置完成,項目也具備了一些創建、更新、刪除物種信息的基礎能力。如果你對 MapKit 有興趣,可以另找 Introduction to MapKit 這類教程深入了解。
集成 Realm 框架
到官網下載框架:https://static.realm.io/downloads/cocoa/latest
環境要求:
- iOS ≥ 7 或 Mac OS X ≥ 10.9
- Xcode ≥ 6
解壓下載到的壓縮包,進入其中的 iOS 文件夾,把 Realm.framework 拖進起始項目,建議放進「Frameworks」組裡保持整潔。
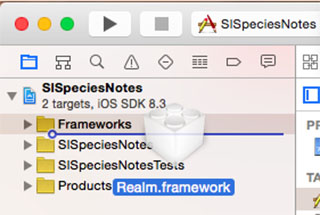
把框架拖進項目
記得勾選 Copy Items if needed,然後點擊 Finish。
接著定位到項目設置中 SISpeciesNotes 的 General 選項卡,在 Link Binary with Libraries 中加入 libc++.dylib。
然後回到解壓目錄,打開名為 Swift 的文件夾,把裡面的 RLMSupport.swift 也拖進項目。這個文件為 Realm 相關類提供了 Swift 便捷方法(比如 RLMResults 的 Generator 支持),讓我們能像操作原生數組一樣操作 Realm 集合。
准備工作完成。先跑一遍起始項目確認沒有報錯,若出錯就回頭核對上述步驟。運行後的基本界面如下:
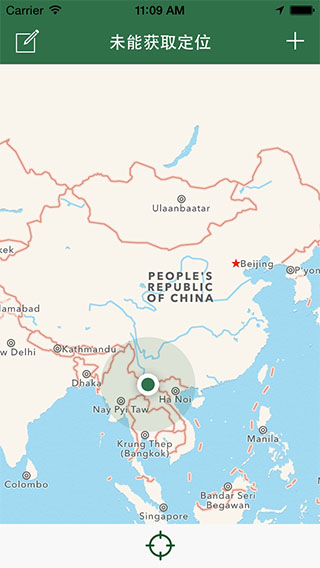
應用界面
認識 Realm Browser
Realm 資源包裡附帶了一個實用工具:Realm Browser。
它讓讀寫 .realm 數據庫變得直觀,不必再頭疼如何解讀私有格式。操作體驗和 SQLite 的可視化客戶端類似,簡單易用(雖然目前功能確實只有讀寫而已)。
Realm Browser
它可以在解壓目錄的 browser 文件夾中找到,也能從 Realm 的 GitHub 倉庫 tools/RealmBrowser 目錄取得。打開後可以試試菜單 Tools → Generate demo database,快速熟悉它的玩法。
核心術語與主要類
- RLMRealm:框架的核心,是我們訪問數據庫的入口,角色相當於 Core Data 的管理對象上下文。為簡化起見,Realm 提供了名為
defaultRealm的單例,本教程只用它。當然你也可以導入外部已有的 realm 文件、在不需要落盤時使用「內存實例」(in-memory realm),甚至同時使用多個數據庫文件。 - RLMObject:自定義的數據模型。模型的定義直接決定數據庫結構,只需繼承 RLMObject 並聲明希望存儲的屬性。
- 關係(Relationships):在模型中聲明一個 RLMObject 類型的屬性,即建立「一對多」關係;配合 RLMArray 還能表達「多對一」與「多對多」。
- 寫事務(Write Transactions):所有創建、修改、刪除對象的操作都必須在事務中完成,也就是包在
beginWriteTransaction()與commitWriteTransaction()之間。 - 查詢(Queries):最簡單的形式是對 RLMObject 發送
allObjects();更複雜的需求可以叠加斷言(predicates)、復合查詢與結果排序。 - RLMResults:查詢返回的集合類型,內容是一組 RLMObject。它支持下標訪問,也有排序、查找等更強的能力。
創建第一個數據模型
在 Xcode 項目導航器中右鍵點選 Model 組,選擇 New File → iOS → Source → Swift File,命名為 SpeciesModel,並確認 target 勾選 SISpeciesNotes。
提示:Realm 文檔提到可以用「插件」像新建 Core Data 模型那樣生成模板文件,但目前該功能只支持 Objective-C。為了代碼純淨,這裡不用它。
打開 SpeciesModel.swift,用下面的內容替換:
import UIKit
import Realm

class SpeciesModel: RLMObject {
    dynamic var name = ""
    dynamic var speciesDescription = ""
    dynamic var latitude: Double = 0
    dynamic var longitude: Double = 0
    dynamic var created = NSDate()
}
各字段含義:name 存物種名稱,speciesDescription 存描述信息。Realm 對字符串等類型要求必須初始化,這裡用空字符串;latitude 與 longitude 存經緯度,類型為 Double(CLLocationDegrees 就是 Double 的別名),以 0 初始化;created 記錄創建時間,NSDate() 返回當前時間,正好拿來做初始值。
小挑戰:物種還需要劃分到不同「類別」。請自行創建 CategoryModel.swift,只需要一個字符串屬性 name。參考實現:
import UIKit
import Realm

class CategoryModel: RLMObject {
    dynamic var name = ""
}
接下來把兩者關聯起來。回顧前面的內容——只需聲明一個屬性即可建立關係。打開 SpeciesModel.swift,在 created 下方添加:
dynamic var category = CategoryModel()
這行確立了「物種 → 類別」的一對多關係:每個物種只能有一個類別,而一個類別可以對應多個物種。
寫入數據
用戶每次新增物種標記時,都可以補充名稱、選擇類別等信息。打開 CategoriesTableViewController.swift,這個控制器會在表視圖中列出類別供選擇,因此我們需要在首次啟動時預置一批默認類別。
在類中添加以下方法(別忘了文件頂部 import Realm):
private func populateDefaultCategories() {
    self.results = CategoryModel.allObjects()          // 1

    if results.count == 0 {                            // 2
        let realm = RLMRealm.defaultRealm()            // 3
        realm.beginWriteTransaction()                  // 4

        let defaultCategories = Categories.allValues   // 5
        for category in defaultCategories {            // 6
            let newCategory = CategoryModel()
            newCategory.name = category
            realm.addObject(newCategory)
        }

        realm.commitWriteTransaction()                 // 7
        self.results = CategoryModel.allObjects()
    }
}
逐條說明:
allObjects()返回指定模型的全部記錄。這裡向 CategoryModel 發了一次查詢,拿到的是一個裝載結果的 RLMResults。- 若結果為 0,說明庫中還沒有類別數據,也就意味著這是首次啟動。
- 取得默認 realm 單例並用局部變量簡寫。
- 在默認庫中開啟事務,之後才能寫入。
- 用已定義的 Categories 枚舉組出全部默認類別。
- 遍歷名稱,為每個名稱建立 CategoryModel 實例、賦值,再添加到 realm。
- 全部添加完畢後提交事務。
只有調用 commitWriteTransaction(),事務中的操作才會真正生效——這與 Realm 的內部處理機制有關。你可以像這樣做簡單創建,也可以在一個事務裡批量創建、更新、刪除多個對象。
在 viewDidLoad() 末尾調用:
populateDefaultCategories()
這樣視圖加載時就會寫入測試用類別。
接著更新表視圖數據源,讓這些類別顯示出來。找到 tableView(_:cellForRowAtIndexPath:) 並替換:
override func tableView(tableView: UITableView, cellForRowAtIndexPath indexPath: NSIndexPath) -> UITableViewCell {
    let cell = tableView.dequeueReusableCellWithIdentifier("CategoryCell", forIndexPath: indexPath) as! UITableViewCell
    cell.textLabel?.text = (results[UInt(indexPath.row)] as! CategoryModel).name
    return cell
}
再添加一個屬性用來保存當前選中項:
var selectedCategory: CategoryModel!
找到 tableView(_:willSelectRowAtIndexPath:) 並替換:
override func tableView(tableView: UITableView, willSelectRowAtIndexPath indexPath: NSIndexPath) -> NSIndexPath? {
    selectedCategory = self.results[UInt(indexPath.row)] as! CategoryModel
    return indexPath
}
這樣用戶點擊某行時,對應類別就被記錄下來了。
編譯運行,用模擬器的位置模擬功能定位到感興趣的地方,點右上角「+」新建標記,點開氣泡查看詳情,再點類別文本框,就能看到類別列表:
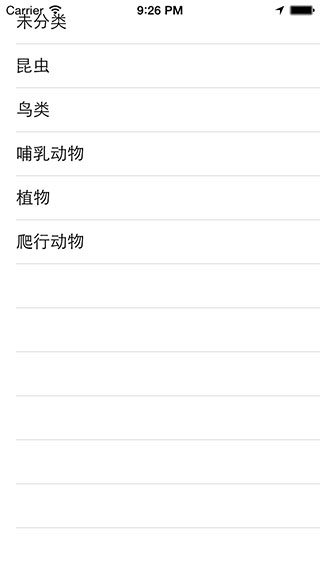
類別列表
選擇目前只會存進屬性。有興趣的話,可以去模擬器的 Documents 目錄用 Realm Browser 打開數據庫,親眼看看剛剛寫入的記錄。
用 Realm Browser 查看數據庫
defaultRealm() 生成的文件通常位於:
/Users/(Your Account)/Library/Developer/CoreSimulator/Devices/(Simulator ID)/data/Containers/Data/Application/(Application ID)/Documents/default.realm
如果嫌路徑太繞,直接打印一行即可拿到完整位置:
println(RLMRealm.defaultRealm().path)
該目錄下可能看到兩個文件:default.realm 是數據庫本體;default.realm.lock 則不一定存在,它用於在數據庫被使用時阻止其它進程修改。
雙擊 default.realm 即可用 Realm Browser 打開:
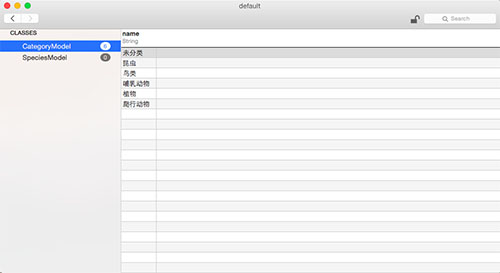
Realm Browser 打開的 default.realm
注意:若 default.realm 已被其它進程打開,強行打開可能出異常。.lock 文件正是為了防止重複操作——打開前請先確保 App 沒有在運行,並刪除 .lock 文件。
打開後你會看到 CategoryModel 下有 6 個對象,說明這張「表」裡已有 6 條記錄。點擊類名即可查看具體對象。
為物種關聯類別
打開 AddNewEntryController.swift,添加屬性:
var selectedCategory: CategoryModel!
找到 unwindFromCategories(segue:),在方法底部添加:
selectedCategory = categoriesController.selectedCategory
categoryTextField.text = selectedCategory.name
用戶從類別列表返回時會觸發這個方法,我們在這裡取出選擇結果存入本地屬性,並回填到文本框。
接下來創建第一個物種。仍在 AddNewEntryController.swift 中再添加一個屬性:
var species: SpeciesModel!
導入 Realm 後,添加寫入方法:
func addNewSpecies() {
    let realm = RLMRealm.defaultRealm()   // 1
    realm.beginWriteTransaction()         // 2

    let newSpecies = SpeciesModel()       // 3
    newSpecies.name = nameTextField.text  // 4
    newSpecies.category = selectedCategory
    newSpecies.speciesDescription = descriptionTextView.text
    newSpecies.latitude = selectedAnnotation.coordinate.latitude
    newSpecies.longitude = selectedAnnotation.coordinate.longitude

    realm.addObject(newSpecies)           // 5
    realm.commitWriteTransaction()        // 6

    self.species = newSpecies
}
- 取得默認 Realm 數據庫
- 開啟寫事務
- 創建 SpeciesModel 實例
- 從界面控件讀取值並賦給各字段
- 把新對象寫入 realm
- 提交事務
當然,寫入前要做輸入校驗。工程裡已有 validateFields() 負責確保名稱與描述非空,我們新增了類別選擇,因此還要判斷它是否為空。找到:
if nameTextField.text.isEmpty || descriptionTextView.text.isEmpty {
改為:
if nameTextField.text.isEmpty || descriptionTextView.text.isEmpty || selectedCategory == nil {
接著添加:
override func shouldPerformSegueWithIdentifier(identifier: String?, sender: AnyObject?) -> Bool {
    if validateFields() {
        if species == nil {
            addNewSpecies()
        }
        return true
    } else {
        return false
    }
}
校驗通過才允許跳轉並寫入新物種。
編譯運行,點「+」新建物種,填名稱與描述、選類別,點保存。
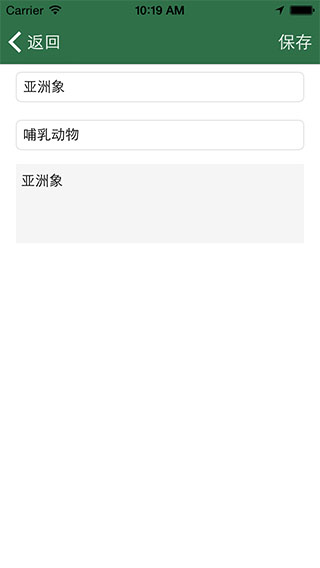
添加新的數據
視圖消失了——但地圖上什麼都沒變。因為數據雖然進了庫,界面卻還沒同步。
檢索並展示數據
先退出模擬器,用 Realm Browser 打開數據庫確認記錄已寫入:
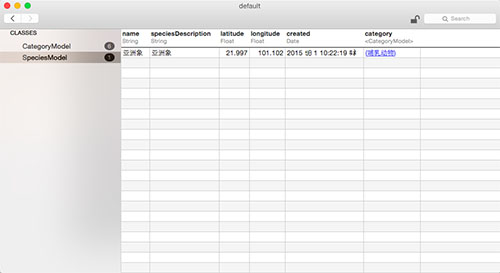
添加的物種信息
目前只有孤零零一條記錄,包含名稱、描述、經緯度與創建時間。最關鍵的是我們看到了指向 CategoryModel 的 category 鏈接,說明「一對多」關係已建立。點擊該鏈接即可查看對應類別。
回到界面。打開 SpeciesAnnotation.swift,添加屬性:
var species: SpeciesModel?
替換構造器:
init(coordinate: CLLocationCoordinate2D, title: String, sub: Categories, species: SpeciesModel? = nil) {
    self.coordinate = coordinate
    self.title = title
    self.subtitle = sub.rawValue
    self.species = species
}
我們加了一個帶默認值的參數,因此可以省略它、沿用原來的三參數初始化方式。
打開 MapViewController.swift,添加屬性(同樣記得導入 Realm):
var results: RLMResults?
注意:RLMResults 不能自行初始化,必須由查詢產生。
添加填充地圖的方法:
func populateMap() {
    mapView.removeAnnotations(mapView.annotations)          // 1

    if let results = SpeciesModel.allObjects() {           // 2
        self.results = results
        for result in results {
            let species = result as! SpeciesModel
            let coordinate = CLLocationCoordinate2DMake(species.latitude, species.longitude)

            let speciesAnnotation = SpeciesAnnotation(
                coordinate: coordinate,
                title: species.name,
                sub: Categories(rawValue: species.category.name)!,
                species: species)                          // 3

            mapView.addAnnotation(speciesAnnotation)       // 4
        }
    }
}
- 先清掉地圖上已有的標記,避免重複
- 從 Realm 取出全部物種
- 組裝自定義的 SpeciesAnnotation
- 把標記添加到 MKMapView
在 viewDidLoad() 末尾調用 populateMap(),即可保證每次進入地圖頁都會刷新標記。
最後完善返回時的處理。替換 unwindFromAddNewEntry():
@IBAction func unwindFromAddNewEntry(segue: UIStoryboardSegue) {
    let addNewEntryController = segue.sourceViewController as! AddNewEntryController
    let addedSpecies = addNewEntryController.species
    let addedSpeciesCoordinate = CLLocationCoordinate2DMake(addedSpecies.latitude, addedSpecies.longitude)

    if lastAnnotation != nil {
        mapView.removeAnnotation(lastAnnotation)
    } else {
        for annotation in mapView.annotations {
            let currentAnnotation = annotation as! SpeciesAnnotation
            if currentAnnotation.coordinate.latitude == addedSpeciesCoordinate.latitude
                && currentAnnotation.coordinate.longitude == addedSpeciesCoordinate.longitude {
                mapView.removeAnnotation(currentAnnotation)
                break
            }
        }
    }

    let annotation = SpeciesAnnotation(
        coordinate: addedSpeciesCoordinate,
        title: addedSpecies.name,
        sub: Categories(rawValue: addedSpecies.category.name)!,
        species: addedSpecies)
    mapView.addAnnotation(annotation)
    lastAnnotation = nil
}
從新增頁返回時,這個方法會把之前那個「臨時」標記換成帶名稱和類別的正式標記。
編譯運行,多建幾個不同類別的物種,看看地圖效果。
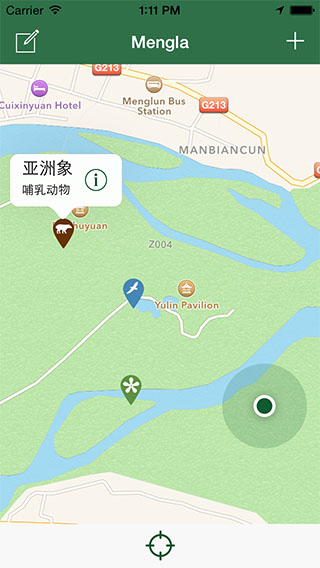
添加的標記點效果
另一個視圖:記錄列表
地圖左上角有個「編輯」按鈕,背後是一個基於文本的表視圖,用來集中列出所有記錄點,我們稱之為「記錄」視圖。目前它還是空的。
打開 LogViewController.swift,把 species 屬性改為(記得導入 Realm):
var species: RLMResults!
在 viewDidLoad() 中 super.viewDidLoad() 下方添加:
species = SpeciesModel.allObjects().sortedResultsUsingProperty("name", ascending: true)
這行會取出全部物種並按名稱排序。
替換 tableView(_:cellForRowAtIndexPath:):
override func tableView(tableView: UITableView, cellForRowAtIndexPath indexPath: NSIndexPath) -> UITableViewCell {
    var cell = tableView.dequeueReusableCellWithIdentifier("LogCell") as! LogCell

    var speciesModel: SpeciesModel!
    speciesModel = species[UInt(indexPath.row)] as! SpeciesModel

    cell.titleLabel.text = speciesModel.name
    cell.subtitleLabel.text = speciesModel.category.name
    cell.iconImageView.image = getImageOfSpecies(speciesModel.category.name)
    return cell
}
編譯運行,點左上角「編輯」,就能看到剛才錄入的物種。
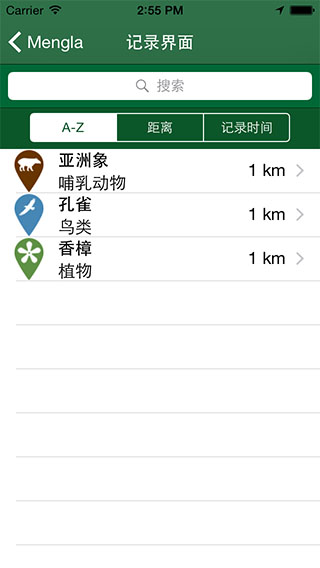
記錄界面
刪除記錄
誤建標記或需要清理舊數據時,就得用到刪除。打開 LogViewController.swift,添加:
func deleteRowAtIndexPath(indexPath: NSIndexPath) {
    let realm = RLMRealm.defaultRealm()                                    // 1
    let objectToDelete = species[UInt(indexPath.row)] as! SpeciesModel     // 2

    realm.beginWriteTransaction()                                          // 3
    realm.deleteObject(objectToDelete)                                     // 4
    realm.commitWriteTransaction()                                         // 5

    species = SpeciesModel.allObjects().sortedResultsUsingProperty("name", ascending: true)  // 6
    tableView.deleteRowsAtIndexPaths([indexPath], withRowAnimation: .Fade)  // 7
}
- 取默認數據庫
- 定位待刪對象
- 開啟寫事務
- 調用
deleteObject(),Realm 會自動完成刪除 - 提交事務
- 刪除後重新讀取數據
- 更新 UI,移除對應單元格
找到 tableView(_:commitEditingStyle:forRowAtIndexPath:),在 if 分支中加入:
deleteRowAtIndexPath(indexPath)
編譯運行,在記錄界面左滑刪除一條,然後退出模擬器、用 Realm Browser 打開數據庫核對。
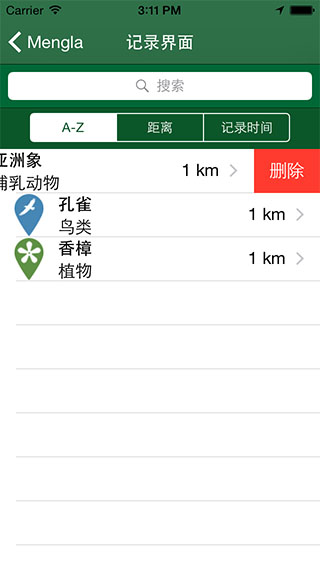
執行刪除操作
斷言匹配與搜索
項目已自帶一個 UISearchController,我們只需要讓它在 Realm 上正常工作。打開 LogViewController.swift,把 searchResults 改為:
var searchResults: RLMResults!
添加過濾方法:
func filterResultsWithSearchString(searchString: String) {
    let predicate = "name BEGINSWITH [c]'\(searchString)'"   // 1
    let scopeIndex = searchController.searchBar.selectedScopeButtonIndex

    searchResults = SpeciesModel.objectsWhere(predicate)     // 2

    switch scopeIndex {
    case 0:
        searchResults = searchResults.sortedResultsUsingProperty("name", ascending: true)     // 3
    case 1:
        searchResults = searchResults.sortedResultsUsingProperty("distance", ascending: true)  // 4
    case 2:
        searchResults = searchResults.sortedResultsUsingProperty("created", ascending: true)   // 5
    default:
        return
    }
}
- 構造字符串形式的斷言,匹配以 searchString 開頭的 name。
[c]表示不區分大小寫;注意 searchString 要用單引號包住。 - 用
objectsWhere執行斷言查詢。 - 選中「名字」標籤時按 A–Z 排序。
- 選中「距離」時按距離排序。
- 選中「創建時間」時按時間排序。
由於搜索會復用同一套數據源方法,tableView(_:cellForRowAtIndexPath:) 需要稍作調整。找到:
speciesModel = species[UInt(indexPath.row)] as! SpeciesModel
替換為:
if searchController.active {
    speciesModel = searchResults[UInt(indexPath.row)] as! SpeciesModel
} else {
    speciesModel = species[UInt(indexPath.row)] as! SpeciesModel
}
這樣搜索激活時讀搜索結果,否則讀全量數據。
最後處理切換排序方式。替換空的 scopeChanged:
@IBAction func scopeChanged(sender: UISegmentedControl) {
    switch sender.selectedSegmentIndex {
    case 0:
        species = SpeciesModel.allObjects().sortedResultsUsingProperty("name", ascending: true)
    case 1:
        break
    case 2:
        species = SpeciesModel.allObjects().sortedResultsUsingProperty("created", ascending: true)
    default:
        species = SpeciesModel.allObjects().sortedResultsUsingProperty("name", ascending: true)
    }
    tableView.reloadData()
}
這裡判斷被點擊的選項(A–Z、距離、添加日期)並相應排序,默認按名稱排。
你可能注意到 case 1(距離)目前是空的——因為數據模型裡還沒有「距離」這個字段,等到後面補上再完善。先跑起來看看效果。
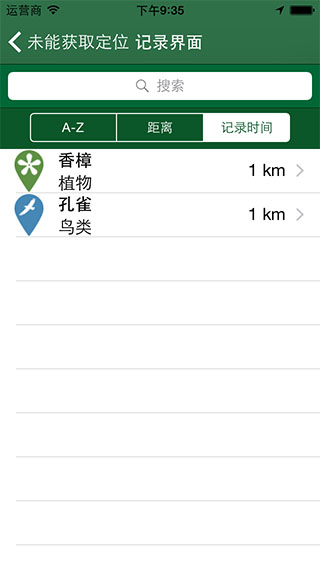
查看不同的結果
提示:在原教程中搜索其實是跑不通的。即便在「合適」位置加上了方法,程序仍會報 cell 的 titleLabel 為 nil。原因是 Cell 在 Storyboard 中自定義,而搜索結果要展示的是一個新表視圖。若希望復用自定義 Cell,最好把它抽到 Xib 中——沒有實現 init(style:reuseIdentifier:) 的自定義 Cell 類是無法被正常復用的。
更新記錄
點擊 LogViewController 中的某行會跳轉到新增頁,但字段都是空的。先讓它把庫裡的數據帶出來。
打開 AddNewEntryController.swift,添加:
func fillTextFields() {
    nameTextField.text = species.name
    categoryTextField.text = species.category.name
    descriptionTextView.text = species.speciesDescription
    selectedCategory = species.category
}
在 viewDidLoad() 末尾添加:
if species == nil {
    title = " 添加新的物種 "
} else {
    title = " 編輯 \(species.name)"
    fillTextFields()
}
這樣導航欄標題會明確告知用戶當前是新增還是編輯;編輯時順帶回填表單。
添加更新方法:
func updateSpecies() {
    let realm = RLMRealm.defaultRealm()
    realm.beginWriteTransaction()

    species.name = nameTextField.text
    species.category = selectedCategory
    species.speciesDescription = descriptionTextView.text

    realm.commitWriteTransaction()
}
套路一致:取默認庫、開事務、改字段、提交。短短幾行就完成了更新。
在用戶點擊保存時調用它。找到 shouldPerformSegueWithIdentifier(_:sender:),在第一個 if 塊內、return true 之前加上:
else {
    updateSpecies()
}
打開 LogViewController.swift,替換 prepareForSegue(_:sender:):
override func prepareForSegue(segue: UIStoryboardSegue, sender: AnyObject?) {
    if segue.identifier == "Edit" {
        let controller = segue.destinationViewController as! AddNewEntryController
        var selectedSpecies: SpeciesModel!

        let indexPath = tableView.indexPathForSelectedRow()
        if searchController.active {
            let searchResultsController = searchController.searchResultsController as! UITableViewController
            let indexPathSearch = searchResultsController.tableView.indexPathForSelectedRow()
            selectedSpecies = searchResults[UInt(indexPathSearch!.row)] as! SpeciesModel
        } else {
            selectedSpecies = species[UInt(indexPath!.row)] as! SpeciesModel
        }

        controller.species = selectedSpecies
    }
}
這裡把選中物種傳給編輯頁;if/else 分支是為了兼顧「用戶正在查看搜索結果」的情況。
編譯運行,進記錄視圖選一條,應該能看到表單已被填充。
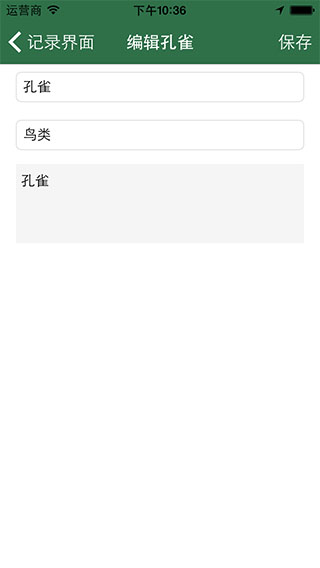
更新數據
收尾:按距離排序
最後補上按距離排序。打開 Species.swift,添加屬性:
dynamic var distance: Double = 0
它保存用戶當前位置與記錄點之間的距離。但這個值顯然不該持久化——用戶位置時刻在變。Realm 提供了忽視屬性(ignored properties)機制來應對這種情況:
func ignoredProperties() -> NSArray {
    let propertiesToIgnore = [distance]
    return propertiesToIgnore
}
只需實現名為 ignoredProperties() 的方法並返回不希望被存儲的屬性數組。
既然不存,就得自己算。打開 MapViewController.swift,添加:
func updateLocationDistance() {
    let realm = RLMRealm.defaultRealm()

    if results != nil {
        for result in results! {
            let currentSpecies = result as! SpeciesModel
            let currentLocation = CLLocation(latitude: currentSpecies.latitude,
                                             longitude: currentSpecies.longitude)
            let distance = currentLocation.distanceFromLocation(mapView.userLocation.location)

            realm.beginWriteTransaction()
            currentSpecies.distance = Double(distance)
            realm.commitWriteTransaction()
        }
    }
}
遍歷所有物種,算出標記點到用戶當前位置的距離。即使不落盤,仍需把它寫回對象並在事務中提交,這樣列表才能讀到最新值。
在 prepareForSegue(_:sender:) 底部添加:
else if segue.identifier == "Log" {
    updateLocationDistance()
}
這樣用戶打開記錄界面前就會先刷新距離。
打開 LogViewController.swift,在 tableView(_:cellForRowAtIndexPath:) 的 return 之前添加:
if speciesModel.distance < 0 {
    cell.distanceLabel.text = "N/A"
} else {
    cell.distanceLabel.text = String(format: "%.2fkm", speciesModel.distance / 1000)
}
最後把 scopeChanged() 裡 case 1 的 break 換成:
species = SpeciesModel.allObjects().sortedResultsUsingProperty("distance", ascending: true)
編譯運行——崩潰了?
'RLMException', reason: 'Column count does not match interface - migration required'
原因不難理解:我們給 Species 加了新字段,等於改動了 schema,但沒有告訴 Realm 如何處理這個新增列。從舊架構遷移到新架構超出了本教程範圍。這也不是 Realm 獨有的問題,Core Data 在增刪改字段時同樣需要遷移。
教程級的簡便解法:從模擬器刪掉這個 App,重新編譯運行,讓它以新架構建一個全新的庫。
刪除 App 並重新運行,添加幾個物種,打開記錄視圖,就能看到距離信息:
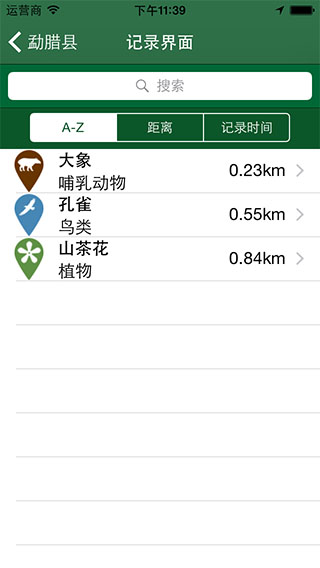
距離信息
若需要更真實的數據,可在模擬器菜單選擇 Debug → Location,從列表中挑一個位置進行模擬。
接下來學什麼
至此,我們已經掌握了 Realm 記錄的創建、讀取、更新、刪除,學會了用斷言做檢索、按屬性名排序,也理解了架構變更帶來的影響。
可能有人會擔心:Realm 看起來是個新項目,用在正式產品裡穩嗎?它雖然近期才面向公眾開放,但早在 2012 年就已在公司級產品中承擔核心存儲。就 Objective-C 而言它相當穩定;Swift 由於語言本身仍在演進,可能遇到版本更迭帶來的語法問題,但隨著 Swift 趨於穩定,這方面的摩擦也會越來越少。
本教程未覆蓋、但值得繼續深入的能力還有:
- 遷移(Migrations):本文遇到的架構變更報錯就是遷移問題的解法入口,可查閱官方文檔的 migrations 章節。
- 其他類型的 Realm:我們全程使用「默認」庫,實際上還有不落盤的內存數據庫(in-memory realm),也可以同時使用多個數據庫文件按數據類型分庫存儲。
更多內容建議直接閱讀官方文檔,寫得相當詳盡。歡迎在評論區留下改進建議。
原文:Realm Tutorial,作者 Bill Kastanakis;譯者及改編:星夜暮晨。