
告別反覆編譯:用 Masonry + Classy + ClassyLiveLayout 即時預覽 iOS UI 代碼
編寫 iOS 應用的 UI 大致有兩條路:Storyboard/Xib,或手寫程式碼。
Storyboard/Xib 提供可視化編輯,從物件庫拖控件就能看到結果,開發速度快。但多人協作時,所有 UI 都放在同一個檔案裡,用 Git/SVN 合併就會衝突。有人提出拆成多個 Storyboard 來緩解,但更根本的問題是復用性差。
所以有些人改走手寫 UI 程式碼:既解決協作衝突,又能把自訂控件在多個 View 間共用。但每次改完都要編譯、構建、執行,再到模擬器上看結果,節奏被拖慢。理想狀態是:改完存檔,模擬器立刻反映變化。
Auto Layout 是什麼、解決什麼
Auto Layout 是一個基於 constraint(約束)的佈局系統,依據 UI 元素之間的約束關係來決定位置與大小。它解決了三件事:
更容易適配不同解析度螢幕(iPhone 6 Plus、6、5s/5、4s/4)
設備旋轉時不需要額外處理
用 constraint 描述佈局邏輯,更易讀也更清晰
約束類別是 NSLayoutConstraint,建立方式主要有兩種。第一種是逐條描述:
+ (id)constraintWithItem:(id)view1 attribute:(NSLayoutAttribute)attribute1\n relatedBy:(NSLayoutRelation)relation\n toItem:(id)view2 attribute:(NSLayoutAttribute)attribute2\n multiplier:(CGFloat)multiplier constant:(CGFloat)constant;
意思是:view1 的 attribute1 等於(或小於/大於等於)view2 的 attribute2 的 multiplier 倍再加上 constant。attribute 可以是位置(上/下/左/右)或大小(寬/高):
view1.attribute1 = view2.attribute2 * multiplier + constant
第二種是視覺格式化語言(VFL):
+ (NSArray *)constraintsWithVisualFormat:(NSString *)format\n options:(NSLayoutFormatOptions)opts\n metrics:(NSDictionary *)metrics\n views:(NSDictionary *)views;
VFL 語法簡潔,但可讀性偏差、容易出錯。
Auto Layout 的痛點
雖然強大靈活,但建立 constraint 的語法實在繁瑣。看看下面這個「四條邊距 10」的簡單例子:
UIView *superview = self;\nUIView *view1 = [[UIView alloc] init];\nview1.translatesAutoresizingMaskIntoConstraints = NO;\n[superview addSubview:view1];\nUIEdgeInsets padding = UIEdgeInsetsMake(10, 10, 10, 10);\n[superview addConstraints:@[\n [NSLayoutConstraint constraintWithItem:view1 attribute:NSLayoutAttributeTop relatedBy:NSLayoutRelationEqual toItem:superview attribute:NSLayoutAttributeTop multiplier:1.0 constant:padding.top],\n [NSLayoutConstraint constraintWithItem:view1 attribute:NSLayoutAttributeLeft relatedBy:NSLayoutRelationEqual toItem:superview attribute:NSLayoutAttributeLeft multiplier:1.0 constant:padding.left],\n // Bottom、Right 同理\n]];
這麼簡單的需求都要寫這麼多行,試想建立多個 view 的約束時會多麼痛苦。
Masonry:用鏈式 DSL 馴服約束
Masonry 以鏈式 DSL 封裝 NSLayoutConstraint,讓佈局程式碼更短、更易讀。上面那段等價寫法如下:
UIEdgeInsets padding = UIEdgeInsetsMake(10, 10, 10, 10);\n[view1 mas_makeConstraints:^(MASConstraintMaker *make) {\n make.top.equalTo(superview.mas_top).with.offset(padding.top);\n make.left.equalTo(superview.mas_left).with.offset(padding.left);\n make.bottom.equalTo(superview.mas_bottom).with.offset(-padding.bottom);\n make.right.equalTo(superview.mas_right).with.offset(-padding.right);\n}];甚至可以更短:
[view1 mas_makeConstraints:^(MASConstraintMaker *make) {\n make.edges.equalTo(superview).with.insets(padding);\n}];Masonry 提供三個建立約束的方法:
mas_makeConstraints
建立後可用區域變數或屬性保存 constraint 以便後續引用;多條則用陣列保存。
@property (nonatomic, strong) MASConstraint *topConstraint;\n\n[view1 mas_makeConstraints:^(MASConstraintMaker *make) {\n self.topConstraint = make.top.equalTo(superview.mas_top).with.offset(padding.top);\n make.left.equalTo(superview.mas_left).with.offset(padding.left);\n}];\n\n// 之後可以 [self.topConstraint uninstall];mas_updateConstraints
需要更新約束(動畫、調試)而不是新建時使用,Apple 建議放在 updateConstraints 中:
- (void)updateConstraints {\n [self.growingButton mas_updateConstraints:^(MASConstraintMaker *make) {\n make.center.equalTo(self);\n make.width.equalTo(@(self.buttonSize.width)).priorityLow();\n make.height.equalTo(@(self.buttonSize.height)).priorityLow();\n make.width.lessThanOrEqualTo(self);\n make.height.lessThanOrEqualTo(self);\n }];\n [super updateConstraints];\n}mas_remakeConstraints
與 update 相似,但會先移除舊約束再加入新的,適合大幅改變位置(移動動畫)的場景:
- (void)changeButtonPosition {\n [self.button mas_remakeConstraints:^(MASConstraintMaker *make) {\n make.size.equalTo(self.buttonSize);\n if (topLeft) { make.top.and.left.offset(10); }\n else { make.bottom.and.right.offset(-10); }\n }];\n}更多細節可下載官方的 Masonry iOS Examples 專案參考。
Classy:借鑑 CSS 思想的樣式系統
Classy 是能和 UIKit 無縫結合的 stylesheet 系統,語法與命名規則則是重新設計過的。
靈活的語法
{ }、:、; 都是可選的,你可以選擇自己喜歡的風格。用符號限定:
$main-color = #e1e1e1;\nMYCustomView {\n background-color: $main-color;\n title-insets: 5, 10, 5, 10;\n > UIProgressView.tinted {\n progress-tint-color: black;\n track-tint-color: yellow;\n }\n}\n^UIButton.warning, UIView.warning ^UIButton {\n title-color[state:highlighted]: #e3e3e3;\n}或者用空格限定:
$main-color = #e1e1e1\nMYCustomView\n background-color $main-color\n title-insets 5, 10, 5, 10\n > UIProgressView.tinted\n progress-tint-color black\n track-tint-color yellow\n^UIButton.warning, UIView.warning ^UIButton\n title-color[state:highlighted] #e3e3e3
預設樣式檔
Classy 預設會在 App Bundle 中尋找名為 stylesheet.cas 的檔案;若採用這個檔名,什麼都不用做就能載入。若想指定其他路徑:
[CASStyler defaultStyler].filePath = [[NSBundle mainBundle] pathForResource:@"myStyles.cas" ofType:nil];
想在出錯時取得錯誤資訊以便除錯,可用帶 error 參數的版本:
NSError *error = nil;\nNSString *filePath = [[NSBundle mainBundle] pathForResource:@"myStyles.cas" ofType:nil];\n[[CASStyler defaultStyler] setFilePath:filePath error:&error];
若用 Storyboard/Xib 組織 UI,需要在 main.m 的 main() 中設定 filePath,以確保在建立 UIWindow 之前完成載入;若用手寫 UI 程式碼,則在 AppDelegate.m 的 application:didFinishLaunchingWithOptions: 中設定即可。
Live Reload:即時預覽的關鍵
Live Reload 是整套方案的靈魂——它能即時偵測 stylesheet 檔案的變化,不必重新編譯、構建與執行模擬器。啟用方式是指定要監看的檔案路徑,且只在模擬器上生效:
#if TARGET_IPHONE_SIMULATOR\n NSString *absoluteFilePath = CASAbsoluteFilePath(@"../Styles/stylesheet.cas");\n [CASStyler defaultStyler].watchFilePath = absoluteFilePath;\n#endif
Selectors 與 Properties
Style Selectors 用來指定哪個 view 套用哪一種樣式,有三種方式可混用:Object Class、View Hierarchy、Style Class。
/* 符合:class 為 UIButton 或其子類、styleClass 為 "large"、且 superview class 為 UITabBar */\nUITabBar > ^UIButton.large { }Classy 支援所有 UIAppearance 的屬性與方法,也支援許多與 UIAppearance 無關的屬性。它使用與 UIKit 相同的屬性命名,所以不必思考如何映射。例如 UIPageControl:
UIPageControl {\n pageIndicatorTintColor black\n currentPageIndicatorTintColor purple\n}也接受 kebab case 寫法:page-indicator-tint-color、current-page-indicator-tint-color。
保持 DRY:Grouping、Nesting、Variables
Grouping——多個 selector 共用相同屬性時:
UISlider.info, UISlider.error {\n minimum-track-tint-color black\n maximum-track-tint-color purple\n}\nUISlider.error { thumb-tint-color red }Nesting——多個 selector 共用相同 view 階層時:
UICollectionView {\n background-color #a2a2a2\n > UICollectionViewCell {\n clips-to-bounds NO\n UILabel {\n text-color purple\n .title { font 20 }\n }\n }\n}Variables——命名規則是必須以字母或 $ 開頭,可含 _、- 或字母數字:
$brand-color = #e1e1e1\ninsets = 5, 10, 5, 10\n\nUIButton {\n background-color $brand-color\n contentEdgeInsets insets\n background-image[state:selected] bg_button insets\n}ClassyLiveLayout:讓約束也能熱重載
ClassyLiveLayout 把 Classy stylesheets 與 Masonry 結合,讓你在執行中的模擬器裡微調 Auto Layout 約束並即時看到效果。
它的核心是一個 category:UIView+ClassyLayoutProperties,為 UIView 加上這些屬性:
@property (nonatomic, assign) UIEdgeInsets cas_margin;\n@property (nonatomic, assign) CGSize cas_size;\n// 單值語法糖\n@property (nonatomic, assign) CGFloat cas_sizeWidth;\n@property (nonatomic, assign) CGFloat cas_sizeHeight;\n@property (nonatomic, assign) CGFloat cas_marginTop;\n@property (nonatomic, assign) CGFloat cas_marginLeft;\n@property (nonatomic, assign) CGFloat cas_marginBottom;\n@property (nonatomic, assign) CGFloat cas_marginRight;
cas_margin 與 cas_size 分別代表位置與大小,其餘屬性是進一步細分。這樣就能從 stylesheets 中讀取約束數值,把資料與程式碼分離:
UIView.blue-box {\n cas_size: 80 100\n cas_margin-top: 60\n cas_margin-left: 50\n}\nUIView.red-box {\n cas_size-width: 120\n cas_margin-left: 20\n}程式碼中在 updateViewConstraints 引用這些屬性:
- (void)updateViewConstraints {\n [super updateViewConstraints];\n [_blueBoxView mas_updateConstraints:^(MASConstraintMaker *make) {\n make.width.equalTo(@(_blueBoxView.cas_size.width));\n make.height.equalTo(@(_blueBoxView.cas_size.height));\n make.top.equalTo(@(_blueBoxView.cas_margin.top));\n make.left.equalTo(@(_blueBoxView.cas_margin.left));\n }];\n}於是修改約束只需編輯 stylesheet,存檔即時生效,不必重新編譯執行。
動手做一個示例工程
Podfile 配置:
pod 'Masonry', '~> 0.6.1'\npod 'Classy', '~> 0.2.4'\npod 'ClassyLiveLayout', '~> 0.6.0'
步驟一:加入 stylesheet.cas。第一次執行會因為找不到 stylesheet.cas 而報錯:

只要往專案中新增一個空的 stylesheet.cas 即可。

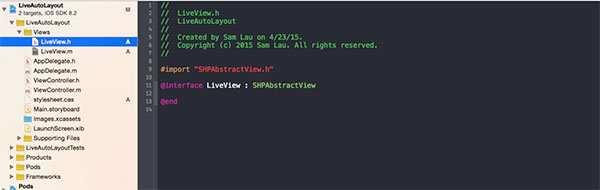
步驟二:建立 LiveView 類別,繼承 SHPAbstractView。
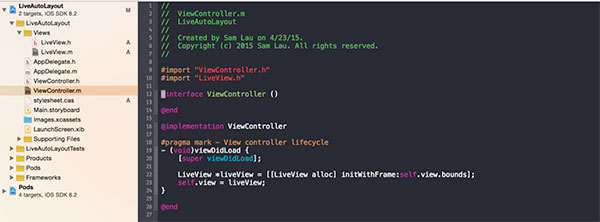
在 ViewController 中建立 LiveView 物件並由 self.view 引用:
編譯執行時,SHPAbstractView.h 會因為找不到 UIView 而報錯:
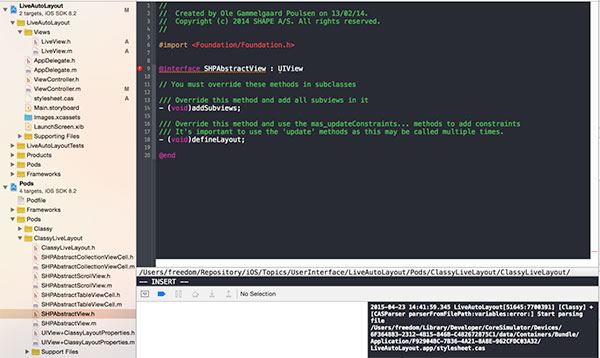
引入 UIKit 即可解決。接著執行會出現另一個錯誤——因為任何繼承 SHPAbstractView 的自訂 UIView 都必須覆寫兩個方法:
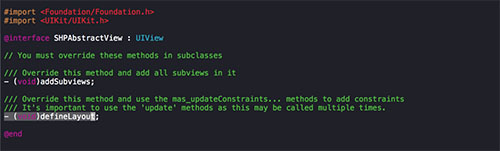
所以在 LiveView.m 中補上實作:
#pragma mark - Add subviews and define layout\n- (void)addSubviews { }\n- (void)defineLayout { }步驟三:設計 LiveView。它包含 redBoxView 與 blueBoxView 兩個屬性,分別代表紅色與藍色方塊。
#import "SHPAbstractView.h"\n\n@interface LiveView : SHPAbstractView\n@property (strong, nonatomic) UIView *redBoxView;\n@property (strong, nonatomic) UIView *blueBoxView;\n@end
步驟四:實作 LiveView。SHPAbstractView 已處理好初始化流程,並暴露 addSubviews 與 defineLayout 分別負責建立 view 階層與定義佈局,子類只要覆寫這兩個方法。而約束數值則寫進 stylesheet.cas,達到資料與程式碼分離:
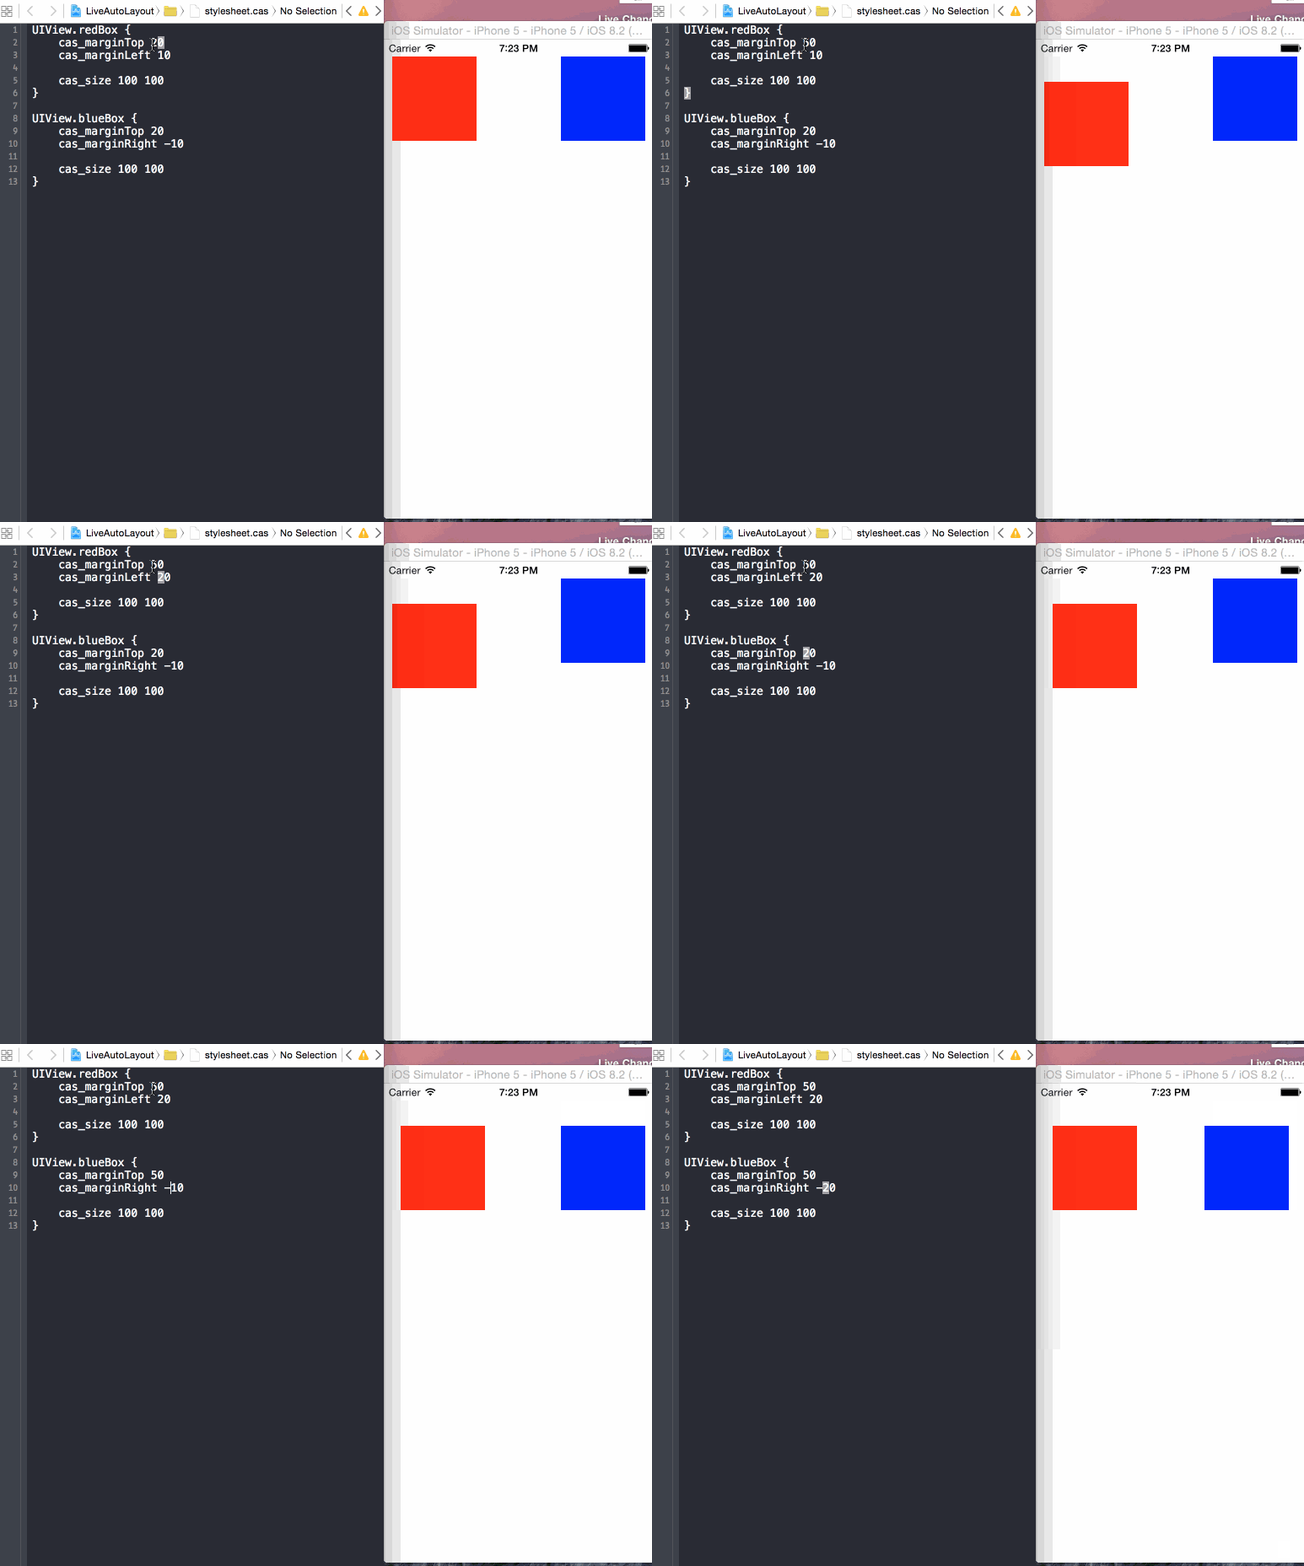
UIView.redBox {\n cas_marginTop 50\n cas_marginLeft 20\n cas_size 100 100\n}\nUIView.blueBox {\n cas_marginTop 50\n cas_marginRight -20\n cas_size 100 100\n}有了數據,就能在程式碼中佈局:
@implementation LiveView\n\n- (void)addSubviews {\n self.backgroundColor = [UIColor whiteColor];\n [self addSubview:self.redBoxView];\n [self addSubview:self.blueBoxView];\n}\n\n- (void)defineLayout {\n [self.redBoxView mas_updateConstraints:^(MASConstraintMaker *make) {\n make.top.equalTo(@(self.redBoxView.cas_marginTop));\n make.left.equalTo(@(self.redBoxView.cas_marginLeft));\n make.width.equalTo(@(self.redBoxView.cas_sizeWidth));\n make.height.equalTo(@(self.redBoxView.cas_sizeHeight));\n }];\n [self.blueBoxView mas_updateConstraints:^(MASConstraintMaker *make) {\n make.top.equalTo(@(self.blueBoxView.cas_marginTop));\n make.right.equalTo(@(self.blueBoxView.cas_marginRight));\n make.width.equalTo(@(self.blueBoxView.cas_sizeWidth));\n make.height.equalTo(@(self.blueBoxView.cas_sizeHeight));\n }];\n}\n\n- (UIView *)redBoxView {\n if (!_redBoxView) {\n _redBoxView = [UIView new];\n _redBoxView.cas_styleClass = @"redBox";\n _redBoxView.backgroundColor = [UIColor redColor];\n }\n return _redBoxView;\n}\n\n- (UIView *)blueBoxView {\n if (!_blueBoxView) {\n _blueBoxView = [UIView new];\n _blueBoxView.cas_styleClass = @"blueBox";\n _blueBoxView.backgroundColor = [UIColor blueColor];\n }\n return _blueBoxView;\n}\n@end步驟五:在模擬器上啟用 Live Reload。指定 stylesheet 路徑並確保只在模擬器環境生效:
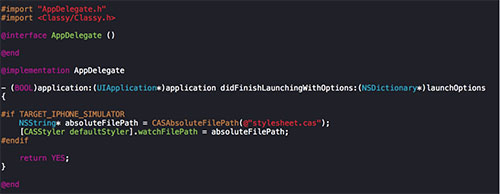
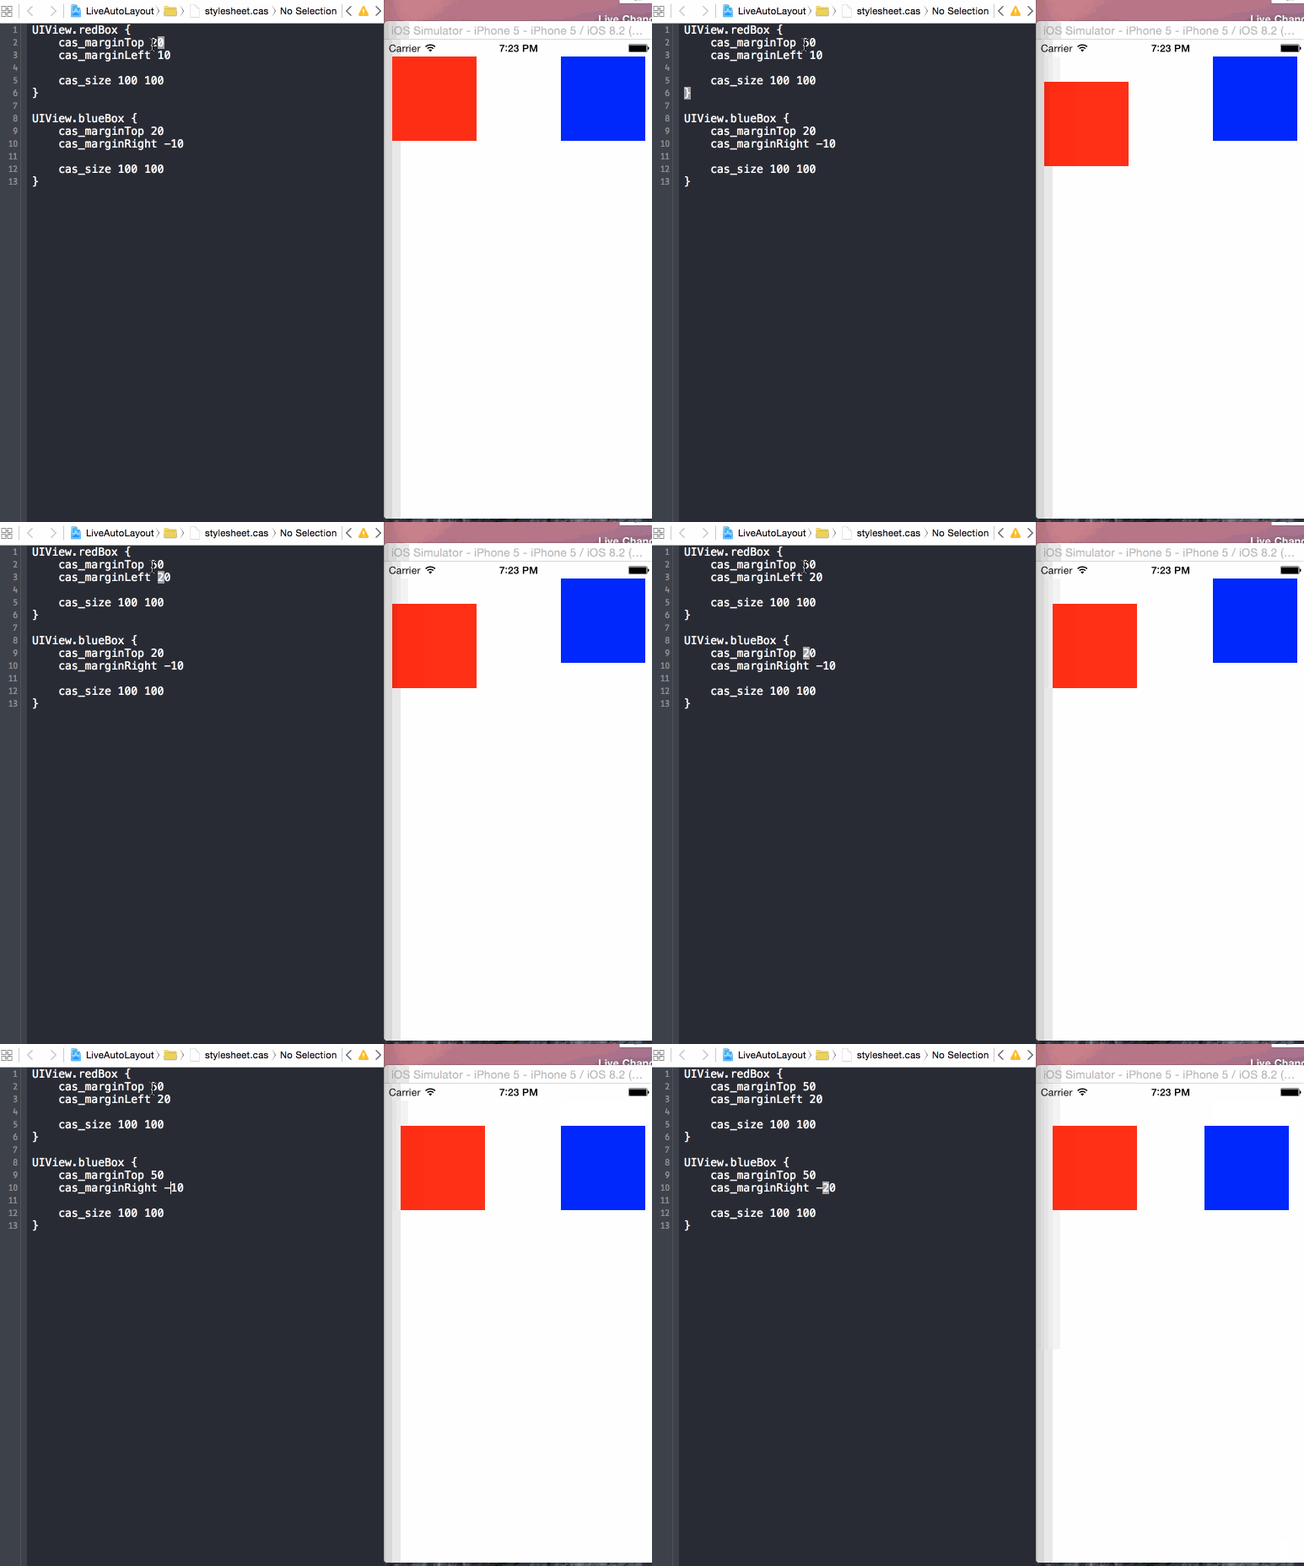
最終效果如下,修改 cas 檔案存檔後,模擬器畫面立刻更新:
示例程式碼:LiveAutoLayout
總結
過去手寫 UI 程式碼,每次改動都得重新編譯、構建、執行模擬器才能看到效果。結合 Masonry、Classy 與 ClassyLiveLayout 之後,這個費時環節被徹底拿掉,開發速度大幅提升。更重要的是,把 Auto Layout 的約束寫進 stylesheets 並即時載入,等於把佈局資料與佈局程式碼分離,讓程式碼更易復用與維護;Classy 提供的 Grouping、Nesting、Variables 三種手段,也讓樣式資料的復用更徹底。
這是我第一次寫技術部落格,難免有錯誤與疏漏,歡迎指正,也希望對你有所幫助。
延伸閱讀
Storyboard/XIB 與手寫程式碼的選擇:代碼手寫 UI、xib 和 StoryBoard 間的博弈,以及 Interface Builder 的一些小技巧;iOS 開發中的爭議(二)
Storyboard 可視化開發:Adaptive Layout Tutorial: Getting Started;WWDC 2014 Session 筆記 - 可視化開發,IB 的新時代
Auto Layout 與 Masonry:iOS 開發實踐之 Auto Layout;Masonry 介紹與使用實踐
Auto Layout WWDC 影片:Introduction to Auto Layout for iOS and OS X(2012)、Best Practices for Mastering Auto Layout(2012)、Auto Layout by Example(2012)、Taking Control of Auto Layout in Xcode 5(2013)