
再造「手機 QQ」側滑菜單(三):視圖聯動與收尾細節
系列前文:再造「手機 QQ」側滑菜單(一)實現側滑效果;(二)高仿左視圖。
代碼示例:https://github.com/johnlui/SwiftSideslipLikeQQ
本篇要解決的是最後一塊硬骨頭:用 UINavigationController 接管主視圖,並讓左側菜單的點擊真正驅動主視圖切換。這篇文章我寫了十個小時的代碼,其中前八個小時都在試錯——畢竟當時我只有三個多月的 iOS 經驗。
給主視圖裝上 NavigationBar
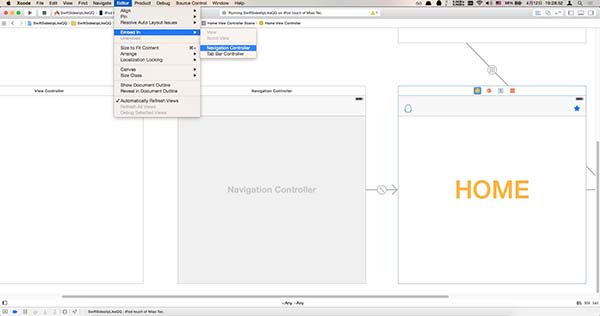
為 HomeViewController 增加 UINavigationController 父視圖
操作如下圖。
調整主視圖的載入邏輯
- 用一個 UIView 把 homeViewController.navigationController!.view 與 homeViewController.view 一起包住,再加到 self.view 上。
- 為了拿到帶 navigationController 的 HomeViewController,要從 StoryBoard 取出 UINavigationController,再取它的第一個 UIViewController。
mainView = UIView(frame: self.view.frame)
homeNavigationController = UIStoryboard(name: "Main", bundle: nil).instantiateViewControllerWithIdentifier("HomeNavigationController") as! UINavigationController
homeViewController = homeNavigationController.viewControllers.first as! HomeViewController

mainView.addSubview(homeViewController.navigationController!.view)
mainView.addSubview(homeViewController.view)
self.view.addSubview(mainView)
小提示:homeNavigationController 也要聲明為成員變量,否則在這種特殊結構下無法對 HomeViewController 的 navigationController 進行操作。
給 mainView 綁定拖動手勢
// 綁定 UIPanGestureRecognizer
let panGesture = homeViewController.panGesture
panGesture.addTarget(self, action: Selector("pan:"))
mainView.addGestureRecognizer(panGesture)
修改自動歸位動畫
把 doTheAnimate 函數中原本操作 homeViewController.view 的部分換成 mainView:
self.mainView.center = CGPointMake(self.view.center.x + self.distance, self.view.center.y)
self.mainView.transform = CGAffineTransformScale(CGAffineTransformIdentity, proportion, proportion)
得益於前面良好的封裝,安裝 NavigationBar 這件事就這樣完成了。
實現聯動
建立子視圖控制器
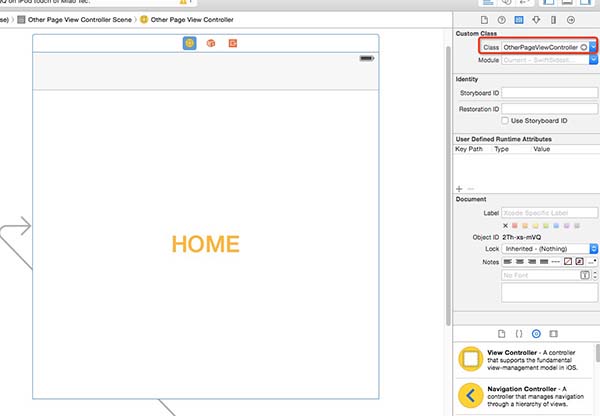
拖一個 View Controller 出來,新建 OtherPageViewController: UIViewController 類並完成綁定。
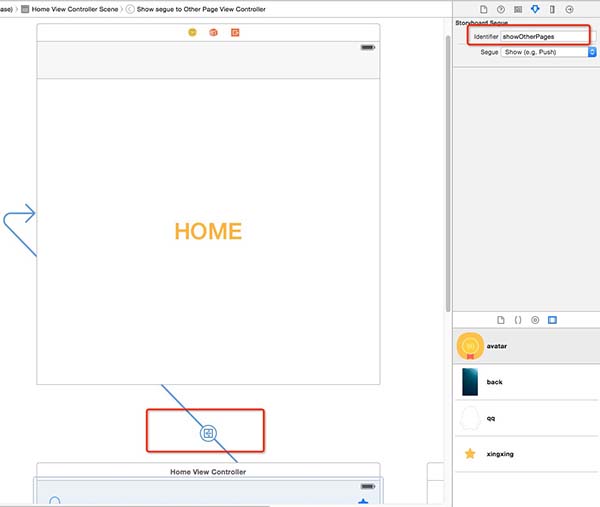
用 segue 連接兩個控制器
在 LeftViewController 中響應點擊
修改 didSelectRowAtIndexPath:
func tableView(tableView: UITableView, didSelectRowAtIndexPath indexPath: NSIndexPath) {
    let viewController = UIApplication.sharedApplication().keyWindow?.rootViewController as! ViewController
    viewController.homeViewController.titleOfOtherPages = titlesDictionary[indexPath.row]
    viewController.homeViewController.performSegueWithIdentifier("showOtherPages", sender: self)

    viewController.showHome()

    tableView.deselectRowAtIndexPath(indexPath, animated: false)
}
在 HomeViewController 中傳遞數據
import UIKit

class HomeViewController: UIViewController {

    var titleOfOtherPages = ""
    @IBOutlet var panGesture: UIPanGestureRecognizer!

    override func viewDidLoad() {
        super.viewDidLoad()
    }

    // MARK: - Navigation
    override func prepareForSegue(segue: UIStoryboardSegue, sender: AnyObject?) {
        if segue.identifier == "showOtherPages" {
            if let a = segue.destinationViewController as? OtherPageViewController {
                a.PageTitle = titleOfOtherPages
            }
        }
    }
}
至此,視圖聯動完成。
收尾工作
主要功能跑通之後,剩下的都是打磨。
設置 segmentView
// 設置中間 segmentView 視圖
let segmentView = UISegmentedControl(items: ["消息", "電話"])
segmentView.selectedSegmentIndex = 0
segmentView.setWidth(60, forSegmentAtIndex: 0)
segmentView.setWidth(60, forSegmentAtIndex: 1)
self.navigationItem.titleView = segmentView
直接從 Xcode 右下角把圖片資源拖到相應位置即可完成圖標設置,然後在 ViewController 合適的位置補上兩行:
homeViewController.navigationItem.leftBarButtonItem?.action = Selector("showLeft")
homeViewController.navigationItem.rightBarButtonItem?.action = Selector("showRight")
點擊主視圖收起菜單
// 綁定單擊收起菜單
let tapGesture = UITapGestureRecognizer(target: self, action: "showHome")
mainView.addGestureRecognizer(tapGesture)
修復返回按鈕失效
override func viewDidLoad() {
    super.viewDidLoad()
    self.title = PageTitle
    mainLabel.text = PageTitle

    // 自定義返回按鈕
    let backButton = UIBarButtonItem(title: "〈返回", style: UIBarButtonItemStyle.Plain, target: self, action: "goBack")
    self.navigationItem.leftBarButtonItem = backButton

    // 彌補返回按鈕被替換後邊緣滑入手勢失效的問題
    let gesture = UIPanGestureRecognizer(target: self, action: "goBack")
    self.view.addGestureRecognizer(gesture)
}

func goBack() {
    self.navigationController?.popViewControllerAnimated(true)
}
最終效果
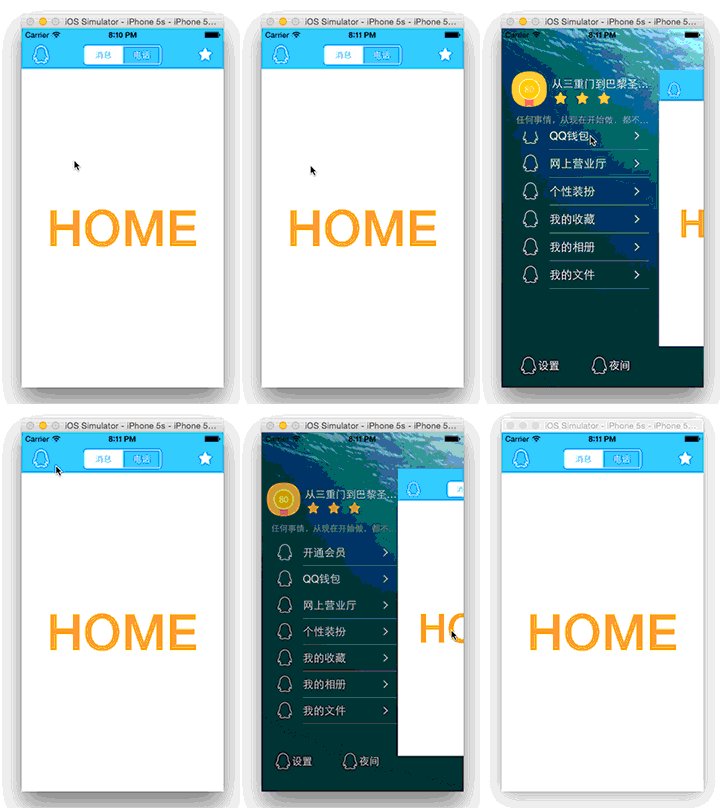
《再造「手機 QQ」側滑菜單》系列到此結束,感謝閱讀。