
iOS 怎麼畫出真正的 1 像素線?Point、Pixel 與反鋸齒的對齊學問

一、Point 與 Pixel 的差別
在 iOS 中,當我們使用 Quartz、UIKit、Core Animation 等框架時,所有座標系統都以 Point 來衡量,系統在實際渲染到螢幕時會自動幫我們完成 Point 到 Pixel 的轉換。
這樣做的好處是隔離變化:布局時我們不必關心當前裝置是否為 Retina,只要用一套座標系統排版即可。
但實務上必須牢記一件事:
One point does not necessarily correspond to one physical pixel.
1 Point 的線在非 Retina 螢幕上是一個像素,在 Retina 螢幕上則可能是 2 個或 3 個,取決於裝置的 DPI。iOS 中,UIScreen、UIView、UIImage、CALayer 都提供了取得 scale factor 的屬性。
原生繪製技術本身會幫我們處理 scale factor。例如在 drawRect: 方法中,UIKit 會依當前裝置自動設定正確的 scale factor,因此你在該方法中繪製的任何內容都會被自動縮放到裝置的物理螢幕上。
由此可見,大多數情況下我們不必關心 pixel,但仍有部分場景必須考慮像素換算。
比如說:畫一條 1 像素的分隔線
看到這個問題,你的直覺可能是:依當前螢幕的縮放因子算出 1 像素對應的 Point,然後設定線寬就好。
1.0f / [UIScreen mainScreen].scale
表面上一切正常,但實際在裝置上測試後你會發現,渲染出來的線寬並不是 1 個像素。
為什麼?
為了獲得良好的視覺效果,繪圖系統通常會採用一種叫 antialiasing(反鋸齒)的技術,iOS 也不例外。
顯示螢幕由許多小的顯示單元組成,可以粗略理解為一個單元代表一個像素。如果要畫一條黑線,而線剛好落在某一列或某一行顯示單元之內,就會渲染出標準的 1 像素黑線。
但若線落在兩行或兩列中間,就會得到一條「失真」的線——實際上是兩個像素寬的灰色線。
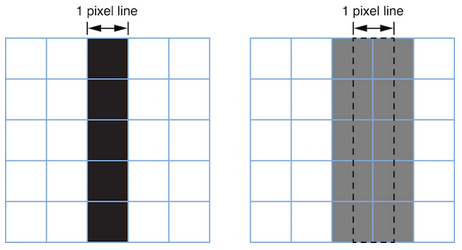
官方說明如下:
Positions defined by whole-numbered points fall at the midpoint between pixels. For example,
if you draw a one-pixel-wide vertical line from (1.0, 1.0) to (1.0, 10.0), you get a fuzzy
grey line. If you draw a two-pixel-wide line, you get a solid black line because it fully
covers two pixels (one on either side of the specified point). As a rule, lines that are an
odd number of physical pixels wide appear softer than lines with widths measured in even
numbers of physical pixels unless you adjust their position to make them cover pixels fully.
簡單翻譯:整數 Point 定義的位置落在兩個像素的中點上。畫一條 1 像素寬的線會得到模糊的灰線;畫 2 像素寬則是實心黑線,因為它完整覆蓋了兩側各一個像素。一般來說,奇數物理像素寬的線看起來會比偶數寬度的線更柔和,除非你手動調整位置讓它完整覆蓋像素。
那要如何對齊?官方接著說:
On a low-resolution display (with a scale factor of 1.0), a one-point-wide line is one pixel
wide. To avoid antialiasing when you draw a one-point-wide horizontal or vertical line, if
the line is an odd number of pixels in width, you must offset the position by 0.5 points to
either side of a whole-numbered position. If the line is an even number of points in width,
to avoid a fuzzy line, you must not do so.

On a high-resolution display (with a scale factor of 2.0), a line that is one point wide is
not antialiased at all because it occupies two full pixels (from -0.5 to +0.5). To draw a
line that covers only a single physical pixel, you would need to make it 0.5 points in
thickness and offset its position by 0.25 points.
翻譯:在非高清螢幕(scale = 1.0)上,1 Point 對應 1 像素;要避免奇數像素線寬產生反鋸齒失真,需將位置偏移 0.5 Point。若線寬為偶數 Point,則不要偏移,否則線條也會模糊。在高清螢幕(scale = 2.0)上,1 Point 寬的線佔滿兩個完整像素,完全不會被反鋸齒;若要只覆蓋單一物理像素,需把線寬設為 0.5 Point,並將位置偏移 0.25 Point。
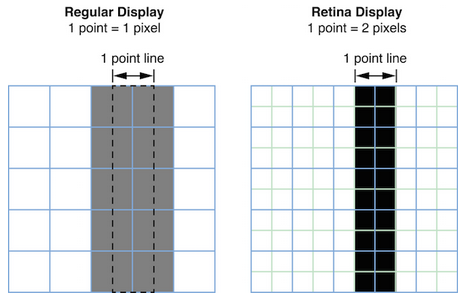
看到這裡,我們已理解 1 像素線條失真的原因與解法。但問題看似解決了?再想想:為什麼非 Retina 與 Retina 螢幕的偏移值不同(前者 0.5 Point,後者 0.25 Point)?那 scale 為 3 的 6 Plus 又該調整多少?
要回答這個問題,得先理解「調整多少」背後依循的原則。
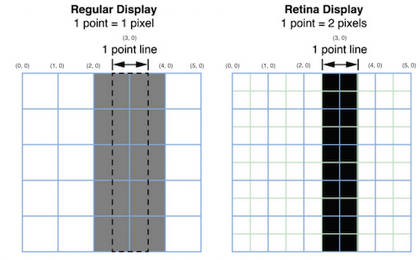
回頭看這張圖:每一格代表一個像素,頂部標記的則是我們布局時使用的座標。
以左邊的非 Retina 螢幕為例,我們要在 (3, 0) 這個位置畫一條 1 像素寬的豎線。由於渲染的最小單位是像素,而 (3, 0) 恰好位於兩個像素中間,系統會對座標 3 左右兩列的像素都做填充,為了避免線顯得太寬,於是淡化線的顏色。由此可推:要畫出 1 像素寬的線,就得把繪製座標移到 (2.5, 0) 或 (3.5, 0),這樣渲染時剛好填滿一列像素,也就是標準的 1 像素線。
依同樣的分析,scale 為 3 的裝置要畫 1 像素寬的線時,位置調整量依然是半個像素,對應的 Point 計算如下:
(1.0f / [UIScreen mainScreen].scale) / 2;
最後奉上兩個方便好用的巨集:
#define SINGLE_LINE_WIDTH           (1 / [UIScreen mainScreen].scale)
#define SINGLE_LINE_ADJUST_OFFSET   ((1 / [UIScreen mainScreen].scale) / 2)
使用方式:
CGFloat xPos = 5;
UIView *view = [[UIView alloc] initWithFrame:CGRect(x - SINGLE_LINE_ADJUST_OFFSET, 0, SINGLE_LINE_WIDTH, 100)];
二、正確繪製網格線
以下是我寫的 GridView 程式碼,其中已對奇數像素的線條做了偏移處理,避免出現模糊。
SvGridView.h
// // SvGridView.h // SvSinglePixel // // Created by xiaoyong.cxy on 6/23/15. // Copyright (c) 2015 smileEvday. All rights reserved. // #import@interface SvGridView : UIView /** * @brief 網格間距,預設 30 */ @property (nonatomic, assign) CGFloat gridSpacing; /** * @brief 網格線寬度,預設為 1 pixel (1.0f / [UIScreen mainScreen].scale) */ @property (nonatomic, assign) CGFloat gridLineWidth; /** * @brief 網格顏色,預設藍色 */ @property (nonatomic, strong) UIColor *gridColor; @end
SvGridView.m
//
//  SvGridView.m
//  SvSinglePixel
//
//  Created by xiaoyong.cxy on 6/23/15.
//  Copyright (c) 2015 smileEvday. All rights reserved.
//

#import "SvGridView.h"

#define SINGLE_LINE_WIDTH           (1 / [UIScreen mainScreen].scale)
#define SINGLE_LINE_ADJUST_OFFSET   ((1 / [UIScreen mainScreen].scale) / 2)

@implementation SvGridView

@synthesize gridColor = _gridColor;
@synthesize gridSpacing = _gridSpacing;

- (instancetype)initWithFrame:(CGRect)frame {
    self = [super initWithFrame:frame];
    if (self) {
        self.backgroundColor = [UIColor clearColor];

        _gridColor = [UIColor blueColor];
        _gridLineWidth = SINGLE_LINE_WIDTH;
        _gridSpacing = 30;
    }

    return self;
}

- (void)setGridColor:(UIColor *)gridColor {
    _gridColor = gridColor;
    [self setNeedsDisplay];
}

- (void)setGridSpacing:(CGFloat)gridSpacing {
    _gridSpacing = gridSpacing;
    [self setNeedsDisplay];
}

- (void)setGridLineWidth:(CGFloat)gridLineWidth {
    _gridLineWidth = gridLineWidth;
    [self setNeedsDisplay];
}

// Only override drawRect: if you perform custom drawing.
// An empty implementation adversely affects performance during animation.
- (void)drawRect:(CGRect)rect {
    CGContextRef context = UIGraphicsGetCurrentContext();

    CGContextBeginPath(context);
    CGFloat lineMargin = self.gridSpacing;

    /**
     *  https://developer.apple.com/library/ios/documentation/2DDrawing/Conceptual/DrawingPrintingiOS/GraphicsDrawingOverview/GraphicsDrawingOverview.html
     *  僅當要繪製的線寬為奇數像素時,繪製位置需要調整
     */
    CGFloat pixelAdjustOffset = 0;
    if (((int)(self.gridLineWidth * [UIScreen mainScreen].scale) + 1) % 2 == 0) {
        pixelAdjustOffset = SINGLE_LINE_ADJUST_OFFSET;
    }

    CGFloat xPos = lineMargin - pixelAdjustOffset;
    CGFloat yPos = lineMargin - pixelAdjustOffset;
    while (xPos < self.bounds.size.width) {
        CGContextMoveToPoint(context, xPos, 0);
        CGContextAddLineToPoint(context, xPos, self.bounds.size.height);
        xPos += lineMargin;
    }

    while (yPos < self.bounds.size.height) {
        CGContextMoveToPoint(context, 0, yPos);
        CGContextAddLineToPoint(context, self.bounds.size.width, yPos);
        yPos += lineMargin;
    }

    CGContextSetLineWidth(context, self.gridLineWidth);
    CGContextSetStrokeColorWithColor(context, self.gridColor.CGColor);
    CGContextStrokePath(context);
}

@end
使用方式:
SvGridView *gridView = [[SvGridView alloc] initWithFrame:self.view.bounds];
gridView.autoresizingMask = UIViewAutoresizingFlexibleWidth | UIViewAutoresizingFlexibleHeight;
gridView.alpha = 0.6;
gridView.gridColor = [UIColor greenColor];
[self.view addSubview:gridView];
三、最後留一個問題
本文的技術內容到這裡結束,最後我想拋出一個問題:設計師為什麼一定要 1 像素的線?
1 像素的線在非 Retina 裝置上看起來寬度合適,但在 Retina 螢幕上可能會顯得偏細。是否真的需要 1 像素,其實該視情況判斷。
參考文件:https://developer.apple.com/library/ios/documentation/2DDrawing/Conceptual/DrawingPrintingiOS/GraphicsDrawingOverview/GraphicsDrawingOverview.html
注:smileEvday 保留本文一切權利。