
深入 UIView 的 tintColor:改一處,換全局
從 iOS 7 開始,UIView 多了一個 tintColor 屬性。它定義了一個非預設的著色顏色,而這個值的影響範圍是以當前視圖為根視圖的整棵視圖層次結構。實務上它常被用在 app 圖標、導航欄、按鈕等控件上,用很低的成本換取整體視覺的一致性。
tintColor 屬性的聲明如下:
var tintColor: UIColor!
預設情況下,一個視圖的 tintColor 是 nil,這代表它會沿用父視圖的 tint color。一旦你替某個視圖明確指定了 tintColor,這個色值就會自動向下傳播到以它為根的所有子視圖。如果系統沿著視圖層次結構一路往上都找不到非預設的 tintColor,就會退回使用系統預設色(藍色,RGB 為 [0, 0.478431, 1],在 Interface Builder 裡可以看到這個顏色)。也就是說,這個屬性讀取時永遠會回傳一個顏色值,即使你從未設定過它。
與 tintColor 配套的還有 tintAdjustmentMode 屬性,它是個枚舉值,用來定義著色的調整模式:
var tintAdjustmentMode: UIViewTintAdjustmentMode
枚舉 UIViewTintAdjustmentMode 的定義如下:
enum UIViewTintAdjustmentMode : Int { case Automatic // 視圖的著色調整模式與父視圖一致 case Normal // 視圖的 tintColor 屬性回傳完全未修改的著色顏色 case Dimmed // 視圖的 tintColor 屬性回傳一個去飽和度、變暗的著色顏色 }因此當 tintAdjustmentMode 設為 Dimmed 時,tintColor 的實際呈現會自動變暗;若沿著層次結構找不到預設值,則預設為 Normal。
還有一個相關方法是 tintColorDidChange:
func tintColorDidChange()
它會在視圖自身的 tintColor 或 tintAdjustmentMode 變動時被自動呼叫;此外,當父視圖的這兩個屬性改變時,子視圖同樣會觸發這個方法。我們可以在其中依需要刷新自訂視圖的外觀。
示例
接下來用一個實例來看 tintColor 的威力(示例沿用 Sam Davies 的例子,可參考 iOS7 Day-by-Day :: Day 6 :: Tint Color,我只負責搬磚,用 Swift 重新實作了一遍,程式碼可在此下載)。
先看最終效果(以下皆為借用圖,懶得重截,敬請見諒):
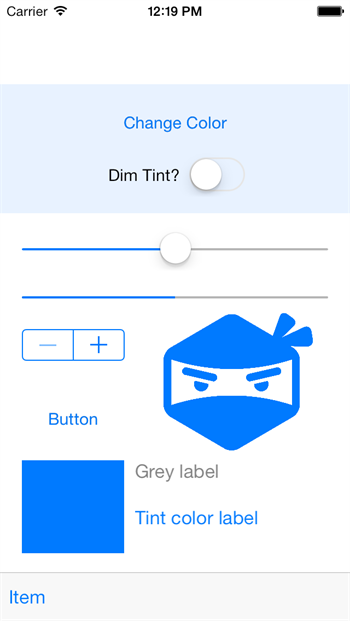
這個介面包含的元素主要有 UIButton、UISlider、UIProgressView、UIStepper、UIImageView、ToolBar,還有一個自訂子視圖 CustomView。接著我們就來看看改動視圖的 tintColor 會對這些控件造成什麼影響。
在 ViewController 的 viewDidLoad 中,我們做了如下設置:
override func viewDidLoad() { super.viewDidLoad() println("\(self.view.tintAdjustmentMode.rawValue)") // 輸出:1 println("\(self.view.tintColor)") // 輸出:UIDeviceRGBColorSpace 0 0.478431 1 1 self.view.tintAdjustmentMode = .Normal self.dimTintSwitch?.on = false // 加載圖片 var shinobiHead = UIImage(named: "shinobihead") // 設置渲染模式 shinobiHead = shinobiHead?.imageWithRenderingMode(.AlwaysTemplate) self.tintedImageView?.image = shinobiHead self.tintedImageView?.contentMode = .ScaleAspectFit }先印出預設的 tintColor 與 tintAdjustmentMode,分別得到 [UIDeviceRGBColorSpace 0 0.478431 1 1] 與 1。這是在我們完全沒有為整棵視圖層次結構設定任何著色值的情況下輸出的結果。可見即使不去設定,tintColor 仍會回傳系統預設值,而 tintAdjustmentMode 則預設回傳 Normal 的原始值。
接著我們顯式把 tintAdjustmentMode 設為 Normal,同時設定 UIImageView 的圖片與渲染模式。
點擊「Change Color」按鈕時,會執行下面的事件處理:
@IBAction func changeColorHandler(sender: AnyObject) { let hue = CGFloat(arc4random() % 256) / 256.0 let saturation = CGFloat(arc4random() % 128) / 256.0 + 0.5 let brightness = CGFloat(arc4random() % 128) / 256.0 + 0.5 let color = UIColor(hue: hue, saturation: saturation, brightness: brightness, alpha: 1.0) self.view.tintColor = color updateViewConstraints() } private func updateProgressViewTint() { self.progressView?.progressTintColor = self.view.tintColor }這段程式碼隨機產生一個顏色並賦給 self.view 的 tintColor,同時更新進度條的 tintColor。
註:部分控件的特定組成部件由專屬屬性控制著色,例如進度條就有兩個 tint color,一個用於進度本身,另一個用於背景軌道。
點擊「Change Color」後可看到如下效果:
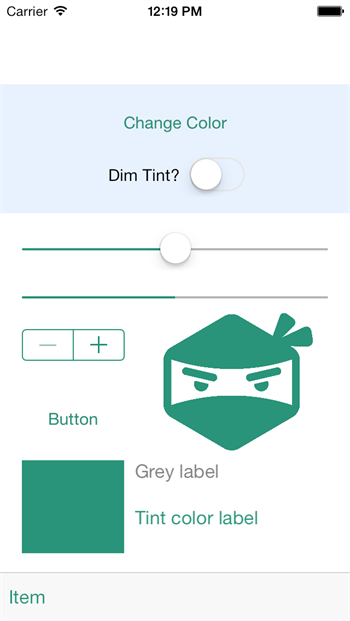
值得注意的點是,我們完全沒有手動設定 UIButton、UISlider、UIStepper、UIImageView、ToolBar 這些子視圖的顏色,但隨著 self.view 的 tintColor 改變,它們的外觀也同步跟著變。也就是說,根視圖的 tintColor 一變,整棵層次結構中所有子視圖的外觀都跟著變。
tintColor 確實相當強大。
介面上還有一個 UISwitch,用來開關 dim tint 功能,對應的處理方法如下:
@IBAction func dimTimtHandler(sender: AnyObject) { if let isOn = self.dimTintSwitch?.on { self.view.tintAdjustmentMode = isOn ? .Dimmed : .Normal } updateViewConstraints() }當 tintAdjustmentMode 設為 Dimmed 時,實際效果就是整體色值變暗(此處無圖可借)。
另外,我們在子視圖 CustomView 中覆寫了 tintColorDidChange,用來監聽 tintColor 變化並更新自訂視圖:
override func tintColorDidChange() { tintColorLabel.textColor = self.tintColor tintColorBlock.backgroundColor = self.tintColor }所以方框與「Tint color label」的顏色會跟著子視圖的 tintColor 變化,而子視圖的 tintColor 又是從父視圖繼承而來。
這個示例裡比較有意思的還有圖片處理。做法相當直接:對每個像素而言,若 alpha 值為 1 就把它的顏色設為 tint color,否則設為透明。示例中的忍者頭像就是這樣產生的。使用前需要把圖片的 imageWithRenderingMode 設為 AlwaysTemplate,這樣渲染時會把它當成模板,忽略原本的顏色資訊:
var shinobiHead = UIImage(named: "shinobihead") // 設置渲染模式 shinobiHead = shinobiHead?.imageWithRenderingMode(.AlwaysTemplate)
題外話
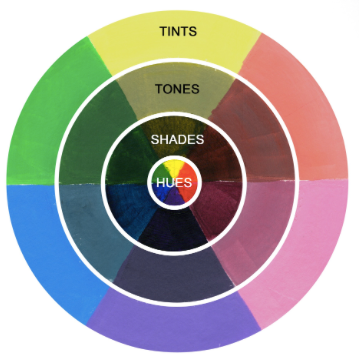
順帶補一點與主題關係不大的知識。在色彩理論(color theory)裡,tint color 指的是某色與白色混合後的結果;類似的還有 shade color(與黑色混合)與 tone color(與灰色混合)。這幾種都建立在 Hues 色調的基礎上,效果如下圖:
基礎理論可參考 Hues, Tints, Tones and Shades: What's the Difference? 或更專業的相關文章。
小結
若想指定整個 App 的 tint color,可以設定 window 的 tint color,這樣同一個 window 下的所有子視圖都會繼承它。
當彈出 alert 或 action sheet 時,iOS 7 會自動把背後視圖的 tint color 變暗;此時可在自訂視圖中覆寫 tintColorDidChange 來執行你想要的操作。
有些較複雜的控件可以有多個 tint color,分別控制不同部分,例如前面提到的 UIProgressView,以及 navigation bars、tab bars、toolbars、search bars、scope bars 等;這些控件的背景著色則由 barTintColor 屬性負責。
參考
UIView Class Reference
iOS7 Day-by-Day :: Day 6 :: Tint Color
Appearance and Behavior
Tints and shades
Hues, Tints, Tones and Shades: What's the Difference?
- 上一篇文章: 鍵盤通知的觸發順序與尺寸獲取實務
- 下一篇文章: 源碼推薦(7.02):把 UITableView 寫成三行的高仿微信系列控件