
知其然更要知其所以然:NSOperation 與 RunLoop 的真相

本文為投稿文章,作者:RyanJIN(簡書)
iOS 並發編程裡用得最普遍的就是 GCD,配合 Block 可以快速搞定多線程。但翻一些諸如 AFNetworking、SDWebImage 的源碼,你會發現它們用的都是 NSOperation。難道 NSOperation 更強?確實更強。先簡單 PK 一下(這裡也包含 NSOperationQueue):
- NSOperation 是基於 GCD 的更高層封裝,擁有更多 API(suspend、resume、cancel 等);
- NSOperationQueue 中可以指定各 operation 之間的依賴關係;
- 通過 KVO 能方便地監測 operation 的狀態(isExecuted、isFinished、isCancelled);
- 可定制性更高,可以繼承 NSOperation 沉澱可復用的邏輯模塊。
官方文檔和網絡資料很多,但大多比較書面化,看著看著就雲深不知處了。所以本文用盡量通俗的方式來講。
三組易混概念
串行 vs 並行:描述任務之間的執行方式。串行是 A 執行完 B 才能開始;並行是 A 和 B 可以同時推進。
同步 vs 異步:描述函數什麼時候返回。同步函數要等下載完成才返回,期間只能搬個小板凳坐等;異步函數立即返回,任務在後面跑,不阻塞當前線程。
並發 vs 並行:這組最容易混。用 Ray 大神的說法:並發是程序的屬性,並行是計算機的屬性。
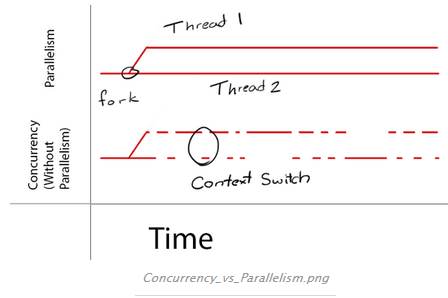
再解釋一下。假設有任務 T1 和 T2:
如果 CPU 是單核,為了「同時」執行,只能分時——跑一會兒 T1 再切到 T2,切換(context switch)本身也要消耗資源,但因為足夠快,你會誤以為它們在同時執行,實際上同一時刻只有一個任務佔有 CPU。
如果是多核 CPU,恭喜,core1 跑 T1、core2 跑 T2,這才是真正的並行。
所以我們日常說的並發編程,其實涵蓋了狹義的「並發」與「並行」:你無法保證代碼一定被並行執行,但可以以並發的方式設計代碼。系統會判斷某時刻是否有空閒核心,有就並行,沒有就用上下文切換分時並發。用 Ray 大神的話收尾:Parallelism requires Concurrency, but Concurrency does not guarantee Parallelism!
獨立執行的 NSOperation
NSOperation 可以自己跑([operation start]),也可以放進 NSOperationQueue 裡跑,兩種情況下的並發行為完全不同。
NSOperation 預設是非並發的(non-concurrent):放到某個線程執行時,它會一直佔住該線程直到 finished。非並發的 operation 只需繼承 NSOperation 並重寫 main:
@implementation YourOperation

- (void)main {
    @autoreleasepool {
        if (self.isCancelled) return;

        NSData *imageData = [[NSData alloc] initWithContentsOfURL:imageURL];
        if (self.isCancelled) { imageData = nil; return; }

        if (imageData) {
            UIImage *downloadedImage = [UIImage imageWithData:imageData];
        }
        imageData = nil;

        if (self.isCancelled) return;

        [self.delegate performSelectorOnMainThread:@selector(imageDownloaderDidFinish:)
                                      withObject:downloadedImage
                                   waitUntilDone:NO];
    }
}

@end
因為 operation 可被取消,所以需要在內部各個關鍵節點判斷 isCancelled,為 YES 就不再往下走。外部調用 [operation cancel] 後該值即被置為 YES。
NSOperation 有三個狀態量:isCancelled、isExecuting、isFinished。main 執行完後 isExecuting 置 NO、isFinished 置 YES。
那怎麼寫並發(concurrent)的 operation?三步:
- 重寫
isConcurrent返回 YES; - 重寫
start; - 重寫
isExecuting與isFinished。
為什麼要自己管這兩個狀態?因為並發情況下系統不知道你的任務何時結束——內部的 task 通常是異步的,start 返回並不代表完成,一切由你控制:你把 isFinished 置 YES 並發出 KVO 通知的那一刻,operation 才算完成。
- (BOOL)isConcurrent {
    return YES;
}

- (void)start {
    [self willChangeValueForKey:@"isExecuting"];
    _isExecuting = YES;
    [self didChangeValueForKey:@"isExecuting"];

    NSURLRequest *request = [NSURLRequest requestWithURL:imageURL];
    _connection = [[NSURLConnection alloc] initWithRequest:request delegate:self];
    if (_connection == nil) [self finish];
}

- (void)finish {
    self.connection = nil;
    [self willChangeValueForKey:@"isExecuting"];
    [self willChangeValueForKey:@"isFinished"];
    _isExecuting = NO;
    _isFinished = YES;
    [self didChangeValueForKey:@"isExecuting"];
    [self didChangeValueForKey:@"isFinished"];
}

#pragma mark - NSURLConnection delegate

- (void)connection:(NSURLConnection *)connection didReceiveResponse:(NSURLResponse *)response { }
- (void)connection:(NSURLConnection *)connection didReceiveData:(NSData *)data { }

- (void)connectionDidFinishLoading:(NSURLConnection *)connection {
    [self finish];
}

- (void)connection:(NSURLConnection *)connection didFailWithError:(NSError *)error {
    [self finish];
}

@end
幾點需要注意:
- executing 與 finished 的變化必須用 willChangeValueForKey / didChangeValueForKey 觸發 KVO;
- 調用 NSURLConnection 之後 start 就返回了,後續靠 delegate 回調;
- 在 connection 完成或失敗的回調裡標記 finish。
如果你在主線程調用這個並發 operation,一切完美,即使正在操作 UI 也不影響下載。但如果在子線程調用、或者把它加進非 main queue,問題就來了:NSURLConnection 的 delegate 不走了。這就必須請出另一位高手——NSRunLoop。
NSRunLoop 是什麼
從字面看,RunLoop 就是「跑圈」,保證程序一直在執行。App 啟動後即使什麼都不做也不會退出,就是 RunLoop 在跑。主線程會自動創建一個 RunLoop;子線程預設不創建,所以子線程的任務一旦返回,線程就結束了。
上面那個並發 operation,start 返回後子線程就退出,等 NSURLConnection 想回調時線程已經沒了,自然收不到。要保證子線程持續存活等待回調,就得給它掛一個 RunLoop。
RunLoop 在某一時刻只能運行在一種模式下,換模式需要暫停當前 Loop 再重啟。主要模式有:
NSDefaultRunLoopMode:默認模式,主線程通常在此運行;UITrackingRunLoopMode:滑動 ScrollView 時切換到該模式;NSRunLoopCommonModes:包含上面兩者。
這裡有個容易踩的坑:滑動 ScrollView 時系統會把模式切換為 UITrackingRunLoopMode 以保證流暢,於是預設加在 NSDefaultRunLoopMode 上的 timer 就失效了。
[NSTimer scheduledTimerWithTimeInterval:1.f
                                  target:self
                                selector:@selector(timerAction:)
                                userInfo:nil
                                 repeats:YES];
解法是把 timer 加到 CommonModes 上:
[[NSRunLoop currentRunLoop] addTimer:timer forMode:NSRunLoopCommonModes];
還有一個實用技巧:tableview 的 cell 異步加載完圖片後回主線程刷新,滑動時容易卡。常見思路是滑動期間延遲加載、停止後再顯示,用 RunLoop 也能優雅實現:
[self.cellImageView performSelector:@selector(setImage:)
                          withObject:downloadedImage
                       afterDelay:0
                          inModes:@[NSDefaultRunLoopMode]];
道理很簡單:RunLoop 處於 NSDefaultRunLoopMode 說明 tableview 已經停止滑動(還在滑的話模式應該是 UITrackingRunLoopMode)。
讓 NSURLConnection 的回調回來
方案一是讓 start 在主線程運行,直接複用主線程已有的 RunLoop:
- (void)start {
    if (![NSThread isMainThread]) {
        [self performSelectorOnMainThread:@selector(start)
                              withObject:nil
                           waitUntilDone:NO];
        return;
    }
    // set up NSURLConnection...
}
或者更直接:
- (void)start {
    [[NSOperationQueue mainQueue] addOperationWithBlock:^{
        self.connection = [NSURLConnection connectionWithRequest:self.request delegate:self];
    }];
}
方案二是在子線程自己建 RunLoop。看看 AFNetworking 怎麼做的:
+ (void)networkRequestThreadEntryPoint:(id)__unused object {
    @autoreleasepool {
        [[NSThread currentThread] setName:@"AFNetworking"];
        NSRunLoop *runLoop = [NSRunLoop currentRunLoop];
        [runLoop addPort:[NSMachPort port] forMode:NSDefaultRunLoopMode];
        [runLoop run];
    }
}

+ (NSThread *)networkRequestThread {
    static NSThread *_networkRequestThread = nil;
    static dispatch_once_t oncePredicate;
    dispatch_once(&oncePredicate, ^{
        _networkRequestThread = [[NSThread alloc] initWithTarget:self
                                                       selector:@selector(networkRequestThreadEntryPoint:)
                                                         object:nil];
        [_networkRequestThread start];
    });
    return _networkRequestThread;
}
它在子線程中調用 [NSRunLoop currentRunLoop](此時會創建 RunLoop),加一個 port 防止 RunLoop 空轉退出,然後 [runLoop run] 讓它持續存活。
實踐中可以判斷當前是否主線程:子線程就自建 RunLoop,主線程直接用 mainRunLoop(主線程本來就在跑,不需要再 run)。也可以用 CFRunLoop 控制:
[self.connection scheduleInRunLoop:[NSRunLoop currentRunLoop]
                          forMode:NSRunLoopCommonModes];
CFRunLoopRun();
注意 operation 結束後一定要調用 CFRunLoopStop(),讓線程能正常退出。
在 NSOperationQueue 中執行
一旦 operation 被 add 進 queue,就不再需要你關心它自身是不是並發設計——隊列裡的 operation 必定並發執行。可以通過 maxConcurrentOperationCount 指定最大並發數,設為 1 時該隊列就是串行的。
原因是:Queue 會為每一個加入的 operation 創建線程來運行其 start,各個 start 分佈在不同線程上,於是實現並發。
要強調的是,這裡說的並發指的是多個 operation 同時執行。若 maxConcurrentOperationCount 設為 1,或把 operation 放進 [NSOperationQueue mainQueue],它們只會順序執行。
[NSOperationQueue mainQueue] 返回的主隊列,任務都在主線程執行,並且會忽略一切設置強制順序執行——放進去就別再想並發了。而 [[NSOperationQueue alloc] init] 得到的是子隊列。
那如果在子線程調 start、或把 operation 放進非 main queue,但內部又把 start 拋回主線程執行呢?答案是:仍然並發。看下面兩張示意圖就明白了。
單線程情況下:

各個任務(在我們這裡就是一個個 NSOperation)通過分時實現偽並行。
多線程情況下:
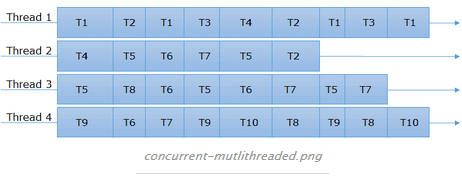
多個線程同時執行不同任務,任務之間也會不斷切換線程,實現真正的並發執行。
最後,添加 operation 時可以指定依賴,比如 [operationB addDependency:operationA],那麼 B 會等 A 完成後才啟動。這裡的「完成」正是前面反覆提到的 isFinished——並發情況下它由你自己設定。比如 A 異步下載一張圖,只有下載成功或超時失敗、isFinished 被標記為 YES 後,Queue 才會把 A 移出隊列並啟動 B。
動手做幾個實驗
想真正搞懂,還是打開 Xcode 寫幾行代碼 Command+R 一下:
- 創建兩個 operation 直接 start,在並發與非並發兩種設計下觀察是否交替執行(打 log 最直觀);
- 分別在主線程與子線程調用 start,對比表現;
- 把 operation 放進 NSOperationQueue,分別試 main queue 與非 main queue;
- 調整 maxConcurrentOperationCount 看變化;
- 試試依賴關係
[operationB addDependency:operationA]; - 寫個完整 demo,比如簡單的 HTTP Downloader。
最後附上乾貨 Demo:RJHTTPDownloader,一個用 NSOperation 實現的下載類。有人會說用 AFNetworking 就行了,何必自己寫?我覺得別人的代碼再看再怎麼用都不屬於你,自己動手寫過的才真正屬於你。這也不算重複造輪子,而是搞清楚輪子是怎麼造出來的——一步一步積累,總有一天我們也能寫出像 AFNetworking 那樣的代碼。共勉。