
別把 ViewController 當成 TableView 的垃圾桶:抽離列表邏輯的實作思路

本文為投稿文章,作者 TEASON。
近來 MVVM 相當熱門,一般認為它的出現是為了讓 iOS 開發模組化。不過在我看來,它終究還是 MVC 的一種變體(若引入響應式思維另當別論,但本文只討論程式碼的設計模式)。
與其糾結 MVVM 的來歷,不如看一個典型 iOS 專案是怎麼組起來的:
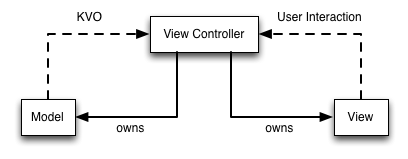
這是最常見的 MVC 結構:Model 負責資料,View 負責介面,ViewController 居中協調兩者互動。
稍微想一下會發現,View 與 ViewController 技術上是兩個元件,實務上卻幾乎總是成對出現。你什麼時候見過一個 View 與不同 ViewController 配對?反之亦然。既然如此,為什麼不正式把這層關係正規化?
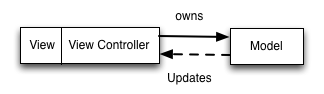
這張圖更貼近多數人實際寫出的 MVC,但它並沒有解決 ViewController 日益肥重的問題。典型的 MVC 專案裡,大量邏輯都塞在 ViewController:有些確實屬於它,但更多是「供顯示用的邏輯」——用 MVVM 的術語說,就是把 Model 的資料轉換成 View 能呈現的樣子,例如把 NSDate 格式化為字串。
圖裡缺了一塊放置這些邏輯的位置。我們稱它為 View Model,位於 View/Controller 與 Model 之間:

這樣看就清楚多了:MVVM 就是 MVC 的增強版,正式連結 View 與 Controller,並把顯示邏輯搬到新物件 View Model 裡。聽起來複雜,本質上是一個經過細節優化的 MVC——而 MVC 你早已熟悉。
如果你認為下圖右側那種寫法把全部程式碼塞進 ViewController 才好維護、好擴充,那大可以直接關掉這個頁面。
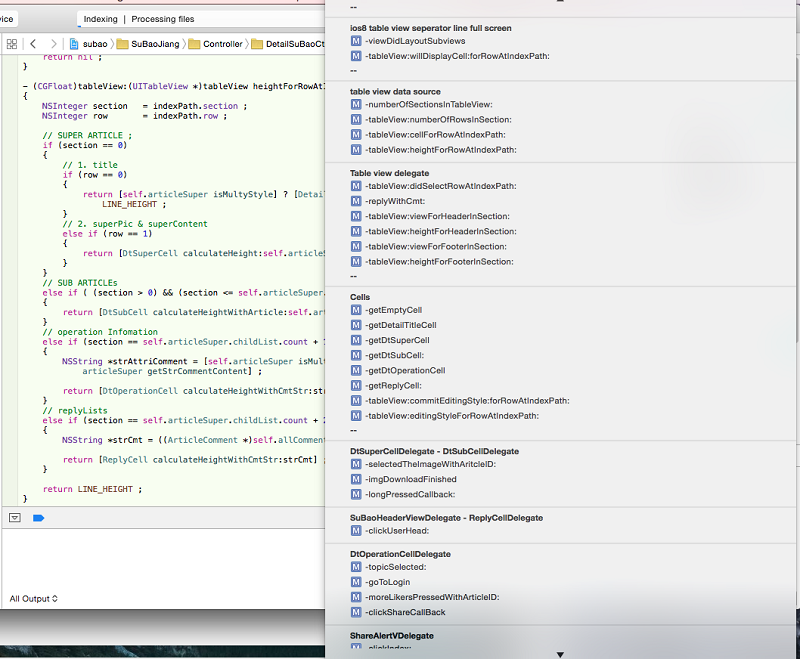
ViewController 減肥有很多面向,本文只談其中一項:把 TableView 的顯示邏輯拆出去。之所以先鋪陳 MVVM,是因為核心思想相通——把「邏輯部分」盡量移進 Model 層。這裡的邏輯可以是各種 delegate、網路請求、快取、資料庫、Core Data 等,而 controller 的職責是把這些環節串接起來,讓整個流程跑通。
把 dataSource 與 delegate 抽出來
最直覺的做法是把 UITableViewDataSource 與 UITableViewDelegate 的實作搬到獨立類別。不過我發現還有東西可以再抽象:cell 的建立、行高計算與點擊回應。這裡用 block 做回呼,若對 block 不熟建議先補基礎。此外,重度使用 xib 產生 cell 的人會發現這套封裝特別合手——它預設以 xib 檔案名作為 cell 的 reuse identifier,實戰時別忘了確認 xib 內的 Identifier 設定一致。
處理類別 XTTableDataDelegate 的介面:
typedef void (^TableViewCellConfigureBlock)(NSIndexPath *indexPath, id item, XTRootCustomCell *cell);
typedef CGFloat (^CellHeightBlock)(NSIndexPath *indexPath, id item);
typedef void (^DidSelectCellBlock)(NSIndexPath *indexPath, id item);

@interface XTTableDataDelegate : NSObject
// 1. 初始化:資料源、cell identifier、以及設定/行高/點擊三個 block
- (id)initWithItems:(NSArray *)anItems
      cellIdentifier:(NSString *)aCellIdentifier
  configureCellBlock:(TableViewCellConfigureBlock)aConfigureCellBlock
       cellHeightBlock:(CellHeightBlock)aHeightBlock
         didSelectBlock:(DidSelectCellBlock)didselectBlock;
// 2. 把 dataSource 與 delegate 掛到 XTTableDataDelegate 上
- (void)handleTableViewDatasourceAndDelegate:(UITableView *)table;
// 3. 預設以 indexPath.row 對應資料,回傳該筆 item
- (id)itemAtIndexPath:(NSIndexPath *)indexPath;
@end
接著再抽出一層「根 Cell」:
@interface XTRootCustomCell : UITableViewCell
+ (void)registerTable:(UITableView *)table nibIdentifier:(NSString *)identifier;
// 依資料源設定並繪製 cell,子類必須覆寫
- (void)configure:(UITableViewCell *)cell
        customObj:(id)obj
        indexPath:(NSIndexPath *)indexPath;
// 依資料源計算行高,子類可自行覆寫,未覆寫時為預設值
+ (CGFloat)getCellHeightWithCustomObj:(id)obj indexPath:(NSIndexPath *)indexPath;
@end
因此所有 cell 都必須是 XTRootCustomCell 的子類,透過覆寫父類方法來定義各自的呈現與高度:
+ (void)registerTable:(UITableView *)table nibIdentifier:(NSString *)identifier {
    [table registerNib:[self nibWithIdentifier:identifier]
 forCellReuseIdentifier:identifier];
}

+ (CGFloat)getCellHeightWithCustomObj:(id)obj indexPath:(NSIndexPath *)indexPath {
    if (!obj) { return 0.0f; }
    return 44.0f; // 預設行高
}
具體 cell 子類只需覆寫兩個方法:
- (void)configure:(UITableViewCell *)cell
        customObj:(id)obj
        indexPath:(NSIndexPath *)indexPath {
    MyObj *myObj = (MyObj *)obj;
    MyCell *mycell = (MyCell *)cell;
    mycell.lbTitle.text = myObj.name;
    mycell.lbHeight.text = [NSString stringWithFormat:@"my Height is : %@", @(myObj.height)];
    cell.backgroundColor = indexPath.row % 2 ? [UIColor greenColor] : [UIColor brownColor];
}

+ (CGFloat)getCellHeightWithCustomObj:(id)obj indexPath:(NSIndexPath *)indexPath {
    return ((MyObj *)obj).height;
}
減肥之後的 controller 乾淨得不像實力派,只剩一個方法:
- (void)setupTableView {
    self.table.separatorStyle = 0;

    TableViewCellConfigureBlock configureCell =
        ^(NSIndexPath *indexPath, MyObj *obj, XTRootCustomCell *cell) {
            [cell configure:cell customObj:obj indexPath:indexPath];
        };

    CellHeightBlock heightBlock = ^CGFloat(NSIndexPath *indexPath, id item) {
        return [MyCell getCellHeightWithCustomObj:item indexPath:indexPath];
    };

    DidSelectCellBlock selectedBlock = ^(NSIndexPath *indexPath, id item) {
        NSLog(@"click row : %@", @(indexPath.row));
    };

    self.tableHander = [[XTTableDataDelegate alloc]
        initWithItems:self.list
        cellIdentifier:MyCellIdentifier
        configureCellBlock:configureCell
        cellHeightBlock:heightBlock
        didSelectBlock:selectedBlock];

    [self.tableHander handleTableViewDatasourceAndDelegate:self.table];
}
其餘 .m 檔過於冗長就不貼了——文章重點是思路,思路才是關鍵。想深入看實作可參考作者上傳到 GitHub 的原始碼。任何疑問或建議都歡迎留言。
參考閱讀
- 介紹 MVVM
- Lighter View Controllers
- Table View Programming Guide
- Cocoa Core Competencies: Controller Object