
MVVM With ReactiveCocoa:從理論到實戰的架構演進

作者:@雷純鋒2011
MVVM 是一種軟體架構模式,它是 Martin Fowler 的 Presentation Model 的一種變體,最早由微軟架構師 John Gossman 於 2005 年提出,並應用於微軟的 WPF 與 Silverlight 軟體開發中。MVVM 衍生自 MVC,是對 MVC 的一種演進,它促進了 UI 程式碼與業務邏輯的分離。
說明:本文將採用理論與實踐相結合的方式,重點介紹一個使用 MVVM 與 RAC 開發的 iOS 開源專案 MVVMReactiveCocoa,希望能為你實踐 MVVM 提供幫助。不過,在正式進入正文之前,請你先思考以下三個問題:
MVC 與 MVVM 有何異同,從 MVC 到 MVVM 是怎樣演進的;
RAC 在 MVVM 中扮演什麼角色,MVVM 是否一定要結合 RAC 使用;
如何把一個現有的 MVC 應用轉變成 MVVM 應用,有哪些需要注意的地方。
帶著這些問題,我們一起進入正文。
名詞解釋:本文中的 RAC 為 ReactiveCocoa 的縮寫。
MVC
MVC 是 iOS 開發中使用最普遍的架構模式,同時也是蘋果官方推薦的模式。MVC 代表 Model–View–Controller,它們之間的關係如下:
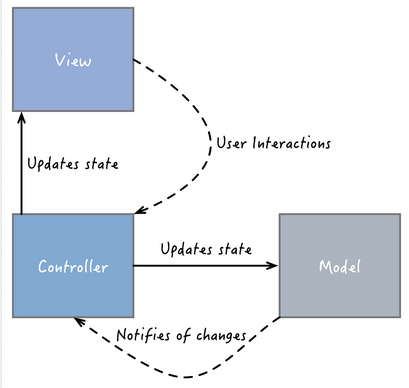
是的,MVC 看上去棒極了:model 代表資料,view 代表 UI,而 controller 則負責協調兩者的關係。然而,儘管從技術上看 view 與 controller 相互獨立,但實際上它們幾乎總是結對出現——一個 view 只能與一個 controller 匹配,反之亦然。既然如此,我們何不把它們視為一個整體呢:
因此,M-VC 或許是對 iOS 中 MVC 模式更為準確的解讀。在一個典型的 MVC 應用裡,controller 由於承載了過多邏輯,往往會變得臃腫不堪,所以 MVC 也常被調侃為 Massive View Controller:
iOS architecture, where MVC stands for Massive View Controller.
坦白說,有一部分邏輯確實屬於 controller,但也有一部分邏輯並不該被放在 controller 裡。比如,把 model 中的 NSDate 轉換成 view 能展示的 NSString 等等。在 MVVM 中,我們把這些邏輯統稱為展示邏輯。
MVVM
因此,一個能很好解決 Massive View Controller 問題的辦法,就是把 controller 中的展示邏輯抽取出來,放到一個專門的地方,而這個地方就是 viewModel。其實,只要在上圖的 M-VC 之間放入 VM,就能得到 MVVM 模式的結構圖:
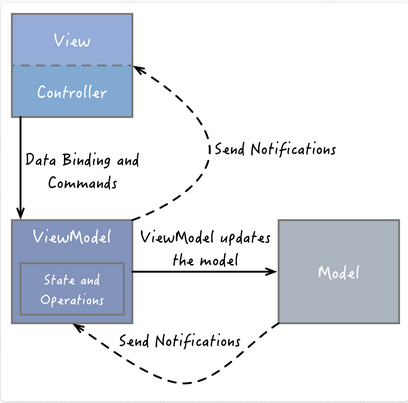
從上圖,我們可以非常清楚地看到 MVVM 中四個組件之間的關係。注意:除了 view、viewModel 與 model 之外,MVVM 中還有一個非常重要的隱含組件 binder:
view:由 MVC 中的 view 與 controller 組成,負責 UI 的展示,綁定 viewModel 中的屬性,觸發 viewModel 中的命令;
viewModel:從 MVC 的 controller 中抽取出來的展示邏輯,負責從 model 取得 view 所需的資料,轉換成 view 能展示的形式,並暴露公開的屬性與命令供 view 綁定;
model:與 MVC 中的 model 一致,包括資料模型、存取資料庫的操作與網路請求等;
binder:在 MVVM 中,聲明式的資料與命令綁定是一個隱含的約定,它能讓開發者非常方便地實現 view 與 viewModel 的同步,避免編寫大量繁雜的樣板化程式碼。在微軟的 MVVM 實現中,使用的是一種被稱為 XAML 的標記語言。
ReactiveCocoa
儘管在 iOS 開發中,系統並未提供類似框架來方便地實現 binder 功能,但值得慶幸的是,GitHub 開源的 RAC 給了我們一個非常不錯的選擇。
RAC 是一個 iOS 上的函數式響應式編程框架,它受 Functional Reactive Programming 的啟發,是 Justin Spahr-Summers 與 Josh Abernathy 在開發 GitHub for Mac 過程中的一個副產品,提供了一系列用來組合與轉換值流的 API。如需了解更多關於 RAC 的資訊,可以閱讀我的上一篇文章《ReactiveCocoa v2.5 源碼解析之架構總覽》。
在 iOS 的 MVVM 實現中,我們可以用 RAC 在 view 與 viewModel 之間充當 binder 的角色,優雅地實現兩者的同步。此外,我們還可以把 RAC 用在 model 層,用 Signal 來代表非同步的資料取得操作,比如讀取檔案、存取資料庫與網路請求等。說明:RAC 的後一個應用場景是與 MVVM 無關的,也就是說,我們同樣可以在 MVC 的 model 層這麼用。
小結
綜上所述,我們只要把 MVC 中 controller 的展示邏輯抽取出來,放到 viewModel 裡,再透過一定的技術手段(比如 RAC)來同步 view 與 viewModel,就完成了從 MVC 到 MVVM 的轉變。
Talk is cheap. Show me the code.
下面,我們直接上程式碼,一起來看一個從 MVC 模式轉換成 MVVM 模式的示例。首先是 model 層的程式碼 Person:
@interface Person : NSObject - (instancetype)initwithSalutation:(NSString *)salutation firstName:(NSString *)firstName lastName:(NSString *)lastName birthdate:(NSDate *)birthdate; @property (nonatomic, copy, readonly) NSString *salutation; @property (nonatomic, copy, readonly) NSString *firstName; @property (nonatomic, copy, readonly) NSString *lastName; @property (nonatomic, copy, readonly) NSDate *birthdate; @end
然後是 view 層的程式碼 PersonViewController,在 viewDidLoad 方法中,我們把 Person 中的屬性做一定轉換後,賦值給相應的 view 進行展示:
- (void)viewDidLoad { [super viewDidLoad]; if (self.model.salutation.length > 0) { self.nameLabel.text =[NSString stringWithFormat:@"%@ %@ %@", self.model.salutation, self.model.firstName, self.model.lastName]; }else { self.nameLabel.text =[NSString stringWithFormat:@"%@ %@", self.model.firstName, self.model.lastName]; } NSDateFormatter *dateFormatter = [[NSDateFormatter alloc] init]; [dateFormatter setDateFormat:@"EEEE MMMM d, yyyy"]; self.birthdateLabel.text = [dateFormatter stringFromDate:model.birthdate]; }接下來,我們引入一個 viewModel,把 PersonViewController 中的展示邏輯抽到這個 PersonViewModel 中:
@interface PersonViewModel : NSObject - (instancetype)initWithPerson:(Person *)person; @property (nonatomic, strong, readonly) Person *person; @property (nonatomic, copy, readonly) NSString *nameText; @property (nonatomic, copy, readonly) NSString *birthdateText; @end @implementation PersonViewModel - (instancetype)initWithPerson:(Person *)person { self = [super init]; if (self) { _person = person; if (person.salutation.length > 0) { _nameText =[NSString stringWithFormat:@"%@ %@ %@", self.person.salutation, self.person.firstName, self.person.lastName]; }else { _nameText =[NSString stringWithFormat:@"%@ %@", self.person.firstName, self.person.lastName]; } NSDateFormatter *dateFormatter = [[NSDateFormatter alloc] init]; [dateFormatter setDateFormat:@"EEEE MMMM d, yyyy"]; _birthdateText = [dateFormatter stringFromDate:person.birthdate]; } return self; } @end最終,PersonViewController 會變得非常輕量級:
- (void)viewDidLoad { [super viewDidLoad]; self.nameLabel.text = self.viewModel.nameText; self.birthdateLabel.text = self.viewModel.birthdateText; }怎麼樣?其實 MVVM 並沒有想像中的那麼難吧?更重要的是,它也沒有破壞 MVC 的現有結構,只不過是挪動了一些程式碼,僅此而已。好了,說了這麼多,那 MVVM 相比 MVC 究竟有哪些好處呢?我想主要可以歸納為以下三點:
由於展示邏輯被抽到了 viewModel 中,所以 view 裡的程式碼會變得非常輕量級;
由於 viewModel 中的程式碼與 UI 無關,因此具有良好的可測試性;
對於一個封裝了大量業務邏輯的 model 來說,改動它可能比較困難且有一定風險。在這種情境下,viewModel 可以作為 model 的適配器使用,從而避免對 model 做較大的改動。
透過前面的示例,我們對第一點已經有了一定體會;至於第三點,對一個複雜的大型應用來說才會比較明顯。下面,我們仍用前面的示例,直觀地感受一下第二點好處:
SpecBegin(Person) NSString *salutation = @"Dr."; NSString *firstName = @"first"; NSString *lastName = @"last"; NSDate *birthdate = [NSDate dateWithTimeIntervalSince1970:0]; it (@"should use the salutation available. ", ^{ Person *person = [[Person alloc] initWithSalutation:salutation firstName:firstName lastName:lastName birthdate:birthdate]; PersonViewModel *viewModel = [[PersonViewModel alloc] initWithPerson:person]; expect(viewModel.nameText).to.equal(@"Dr. first last"); }); it (@"should not use an unavailable salutation. ", ^{ Person *person = [[Person alloc] initWithSalutation:nil firstName:firstName lastName:lastName birthdate:birthdate]; PersonViewModel *viewModel = [[PersonViewModel alloc] initWithPerson:person]; expect(viewModel.nameText).to.equal(@"first last"); }); it (@"should use the correct date format. ", ^{ Person *person = [[Person alloc] initWithSalutation:nil firstName:firstName lastName:lastName birthdate:birthdate]; PersonViewModel *viewModel = [[PersonViewModel alloc] initWithPerson:person]; expect(viewModel.birthdateText).to.equal(@"Thursday January 1, 1970"); }); SpecEnd對 MVVM 來說,我們可以把 view 視為 viewModel 的可視化形式,viewModel 提供了 view 所需的資料與命令。因此,viewModel 的可測試性能幫助我們極大地提高應用的品質。
MVVMReactiveCocoa
接下來,我們進入本文第二部分,重點介紹一個使用 MVVM 與 RAC 開發的開源專案 MVVMReactiveCocoa。說明:本文將主要介紹這個應用的架構與設計思路,希望能為你實踐 MVVM 提供一個真實的參考案例。有些架構並非 MVVM 所必須,而是我們為了更順暢地使用 MVVM 而引入的,特別是 ViewModel-Based Navigation。所以,請你在實踐過程中能結合自身應用的實際情況做出相應取捨、靈活處理。最後,我們將以登入介面為例,一起探討 MVVM 的實踐思路。
說明:以下內容均基於 MVVMReactiveCocoa 的 v2.1.1 標簽展開,並對部分無關程式碼做了刪減。
類圖
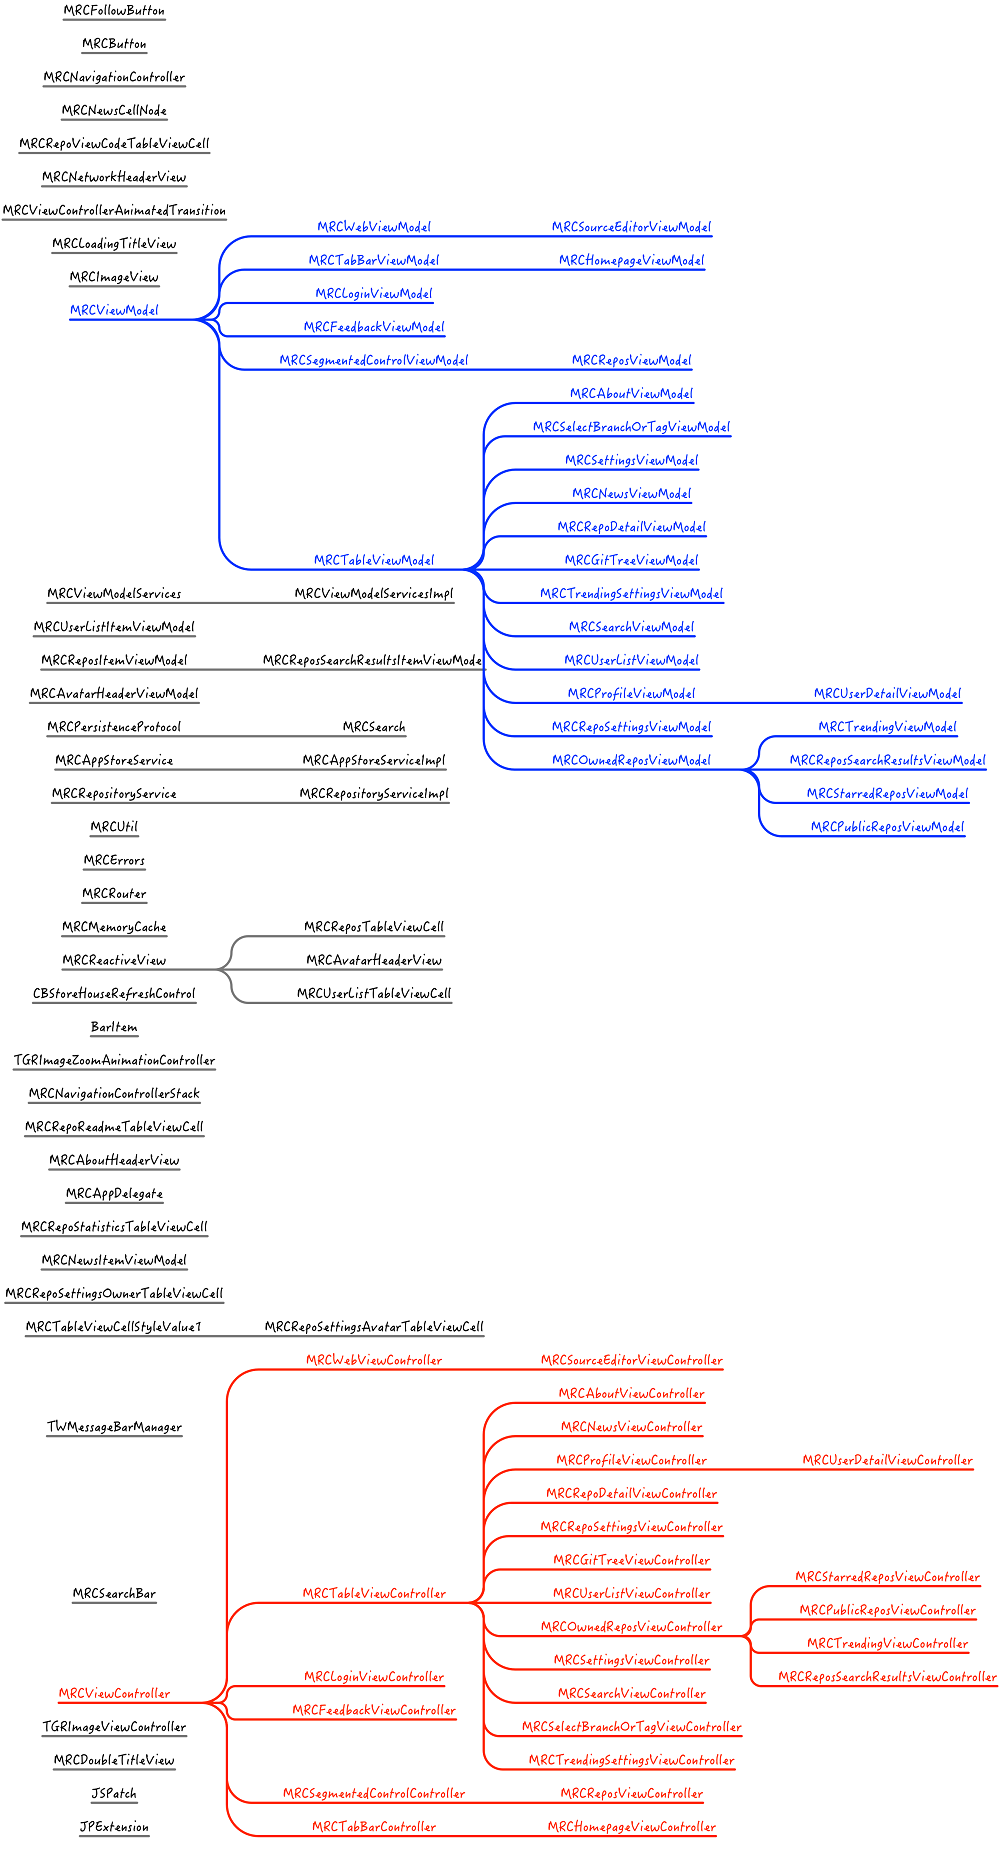
為方便我們從宏觀上了解 MVVMReactiveCocoa 的整體結構,先來看看它的類圖:
MVVMReactiveCocoa-v2.1.1
從上圖可以看到,在 MVVMReactiveCocoa 中主要有兩大繼承體系:
用藍色標識出來的 viewModel 繼承體系,基類為 MRCViewModel;
用紅色標識出來的 view 繼承體系,基類為 MRCViewController。
除了提供與系統基類 UIViewController 相對應的基類 MRCViewModel/MRCViewController 外,還提供了與系統基類 UITableViewController 和 UITabBarController 相對應的基類 MRCTableViewModel/MRCTableViewController 與 MRCTabBarViewModel/MRCTabBarController,其中以 MRCTableViewModel/MRCTableViewController 的使用最為普遍。
說明:之所以用基類的方式來組織 MVVMReactiveCocoa,一方面是由於主要開發者只有我一個人,這個方案非常容易實施;另一方面是由於透過基類的方式,可以盡可能簡單地實現程式碼重用、提高開發效率。
服務總線
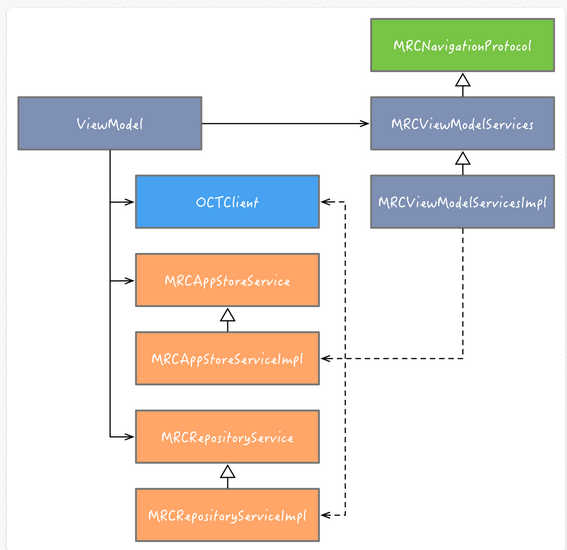
經過前面的探討,我們已經知道 MVVM 中 viewModel 的主要職責,就是從 model 層取得 view 所需的資料,並把這些資料轉換成 view 能展示的形式。因此,為方便 viewModel 層呼叫 model 層中的所有服務,並統一管理這些服務的創建,我用抽象工廠模式把 model 層的所有服務集中管理了起來,結構圖如下:
從上圖可以看出,在服務總線類 MRCViewModelServices/MRCViewModelServicesImpl 中,主要包括以下三方面內容:
應用自有的服務類,用柚黃色標識,包括 MRCAppStoreService/MRCAppStoreServiceImpl 與 MRCRepositoryService/MRCRepositoryServiceImpl 兩個服務類;
第三方 GitHub 提供的 API 框架,用天藍色標識,主要包括 OCTClient 服務類;
應用的導航服務,用藻綠色標識,包括 MRCNavigationProtocol 協議與實現類 MRCViewModelServicesImpl 等。
其中,前兩者都以信號的形式對 viewModel 層提供服務,代表非同步的網路請求等資料取得操作,而我們在 viewModel 層則可以透過訂閱信號的形式取得所需資料。此外,服務總線還實現了 MRCNavigationProtocol 協議,其內容如下:
@protocol MRCNavigationProtocol(因識別問題,這裡用方括號代替尖括號) - (void)pushViewModel:(MRCViewModel *)viewModel animated:(BOOL)animated; - (void)popViewModelAnimated:(BOOL)animated; - (void)popToRootViewModelAnimated:(BOOL)animated; - (void)presentViewModel:(MRCViewModel *)viewModel animated:(BOOL)animated completion:(VoidBlock)completion; - (void)dismissViewModelAnimated:(BOOL)animated completion:(VoidBlock)completion; - (void)resetRootViewModel:(MRCViewModel *)viewModel; @end
看上去是不是有點眼熟?是的,MRCNavigationProtocol 協議其實就是參照系統的導航操作定義出來的,用來實現 ViewModel-Based 的導航服務。注意,服務總線類 MRCViewModelServicesImpl 其實並沒有真正實現 MRCNavigationProtocol 協議中聲明的操作,只不過是實現了一些空操作而已:
- (void)pushViewModel:(MRCViewModel *)viewModel animated:(BOOL)animated {} - (void)popViewModelAnimated:(BOOL)animated {} - (void)popToRootViewModelAnimated:(BOOL)animated {} - (void)presentViewModel:(MRCViewModel *)viewModel animated:(BOOL)animated completion:(VoidBlock)completion {} - (void)dismissViewModelAnimated:(BOOL)animated completion:(VoidBlock)completion {} - (void)resetRootViewModel:(MRCViewModel *)viewModel {}那麼,我們是怎麼實現 ViewModel-Based 的導航操作的呢?用 MRCViewModelServicesImpl 來實現這些空操作到底有何用意?為什麼要這麼做,目的是什麼?兄台,莫急,請接著看下一小節。
ViewModel-Based Navigation
我們先來思考一個問題:我們為什麼要實現 ViewModel-Based 的導航操作呢?直接在 view 層使用系統的 push/present 等操作來完成導航,不就好了?我總結了這麼做的理由,主要有以下三點:
從理論上來說,MVVM 模式的應用應該是以 viewModel 為驅動來運轉的;
根據我們前面對 MVVM 的探討,viewModel 提供了 view 所需的資料與命令。因此,我們往往可以直接在命令執行成功後,用 doNext 順帶就把導航操作給做了,一氣呵成;
這樣能讓 view 更加輕量級,只需綁定 viewModel 提供的資料與命令即可。
既然如此,那我們究竟該如何實現 ViewModel-Based 的導航操作呢?我們都知道,iOS 中的導航操作無外乎兩種:push/pop 與 present/dismiss,前者是 UINavigationController 特有的功能,而後者是所有 UIViewController 都具備的功能。注意,UINavigationController 也是 UIViewController 的子類,所以它同樣具備 present/dismiss 的功能。因此,從本質上來說,不管我們要實現什麼樣的導航操作,最終都離不開 push/pop 與 present/dismiss。
目前,MVVMReactiveCocoa 的做法是在 view 層維護一個 NavigationController 的堆疊 MRCNavigationControllerStack,不管是 push/pop 還是 present/dismiss,都使用堆疊頂的 NavigationController 來執行導航操作,並保證 present 出來的是一個 NavigationController。
接下來,我們一起看看 MVVMReactiveCocoa 在執行了 push/pop 或 present/dismiss 操作後,視圖層次結構的變化過程。首先,我們來看看用戶在登入成功後進入首頁時,應用的視圖層次結構圖:
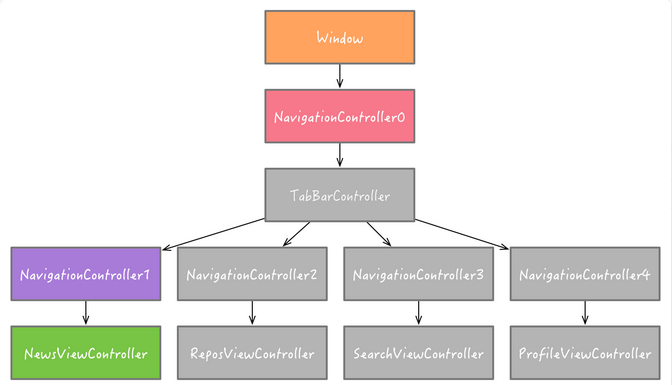
此時,應用展示的介面是 NewsViewController。在 MRCNavigationControllerStack 堆疊中只有 NavigationController0 一個元素;而 NavigationController1 並不在 MRCNavigationControllerStack 堆疊中,這是為了支持 TabBarController 的滑動切換而設計的視圖層次結構,是首頁比較特殊的一個地方。更多資訊可以查看 GitHub 開源庫 WXTabBarController,在這裡我們不用太過糾結這個問題,理解原理就好。
接下來,當用戶在 NewsViewController 介面點擊了某一個 cell,透過 push 的方式進入倉庫詳情介面時,應用的視圖層次結構圖如下:
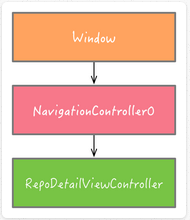
應用透過 MRCNavigationControllerStack 堆疊頂的元素 NavigationController0,把倉庫詳情介面 push 到了自身的堆疊中。此時,應用展示的介面是被 push 進來的倉庫詳情介面 RepoDetailViewController。最後,當用戶在倉庫詳情介面點擊左下角的切換分支按鈕,透過 present 的方式彈出分支選擇介面時,應用的視圖層次結構圖如下:
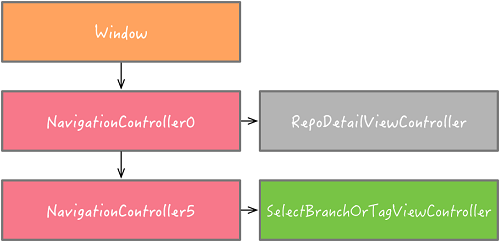
應用透過 MRCNavigationControllerStack 堆疊頂的元素 NavigationController0,把 NavigationController5 以 present 的方式彈出來。此時,應用展示的是 NavigationController5 的根視圖 SelectBranchOrTagViewController。說明:由於 pop 與 dismiss 同 push 與 present 互為逆操作,所以只要按從下到上的順序看上面的視圖層次結構圖即可,這裡不再贅述。
等等,如果我沒記錯的話,MRCNavigationControllerStack 堆疊是在 view 層,而服務總線類 MRCViewModelServicesImpl 是在 viewModel 層的。據我所知,viewModel 層是不能引入 view 層任何東西的,更嚴格地說,是不能引入任何 UIKit 中的東西的,否則就違背了 MVVM 的基本原則,也會喪失 viewModel 的可測試性。在這個前提下,你要如何讓這兩者產生關聯呢?
沒錯,這正是 MRCViewModelServicesImpl 中之所以實現那些空操作的目的所在了。viewModel 透過呼叫 MRCViewModelServicesImpl 中的空操作,來表明需要執行相應的導航操作;而 MRCNavigationControllerStack 則透過 Hook 來捕獲這些空操作,然後使用堆疊頂的 NavigationController 來執行真正的導航操作:
- (void)registerNavigationHooks { @weakify(self) [[(NSObject *)self.services rac_signalForSelector:@selector(pushViewModel:animated:)] subscribeNext:^(RACTuple *tuple){ @strongify(self) UIViewController *viewController = (UIViewController *)[MRCRouter.sharedInstance viewControllerForViewModel:tuple.first]; [self.navigationControllers.lastObject pushViewController:viewController animated:[tuple.second boolValue]]; }]; [[(NSObject *)self.services rac_signalForSelector:@selector(popViewModelAnimated:)] subscribeNext:^(RACTuple *tuple){ @strongify(self) [self.navigationControllers.lastObject popViewControllerAnimated:[tuple.first boolValue]]; }]; [[(NSObject *)self.services rac_signalForSelector:@selector(popToRootViewModelAnimated:)] subscribeNext:^(RACTuple *tuple){ @strongify(self) [self.navigationControllers.lastObject popToRootViewControllerAnimated:[tuple.first boolValue]]; }]; [[(NSObject *)self.services rac_signalForSelector:@selector(presentViewModel:animated:completion:)] subscribeNext:^(RACTuple *tuple){ @strongify(self) UIViewController *viewController = (UIViewController *)[MRCRouter.sharedInstance viewControllerForViewModel:tuple.first]; UINavigationController *presentingViewController = self.navigationControllers.lastObject; if (![viewController isKindOfClass:UINavigationController.class]) { viewController = [[MRCNavigationController alloc] initWithRootViewController:viewController]; } [self pushNavigationController:(UINavigationController *)viewController]; [presentingViewController presentViewController:viewController animated:[tuple.second boolValue] completion:tuple.third]; }]; [[(NSObject *)self.services rac_signalForSelector:@selector(dismissViewModelAnimated:completion:)] subscribeNext:^(RACTuple *tuple){ @strongify(self) [self popNavigationController]; [self.navigationControllers.lastObject dismissViewControllerAnimated:[tuple.first boolValue] completion:tuple.second]; }]; [[(NSObject *)self.services rac_signalForSelector:@selector(resetRootViewModel:)] subscribeNext:^(RACTuple *tuple){ @strongify(self) [self.navigationControllers removeAllObjects]; UIViewController *viewController = (UIViewController *)[MRCRouter.sharedInstance viewControllerForViewModel:tuple.first]; if (![viewController isKindOfClass:[UINavigationController class]]) { viewController = [[MRCNavigationController alloc] initWithRootViewController:viewController]; ((UINavigationController *)viewController).delegate = self; [self pushNavigationController:(UINavigationController *)viewController]; } MRCSharedAppDelegate.window.rootViewController = viewController; }]; }透過 Hook 的方式,我們最終實現了 ViewModel-Based 的導航操作,並且在 viewModel 層也沒有引入 view 層的任意東西,實現了解耦合。
Router
還有一點值得一提:我們在 viewModel 中呼叫導航操作時,只傳入了 viewModel 的實例作為參數,那麼我們在 MRCNavigationControllerStack 中執行真正的導航操作時,怎麼才能知道要跳轉到哪個介面呢?為此,我們配置了一個從 viewModel 到 view 的映射,並約定了一個統一的初始化 view 的方法 initWithViewModel::
- (MRCViewController *)viewControllerForViewModel:(MRCViewModel *)viewModel { NSString *viewController = self.viewModelViewMappings[NSStringFromClass(viewModel.class)]; NSParameterAssert([NSClassFromString(viewController) isSubclassOfClass:[MRCViewController class]]); NSParameterAssert([NSClassFromString(viewController) instancesRespondToSelector:@selector(initWithViewModel:)]); return [[NSClassFromString(viewController) alloc] initWithViewModel:viewModel]; } - (NSDictionary *)viewModelViewMappings { return @{ @"MRCLoginViewModel": @"MRCLoginViewController", @"MRCHomepageViewModel": @"MRCHomepageViewController", @"MRCRepoDetailViewModel": @"MRCRepoDetailViewController", ... }; }登入介面
最後,我們一起看看登入介面中 viewModel 與 view 的部分關鍵程式碼,探討 MVVM 的具體實踐過程。說明:我們會盡可能地回避具體的業務邏輯,重點關注 MVVM 的實踐思路。下面是登入介面的截圖:
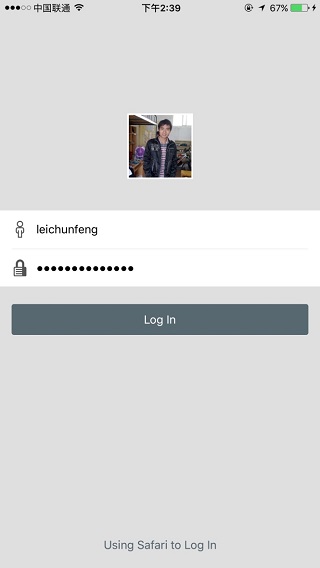
其中,主要的介面元素有:
一個用於展示用戶頭像的按鈕 avatarButton;
用於輸入帳號與密碼的輸入框 usernameTextField 與 passwordTextField;
一個直接登入的按鈕 loginButton,和一個跳轉到瀏覽器授權登入的按鈕 browserLoginButton。
分析:根據我們前面對 MVVM 的探討,viewModel 需要提供 view 所需的資料與命令。因此,MRCLoginViewModel.h 頭檔的內容大致如下:
@interface MRCLoginViewModel : MRCViewModel @property (nonatomic, copy, readonly) NSURL *avatarURL; @property (nonatomic, copy) NSString *username; @property (nonatomic, copy) NSString *password; @property (nonatomic, strong, readonly) RACSignal *validLoginSignal; @property (nonatomic, strong, readonly) RACCommand *loginCommand; @property (nonatomic, strong, readonly) RACCommand *browserLoginCommand; @end
非常直觀。其中需要特別說明的是,validLoginSignal 屬性代表登入按鈕是否可用,它將會與 view 中登入按鈕的 enabled 屬性進行綁定。接著,我們來看看 MRCLoginViewModel.m 實現檔中的部分關鍵程式碼。
當用戶輸入的用戶名發生變化時,呼叫 model 層的方法查詢本地資料庫中緩存的用戶資料,並回傳 avatarURL 屬性;當用戶輸入的用戶名或密碼發生變化時,判斷用戶名與密碼的長度是否均大於 0,若是則登入按鈕可用,否則不可用;當 loginCommand 或 browserLoginCommand 命令執行成功時,呼叫 doNext 程式碼塊,使用服務總線中的方法 resetRootViewModel: 進入首頁。
接下來,我們來看看 MRCLoginViewController 中的部分關鍵程式碼:
@implementation MRCLoginViewController - (void)bindViewModel { [super bindViewModel]; @weakify(self) [RACObserve(self.viewModel, avatarURL) subscribeNext:^(NSURL *avatarURL){ @strongify(self) [self.avatarButton sd_setImageWithURL:avatarURL forState:UIControlStateNormal placeholderImage:[UIImage imageNamed:@"default-avatar"]]; }]; RAC(self.viewModel, username) = self.usernameTextField.rac_textSignal; RAC(self.viewModel, password) = self.passwordTextField.rac_textSignal; RAC(self.loginButton, enabled) = self.viewModel.validLoginSignal; [[self.loginButton rac_signalForControlEvents:UIControlEventTouchUpInside] subscribeNext:^(id x){ @strongify(self) [self.viewModel.loginCommand execute:nil]; }]; [[self.browserLoginButton rac_signalForControlEvents:UIControlEventTouchUpInside] subscribeNext:^(id x){ @strongify(self) NSString *message = [NSString stringWithFormat:@"“%@” wants to open “Safari”", MRC_APP_NAME]; UIAlertController *alertController = [UIAlertController alertControllerWithTitle:nil message:message preferredStyle:UIAlertControllerStyleAlert]; [alertController addAction:[UIAlertAction actionWithTitle:@"Cancel" style:UIAlertActionStyleCancel handler:NULL]]; [alertController addAction:[UIAlertAction actionWithTitle:@"Open" style:UIAlertActionStyleDefault handler:^(UIAlertAction *action){ @strongify(self) [self.viewModel.browserLoginCommand execute:nil]; }]]; [self presentViewController:alertController animated:YES completion:NULL]; }]; } @end觀察 viewModel 中 avatarURL 屬性的變化,然後設定 avatarButton 中的圖片;
把 viewModel 中的 username 與 password 屬性,分別與 usernameTextField 和 passwordTextField 輸入框中的內容進行綁定;
把 loginButton 的 enabled 屬性與 viewModel 的 validLoginSignal 屬性進行綁定;
在 loginButton 與 browserLoginButton 按鈕被點擊時,分別執行 loginCommand 與 browserLoginCommand 命令。
綜上所述,我們把 MRCLoginViewController 中的展示邏輯抽到 MRCLoginViewModel 中後,使得 MRCLoginViewController 中的程式碼更加簡潔清晰。實踐 MVVM 的關鍵點在於:我們要能分析清楚 viewModel 需要暴露給 view 的資料與命令,這些資料與命令能夠代表 view 當前的狀態。
總結
首先,我們從理論出發,介紹了 MVC 與 MVVM 各自的概念,以及從 MVC 到 MVVM 的演進過程;接著,介紹了 RAC 在 MVVM 中的兩個使用場景;最後,我們從實踐的角度,重點介紹了一個使用 MVVM 與 RAC 開發的開源專案 MVVMReactiveCocoa。總的來說,我認為 iOS 中的 MVVM 可以分為以下三種不同的實踐程度,分別對應不同的適用場景:
MVVM + KVO,適用於現有的 MVC 專案,想轉換成 MVVM 但不打算引入 RAC 作為 binder 的團隊;
MVVM + RAC,適用於現有的 MVC 專案,想轉換成 MVVM 並打算引入 RAC 作為 binder 的團隊;
MVVM + RAC + ViewModel-Based Navigation,適用於全新的專案,想實踐 MVVM 並打算引入 RAC 作為 binder,也想實踐 ViewModel-Based Navigation 的團隊。
寫在最後,希望這篇文章能打消你對 MVVM 模式的顧慮,趕快行動起来吧!
參考鏈接
https://www.objc.io/issues/13-architecture/mvvm/
https://msdn.microsoft.com/en-us/library/hh848246.aspx
https://en.wikipedia.org/wiki/Model%E2%80%93view%E2%80%93viewmodel
https://medium.com/ios-os-x-development/ios-architecture-patterns-ecba4c38de52#.p6n56kyc4
https://cocoasamurai.blogspot.ru/2013/03/basic-mvvm-with-reactivecocoa.html
https://www.sprynthesis.com/2014/12/06/reactivecocoa-mvvm-introduction/