
iOS 自訂 Layout 打造瀑布流:從設計思路到完整實作
前言
瀑布流其實沒有想像中複雜。這篇文章把整個實作思路梳理一遍,核心程式碼都會附上,看完你就能自己寫出一個可重複使用的 waterfall layout。
效果預覽
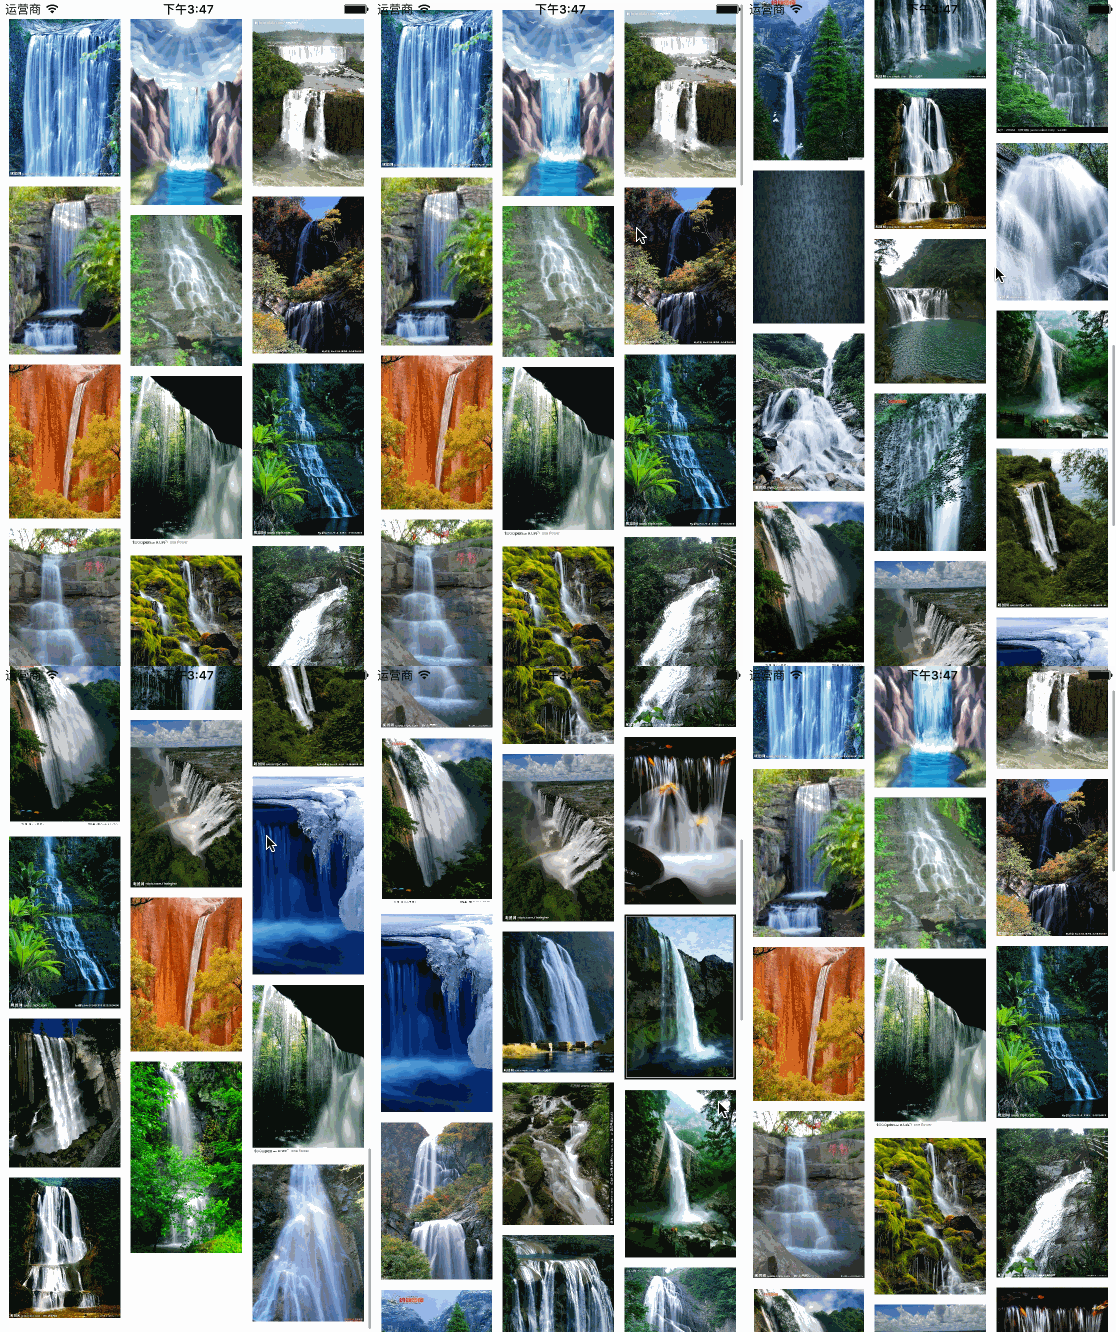
整體思路
UICollectionView 之所以能做出各種變化多端的排版,關鍵就在 UICollectionViewLayout。系統預設的 flow layout 只能處理等高的網格,因此我們的做法是繼承 UICollectionViewLayout,自訂一個子類,把所有計算邏輯都收攏在這個類別裡。
一、先定義需要的屬性
瀑布流的規則很單純:由上往下掃,哪一列目前最短,下一個 item 就放到那一列。所以我們需要一份「每一列目前最大 y 值」的紀錄,用字典來存最直觀。
接著,每個 item 都對應一個 layout attributes,用一個陣列把它們全部保存起來,後續查詢時直接回傳即可。
最後別忘了版面參數:總共幾列、列間距、列間距之外還有行間距,以及 section 到 collectionView 四邊的內距。
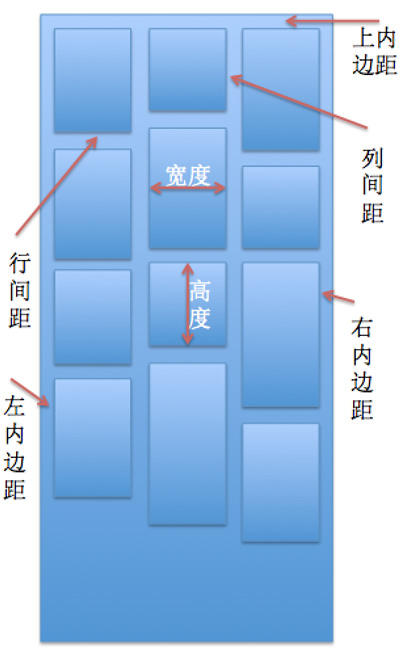
// 總列數
@property (nonatomic, assign) NSInteger columnCount;
// 列間距
@property (nonatomic, assign) NSInteger columnSpacing;
// 行間距
@property (nonatomic, assign) NSInteger rowSpacing;
// section 到 collectionView 的內距
@property (nonatomic, assign) UIEdgeInsets sectionInset;
// 紀錄每一列目前的最大 y 值
@property (nonatomic, strong) NSMutableDictionary *maxYDic;
// 保存每一個 item 的 attributes
@property (nonatomic, strong) NSMutableArray *attributesArray;
二、需要覆寫的四個系統方法
1)- (void)prepareLayout
2)- (CGSize)collectionViewContentSize
3)- (UICollectionViewLayoutAttributes *)layoutAttributesForItemAtIndexPath:(NSIndexPath *)indexPath
4)- (NSArray *)layoutAttributesForElementsInRect:(CGRect)rect
prepareLayout:布局前的準備工作
所有預先計算都在這裡完成。先初始化字典,有幾列就有幾筆紀錄,key 是列的索引,value 是該列目前的最大 y 值,初始值就是上內距:
for (int i = 0; i < self.columnCount; i++) {
    self.maxYDic[@(i)] = @(self.sectionInset.top);
}
再依 item 總數逐一建立 attributes 並放進陣列:
// 向 collectionView 取得 item 總數
NSInteger itemCount = [self.collectionView numberOfItemsInSection:0];
// 為每個 item 建立 attributes 並存入陣列
for (int i = 0; i < itemCount; i++) {
    UICollectionViewLayoutAttributes *attributes =
        [self layoutAttributesForItemAtIndexPath:[NSIndexPath indexPathForItem:i inSection:0]];
    [self.attributesArray addObject:attributes];
}
collectionViewContentSize:算出可滾動的範圍
瀑布流通常只垂直滾動,寬度不變,所以 contentSize.width 給 0 就好,重點是把高度算出來:找出最長那一列的最大 y 值,再加上下內距。
- (CGSize)collectionViewContentSize {
    // 先假設第 0 列最長
    __block NSNumber *maxIndex = @0;
    // 走訪字典,找出真正最長的那一列
    [self.maxYDic enumerateKeysAndObjectsUsingBlock:^(NSNumber *key, NSNumber *obj, BOOL *stop) {
        if ([self.maxYDic[maxIndex] floatValue] < obj.floatValue) {
            maxIndex = key;
        }
    }];
    // 高度 = 最長列的最大 y 值 + 下內距
    return CGSizeMake(0, [self.maxYDic[maxIndex] floatValue] + self.sectionInset.bottom);
}
layoutAttributesForItemAtIndexPath:決定每個 item 的位置與尺寸
先把寬度算出來。item 寬度等於可用寬度除以列數,可用寬度要扣掉左右內距與所有列間距:
item 寬度 =(collectionView 寬度 − 左右內距 − 列間距總和)÷ 列數
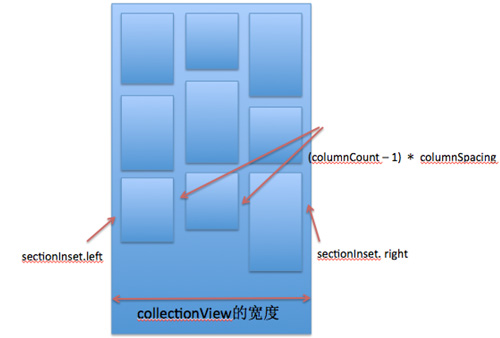
CGFloat collectionViewWidth = self.collectionView.frame.size.width;
// sectionInset.left 為左內距,sectionInset.right 為右內距
// (columnCount - 1) * columnSpacing 為一整列的所有間距
CGFloat itemWidth = (collectionViewWidth
                     - self.sectionInset.left
                     - self.sectionInset.right
                     - (self.columnCount - 1) * self.columnSpacing) / self.columnCount;
接著求座標。要求座標,得先知道目前哪一列最短,於是再走訪一次字典,記下最短列的索引 minIndex 與它的高度。
那麼 y 值 = 最短列的最大 y 值 + 行間距;x 值 = 左內距 +(item 寬度 + 列間距)× minIndex。
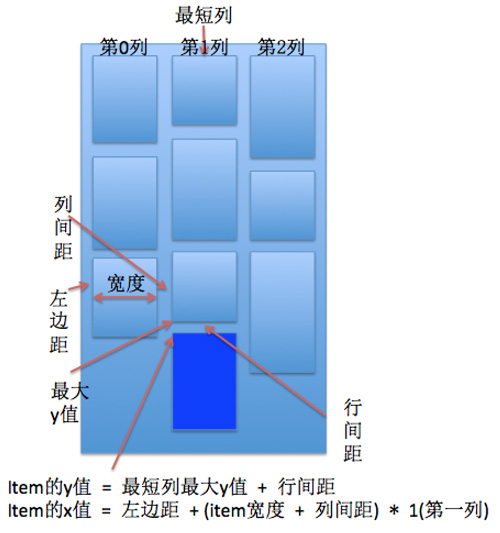
// 找出最短的那一列
__block NSNumber *minIndex = @0;
[self.maxYDic enumerateKeysAndObjectsUsingBlock:^(NSNumber *key, NSNumber *obj, BOOL *stop) {
    if ([self.maxYDic[minIndex] floatValue] > obj.floatValue) {
        minIndex = key;
    }
}];
// 依最短列的索引計算 x
CGFloat itemX = self.sectionInset.left + (self.columnSpacing + itemWidth) * minIndex.integerValue;
// y = 最短列目前的最大 y 值 + 行間距
CGFloat itemY = [self.maxYDic[minIndex] floatValue] + self.rowSpacing;
剩下高度怎麼辦?理想作法是拿圖片原始尺寸與算好的寬度做等比例縮放,但 layout 類別裡根本拿不到圖片。解法是把這件事交給外部:定義一個 block(或用 delegate),把寬度與 indexPath 傳出去,讓呼叫方回傳高度。
@property (nonatomic, strong) CGFloat(^itemHeightBlock)(CGFloat itemWidth, NSIndexPath *indexPath);
if (self.itemHeightBlock) itemHeight = self.itemHeightBlock(itemWidth, indexPath);
最後寫回 frame,並更新該列的最大 y 值,讓下一個 item 知道要接在哪裡:
// 設定 frame
attributes.frame = CGRectMake(itemX, itemY, itemWidth, itemHeight);
// 更新最短列的最大 y 值
self.maxYDic[minIndex] = @(CGRectGetMaxY(attributes.frame));
layoutAttributesForElementsInRect:回傳可見範圍的 attributes
因為 prepareLayout 已經全部算完,這裡直接把陣列丟回去即可:
- (NSArray *)layoutAttributesForElementsInRect:(CGRect)rect {
    return self.attributesArray;
}
三、怎麼用
布局類寫好之後,使用端只需要設定幾個參數,再透過 block 告訴 layout 每個 item 該多高:
// 建立布局物件
XRWaterfallLayout *waterfall = [[XRWaterfallLayout alloc] init];
// 設定各項參數
waterfall.columnCount = 3;   // 共 3 列
waterfall.columnSpacing = 10; // 列間距
waterfall.rowSpacing = 10;    // 行間距
waterfall.sectionInset = UIEdgeInsetsMake(10, 10, 10, 10); // 內距

[waterfall setItemHeightBlock:^CGFloat(CGFloat itemWidth, NSIndexPath *indexPath) {
    // 依圖片原始尺寸與實際顯示寬度等比例縮放
    XRImage *image = self.images[indexPath.item];
    return image.imageH / image.imageW * itemWidth;
}];

collectionView.collectionViewLayout = waterfall;
完整專案可以從這裡取得:https://github.com/codingZero/XRWaterfallLayout ,覺得有幫助的話歡迎給個 star。
小結一下:瀑布流的本質就是「貪婪地塞進目前最矮的那一列」,剩下的都是 layout 生命週期裡的例行工作。理解了這個核心,要擴充成多 section、可置頂、或支援橫向滾動都不難。