
iOS 動畫實作:用 Quartz2D 打造自訂 View
從一個圓形進度條說起
核心動畫能做的,多半局限在系統控件那些天生自帶動畫能力的屬性上。可如果我想做一個空心圓環進度條,讓弧線隨著進度值平滑生長呢?這時候就得自己畫一個 View,並讓它的形狀跟著屬性一起變。Quartz2D 正好能輕鬆接下這份工作。
Quartz2D 是什麼
它是 iOS 與 OS X 上的二維繪圖引擎,能力清單很長:圖形繪製、透明圖層、陰影、色彩管理、反鋸齒、PDF 文件處理等等。本文聚焦其中的路徑繪製部分,足夠支撐自訂 View 的需求;更全面的內容建議直接讀「Quartz2D 編程指南」系列譯文。
四個必須先搞懂的關鍵詞
1. Core Graphics
一套以 C 語言為基礎的繪圖框架,UIKit 本身就是建在它之上,所以它能觸及比 UIKit 更底層的能力。
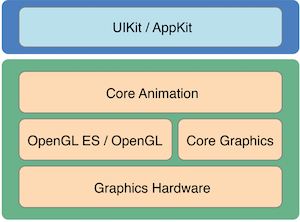
Core Graphic
Core Graphics 使用的繪圖引擎正是 Quartz2D,所以 Quartz2D 其實是 Core Graphics 的一部分,兩個名字幾乎綁在一起。
2. 圖形上下文
畫畫要有畫布,Core Graphics 的「畫布」就是圖形上下文,它決定圖形長什麼樣、畫到哪裡去。每一次連續的繪製操作,可以理解為往畫布上疊一層;多層疊加,就能組出複雜圖形。
建議直接用 UIView 幫你準備好的上下文,自己新建上下文反而會拉低記憶體效率、拖累效能。取得方式就一句 UIGraphicsGetCurrentContext()。
3. 路徑
臨摹書法時,紙上那道「筆跡」就是路徑——路徑一旦確定,形狀與渲染區域也就跟著定了。建立路徑、加進上下文、渲染,想要的圖形就出現了。
建立路徑有三條路可走。
其一,直接用 CGContextRef,例如 CGContextAddArc。這種方式直接操作上下文,常用方法包括:
CGContextBeginPath        // 開始一條路徑
CGContextMoveToPoint      // 移動到指定座標
CGContextAddLineToPoint   // 畫直線
CGContextAddCurveToPoint  // 畫貝茲曲線
CGContextAddEllipseInRect // 畫橢圓
CGContextAddArc           // 畫圓弧
CGContextAddRect          // 畫矩形
CGContextClosePath        // 封閉當前路徑
其二,用 CGPathRef,例如 CGPathAddArc。第一種方式渲染完會清空上下文,如果想把路徑留著重複使用,就該改用 Quartz 提供的 CGPath 系列函數,建立可複用的路徑物件:
CGPathCreateMutable
CGPathMoveToPoint
CGPathAddLineToPoint
CGPathAddCurveToPoint
CGPathAddEllipseInRect
CGPathAddArc
CGPathAddRect
CGPathCloseSubpath
這些函數與第一種方式幾乎一一對應,之後再用 CGContextAddPath 把路徑掛回上下文即可。
其三,用 UIBezierPath,例如 bezierPathWithOvalInRect。它住在 UIKit 裡,是對路徑繪製的物件化封裝,用法近似 CGContextRef,但更面向物件,操作起來像對待普通物件一樣自然。自訂 View 時,絕大多數需求用它都能搞定,也是本文推薦的做法。
@property(nonatomic) CGFloat lineWidth;    // 線寬
@property(nonatomic) CGLineCap lineCapStyle;   // 起點與終點樣式
@property(nonatomic) CGLineJoin lineJoinStyle; // 轉角樣式

+ (instancetype)bezierPath;
+ (instancetype)bezierPathWithRect:(CGRect)rect;
+ (instancetype)bezierPathWithOvalInRect:(CGRect)rect;
+ (instancetype)bezierPathWithRoundedRect:(CGRect)rect cornerRadius:(CGFloat)cornerRadius;
+ (instancetype)bezierPathWithArcCenter:(CGPoint)center radius:(CGFloat)radius startAngle:(CGFloat)startAngle endAngle:(CGFloat)endAngle clockwise:(BOOL)clockwise;

- (void)moveToPoint:(CGPoint)point;
- (void)addLineToPoint:(CGPoint)point;
- (void)addQuadCurveToPoint:(CGPoint)endPoint controlPoint:(CGPoint)controlPoint;
- (void)addCurveToPoint:(CGPoint)endPoint controlPoint1:(CGPoint)controlPoint1 controlPoint2:(CGPoint)controlPoint2;
- (void)closePath;
- (void)appendPath:(UIBezierPath *)bezierPath;
- (void)fill;
- (void)stroke;
4. 渲染
繪畫的收尾動作,相當於最後上色的那一步,有兩種形式:
Fill(填充):把路徑內部的區域填滿。
Stroke(描邊):不填色,只沿路徑輪廓著墨。
5. 繪圖狀態棧
圖形上下文自帶一個狀態棧,預設是空的。保存狀態時,會把當前狀態複製一份壓入堆疊;還原狀態時,則把棧頂狀態彈出並取代當前狀態。對應的 API 是 CGContextSaveGState 與 CGContextRestoreGState。
繪圖的五個核心步驟
在 view 上畫圖的寫法五花八門,但骨架始終是這五步:取得上下文 → 建立路徑 → 把路徑加入上下文 → 設定圖形狀態參數 → 渲染。
下面用「畫一個圓」把三種路徑寫法各示範一次。
寫法一:CGContextRef
CGContextRef ctx = UIGraphicsGetCurrentContext();
// 圓心 (200, 200)、半徑 100、起始弧度 0、終止弧度 2π、方向 0 逆 1 順
CGContextAddArc(ctx, 200, 200, 100, 0, M_PI * 2, 0);
CGContextSetRGBStrokeColor(ctx, 0.5, 0.5, 0.9, 1.0); // 筆色
CGContextSetLineWidth(ctx, 10);                       // 線寬
CGContextStrokePath(ctx);
寫法二:CGPathRef
CGContextRef ctx = UIGraphicsGetCurrentContext();
CGMutablePathRef path = CGPathCreateMutable();
CGPathAddArc(path, NULL, 200, 200, 100, 0, M_PI * 2, 1);
CGContextAddPath(ctx, path);
CGContextSetRGBStrokeColor(ctx, 0.5, 0.5, 0.9, 1.0);
CGContextSetLineWidth(ctx, 10);
CGContextStrokePath(ctx);
寫法三:UIBezierPath
UIBezierPath *path = [UIBezierPath bezierPathWithOvalInRect:CGRectMake(100, 100, 200, 200)];
[[UIColor colorWithRed:0.5 green:0.5 blue:0.9 alpha:1.0] setStroke];
[path setLineWidth:10];
[path stroke];
三者對比下來,UIBezierPath 明顯最簡潔直觀,後續的動畫文章裡我們也會大量用到它。
自訂 View 只需兩步
步驟一:新建一個類,繼承 UIView。
步驟二:重載 drawRect:,在裡面完成繪圖。
以一個圓形 View 為例。
先建立 CircleView 類:
CircleView.png
接著在 CircleView.m 裡重載 drawRect:
- (void)drawRect:(CGRect)rect {
}
把圓畫進去:
- (void)drawRect:(CGRect)rect {
    UIBezierPath *path = [UIBezierPath bezierPathWithOvalInRect:CGRectMake(100, 100, 200, 200)];
    [[UIColor colorWithRed:0.5 green:0.5 blue:0.9 alpha:1.0] setStroke];
    [path setLineWidth:10];
    [path stroke];
}
然後建立實例並掛到畫面上:
- (void)viewDidLoad {
    [super viewDidLoad];
    CircleView *circleView = [[CircleView alloc] initWithFrame:self.view.bounds];
    [self.view addSubview:circleView];
}
執行結果:
效果圖.png
圓畫出來了,剩下的難題只有一個:怎麼讓它動起來。
留三個問題給你
1、Quartz2D 的座標系和 UIView 的座標系差在哪裡?
2、不同路徑要用不同狀態參數渲染時,該怎麼安排?
3、能不能改用 CALayer 來完成同樣的自訂 View?
文/明仔Su(簡書作者)
原文鏈接:https://www.jianshu.com/p/9ac974756f77