
微博、微信式圖片瀏覽過渡動畫的實現思路
刷朋友圈、逛微博時,你一定做過這個動作:點開九宮格裡的某張照片,它會緩緩放大鋪滿全屏;左右滑動換看下一張;輕點一下,它又縮回原位——而且精準地回到你滑動後所對應的那張縮略圖。文字描述總顯得蒼白,不如直接看動圖。

上面兩張 gif 的過渡細節不算明顯,真機上觀感會更好。接下來我用一個 Demo 拆解實現思路,如果你有更好的方案,歡迎指教。
Demo 預覽
先看最終效果:

這個 Demo 抓取了美麗說的在線圖片,這裡對毫不知情的美麗說表示感謝。
往下讀之前,假定你已經掌握 Swift 基礎、網絡請求,並熟悉 UICollectionView 等常用組件。
Demo:GitHub 地址
結構分析
Demo 主要由兩套視圖結構組成:縮略圖瀏覽(主視圖)與大圖瀏覽。兩者展示的內容都是有規律的矩形,因此都可以用 UICollectionView 實現。
差別在於:縮略圖是垂直布局,大圖是水平布局;兩個 collectionView 的 cell 內部都只放一個 UIImageView。
這裡有個容易踩的細節:為了呈現間隔效果,圖與圖之間需要留白。如果讓每個 cell 剛好等寬於屏幕,再靠 cell 間距去製造間隔,那麼停止滑動時,黑色的間隙就會明明白白地留在屏幕中央(如下圖),顯然不是我們想要的。
根源在於 UICollectionView 的分頁(pagingEnabled)是按 collectionView 自身寬度翻動的:無論 cell 多大,每次滾動距離固定等於一個 collectionView 寬。要繞開它其實有個小技巧,後文會講。
主視圖的縮略圖瀏覽
依據上一節的結論,主視圖用 collectionView。這部分沒有特別的技巧,只是在添加 collectionView 之前要先備好幾個基礎組件。
因為圖片來自網絡,我們需要一個網絡請求組件;為了承載圖片,還要一個數據模型。這兩者都不是本文重點,實現可參考 GitHub 源碼。順帶說明:每次請求 30 條數據,這是唯一需要你記住的參數。
組件就位後,縮略圖部分就很好寫了。控制器直接採用 UICollectionViewController,在 viewDidLoad 中配置流水布局,實現 datasource 與 delegate。常規套路此處不再贅述,重點看兩個方法。
override func collectionView(collectionView: UICollectionView, cellForItemAtIndexPath indexPath: NSIndexPath) -> UICollectionViewCell { // 從緩存池中取出重用cell let cell = collectionView.dequeueReusableCellWithReuseIdentifier(reuseIdentifier, forIndexPath: indexPath) as CollectionViewCell // 從模形數組中取出相應的模形 let item = shopitems[indexPath.item]; // 設置模形數據為顯示縮略圖模式 item.showBigImage = false // 把模形數據賦值給cell,由cell去決定怎樣顯示,顯示什麼內容 cell.item = item // 當滑動到到最後一個cell時請求加載30個數據 if indexPath.item == shopitems.count - 1 { loadMoreHomePageData(shopitems.count) } return cell }為了不讓 Demo 過於繁瑣,我沒有引入「上拉加載更多」控件,而是每次滑到最後一個 cell 時順手拉 30 條,實際體驗也夠順滑。
override func collectionView(collectionView: UICollectionView, didSelectItemAtIndexPath indexPath: NSIndexPath) { // 當點擊某個cell時, 創建大圖浏覽控制器 let photoVC = PhotoBrowseCollectionVC() // 當前點擊cell的indexPathw傳給控制器,以使大圖浏覽器直接顯示對應圖片 photoVC.indexPath = indexPath // 當前模型數組的內容傳給控制器,以使大圖浏覽能左右滑動 photoVC.items = shopitems // 先以正常形式modal出大圖浏覽 presentViewController(photoVC, animated: true, completion: nil) }這裡先用系統默認樣式(從底部彈出)呈現大圖瀏覽,等跳轉邏輯跑通,再回頭替換過渡動畫。
大圖瀏覽的實現
大圖瀏覽同樣是一個 collectionView。我為它加了一個便利構造器,方便點擊縮略圖時快速創建固定參數的流水布局。
convenience init() { let layout = UICollectionViewFlowLayout() layout.itemSize = CGSize(width: UIScreen.mainScreen().bounds.width + cellMargin, height: UIScreen.mainScreen().bounds.height) layout.minimumLineSpacing = 0 layout.minimumInteritemSpacing = 0 layout.scrollDirection = .Horizontal self.init(collectionViewLayout: layout) }現在回應上一節留下的問題。實現全屏圖片間隔其實很簡單:把 collectionView 和 cell 的寬度都設為「屏寬 + 固定間距」,並讓 cell 之間的間距為 0;圖片則只顯示在屏幕正中間(與屏等寬)。這樣在開啟 pagingEnabled 的情況下,每次滑動走的距離是「圖片寬 + 間距」,等於把留白放在了 cell 內部,而不是 cell 之間。
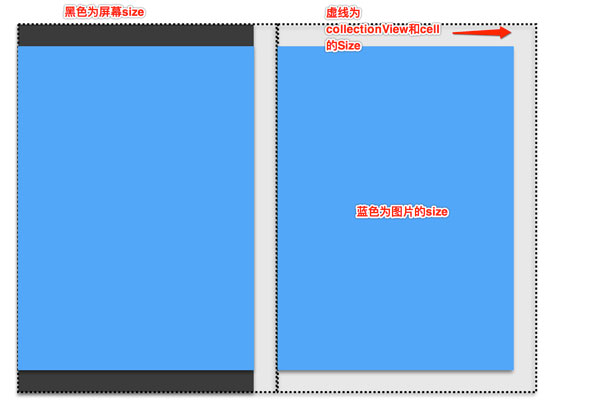
上圖兩個 cell 間距為零。開啟分頁後每次移動一個 cell 寬,停下時間隔自然不會留在屏幕裡。
大圖瀏覽的 collectionView 代碼與縮略圖幾乎一致,唯一要留心的是:modal 出來的瞬間就必須停在對應的那張圖上——這也是縮略圖控制器要傳遞 indexPath 的原因。
override func viewDidLoad() { super.viewDidLoad() // 大圖colletionview的frame collectionView.frame = UIScreen.mainScreen().bounds collectionView.frame.size.width = UIScreen.mainScreen().bounds.size.width + cellMargin // 開啟分頁 collectionView.pagingEnabled = true // 注冊重用cell collectionView.registerClass(CollectionViewCell.self, forCellWithReuseIdentifier: cellID) // collectionView顯示時跳轉到應的圖片 collectionView.scrollToItemAtIndexPath(indexPath, atScrollPosition: .Left, animated: false) }scrollToItemAtIndexPath 的 atScrollPosition 描述的是停止滾動時 cell 與 collectionView 的對齊關係,Left 即 cell 左邊對齊 collectionView 左邊,其餘選項同理。
關鍵的代理方法實現如下:
override func collectionView(collectionView: UICollectionView,cellForItemAtIndexPath indexPath: NSIndexPath) -> UICollectionViewCell { let cell = collectionView.dequeueReusableCellWithReuseIdentifier(cellID, forIndexPath: indexPath) as CollectionViewCell let item = items[indexPath.item] item.showBigImage = true cell.item = item return cell } override func collectionView(collectionView: UICollectionView, didSelectItemAtIndexPath indexPath: NSIndexPath) { dismissViewControllerAnimated(true, completion: nil) }之所以說「重要」,是因為要對照縮略圖控制器來看:cellForItemAtIndexPath 只是常規賦值,而選中 cell 直接 dismiss。
跳轉邏輯到這裡就完整了。接下來才是真正的重點——之所以前面鋪墊這麼多,是因為 present 與 dismiss 的動畫極度依賴前後兩個控制器的視圖結構。
modal 出一個 View 的原理
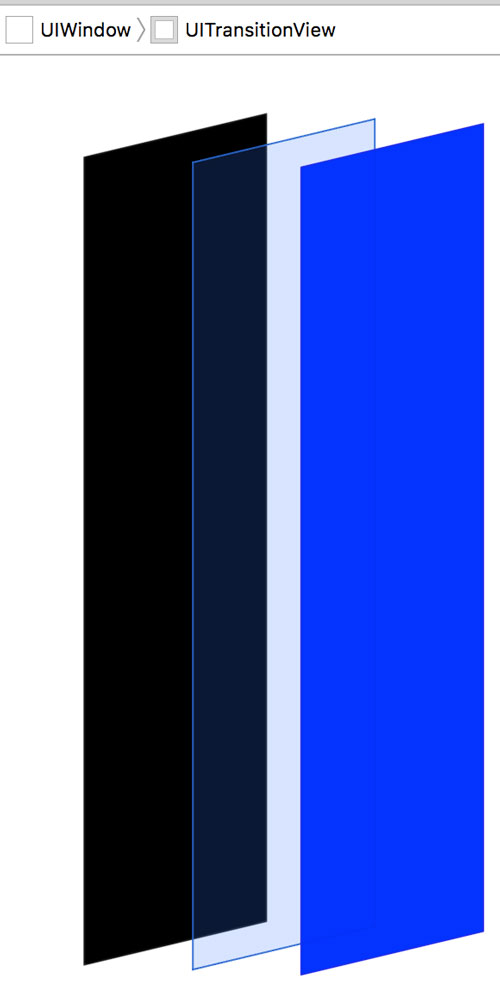
默認的底部彈出,是這樣工作的:把要展示的 view 放進一個容器 view,對容器 view 做動畫,動畫結束後把原控制器的 view 從 window 上移除。最終 window 上只剩彈出的 view,結構如下:
modal 視圖結構
圖中黑色是 window,藍色是彈出的 view,中間那層是容器 view,類型為 UITransitionView。
dismiss 就是 present 的逆過程。除了底部彈出,UIKit 還提供多種效果,通過 modalTransitionStyle 選擇。
這裡有兩個要點:把 modalPresentationStyle 設為 Custom 時,原控制器的 view 不會被移出 window;同時,一旦設置了 transitioningDelegate,modalTransitionStyle 的效果將全部失效,動畫權重完全移交給代理。UIViewControllerTransitioningDelegate 協議有五個方法,我們只需關注 Getting the Transition Animator Objects 下的兩個,它們都要求返回一個實現 UIViewControllerAnimatedTransitioning 協議的對象,具體動畫邏輯就寫在那個對象裡。
加入點擊放大動畫
依據上一節,點擊縮略圖時把大圖控制器的 modalPresentationStyle 設為 .Custom,並掛上過渡動畫代理:
override func collectionView(collectionView: UICollectionView, didSelectItemAtIndexPath indexPath: NSIndexPath) { let photoVC = PhotoBrowseCollectionVC() photoVC.indexPath = indexPath photoVC.items = shopitems photoVC.transitioningDelegate = modalDelegate photoVC.modalPresentationStyle = .Custom presentViewController(photoVC, animated: true, completion: nil) }modalDelegate 是 ModalAnimationDelegate 的實例,它實現了 UIViewControllerTransitioningDelegate;由於 animationControllerForPresentedController 返回的是自身,所以它同時也要實現 UIViewControllerAnimatedTransitioning。
func animationControllerForPresentedController(presented: UIViewController, presentingController presenting: UIViewController, sourceController source: UIViewController) -> UIViewControllerAnimatedTransitioning{ return self }於是動畫邏輯落到了 animateTransition 裡。要實現「選中圖片緩緩放大」,可以拆成六步:
取出容器 view,也就是 UITransitionView 實例
取出目標 view(展示大圖的 collectionView),添加到容器 view
新建 UIImageView,裝入選中的 UIImage,frame 設為該圖在 window 中的位置
把這個 imageView 添加到容器 view
對它執行放大動畫,結束後從容器 view 移除
調用 completeTransition 通知系統動畫完成
這樣一拆是不是清楚多了?具體實現如下:
func presentViewAnimation(transitionContext: UIViewControllerContextTransitioning) { // 目標view let destinationView = transitionContext.viewForKey(UITransitionContextToViewKey) // 容器view let containerView = transitionContext.containerView() guard let _ = destinationView else { return } // 目標view添加到容器view上 containerView.addSubview(destinationView) // 獲取目標控制器 let destinationController = transitionContext.viewControllerForKey(UITransitionContextToViewControllerKey) as PhotoBrowseCollectionVC let indexPath = destinationController.indexPath // 跳轉前的控制器 let collectionViewController = ((transitionContext.viewControllerForKey(UITransitionContextFromViewControllerKey)) as UINavigationController).topViewController as UICollectionViewController let currentCollectionView = collectionViewController.collectionView // 當前選中的cell let selectctedCell = currentCollectionView.cellForItemAtIndexPath(indexPath) as CollectionViewCell // 新建一個imageview添加到目標view之上, 做為動畫view let annimateViwe = UIImageView() annimateViwe.image = selectctedCell.imageView.image annimateViwe.contentMode = .ScaleAspectFill annimateViwe.clipsToBounds = true // 被選中的cell到目標view上的座標轉換 let originFrame = currentCollectionView.convertRect(selectctedCell.frame, toView: UIApplication.sharedApplication().keyWindow) annimateViwe.frame = originFrame containerView.addSubview(annimateViwe) let endFrame = coverImageFrameToFullScreenFrame(selectctedCell.imageView.image) destinationView.alpha = 0 // 過渡動畫執行 UIView.animateWithDuration(1, animations: { annimateViwe.frame = endFrame }) { (finished) in transitionContext.completeTransition(true) UIView.animateWithDuration(0.5, animations: { destinationView.alpha = 1 }) { (_) in annimateViwe.removeFromSuperview() } } }關鍵在於如何通過 transitionContext 拿到兩個控制器。UITransitionContextFromViewControllerKey 給出的是跳轉前控制器的父控制器——Demo 中縮略圖控制器嵌在導航控制器裡,所以拿到的是 UINavigationController,需要再取 topViewController 才能定位到選中的圖片。拿到圖片後計算起止 frame:起始 frame 由選中 cell 的坐標換算到 window;結束 frame 是 imageView 鋪滿屏寬並居中後的 frame,具體算法見 Demo 中的 coverImageFrameToFullScreenFrame 全局函數。
另外,UIViewControllerAnimatedTransitioning 還有一個必須實現的方法 transitionDuration,它決定動畫時長。
func transitionDuration(transitionContext: UIViewControllerContextTransitioning) -> NSTimeInterval { return 1.0 }加入輕擊返回動畫
dismiss 的過程與 present 相反,但有幾處差異。步驟如下:
取出彈出的大圖 collectionView,定位當前輕點的圖片
新建 UIImageView 作為動畫載體,裝上該圖片
把它的起始 frame 設為大圖在 window 中的位置
計算該圖對應的縮略圖 frame,作為動畫終點
執行動畫,結束後移除 imageView
調用 completeTransition 通知系統完成
與 present 最大的不同是:From 與 To 兩個 key 的角色互換了。present 時 From 是縮略圖的父控制器、To 是大圖瀏覽控制器;dismiss 時正好相反。
func dismissViewAnimation(transitionContext: UIViewControllerContextTransitioning) { let transitionView = transitionContext.viewForKey(UITransitionContextFromViewKey) let contentView = transitionContext.containerView() // 取出modal出的來控制器 let destinationController = transitionContext.viewControllerForKey(UITransitionContextFromViewControllerKey) as UICollectionViewController // 取出當前顯示的collectionview let presentView = destinationController.collectionView // 取出控制器當前顯示的cell let dismissCell = presentView.visibleCells().first as CollectionViewCell // 新建過渡動畫imageview let animateImageView = UIImageView() animateImageView.contentMode = .ScaleAspectFill animateImageView.clipsToBounds = true // 獲取當前顯示的cell的image animateImageView.image = dismissCell.imageView.image // 獲取當前顯示cell在window中的frame animateImageView.frame = (dismissCell.imageView.frame) contentView.addSubview(animateImageView) // 縮略圖對應的indexPath let indexPath = presentView.indexPathForCell(dismissCell) // 取出要返回的控制器view let originView = ((transitionContext.viewControllerForKey(UITransitionContextToViewControllerKey) as UINavigationController).topViewController as UICollectionViewController).collectionView var originCell = originView.cellForItemAtIndexPath(indexPath) // 得到返回後對應cell在window上的frame let originFrame = originView.convertRect(originCell.frame, toView: UIApplication.sharedApplication().keyWindow) UIView.animateWithDuration(1, animations: { animateImageView.frame = originFrame transitionView.alpha = 0 }) { (_) in animateImageView.removeFromSuperview() transitionContext.completeTransition(true) } }present 與 dismiss 都會走 animateTransition,因此需要一個屬性 isPresentAnimationing 來區分當前該跑哪套邏輯。它的取值由 UIViewControllerTransitioningDelegate 的兩個方法決定:
func animationControllerForPresentedController(presented: UIViewController, presentingController presenting: UIViewController, sourceController source: UIViewController) -> UIViewControllerAnimatedTransitioning{ isPresentAnimationing = true return self } func animationControllerForDismissedController(dismissed: UIViewController) -> UIViewControllerAnimatedTransitioning{ isPresentAnimationing = false return self } func animateTransition(transitionContext: UIViewControllerContextTransitioning) { isPresentAnimationing presentViewAnimation(transitionContext) : dismissViewAnimation(transitionContext) }一個必須補上的坑
dismiss 的邏輯裡藏著一個隱患:它需要拿到對應的縮略圖 cell 才能算出動畫終點,而上面用的是 cellForItemAtIndexPath。
... let originView = ((transitionContext.viewControllerForKey(UITransitionContextToViewControllerKey) as UINavigationController).topViewController as UICollectionViewController).collectionView var originCell = originView.cellForItemAtIndexPath(indexPath) // 得到返回後對應cell在window上的frame let originFrame = originView.convertRect(originCell.frame,toView: UIApplication.sharedApplication().keyWindow) ...
問題是 cellForItemAtIndexPath 只能返回當前可見的 cell,不可見的會返回 nil。所以當大圖對應的縮略圖恰好不在屏幕內時,強制解包就會崩潰——典型場景是查看當前可見的最後一張縮略圖對應的大圖。
解法是:取不到 cell 時,先把目標 cell 滾進可視範圍。由於 cellForItemAtIndexPath 需要等到下一個顯示週期才生效,還要主動調用一次 layoutIfNeeded:
var originCell = originView.cellForItemAtIndexPath(indexPath) if originCell == nil { originView.scrollToItemAtIndexPath(indexPath, atScrollPosition: .CenteredVertically, animated: false) originView.layoutIfNeeded() } originCell = originView.cellForItemAtIndexPath(indexPath) let originFrame = originView.convertRect(originCell.frame, toView: UIApplication.sharedApplication().keyWindow)總結
前面鋪墊了不少基礎知識,但真正承擔效果的其實只有 dismissViewAnimation 與 presentViewAnimation 兩個方法。本文用一個簡單 Demo 復刻了微信、微博式的圖片瀏覽過渡,希望能給你在自己項目裡落地類似效果提供一條可參考的思路。本人水平有限,若你有更簡潔的做法,也歡迎分享。
轉自 lemtter 的博客
- 上一篇文章: Objective-C Runtime 全方位實戰指南
- 下一篇文章: 應對蘋果新規:讓你的 App 兼容 IPv6-only 網絡