
UITableViewCell 高度自適應:systemLayoutSizeFittingSize 使用心得
編輯:iOS 開發基礎
動態 Cell 高度一直是列表開發裡最惱人的環節之一。本文分享使用系統自帶的 systemLayoutSizeFittingSize 計算高度時累積的一些實務心得。

先看官方註釋
/*
 The size fitting most closely to targetSize in which the receiver's subtree can be
 laid out while optimally satisfying the constraints. If you want the smallest
 possible size, pass UILayoutFittingCompressedSize; for the largest possible size,
 pass UILayoutFittingExpandedSize.

 Also see the comment for UILayoutPriorityFittingSizeLevel.
 */
- (CGSize)systemLayoutSizeFittingSize:(CGSize)targetSize NS_AVAILABLE_IOS(6_0);

// 等價於以 UILayoutPriorityFittingSizeLevel 作為兩個方向的 fitting priority
重點很明確:只要約束設定完整,它就能算出最接近目標的 Size。我們想要最小可行尺寸,所以傳入 UILayoutFittingCompressedSize。
1. 建立 Cell
假設 Cell 的版面如下:
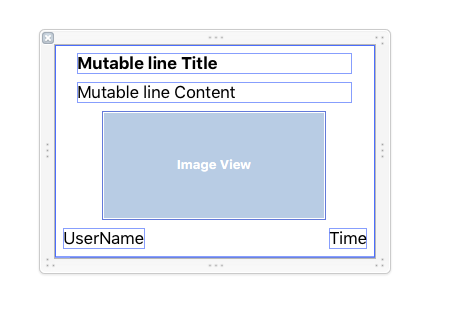
類別取名為 ZHCalculateTableViewCell,屬性定義:
@interface ZHCalculateTableViewCell : UITableViewCell

@property (weak, nonatomic) IBOutlet UILabel     *TitleLabel;
@property (weak, nonatomic) IBOutlet UILabel     *ContentLabel;
@property (weak, nonatomic) IBOutlet UIImageView *showImgView;
@property (weak, nonatomic) IBOutlet UILabel     *UseNameLabel;
@property (weak, nonatomic) IBOutlet UILabel     *TimeLabel;

@property (strong, nonatomic) ZHCalculateHeightModel *model;

@end
2. 建立資料模型
@interface ZHCalculateHeightModel : NSObject

@property (nonatomic, strong) NSString *title;
@property (nonatomic, strong) NSString *content;
@property (nonatomic, strong) NSString *username;
@property (nonatomic, strong) NSString *time;
@property (nonatomic, strong) NSString *imageName;

@end
模型與 Cell 都備齊了,接著讓它跑起來。
3. 建立 ZHCustomLayoutTableViewController
先宣告一個「原型 Cell」,專門用來算高度:
@property (nonatomic, strong) ZHCalculateTableViewCell *prototypeCell;
註冊 Cell,並預先 dequeue 一個原型出來:
[self.tableView registerNib:[UINib nibWithNibName:@"ZHCalculateTableViewCell"
                                bundle:[NSBundle mainBundle]]
       forCellReuseIdentifier:CellIdentifier];

self.tableView.estimatedRowHeight = 100;   // 很重要,直接影響滑動流暢度

self.prototypeCell = [self.tableView dequeueReusableCellWithIdentifier:CellIdentifier];
核心的高度計算:
- (CGFloat)tableView:(UITableView *)tableView heightForRowAtIndexPath:(NSIndexPath *)indexPath {
    ZHCalculateTableViewCell *cell = self.prototypeCell;

    cell.contentView.translatesAutoresizingMaskIntoConstraints = NO;

    // 必須先配置資料,才能依內容算出正確高度
    [self configureCell:cell atIndexPath:indexPath];

    /* 重點:一定要給 contentView 加上寬度約束,否則算出來的高度會不準 */
    CGFloat contentViewWidth = CGRectGetWidth(self.tableView.bounds);
    NSLayoutConstraint *widthFenceConstraint =
        [NSLayoutConstraint constraintWithItem:cell.contentView
                                     attribute:NSLayoutAttributeWidth
                                     relatedBy:NSLayoutRelationEqual
                                        toItem:nil
                                     attribute:NSLayoutAttributeNotAnAttribute
                                    multiplier:1.0
                                      constant:contentViewWidth];
    [cell.contentView addConstraint:widthFenceConstraint];

    // 讓 Auto Layout 引擎自己算
    CGFloat fittingHeight =
        [cell.contentView systemLayoutSizeFittingSize:UILayoutFittingCompressedSize].height;

    [cell.contentView removeConstraint:widthFenceConstraint];

    // 記得補上上下分隔線的高度
    return fittingHeight + 2 * (1 / [UIScreen mainScreen].scale);
}

#pragma mark - Configure Cell Data
- (void)configureCell:(ZHCalculateTableViewCell *)cell atIndexPath:(NSIndexPath *)indexPath {
    cell.model = [dataArray objectAtIndex:indexPath.row];
}
4. 在 Cell 中重寫 model 的 setter
#pragma mark - Setters
- (void)setModel:(ZHCalculateHeightModel *)model {
    _model = model;

    self.TitleLabel.text   = model.title;
    self.ContentLabel.text = model.content;
    self.showImgView.image = model.imageName.length > 0 ? [UIImage imageNamed:model.imageName] : nil;
    self.UseNameLabel.text = model.username;
    self.TimeLabel.text    = model.time;
}
延伸:加上高度快取
算完高度後可以按 indexPath 存進字典,下次直接回傳,能省下大量重複計算。實務上建議的做法是:資料變動時清掉快取,滾動過程中命中快取,只有第一次出現的 cell 才真的去算。
幾個必須記住的重點
- 不要用
[tableView cellForRowAtIndexPath:indexPath]來取 cell 算高度。這是常見誤用,會觸發不必要的 dequeue 與副作用。 - 計算前一定要先填入資料,否則算出來的是空白 cell 的高度。
- 一定要給 contentView 加寬度約束。沒有寬度約束,Auto Layout 無法判斷文字該在何處換行,高度自然不準。
CGFloat contentViewWidth = CGRectGetWidth(self.tableView.bounds);
NSLayoutConstraint *widthFenceConstraint =
    [NSLayoutConstraint constraintWithItem:cell.contentView
                                 attribute:NSLayoutAttributeWidth
                                 relatedBy:NSLayoutRelationEqual
                                    toItem:nil
                                 attribute:NSLayoutAttributeNotAnAttribute
                                multiplier:1.0
                                  constant:contentViewWidth];
[cell.contentView addConstraint:widthFenceConstraint];

CGFloat fittingHeight =
    [cell.contentView systemLayoutSizeFittingSize:UILayoutFittingCompressedSize].height;

[cell.contentView removeConstraint:widthFenceConstraint];
如果 iOS 11 以上可以只支援,也可以考慮改用 UITableViewAutomaticDimension 加上正確的約束鏈,程式碼會更精簡;但在需要相容舊版本的專案裡,上面這套手動算法仍然是最穩健的選擇。
- 上一篇文章: 拆解 Masonry 原始碼:三個關鍵步驟看懂它如何運作
- 下一篇文章: 自訂返回按鈕也能保留系統側滑返回手勢