
iOS 球形波浪加載進度控件 HcdProcessView 詳解
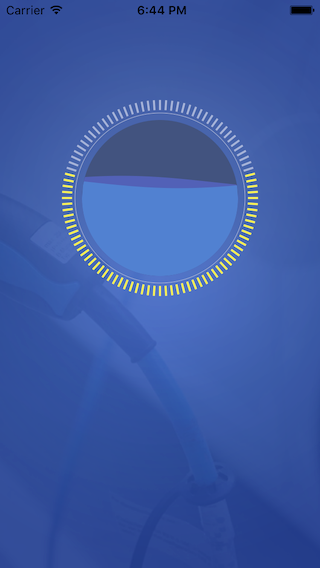
先前的〈iOS 球形波浪加載進度控件-HcdProcessView〉一文展示了筆者在專案中實作的一個球形進度加載控件 HcdProcessView,這篇就來簡單介紹它的製作過程。
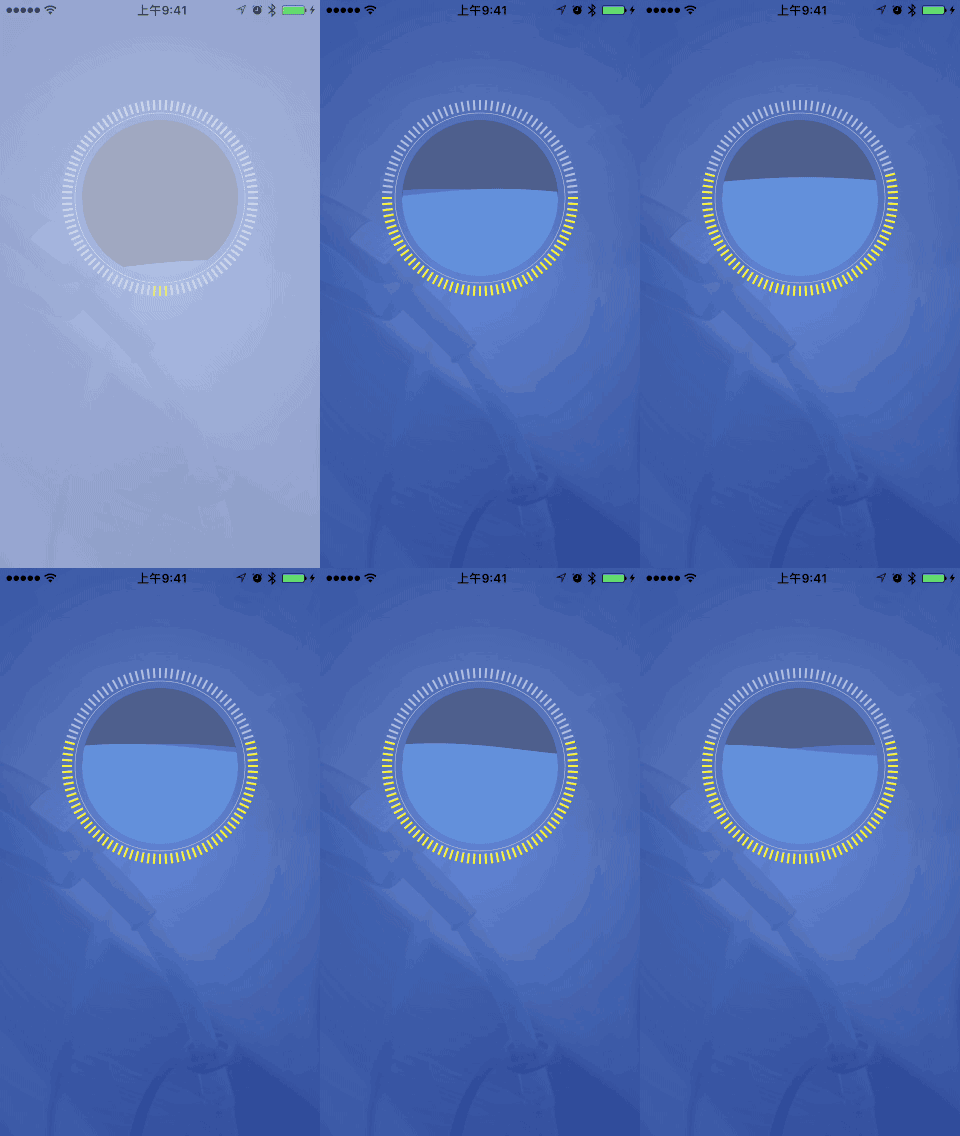
思路
一開始筆者放棄了「透過改變圖片位置來實現動畫」的做法——雖然也能做出效果,但從效能與資源消耗來看並不是最好的選擇。這裡改用上下文(CGContextRef)來繪製,它能畫直線、曲線、多邊形、圓形等各種幾何圖形,正好勝任。
具體步驟
我們可以把這個複雜圖形拆成三步:
繪製最外圈刻度尺;
繪製表示進度的刻度尺;
繪製中間的球形加載介面。
繪製刻度尺
要在控件中繪製自訂圖形,需要重寫 UIView 的 drawRect 方法:
- (void)drawRect:(CGRect)rect {
    CGContextRef context = UIGraphicsGetCurrentContext();
    [self drawScale:context];
}
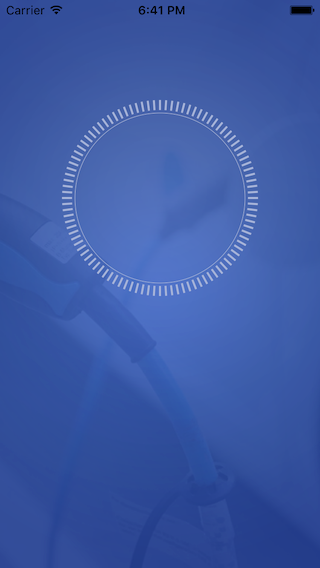
刻度尺是由一圈短線在圓內圍成的一個圓。
/**
 *  畫比例尺
 */
- (void)drawScale:(CGContextRef)context {
    CGContextSetLineWidth(context, _scaleDivisionsWidth); // 線的寬度
    // 先將參照點移到控件中心
    CGContextTranslateCTM(context, fullRect.size.width / 2, fullRect.size.width / 2);
    CGContextSetStrokeColorWithColor(context, [UIColor colorWithRed:0.655 green:0.710 blue:0.859 alpha:1.00].CGColor); // 線框顏色
    for (int i = 0; i < _scaleCount; i++) {
        CGContextMoveToPoint(context, scaleRect.size.width/2 - _scaleDivisionsLength, 0);
        CGContextAddLineToPoint(context, scaleRect.size.width/2, 0);
        CGContextStrokePath(context); // 渲染
        CGContextRotateCTM(context, 2 * M_PI / _scaleCount);
    }
    // 繪制刻度尺外的一個圈
    CGContextSetStrokeColorWithColor(context, [UIColor colorWithRed:0.694 green:0.745 blue:0.867 alpha:1.00].CGColor);
    CGContextSetLineWidth(context, 0.5);
    CGContextAddArc(context, 0, 0, scaleRect.size.width/2 - _scaleDivisionsLength - 3, 0, M_PI* 2 , 0);
    CGContextStrokePath(context);
    // 復原參照點
    CGContextTranslateCTM(context, -fullRect.size.width / 2, -fullRect.size.width / 2);
}
這裡用到 CGContextAddArc 與 CGContextAddLineToPoint。畫圓弧有 CGContextAddArc 與 CGContextAddArcToPoint 兩種,這裡畫的圓較簡單,用前者即可。
CGContextAddArc
void CGContextAddArc (
    CGContextRef c,
    CGFloat x,          // 圓心的 x 坐標
    CGFloat y,          // 圓心的 y 坐標
    CGFloat radius,     // 圓的半徑
    CGFloat startAngle, // 開始弧度
    CGFloat endAngle,   // 結束弧度
    int clockwise       // 0 順時針,1 逆時針
);
要畫一個完整的圓,開始弧度為 0、結束弧度為 2π。函數執行完後 current point 會被重置為 (x, y)。
CGContextAddLineToPoint
void CGContextAddLineToPoint (
    CGContextRef c,
    CGFloat x,
    CGFloat y
);
從 current point 畫一條直線到 (x, y),然後 current point 變成 (x, y)。由於短線不連續,所以用 for 迴圈不斷畫短線,每次先把 current point 移到位於圓邊的起點,畫完後將圖形旋轉一個刻度的角度,最終渲染即可得到刻度尺。
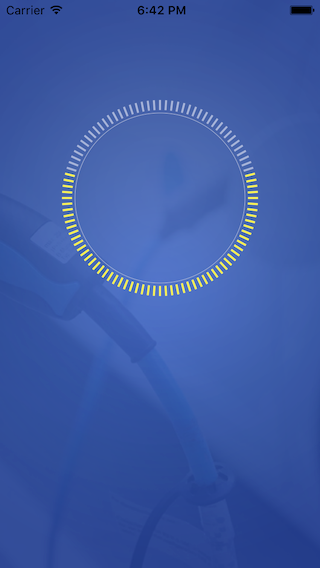
刻度尺上的進度繪製
先在 drawRect 加入 drawProcessScale:
- (void)drawRect:(CGRect)rect {
    CGContextRef context = UIGraphicsGetCurrentContext();
    [self drawScale:context];
    [self drawProcessScale:context];
}
/**
* 比例尺進度
*/
- (void)drawProcessScale:(CGContextRef)context {
CGContextSetLineWidth(context, _scaleDivisionsWidth);
CGContextTranslateCTM(context, fullRect.size.width / 2, fullRect.size.width / 2);
CGContextSetStrokeColorWithColor(context, [UIColor colorWithRed:0.969 green:0.937 blue:0.227 alpha:1.00].CGColor);
int count = (_scaleCount / 2 + 1) * currentPercent;
CGFloat scaleAngle = 2 * M_PI / _scaleCount;
// 繪制左邊刻度進度
for (int i = 0; i < count; i++) {
CGContextMoveToPoint(context, 0, scaleRect.size.width/2 - _scaleDivisionsLength);
CGContextAddLineToPoint(context, 0, scaleRect.size.width/2);
CGContextStrokePath(context);
CGContextRotateCTM(context, scaleAngle);
}
// 繪制右邊刻度進度
CGContextRotateCTM(context, -count * scaleAngle);
for (int i = 0; i < count; i++) {
CGContextMoveToPoint(context, 0, scaleRect.size.width/2 - _scaleDivisionsLength);
CGContextAddLineToPoint(context, 0, scaleRect.size.width/2);
CGContextStrokePath(context);
CGContextRotateCTM(context, -scaleAngle);
}
CGContextTranslateCTM(context, -fullRect.size.width / 2, -fullRect.size.width / 2);
}
水的波浪效果繪製
終於來到最主要也最難的效果。帶有滾動波浪的效果是用 NSTimer 不斷重繪每一幀來實現的。先在 drawRect 加入 drawWave:
- (void)drawRect:(CGRect)rect {
    CGContextRef context = UIGraphicsGetCurrentContext();
    [self drawScale:context];
    [self drawProcessScale:context];
    [self drawWave:context];
}
/**
* 畫波浪
*/
- (void)drawWave:(CGContextRef)context {
CGMutablePathRef frontPath = CGPathCreateMutable();
CGMutablePathRef backPath = CGPathCreateMutable();
CGContextSetLineWidth(context, 1);
CGContextSetFillColorWithColor(context, [_frontWaterColor CGColor]);
CGFloat offset = _scaleMargin + _waveMargin + _scaleDivisionsWidth;
float frontY = currentLinePointY;
float backY = currentLinePointY;
CGFloat radius = waveRect.size.width / 2;
CGPoint frontStartPoint = CGPointMake(offset, currentLinePointY + offset);
CGPoint frontEndPoint = CGPointMake(offset, currentLinePointY + offset);
CGPoint backStartPoint = CGPointMake(offset, currentLinePointY + offset);
CGPoint backEndPoint = CGPointMake(offset, currentLinePointY + offset);
for(float x = 0; x <= waveRect.size.width; x++){
// 前浪繪制
frontY = a * sin( x / 180 * M_PI + 4 * b / M_PI ) * amplitude + currentLinePointY;
CGFloat frontCircleY = frontY;
if (currentLinePointY < radius) {
frontCircleY = radius - sqrt(pow(radius, 2) - pow((radius - x), 2));
if (frontY < frontCircleY) { frontY = frontCircleY; }
} else if (currentLinePointY > radius) {
frontCircleY = radius + sqrt(pow(radius, 2) - pow((radius - x), 2));
if (frontY > frontCircleY) { frontY = frontCircleY; }
}
if (fabs(0 - x) < 0.001) {
frontStartPoint = CGPointMake(x + offset, frontY + offset);
CGPathMoveToPoint(frontPath, NULL, frontStartPoint.x, frontStartPoint.y);
}
frontEndPoint = CGPointMake(x + offset, frontY + offset);
CGPathAddLineToPoint(frontPath, nil, frontEndPoint.x, frontEndPoint.y);
// 後波浪繪制(與前浪類似,改用 cos 函數)
backY = a * cos( x / 180 * M_PI + 3 * b / M_PI ) * amplitude + currentLinePointY;
// ...(同樣做圓弧邊界判斷與 CGPathAddLineToPoint)
}
CGPoint centerPoint = CGPointMake(fullRect.size.width / 2, fullRect.size.height / 2);
// 繪制前浪圓弧
CGFloat frontStart = [self calculateRotateDegree:centerPoint point:frontStartPoint];
CGFloat frontEnd = [self calculateRotateDegree:centerPoint point:frontEndPoint];
CGPathAddArc(frontPath, nil, centerPoint.x, centerPoint.y, waveRect.size.width / 2, frontEnd, frontStart, 0);
CGContextAddPath(context, frontPath);
CGContextFillPath(context);
CGContextSaveGState(context);
CGContextDrawPath(context, kCGPathStroke);
CGPathRelease(frontPath);
// 繪制後浪圓弧(同理,換用 _backWaterColor)
// ...
}以上程式碼較長,以下針對重點解讀(以前浪為例,後浪實作方式基本相同,只是正餘弦函數不同)。每個浪都由一條曲線與一段圓弧構成封閉區間:曲線的 x 區間為 [0, waveRect.size.width],y 值由 frontY = a * sin( x / 180 * M_PI + 4 * b / M_PI ) * amplitude + currentLinePointY; 計算(currentLinePointY 為偏移量)。透過 for 迴圈自增 x 並計算 y,以 CGPathAddLineToPoint 繪出曲線,再依起點、終點與圓心補上一段封閉圓弧。這裡用到 CGPathAddArc,需先算出波浪起點與終點各自與圓心的夾角:
/**
 *  根據圓心點和圓上一個點計算角度
 */
- (CGFloat)calculateRotateDegree:(CGPoint)centerPoint point:(CGPoint)point {
    CGFloat rotateDegree = asin(fabs(point.y - centerPoint.y) / (sqrt(pow(point.x - centerPoint.x, 2) + pow(point.y - centerPoint.y, 2))));
    if (point.y > centerPoint.y) {          // 第一、二象限
        if (point.x >= centerPoint.x) {     // 第一象限
            rotateDegree = rotateDegree;
        } else {                            // 第二象限
            rotateDegree = M_PI - rotateDegree;
        }
    } else {                                // 第三、四象限
        if (point.x <= centerPoint.x) {     // 第三象限
            rotateDegree = M_PI + rotateDegree;
        } else {                            // 第四象限
            rotateDegree = 2 * M_PI - rotateDegree;
        }
    }
    return rotateDegree;
}
波浪繪制的相關判斷
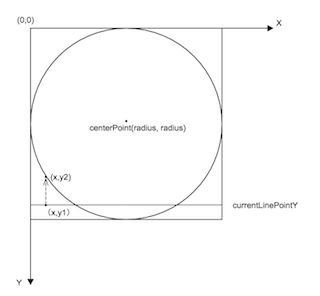
由於曲線 y 值是依公式算出的,最終構成的波浪卻是球形的,所以需判斷算出的 y 是否在圓上,若不在就把它移到圓上。分兩種情況:
currentLinePointY < fullRect.size.height / 2
此時若曲線算出的 y1 小於圓上對應的 y2,最終就取 (x, y2)。
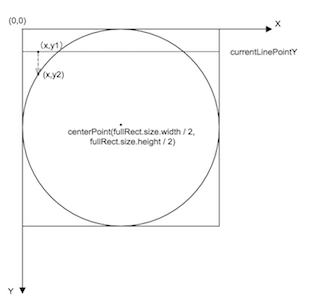
currentLinePointY > fullRect.size.height / 2
同理,此時若 y1 大於圓上對應的 y2,最終就取 (x, y2)。
判斷程式碼如下:
frontY = a * sin( x / 180 * M_PI + 4 * b / M_PI ) * amplitude + currentLinePointY;
CGFloat frontCircleY = frontY;
if (currentLinePointY < radius) {
    frontCircleY = radius - sqrt(pow(radius, 2) - pow((radius - x), 2));
    if (frontY < frontCircleY) { frontY = frontCircleY; }
} else if (currentLinePointY > radius) {
    frontCircleY = radius + sqrt(pow(radius, 2) - pow((radius - x), 2));
    if (frontY > frontCircleY) { frontY = frontCircleY; }
}
其中當 currentLinePointY < radius 時,y2 = radius - sqrt(pow(radius, 2) - pow((radius - x), 2));當 currentLinePointY > radius 時,y2 = radius + sqrt(pow(radius, 2) - pow((radius - x), 2))。
如此便構成球形波浪效果,再透過 Timer 不斷改變 a、b 的值,就得到了想要的動畫。
GitHub:https://github.com/Jvaeyhcd/HcdProcessView
文章轉自 Jvaeyhcd的簡書
- 上一篇文章: Xcode 8 升級 Swift 3 踩坑實錄
- 下一篇文章: Xcode 7 升級 Xcode 8 後遭遇的重複符號衝突