
iOS 後台定位實作:即時向伺服器回報最新位置
編輯:iOS 開發基礎
第一步,開啟後台模式並勾選定位。進入 project -> capabilities -> Background Modes -> Location updates,如下圖:
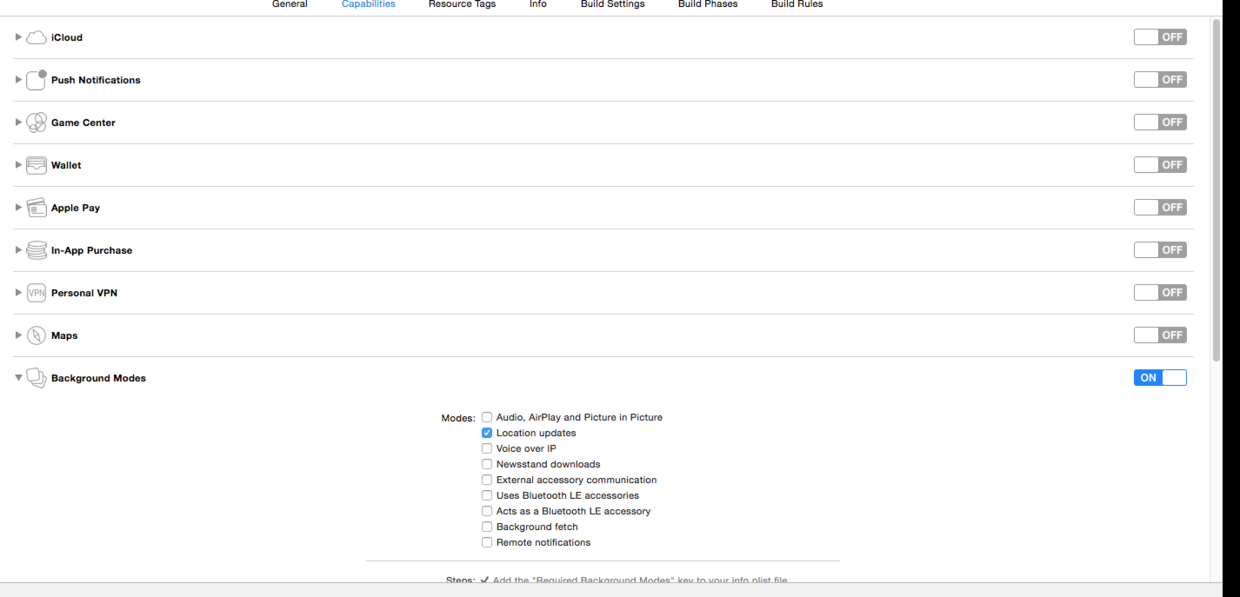
第二步,在 info.list 中加入以下配置:
// 允許 http 請求,iOS 9 之後需要添加,便於向服務器發送請求NSAppTransportSecurity // 添加定位權限,iOS 8 之後需要添加,否則無法定位 NSAllowsArbitraryLoads NSLocationWhenInUseUsageDescription YES NSLocationAlwaysUsageDescription YES
第三步,撰寫程式碼如下:
#import "ViewController.h"

@interface ViewController () @end

@implementation ViewController

- (void)viewDidLoad {
    [super viewDidLoad];
    self.view.backgroundColor = [UIColor whiteColor];
    self.title = @"後台定位";
    self.locationManager = [[CLLocationManager alloc] init];
    self.locationManager.delegate = self;
    [self.locationManager setDesiredAccuracy:kCLLocationAccuracyBest];

    if ([[UIDevice currentDevice].systemVersion floatValue] > 8) {
        // 請求用戶權限:分為只在前台定位 / 後台也可定位
        // [self.locationManager requestWhenInUseAuthorization]; // 只在前台
        [self.locationManager requestAlwaysAuthorization]; // 後台也可定位
    }
    if ([[UIDevice currentDevice].systemVersion floatValue] > 9) {
        // iOS 9 新特性:同一 app 中可有多個 location manager,允許部分在後台定位
        [self.locationManager setAllowsBackgroundLocationUpdates:YES];
    }
    // 開始定位
    [self.locationManager startUpdatingLocation];
}

#pragma mark - 定位代理方法
- (void)locationManager:(CLLocationManager *)manager didUpdateLocations:(NSArray *)locations {
    CLLocation *loc = [locations objectAtIndex:0];
    NSLog(@"經緯度  %f  %f ", loc.coordinate.latitude, loc.coordinate.longitude);

    NSURLSession *session = [NSURLSession sharedSession];
    NSURLSessionDataTask *task = [session dataTaskWithRequest:[NSURLRequest requestWithURL:[NSURL URLWithString:@"https://ac.ybjk.com/ua.php"]] completionHandler:^(NSData * _Nullable data, NSURLResponse * _Nullable response, NSError * _Nullable error) {
        NSString *result = [[NSString alloc] initWithData:data encoding:NSUTF8StringEncoding];
        NSLog(@"result %@", result);
    }];
    [task resume];
}
@end
至此,便完成了後台即時定位,並成功向伺服器發送請求。
記錄點滴
Tip
學習的路總是曲折的,每個人都從菜鳥走來。遇到問題時總希望能與人交流,卻常在各種群組裡石沉大海。於是想建立一個以技術交流為主的社群,把遇到的問題記錄下來分享給他人,方便自己,也成就他人。但願與君共勉。
文章轉自 Lonely__的簡書
- 上一篇文章: 解決 Xcode 8 模擬器雜訊與 iOS 10 真機 NSLog 失效問題
- 下一篇文章: iOS 開發中的正則表達式完全指南