
Swift 開源練習:用純程式碼打造一個訂餐 App 的 UI 骨架
前言
學 Swift 也有一段時間了,期間做過幾個小 demo。一直想動手做個完整的專案,剛好學校周邊的午餐外賣逐漸流行起來——不像國內有那麼多成熟的外賣軟體,這邊雖然也有,但華人圈普遍不太熟悉也不太用。於是決定針對午餐外賣做一個 App,折騰了幾天,目前只完成了 UI。軟體看起來簡單,新手做起來才發現細節還真不少。Swift 如何與後端互動這塊之後再慢慢補,如果有前輩願意在留言區推薦幾份教程就更好了。資料庫部分我還算熟悉,SQL 或 MongoDB 都可以。
順帶一提,想瞭解 MongoDB 的可以看我前面寫的兩篇系列文章;之前做過一個前後端完整的網站 demo,部署在 Heroku 上,玩起來挺有意思。
已實作的功能
這個 App 的所有 UI 都以程式碼建立。早期練習時我偏好 storyboard,但頁面一超過十頁,畫面就開始失控,尤其是那些滿屏亂竄的 segue 連線。後來改用 SnapKit 寫 UI,雖然跟 CSS 比起來還是笨重,但整體體驗可以接受。目前完成的部分包括:
引導頁
午餐菜單(tableView)
購物車與加入動畫
下拉刷新
自訂個人主頁(collectionView)
Reminder 與 Setting 暫以 Alert 簡化處理
全屏右滑返回
完整程式碼在 GitHub 上,以下主要展示效果並說明實作思路,程式碼中已有大量註解。
引導頁

引導頁用 collectionView 實作。先判斷是否需要進入引導頁(例如版本更新時才顯示),滾動方向設為 .horizontal,頁數可任意設定。再放一個啟動用的 startButton,前幾頁設為 startButton.isHidden = true,最後一頁才顯示,並加上淡入動畫。
菜單與購物車
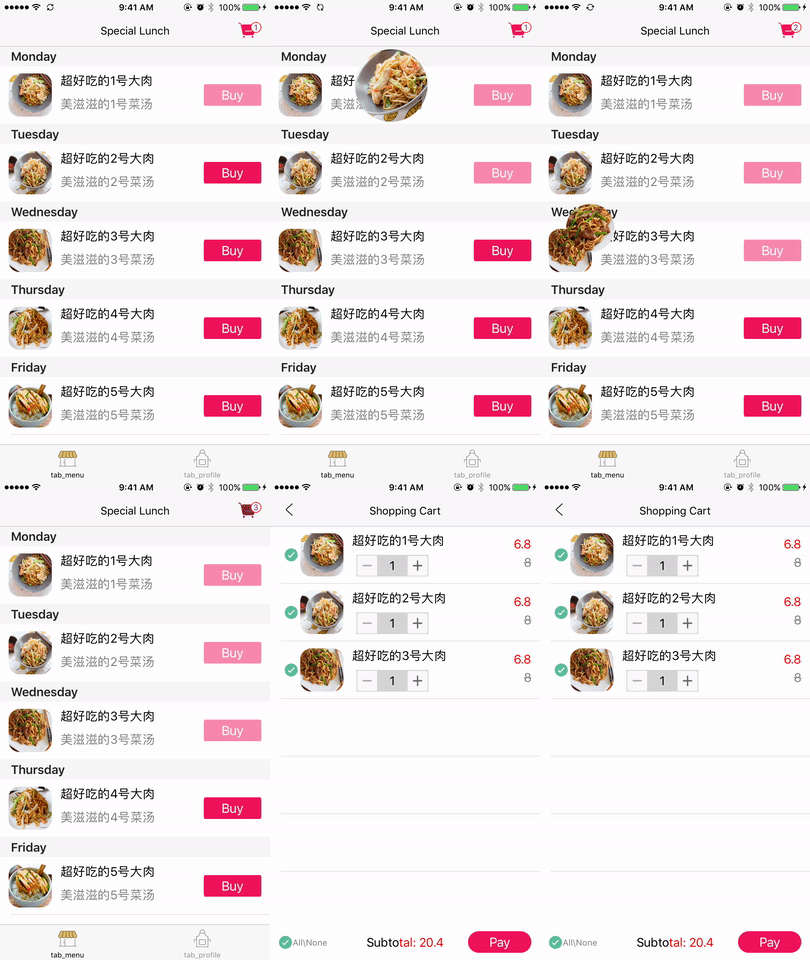
菜單支援下拉刷新。原本想自訂刷新樣式,嘗試之後遇到一些問題,最後沿用系統的 UIRefreshControl,在下拉時顯示刷新時間,並微調了時間格式:
let dateString = DateFormatter.localizedString(from: NSDate() as Date, dateStyle: .medium, timeStyle: .short)
self.refreshControl.attributedTitle = NSAttributedString(string: "Last updated on \(dateString)", attributes: attributes)
self.refreshControl.tintColor = UIColor.white
接著是購物車動畫:把菜單中的圖片先放大再縮小,「拋」進購物車,實際上是沿著 UIBezierPath 走一段路徑;動畫結束後在 animationDidStop() 中做購物車圖示的抖動,並更新購買數量。那個 countLabel 是一個長寬 15、位於購物車右上角的小 UILabel()。
先實作一個回呼方法,點擊 cell 上的購買按鈕時觸發:
func menuListCell(_ cell: MenuListCell, foodImageView: UIImageView) {
    guard let indexPath = tableView.indexPath(for: cell) else { return }

    // 取出當前餐點模型並加入購物車
    let model = foodArray[indexPath.section][indexPath.row]
    addFoodArray.append(model)

    // 重新計算 imageView 的 frame,啟動動畫
    var rect = tableView.rectForRow(at: indexPath)
    rect.origin.y -= tableView.contentOffset.y

    var headRect = foodImageView.frame
    headRect.origin.y = rect.origin.y + headRect.origin.y - 64

    startAnimation(headRect, foodImageView: foodImageView)
}
點擊購買後的動畫實作:
fileprivate func startAnimation(_ rect: CGRect, foodImageView: UIImageView) {
    if layer == nil {
        layer = CALayer()
        layer?.contents = foodImageView.layer.contents
        layer?.contentsGravity = kCAGravityResizeAspectFill
        layer?.bounds = rect
        layer?.cornerRadius = layer!.bounds.height * 0.5
        layer?.masksToBounds = true
        layer?.position = CGPoint(x: foodImageView.center.x, y: rect.minY + 96)
        KeyWindow.layer.addSublayer(layer!)

        // 動畫路徑
        path = UIBezierPath()
        path!.move(to: layer!.position)
        path!.addQuadCurve(to: CGPoint(x: SCREEN_WIDTH - 25, y: 35),
                           controlPoint: CGPoint(x: SCREEN_WIDTH * 0.5, y: rect.origin.y - 80))
    }

    groupAnimation()
}
放大、縮小、拋入的組合動畫:
// 組合動畫:拋出、放大、縮小
fileprivate func groupAnimation() {
    tableView.isUserInteractionEnabled = false

    // 移動路徑
    let animation = CAKeyframeAnimation(keyPath: "position")
    animation.path = path!.cgPath
    animation.rotationMode = kCAAnimationRotateAuto

    // 放大
    let bigAnimation = CABasicAnimation(keyPath: "transform.scale")
    bigAnimation.duration = 0.5
    bigAnimation.fromValue = 1
    bigAnimation.toValue = 2
    bigAnimation.timingFunction = CAMediaTimingFunction(name: kCAMediaTimingFunctionEaseIn)

    // 縮小
    let smallAnimation = CABasicAnimation(keyPath: "transform.scale")
    smallAnimation.beginTime = 0.5
    smallAnimation.duration = 1
    smallAnimation.fromValue = 2
    smallAnimation.toValue = 0.5
    smallAnimation.timingFunction = CAMediaTimingFunction(name: kCAMediaTimingFunctionEaseOut)

    // 組合
    let groupAnimation = CAAnimationGroup()
    groupAnimation.animations = [animation, bigAnimation, smallAnimation]
    groupAnimation.duration = 1.5
    groupAnimation.isRemovedOnCompletion = false
    groupAnimation.fillMode = kCAFillModeForwards
    groupAnimation.delegate = self

    layer?.add(groupAnimation, forKey: "groupAnimation")
}
組合動畫結束後的收尾效果:
    // 圖片動畫結束,啟動其他動畫
    func animationDidStop(_ anim: CAAnimation, finished flag: Bool) {
        if anim == layer?.animation(forKey: "groupAnimation") {
            // 恢復使用者互動
            tableView.isUserInteractionEnabled = true

            // 移除 layer
            layer?.removeAllAnimations()
            layer?.removeFromSuperlayer()
            layer = nil

            // 若有購買任何餐點,顯示數量標籤
            if self.addFoodArray.count > 0 {
                addCountLabel.isHidden = false
            }

            // 數量標籤的切換動畫
            let goodCountAnimation = CATransition()
            goodCountAnimation.duration = 0.25
            addCountLabel.text = "\(self.addFoodArray.count)"
            addCountLabel.layer.add(goodCountAnimation, forKey: nil)

            // 購物車抖動
            let cartAnimation = CABasicAnimation(keyPath: "transform.translation.y")
            cartAnimation.duration = 0.25
            cartAnimation.fromValue = -5
            cartAnimation.toValue = 5
            cartAnimation.autoreverses = true
            cartButton.layer.add(cartAnimation, forKey: nil)
        }
}購物車內可以增減數量,總價會同步更新。這裡主要用到兩個東西:selected 變數與 reCalculateCount() 方法——依 selected 決定哪些品項計入總價,若有變動就重新計算。
fileprivate func reCalculateCount() {
    for model in addFoodArray! {
        if model.selected == true {
            price += Float(model.count) * (model.vipPrice! as NSString).floatValue
        }
    }

    // 更新總價
    let attributeText = NSMutableAttributedString(string: "Subtotal: \(self.price)")
    attributeText.setAttributes([NSForegroundColorAttributeName: UIColor.red],
                               range: NSMakeRange(5, attributeText.length - 5))
    totalPriceLabel.attributedText = attributeText

    price = 0
    tableView.reloadData()
}
目前還沒實作 Pay(),打算之後試試 Apple Pay。之前用慣了支付寶,剛到美國時頗不適應;其實很多地方國內已經領先不少。好在 Apple Pay 現在也算好用。
自訂個人主頁
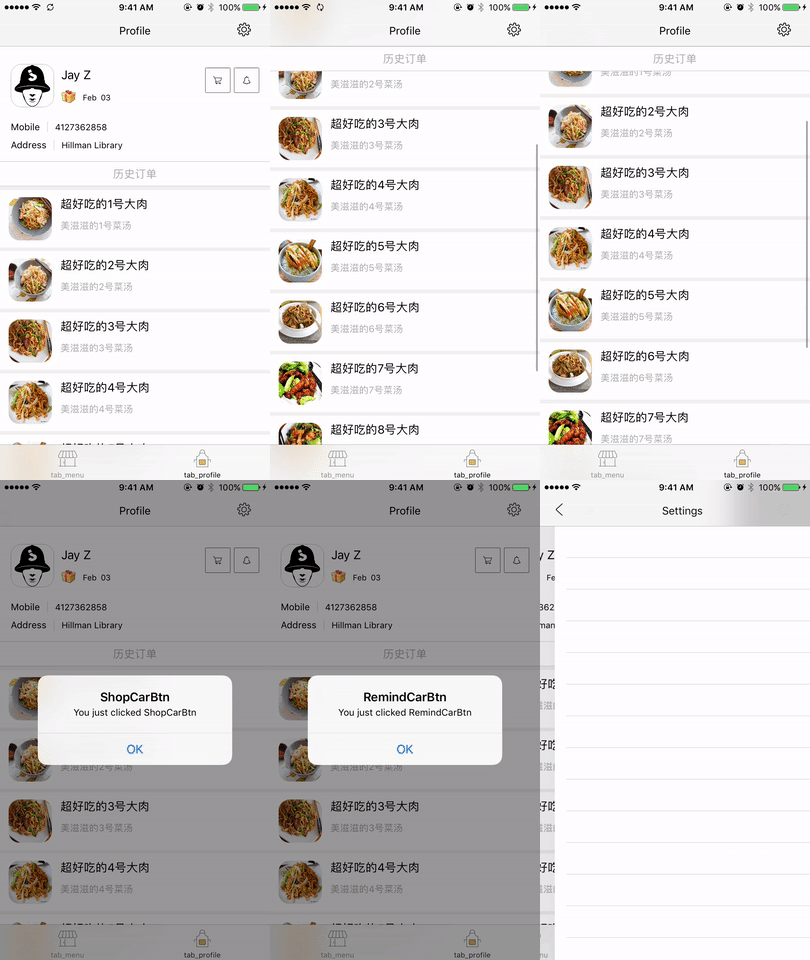
原本想做成簡書那樣,但以新手的程度還有些難度,加上這個 App 裡也沒必要做到那麼完整,就先擱著。
如前面提到的,這頁同樣用 collectionView,共兩個 section:上面是 UserCollectionViewCell,下面是 HistoryCollectionViewCell。第二個 section 的行為近似 table 的 section,有一個會自動懸浮的 header,這裡用的是 ALin 的作品 LevitateHeaderFlowLayout(),版權當然保留原作者。
class CollectionViewFlowLayout: LevitateHeaderFlowLayout {
    override func prepare() {
        super.prepare()
        collectionView?.alwaysBounceVertical = true
        scrollDirection = .vertical
        minimumLineSpacing = 5
        minimumInteritemSpacing = 0
    }
}
整體來說這還算個小專案,若之後把後端補上,大概也能算是一個功能完整的小作品了。
最後
特別感謝 ALin 的開源專案「花田小憩」,他寫了不少實用的小工具,我在幾處都有參考。站在前人的肩膀上真的能省下很多時間。
另外推薦幾篇文章:
談 tableview 程式碼布局:Refactoring table view data source and delegate methods
對我幫助很大的開源專案:iOS 高仿「花田小憩」3.0.1
關於架構與框架的一些看法:架構(Architecture)和框架(Framework)雜談
文章轉自 諸葛俊偉的簡書