
UITableView 的 Cell 復用原理與源碼分析
簡介
日常開發中,絕大多數情況下只要仔細讀懂類頭檔裡的註釋,再把 UIKit 的大量控件組合起來,就能很好地滿足工作需求。但僅僅「會用」是遠遠不夠的。
假設產品現在要一個類似 Excel 風格的控件來呈現資料,要求能上下左右滑動——這時你會發現 UIKit 裡根本沒有現成可用的控件。UITableView 可以看做一個只能上下滾動的 Excel,於是我們的直覺是:仿照 UITableView 來實作這個自訂控件。
本文將透過開源專案 Chameleon 分析 UITableView 的源碼,讀完之後你會理解 UITableView 的繪製流程,以及 UITableViewCell 的復用原理。下一篇我會動手實作一個類似 Excel 的自訂控件。
關於 Chameleon
Chameleon 是一個把 iOS 的 UIKit 框架移植到 Mac OS X 的開源專案,目標是盡可能提供 UIKit 的替代方案,讓 Mac 開發者也能做出接近 iOS 觀感的 UI。
UITableView 的簡單使用
//創建UITableView對象,並設置代代理和數據源為包含該視圖的視圖控制器 UITableView *tableView = [[UITableView alloc] initWithFrame:frame style:UITableViewStyleGrouped]; tableView.delegate = self; tableView.dataSource = self; [tableView registerClass:[UITableViewCell class] forCellReuseIdentifier:kReuseCellIdentifier]; [self.view addSubview:tableView]; //實現代理和數據源協議中的方法 #pragma mark - UITableViewDelegate - (CGFloat)tableView:(UITableView *)tableView heightForRowAtIndexPath:(NSIndexPath *)indexPath { return kDefaultCellHeight; } #pragma mark - UITableViewDataSource - (UITableViewCell *)tableView:(UITableView *)tableView cellForRowAtIndexPath:(NSIndexPath *)indexPath { UITableViewCell *cell = [tableView dequeueReusableCellWithIdentifier:kReuseCellIdentifier]; return cell; } - (NSInteger)tableView:(UITableView *)tableView numberOfRowsInSection:(NSInteger)section { return self.dataArray.count; }建立 UITableView 實例
UITableView *tableView = [[UITableView alloc] initWithFrame:frame style:UITableViewStyleGrouped];
initWithFrame:style: 的源碼如下:
- (id)initWithFrame:(CGRect)frame style:(UITableViewStyle)theStyle { if ((self=[super initWithFrame:frame])) { _style = theStyle; //_cachedCells 用於保存正在顯示的Cell對象的引用 _cachedCells = [[NSMutableDictionary alloc] init]; //在計算完每個 section 包含的 section 頭部,尾部視圖的高度,和包含的每個 row 的整體高度後, //使用 UITableViewSection 對象對這些高度值進行保存,並將該 UITableViewSection 對象的引用 //保存到 _sections中。在指定完 dataSource 後,至下一次數據源變化調用 reloadData 方法, //由於數據源沒有變化,section 相關的高度值是不會變化,只需計算一次,所以需要緩存起來。 _sections = [[NSMutableArray alloc] init]; //_reusableCells用於保存存在但未顯示在界面上的可復用的Cell _reusableCells = [[NSMutableSet alloc] init]; self.separatorColor = [UIColor colorWithRed:.88f green:.88f blue:.88f alpha:1]; self.separatorStyle = UITableViewCellSeparatorStyleSingleLine; self.showsHorizontalScrollIndicator = NO; self.allowsSelection = YES; self.allowsSelectionDuringEditing = NO; self.sectionHeaderHeight = self.sectionFooterHeight = 22; self.alwaysBounceVertical = YES; if (_style == UITableViewStylePlain) { self.backgroundColor = [UIColor whiteColor]; } [self _setNeedsReload]; } return self; }我在關鍵位置加了註釋,這裡需要重點關注 _cachedCells、_sections、_reusableCells 這三個變量的職責。
設置資料來源
tableView.dataSource = self;
dataSource 的 setter 源碼:
- (void)setDataSource:(id)newSource { _dataSource = newSource; _dataSourceHas.numberOfSectionsInTableView = [_dataSource respondsToSelector:@selector(numberOfSectionsInTableView:)]; _dataSourceHas.titleForHeaderInSection = [_dataSource respondsToSelector:@selector(tableView:titleForHeaderInSection:)]; _dataSourceHas.titleForFooterInSection = [_dataSource respondsToSelector:@selector(tableView:titleForFooterInSection:)]; _dataSourceHas.commitEditingStyle = [_dataSource respondsToSelector:@selector(tableView:commitEditingStyle:forRowAtIndexPath:)]; _dataSourceHas.canEditRowAtIndexPath = [_dataSource respondsToSelector:@selector(tableView:canEditRowAtIndexPath:)]; [self _setNeedsReload]; }
_dataSourceHas 是一個用來記錄資料源實作了哪些協議方法的結構體:
struct { unsigned numberOfSectionsInTableView : 1; unsigned titleForHeaderInSection : 1; unsigned titleForFooterInSection : 1; unsigned commitEditingStyle : 1; unsigned canEditRowAtIndexPath : 1; } _dataSourceHas;記錄「是否實作了某協議」用布林值就夠了。布林變量通常佔一個位元組(8 個比特),但這裡改用 bitfields,只用一个比特(0 或 1)來記錄,大幅節省了記憶體。
資料源設定好之後,還要打一個標記告訴 NSRunLoop「資料源已就緒,下次循環請用它來布局」:
- (void)_setNeedsReload { _needsReload = YES; [self setNeedsLayout]; }呼叫 setNeedsLayout 之後,NSRunLoop 會在下一次循環中自動觸發 layoutSubViews。
視圖內容需要重繪時呼叫 setNeedsDisplay,它會把該視圖的 displayIfNeeded 標記為 YES,NSRunLoop 於下一次循環偵測到後自動呼叫 drawRect 重繪。
視圖內容沒變但位置在父視圖中改變了,則呼叫 setNeedsLayout,它會把 layoutIfNeeded 標記為 YES,NSRunLoop 偵測到後自動呼叫 layoutSubViews。
更詳細的說明可參考 “When is layoutSubviews called?”
設置代理
tableView.delegate = self;
delegate 的 setter 源碼:
- (void)setDelegate:(id)newDelegate { [super setDelegate:newDelegate]; _delegateHas.heightForRowAtIndexPath = [newDelegate respondsToSelector:@selector(tableView:heightForRowAtIndexPath:)]; _delegateHas.heightForHeaderInSection = [newDelegate respondsToSelector:@selector(tableView:heightForHeaderInSection:)]; _delegateHas.heightForFooterInSection = [newDelegate respondsToSelector:@selector(tableView:heightForFooterInSection:)]; _delegateHas.viewForHeaderInSection = [newDelegate respondsToSelector:@selector(tableView:viewForHeaderInSection:)]; _delegateHas.viewForFooterInSection = [newDelegate respondsToSelector:@selector(tableView:viewForFooterInSection:)]; _delegateHas.willSelectRowAtIndexPath = [newDelegate respondsToSelector:@selector(tableView:willSelectRowAtIndexPath:)]; _delegateHas.didSelectRowAtIndexPath = [newDelegate respondsToSelector:@selector(tableView:didSelectRowAtIndexPath:)]; _delegateHas.willDeselectRowAtIndexPath = [newDelegate respondsToSelector:@selector(tableView:willDeselectRowAtIndexPath:)]; _delegateHas.didDeselectRowAtIndexPath = [newDelegate respondsToSelector:@selector(tableView:didDeselectRowAtIndexPath:)]; _delegateHas.willBeginEditingRowAtIndexPath = [newDelegate respondsToSelector:@selector(tableView:willBeginEditingRowAtIndexPath:)]; _delegateHas.didEndEditingRowAtIndexPath = [newDelegate respondsToSelector:@selector(tableView:didEndEditingRowAtIndexPath:)]; _delegateHas.titleForDeleteConfirmationButtonForRowAtIndexPath = [newDelegate respondsToSelector:@selector(tableView:titleForDeleteConfirmationButtonForRowAtIndexPath:)]; }
與資料源相同,這裡也用類似結構體記錄代理實作了哪些協議方法。
UITableView 的繪製
由於設置資料源時呼叫了 setNeedsLayout 打上標記,因此約 1/60 秒(NSRunLoop 的循環週期)後會自動觸發 layoutSubViews:
- (void)layoutSubviews { //對子視圖進行布局,該方法會在第一次設置數據源調用 setNeedsLayout 方法後自動調用。 //並且 UITableView 是繼承自 UIScrollview,當滾動時也會觸發該方法的調用 _backgroundView.frame = self.bounds; //在進行布局前必須確保 section 已經緩存了所有高度相關的信息 [self _reloadDataIfNeeded]; //對 UITableView 的 section 進行布局,包含 section 的頭部,尾部,每一行 Cell [self _layoutTableView]; //對 UITableView 的頭視圖,尾視圖進行布局 [super layoutSubviews]; }由於 UITableView 繼承自 UIScrollView,滾動時同樣會自動觸發這個方法。
_reloadDataIfNeeded
- (void)_reloadDataIfNeeded { if (_needsReload) { [self reloadData]; } } - (void)reloadData { //當數據源更新後,需要將所有顯示的UITableViewCell和未顯示可復用的UITableViewCell全部從父視圖移除, //重新創建 [[_cachedCells allValues] makeObjectsPerformSelector:@selector(removeFromSuperview)]; [_reusableCells makeObjectsPerformSelector:@selector(removeFromSuperview)]; [_reusableCells removeAllObjects]; [_cachedCells removeAllObjects]; _selectedRow = nil; _highlightedRow = nil; // 重新計算 section 相關的高度值,並緩存起來 [self _updateSectionsCache]; [self _setContentSize]; _needsReload = NO; }其中 _updateSectionsCache 最為關鍵,它在兩次資料源更新之間只會被呼叫一次:
- (void)_updateSectionsCache { //該逆向源碼只復用了 section 中的每個 UITableViewCell,並沒有復用每個 section 的頭視圖和尾視圖, //UIKit肯定是實現了所有視圖的復用 // remove all previous section header/footer views for (UITableViewSection *previousSectionRecord in _sections) { [previousSectionRecord.headerView removeFromSuperview]; [previousSectionRecord.footerView removeFromSuperview]; } // clear the previous cache [_sections removeAllObjects]; //如果數據源為空,不做任何處理 if (_dataSource) { // compute the heights/offsets of everything const CGFloat defaultRowHeight = _rowHeight ?: _UITableViewDefaultRowHeight; const NSInteger numberOfSections = [self numberOfSections]; for (NSInteger section=0; section 0 && _delegateHas.viewForHeaderInSection)? [self.delegate tableView:self viewForHeaderInSection:section] : nil; sectionRecord.footerView = (sectionRecord.footerHeight > 0 && _delegateHas.viewForFooterInSection)? [self.delegate tableView:self viewForFooterInSection:section] : nil; // make a default section header view if there's a title for it and no overriding view if (!sectionRecord.headerView && sectionRecord.headerHeight > 0 && sectionRecord.headerTitle) { sectionRecord.headerView = [UITableViewSectionLabel sectionLabelWithTitle:sectionRecord.headerTitle]; } // make a default section footer view if there's a title for it and no overriding view if (!sectionRecord.footerView && sectionRecord.footerHeight > 0 && sectionRecord.footerTitle) { sectionRecord.footerView = [UITableViewSectionLabel sectionLabelWithTitle:sectionRecord.footerTitle]; } if (sectionRecord.headerView) { [self addSubview:sectionRecord.headerView]; } else { sectionRecord.headerHeight = 0; } if (sectionRecord.footerView) { [self addSubview:sectionRecord.footerView]; } else { sectionRecord.footerHeight = 0; } //section 中每個 row 的高度使用了數組指針來保存 CGFloat *rowHeights = malloc(numberOfRowsInSection * sizeof(CGFloat)); CGFloat totalRowsHeight = 0; //每行 row 的高度通過數據源實現的協議方法 heightForRowAtIndexPath: 返回, //若數據源沒有實現該協議方法則使用默認的高度 for (NSInteger row=0; row這個方法主要負責記錄每個 Cell 的高度與整個 section 的總高度,並用 UITableViewSection 物件把結果快取起來。
_layoutTableView
- (void)_layoutTableView { //這裡實現了 UITableViewCell 的復用 const CGSize boundsSize = self.bounds.size; const CGFloat contentOffset = self.contentOffset.y; //由於 UITableView 繼承於 UIScrollview,所以通過滾動偏移量得到當前可視的 bounds const CGRect visibleBounds = CGRectMake(0,contentOffset,boundsSize.width,boundsSize.height); CGFloat tableHeight = 0; //若有頭部視圖,則計算頭部視圖在父視圖中的 frame if (_tableHeaderView) { CGRect tableHeaderFrame = _tableHeaderView.frame; tableHeaderFrame.origin = CGPointZero; tableHeaderFrame.size.width = boundsSize.width; _tableHeaderView.frame = tableHeaderFrame; tableHeight += tableHeaderFrame.size.height; } //_cashedCells 用於記錄正在顯示的 UITableViewCell 的引用 //avaliableCells 用於記錄當前正在顯示但在滾動後不再顯示的 UITableViewCell(該 Cell 可以復用) //在滾動後將該字典中的所有數據都添加到 _reusableCells 中, //記錄下所有當前在可視但由於滾動而變得不再可視的 Cell 的引用 NSMutableDictionary *availableCells = [_cachedCells mutableCopy]; const NSInteger numberOfSections = [_sections count]; [_cachedCells removeAllObjects]; for (NSInteger section=0; section 0) { //在滾動時,如果向上滾動,除去頂部要隱藏的 Cell 和底部要顯示的 Cell,中部的 Cell 都可以 //根據 indexPath 直接獲取 UITableViewCell *cell = [availableCells objectForKey:indexPath] ?: [self.dataSource tableView:self cellForRowAtIndexPath:indexPath]; if (cell) { [_cachedCells setObject:cell forKey:indexPath]; //將當前仍留在可視區域的 Cell 從 availableCells 中移除, //availableCells 中剩下的即為頂部已經隱藏的 Cell //後面會將該 Cell 加入 _reusableCells 中以便下次取出進行復用。 [availableCells removeObjectForKey:indexPath]; cell.highlighted = [_highlightedRow isEqual:indexPath]; cell.selected = [_selectedRow isEqual:indexPath]; cell.frame = rowRect; cell.backgroundColor = self.backgroundColor; [cell _setSeparatorStyle:_separatorStyle color:_separatorColor]; [self addSubview:cell]; } } } } } //把所有因滾動而不再可視的 Cell 從父視圖移除並加入 _reusableCells 中,以便下次取出復用 for (UITableViewCell *cell in [availableCells allValues]) { if (cell.reuseIdentifier) { [_reusableCells addObject:cell]; } else { [cell removeFromSuperview]; } } //把仍在可視區域的 Cell(但不應該在父視圖上顯示) 但已經被回收至可復用的 _reusableCells 中的 Cell從父視圖移除 NSArray* allCachedCells = [_cachedCells allValues]; for (UITableViewCell *cell in _reusableCells) { if (CGRectIntersectsRect(cell.frame,visibleBounds) && ![allCachedCells containsObject: cell]) { [cell removeFromSuperview]; } } if (_tableFooterView) { CGRect tableFooterFrame = _tableFooterView.frame; tableFooterFrame.origin = CGPointMake(0,tableHeight); tableFooterFrame.size.width = boundsSize.width; _tableFooterView.frame = tableFooterFrame; } } 關於 UIView 的 frame 與 bounds 的差異,可參考 “What's the difference between the frame and the bounds?”
Cell 的復用正是靠 _cachedCells、availableCells、_reusableCells 這三個容器協同完成的,這是 UITableView 最核心的設計。
下面一起看看從建立到滾動的全過程中,這三個容器裡的元素如何變化。
第一次設置資料源並呼叫該方法時,三個容器都是空的;呼叫結束後,_cachedCells 裝著當前所有可視 Cell 與其 indexPath 的鍵值對,availableCells 與 _reusableCells 仍為空。只有真正滾動起來之後,_reusableCells 才會出現多餘的、可回收的 Cell。
剛建立 UITableView 時的狀態如下圖(紅色為螢幕內容即可視區域,藍色為超出螢幕的不可視區域):
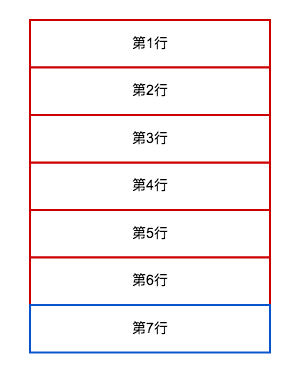
此時 _cachedCells 的元素,就是當前可視的所有 Cell 與對應 indexPath 的鍵值對。
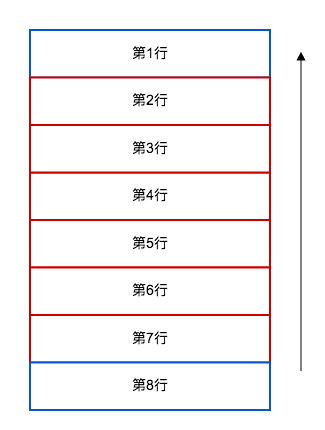
向上滾動一個 Cell 的過程中,由於 availableCells 是 _cachedCells 的拷貝,可以直接按 indexPath 取到對應 Cell。這時從底部滾上來的第 7 行,因為先前 _reusableCells 為空,只能重新建立;而滾出可視區域的頂部 Cell 則被放進 _reusableCells 以備後續復用。滾動結束後,_cachedCells 裝的是第 2 到第 7 行,_reusableCells 裝的是滾出頂部的第 1 行。
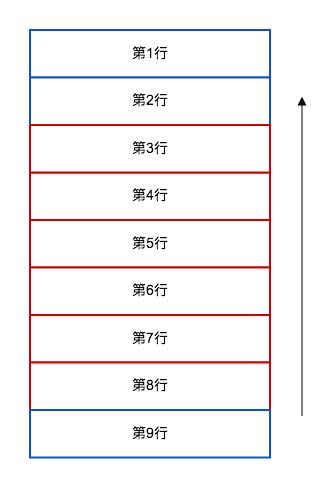
再往上滾一個 Cell 時,第 3 到第 7 行同樣可依 indexPath 直接取得。這次 _reusableCells 裡正好有一個可復用的 Cell,用來承載從底部滾上來的第 8 行;滾出頂部的第 2 行則被加入 _reusableCells。
總結
至此你已經理解了 UITableView 的 Cell 復用原理,也具備了自行定制更複雜控件的基礎。