
自封裝 UICollectionView:刪除、拖曳移動與插入一次搞定
前言
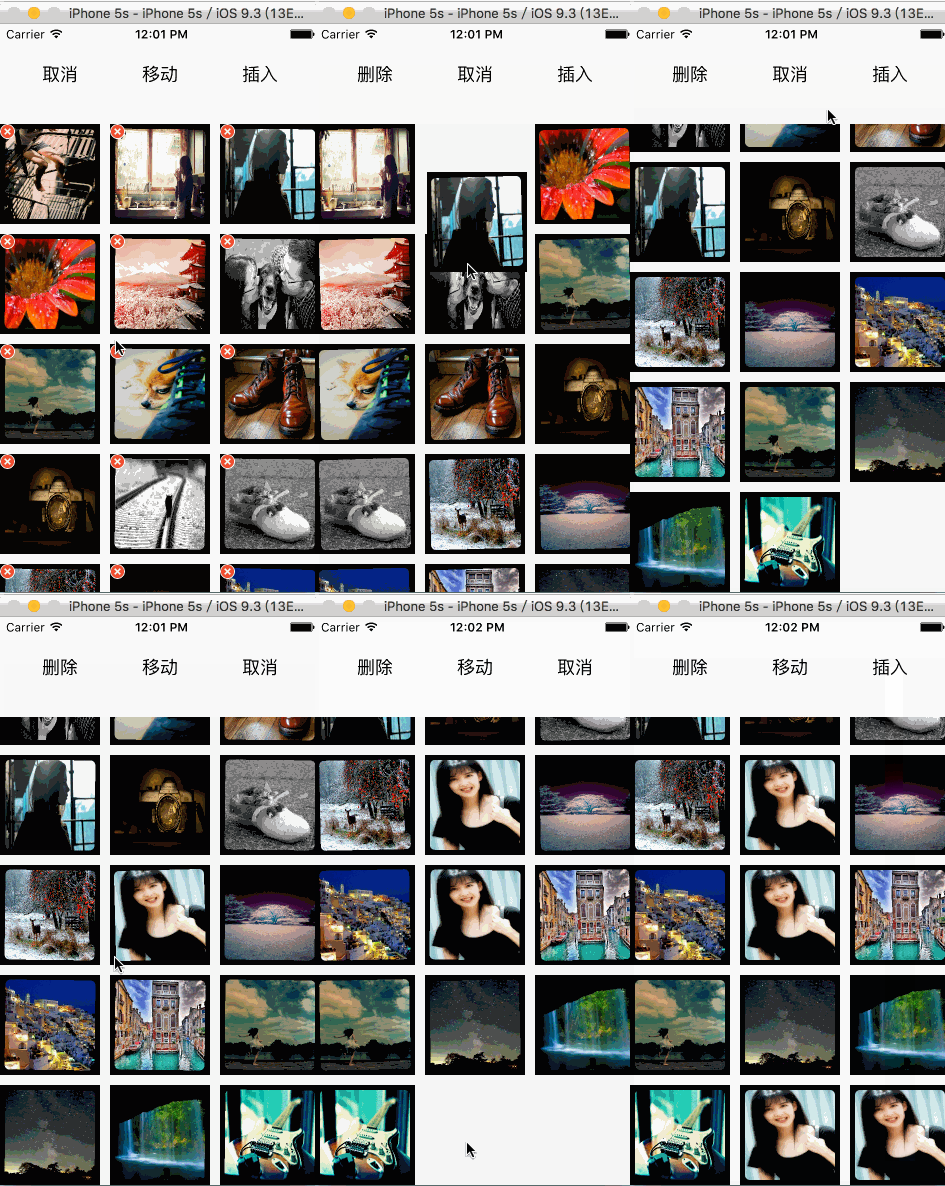
折騰了幾天,原本懶得寫,還是留下來給未來的自己備用。這次要做的是把一個 collectionView 完整封裝起來:使用時只要把它實例化、把資料源丟進去,就能直接進行刪除、移動與插入三種操作。先看效果:
設計思路
1、視圖層結構。這個自訂的 collectionView 本質上就是一個 UIView,內部放了一個鋪滿整個邊界的 UICollectionView,並且把 collectionView 的 delegate 指向外層的 UIView,方便集中處理手勢與事件。
2、用枚舉 + KVO 取代一堆介面。為了讓程式碼保持精簡,這裡用一個枚舉型別 methodType 表示當前要執行的操作,再透過 KVO 即時觀察 type 的變化。這樣就不必為每種操作各寫一堆方法,外部只要改 type 即可切換行為。
3、動畫是重點。加入了一些細節動畫,讓操作看起來更自然流暢。自訂的 FlowLayout 與 Cell 目前是空實作,若有客製需求直接改就好。
使用方式
實例化時把資料傳進來就完成了:
- (MDCollectionView *)collectionView{ if (!_collectionView) { _collectionView = [[MDCollectionView alloc]initWithFrame:CGRectMake(0, 100, SW, SH-100) DataSource:self.dataSource]; } return _collectionView; }具體實作
刪除
在自訂 cell 上加了一顆刪除按鈕,預設隱藏。當 type 切換為 MDDelete 時重新載入列表,並在 willDisplayCell 的時機把刪除按鈕顯示出來,同時讓圖示左右輕微搖晃,強化「現在處於編輯態」的心理暗示。
- (void)collectionView:(UICollectionView )collectionView willDisplayCell:(UICollectionViewCell )cell forItemAtIndexPath:(NSIndexPath )indexPath{ MDCollectionCell MDcell = (MDCollectionCell )cell; if (_isShake) { if (self.type == MDDelete) { MDcell.deleteBtn.hidden = NO; }else MDcell.deleteBtn.hidden = YES; CAKeyframeAnimation keyAnimation = [CAKeyframeAnimation animation]; keyAnimation.keyPath = @"transform.rotation"; keyAnimation.values = @[@(-0.03),@(0.03)]; keyAnimation.repeatCount = MAXFLOAT; keyAnimation.duration = 0.2f; [MDcell.image.layer addAnimation:keyAnimation forKey:@"keyAnimation"]; }else if (!_isShake){ [MDcell.image.layer removeAllAnimations]; MDcell.deleteBtn.hidden = YES; } }這裡有個關鍵細節:刪除時必須先移除資料源,再移除 Item,順序顛倒會直接讓 App 崩潰。
移動
iOS 9 之後移動變得非常簡單,系統已經提供了現成 API。要注意的是,我們為 collectionView 掛上了 panGesture 來驅動移動,第一步得根據手指落點找出被選中的 item,因此必須先判斷取到的 IndexPath 是否為 nil:
- (void)handleMethod:(UIPanGestureRecognizer )sender{ CGPoint location = [sender locationInView:self.collectionView]; NSIndexPath indexPath = [self.collectionView indexPathForItemAtPoint:location]; // location.x = if (self.type == MDMove) { if (indexPath) { switch (sender.state) { case UIGestureRecognizerStateBegan: [self.collectionView beginInteractiveMovementForItemAtIndexPath:indexPath]; break; case UIGestureRecognizerStateChanged: [self.collectionView updateInteractiveMovementTargetPosition:[sender locationInView:self.collectionView]]; break; default: break; } } if (sender.state == UIGestureRecognizerStateEnded) { [self.collectionView endInteractiveMovement]; } }另一個容易忽略的地方:移動時必須在 moveItem 方法裡同步調整好資料源的順序,否則畫面與資料就會對不上。
- (BOOL)collectionView:(UICollectionView )collectionView canMoveItemAtIndexPath:(NSIndexPath )indexPath{ return YES; } - (void)collectionView:(UICollectionView )collectionView moveItemAtIndexPath:(NSIndexPath )sourceIndexPath toIndexPath:(NSIndexPath *)destinationIndexPath{ id obj = [dataSource objectAtIndex:sourceIndexPath.row]; [dataSource removeObjectAtIndex:sourceIndexPath.row]; [dataSource insertObject:obj atIndex:destinationIndexPath.row]; }插入
這裡以插入一張女神周慧敏的照片作為示範,實務上替換成你要插入的內容即可。做法是先造一個臨時的 UIImageView 從畫面中央飛向目標位置,動畫結束後再寫入資料源並執行批次更新。
//以女神周慧敏照片做例子插入 else if (self.type == MDInsert){ if (!indexPath) { indexPath = [self getIndexPathWithPoint:location]; if (sender.state == UIGestureRecognizerStateBegan) { CGRect destinationFrame = [self.collectionView cellForItemAtIndexPath:indexPath].frame; if (indexPath.row == dataSource.count) { CGRect lastItemFrame = [self.collectionView cellForItemAtIndexPath:[NSIndexPath indexPathForItem:dataSource.count-1 inSection:0]].frame; destinationFrame = CGRectMake(lastItemFrame.origin.x+self.flowLayout.itemSize.width, lastItemFrame.origin.y, self.flowLayout.itemSize.width, self.flowLayout.itemSize.height); } UIImageView showImage = [[UIImageView alloc]initWithFrame:CGRectMake(SW/2-100, self.collectionView.contentOffset.y+SH/2 - 100, 200, 200)]; [showImage setImage:[UIImage imageNamed:@"vivian.jpg"]]; showImage.layer.cornerRadius = 5.0f; showImage.layer.masksToBounds = YES; [self.collectionView addSubview:showImage]; [UIView animateWithDuration:1 animations:^{ [showImage setFrame:destinationFrame]; }completion:^(BOOL finished) { [showImage removeFromSuperview]; [dataSource insertObject:@"vivian.jpg" atIndex:indexPath.row]; [self.collectionView performBatchUpdates:^{ [self.collectionView insertItemsAtIndexPaths:@[indexPath]]; } completion:nil]; } } } }插入與移動剛好相反:使用者點的是 Item 之外的空白處,尤其是最後一個 Item 後方的空白,這時就需要額外邏輯判斷到底該插到哪個位置:
//獲取按壓點該插入的IndexPath - (NSIndexPath )getIndexPathWithPoint:(CGPoint)point{ if(![self.collectionView indexPathForItemAtPoint:CGPointMake(point.x+self.flowLayout.itemSize.width, point.y)] && [self.collectionView indexPathForItemAtPoint:CGPointMake(point.x, point.y+self.flowLayout.itemSize.height)]){ return [self.collectionView indexPathForItemAtPoint:CGPointMake(point.x, point.y+self.flowLayout.itemSize.height)]; }else if (![self.collectionView indexPathForItemAtPoint:CGPointMake(point.x, point.y+self.flowLayout.itemSize.height)] && [self.collectionView indexPathForItemAtPoint:CGPointMake(point.x+self.flowLayout.itemSize.width, point.y)]){ return [self.collectionView indexPathForItemAtPoint:CGPointMake(point.x+self.flowLayout.itemSize.width, point.y)]; }else{ return [NSIndexPath indexPathForItem:dataSource.count inSection:self.collectionView.numberOfSections - 1]; } return nil; }總結
整體思路大致如此,細節請直接看源碼。由於 delegate 指向的是外層的 collectionView,點擊等事件需要自己寫一些代理方法往外拋,可依實際需求補上。
GitHub 部落格:源碼位址
- 上一篇文章: 中介者模式:用「主板思維」馴服物件之間的混亂交互
- 下一篇文章: 談談 iOS 的記憶體洩漏:從偵查到排查的完整思路