
UITableView 如何開啟「極簡模式」
一、如何從容應對需求多變的列表
以我負責的樓盤詳情頁為例:

產品會不時參考運維數據和競品,隨時要求調整模塊順序、增刪區塊、改動行高。如果用最直白的寫法:
- (UITableViewCell *)tableView:(UITableView *)tableView cellForRowAtIndexPath:(NSIndexPath *)indexPath {
    if (indexPath.row == 0) {
        // dosomething
    } else if (indexPath.row == 1) {
        // dosomething
    }
}

- (void)tableView:(UITableView *)tableView didSelectRowAtIndexPath:(NSIndexPath *)indexPath {
    if (indexPath.row == 0) {
        // didSelect
    } else if (indexPath.row == 1) {
        // didSelect
    }
}
那麼 heightForRow、editingStyle、willDisplay 等一系列方法都得跟著小心修正。想想就覺得不保險。要讓自己身心愉悅地快速響應需求,必須有一套通用模式。
遵循「一切皆對象」的思維,我的做法是不同模塊盡量用獨立 cell。比如下圖這塊,就拆成兩個 cell 實現——誰知道下一次需求會不會把「地址」和「最新開盤」分開。

另外,項目最好有一個 BaseTableViewCell:
@interface FDDBaseTableViewCell(ObjectType) : UITableViewCell
@property (nonatomic, weak) id(FDDBaseTableViewCellDelegate) fddDelegate;
@property (nonatomic, strong) ObjectType fddCellData;
+ (CGFloat)cellHeightWithCellData:(ObjectType)cellData;
- (void)setCellData:(ObjectType)fddCellData;
@end
隨著 MVVM 普及,我還引入一層 cellModel 來驅動 UITableView 對 cell 的構建:
@interface FDDBaseCellModel : NSObject
@property (nonatomic, strong) id cellData;      // cell 的數據源
@property (nonatomic, assign) Class cellClass;  // cell 的 Class
@property (nonatomic, weak)   id delegate;      // cell 的代理
@property (nonatomic, assign) CGFloat cellHeight; // 預先算好的高度
@property (nonatomic, strong) FDDBaseTableViewCell *staticCell; // 兼容靜態 cell

+ (instancetype)modelFromCellClass:(Class)cellClass
                        cellHeight:(CGFloat)cellHeight
                          cellData:(id)cellData;
- (instancetype)initWithCellClass:(Class)cellClass
                       cellHeight:(CGFloat)cellHeight
                         cellData:(id)cellData;
@end
整體思路如下:
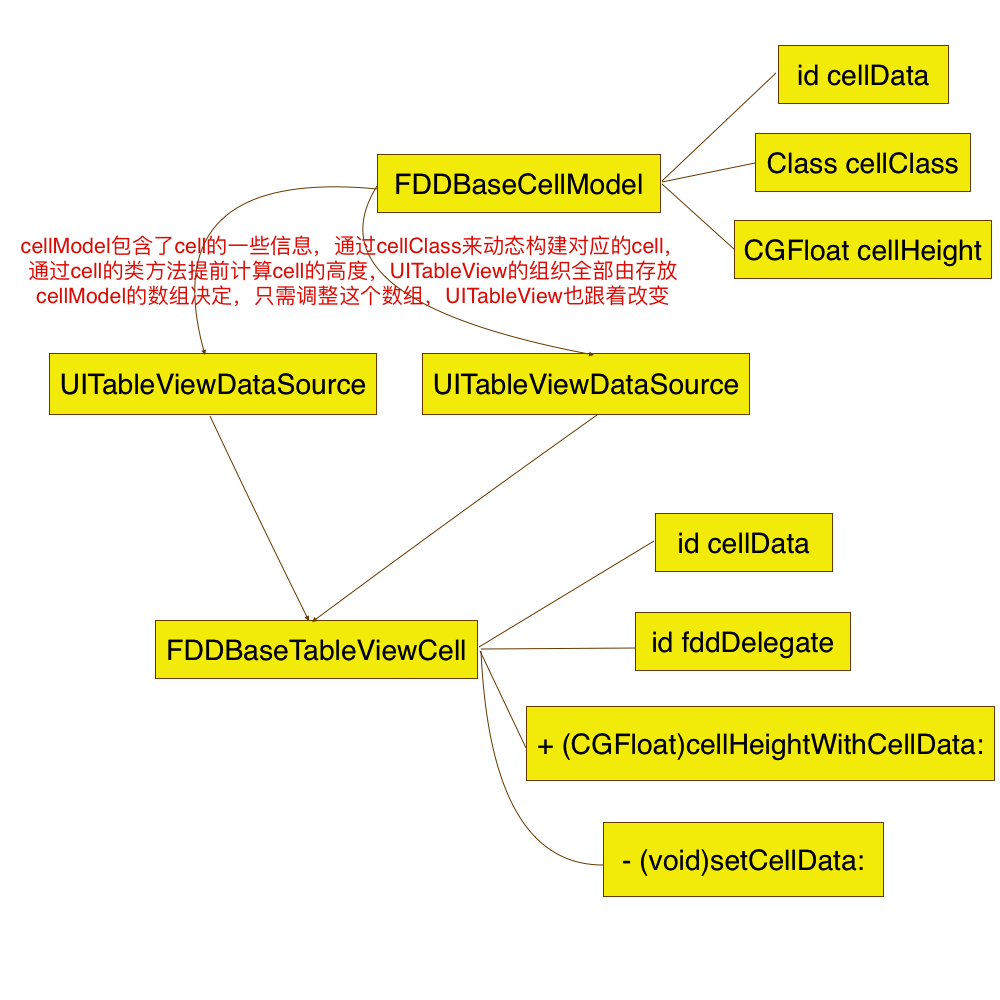
對應代碼:
- (void)disposeDataSources {
    NSArray *randomSources = @[@"Swift is now open source!", @"...", @"...", @"...", @"..."];
    for (int i = 0; i < 30; i++) {
        NSInteger randomIndex = arc4random() % 5;
        FDDBaseCellModel *cellModel = [FDDBaseCellModel modelFromCellClass:HDTableViewCell.class
                                                              cellHeight:[HDTableViewCell cellHeightWithCellData:randomSources[randomIndex]]
                                                                cellData:randomSources[randomIndex]];
        [self.dataArr addObject:cellModel];
    }
}

- (NSInteger)tableView:(UITableView *)tableView numberOfRowsInSection:(NSInteger)section {
    return self.dataArr.count;
}

- (UITableViewCell *)tableView:(UITableView *)tableView cellForRowAtIndexPath:(NSIndexPath *)indexPath {
    FDDBaseCellModel *cellModel = self.dataArr[indexPath.row];
    FDDBaseTableViewCell *cell = [tableView cellForIndexPath:indexPath cellClass:cellModel.cellClass];
    [cell setCellData:cellModel.cellData delegate:self];
    return cell;
}

- (void)tableView:(UITableView *)tableView didSelectRowAtIndexPath:(NSIndexPath *)indexPath {
    FDDBaseCellModel *cellModel = self.dataArr[indexPath.row];
    // dosomething
}
也就是說,無論有多少種類型、多少種排列組合的 cell,我們只需要關注數據源裡的 FDDBaseCellModel,而 UITableViewDataSource 的協議方法變得極其簡潔通用。
二、如何避免同一套 delegate / dataSource 代碼到處複製
更妙的發現是:實現一個列表的複雜度,完全取決於數據源;而所有含列表的 VC,其 delegate 與 dataSource 代碼完全一致。怎麼消掉這份重複?
方案 1:繼承
在 UIViewController 基類中實現通用方法,dataArr 也放在基類;子類遇到特殊情況重載對應方法即可。Objective-C 和 Swift 通用。
問題:
對不繼承基類的 VC 無能為力;
無法覆蓋 UIView 內部持有的 UITableView;
當 delegate / dataSource 不是當前 VC 時失效。
方案 2:中間轉換類 FDDTableViewConverter
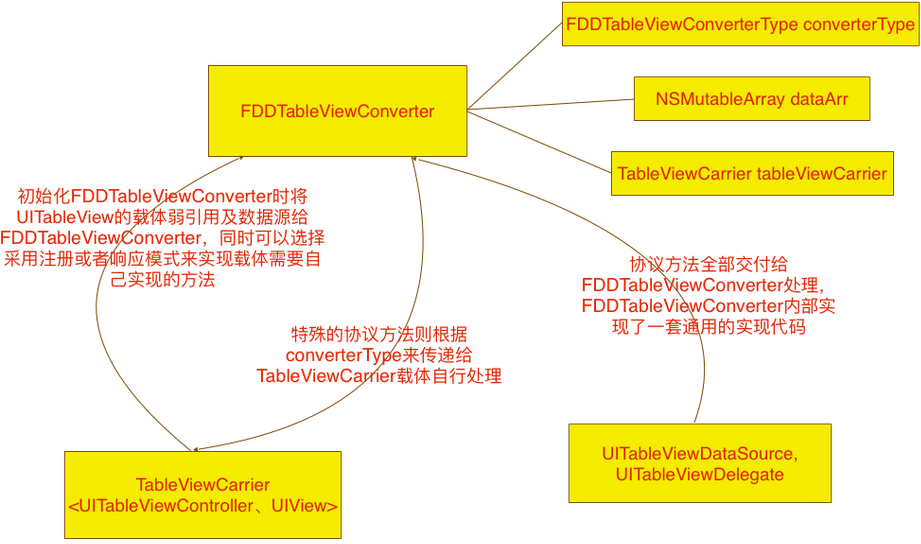
2.1 響應式實現。判斷列表的載體是否響應某個 delegate 方法,響應就調載體自己的實現,否則走默認邏輯。思路與繼承中的重載一致,但少了一層繼承依賴。缺點是 Swift 不可用(NSInvocation 已被廢棄,OC 可用 NSInvocation 繞過 performSelector 的入參限制);另外載體不再遵循協議,寫方法時沒有自動補全;轉換類需要把大部分 delegate / dataSource 方法寫全。
2.2 註冊式實現。思路接近 AOP 切片:哪裡註冊了某個方法,就在哪裡處理;沒註冊的一律走轉換類的默認實現。用 NSMutableDictionary 保存註冊的 SEL 與 resultBlock,block 的入參數組與 SEL 的入參一一對應,返回值再回交給轉換類。OC 和 Swift 通用,且 SEL 有代碼補全。
轉換類部分代碼:
typedef id (^resultBlock)(NSArray *results);

@interface FDDTableViewConverter(TableViewCarrier) : NSObject (UITableViewDataSource, UITableViewDelegate)
// 默認走註冊方式處理
@property (nonatomic, assign) FDDTableViewConverterType converterType;
// 僅 FDDTableViewConverter_Register 模式下會 block 回調
- (void)registerTableViewMethod:(SEL)selector handleParams:(resultBlock)block;
@end
載體 VC 部分代碼:
- (void)disposeTableViewConverter {
    _tableViewConverter = [[FDDTableViewConverter alloc] initWithTableViewCarrier:self daraSources:self.dataArr];
    UITableView *tableView = [[UITableView alloc] initWithFrame:self.view.bounds style:UITableViewStylePlain];
    tableView.delegate = _tableViewConverter;
    tableView.dataSource = _tableViewConverter;
    tableView.separatorStyle = UITableViewCellSeparatorStyleNone;
    [self.view addSubview:tableView];

    __weak typeof(self) weakSelf = self;
    [_tableViewConverter registerTableViewMethod:@selector(tableView:cellForRowAtIndexPath:)
                                    handleParams:^id(NSArray *results) {
        UITableView *tableView = results[0];
        NSIndexPath *indexPath = results[1];
        FDDBaseCellModel *cellModel = weakSelf.dataArr[indexPath.row];
        FDDBaseTableViewCell *cell = [tableView cellForIndexPath:indexPath cellClass:cellModel.cellClass];
        [cell setCellData:cellModel.cellData delegate:weakSelf];
        return cell;
    }];
}
從代碼整潔度和耦合度看,這是目前最可取的方案:誰註冊誰處理,特殊化邏輯就近表達,OC 與 Swift 通用。缺點只是轉換類要把 delegate / dataSource 方法寫得足夠全。
方案 3:Swift 的 Category(extension)
Swift 與 OC 的 Category 機制不同:OC 中同名方法 Category 優先,Swift 則不允許重複定義,因此引入了 override 關鍵字來表達「我要覆蓋通用實現」。
做法是在載體的 extension 中寫通用實現,需要特殊處理時用 override:
extension FDDBaseViewController: FDDBaseTableViewCellDelegate {
    @objc(tableView:numberOfRowsInSection:)
    func tableView(_ tableView: UITableView, numberOfRowsInSection section: Int) -> Int {
        return self.dataArr.count
    }

    @objc(tableView:cellForRowAtIndexPath:)
    func tableView(_ tableView: UITableView, cellForRowAt indexPath: IndexPath) -> UITableViewCell {
        let cellModel: FDDBaseCellModel = self.dataArr.object(at: indexPath.row) as! FDDBaseCellModel
        let cell: FDDBaseTableViewCell = tableView.cellForIndexPath(indexPath, cellClass: cellModel.cellClass)!
        cell.setCellData(cellModel.cellData, delegate: self)
        return cell
    }

    @objc(tableView:heightForRowAtIndexPath:)
    func tableView(_ tableView: UITableView, heightForRowAt indexPath: IndexPath) -> CGFloat {
        let cellModel: FDDBaseCellModel = self.dataArr.object(at: indexPath.row) as! FDDBaseCellModel
        return CGFloat(cellModel.cellHeight)
    }
}
需要特殊化時:
override internal func tableView(_ tableView: UITableView, numberOfRowsInSection section: Int) -> Int {
    return 10
}
代碼量極少,寫起來最爽,但 Objective-C 不可用。問題在於:引入這個 extension 後,項目中所有非通用的 delegate / dataSource 方法都得補上 override;而且不同載體要各自寫一份 extension,重複代碼又回來了。
三、小結
以上兩個問題是同事給我的,解決思路則很多來自另一位同事,很慶幸有這麼一次機會一起打磨代碼。相信還有更好的解法,如果你正好看到,歡迎不吝賜教。
代碼整潔之路很長,但只要需求理解到位、設計合理,未來實現一個列表也許只需要這樣:
@implementation ViewController

- (void)viewDidLoad {
    [super viewDidLoad];
    self.title = @"ViewController";
    [self disposeDataSources];
    [self disposeTableViewConverter];
}

- (void)disposeDataSources {
    NSArray *randomSources = @[@"...", @"...", @"...", @"...", @"..."];
    for (int i = 0; i < 30; i++) {
        NSInteger randomIndex = arc4random() % 5;
        FDDBaseCellModel *cellModel = [FDDBaseCellModel modelFromCellClass:HDTableViewCell.class
                                                              cellHeight:[HDTableViewCell cellHeightWithCellData:randomSources[randomIndex]]
                                                                cellData:randomSources[randomIndex]];
        [self.dataArr addObject:cellModel];
    }
}

- (void)disposeTableViewConverter {
    _tableViewConverter = [[FDDTableViewConverter alloc] initWithTableViewCarrier:self daraSources:self.dataArr];
    UITableView *tableView = [[UITableView alloc] initWithFrame:self.view.bounds style:UITableViewStylePlain];
    tableView.delegate = _tableViewConverter;
    tableView.dataSource = _tableViewConverter;
    tableView.separatorStyle = UITableViewCellSeparatorStyleNone;
    [self.view addSubview:tableView];
}
@end
感興趣的可以不支持,OC 與 Swift 兩版源碼都已開源,歡迎 star。
- 上一篇文章: 如何接手一個沒有文檔的老舊 iOS 項目
- 下一篇文章: 不用任何第三方庫,自己寫一個 RTMP 直播推流器