
iOS UI 入門練習:根據 URL 顯示並下載圖片到沙盒
編輯:iOS 程式設計技術
這是一個很適合新手的綜合小練習,一口氣把 Button、TextField、UIImageView、NSURL、NSData 與文件操作串了起來。
需求描述
編寫如下界面,實現三件事:
- 在輸入框中貼上一個圖片網址,點擊「顯示圖片」,圖片加載到 UIImageView 中;
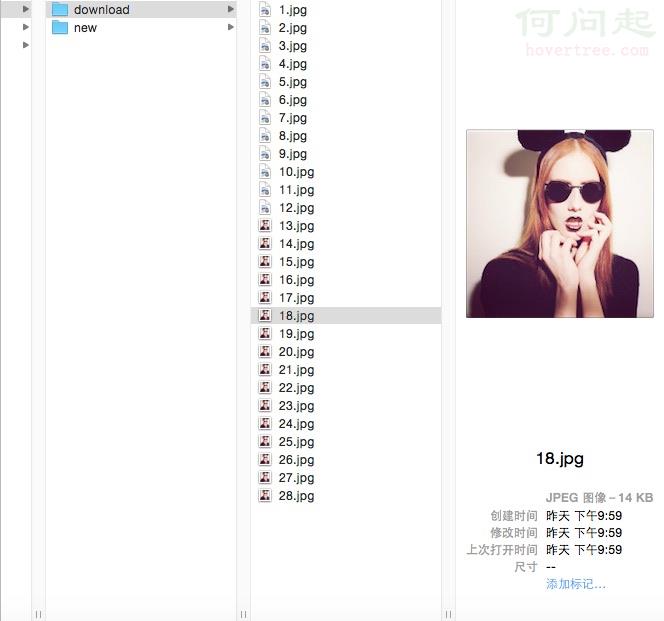
- 點擊「下載圖片」,把當前這張圖保存到 App 沙盒 Documents 目錄下的 download 文件夾中,並按序號命名;
- 輸入框編輯完成後,點擊界面其他位置,鍵盤自動收起。
一、準備工作:允許 HTTP 請求
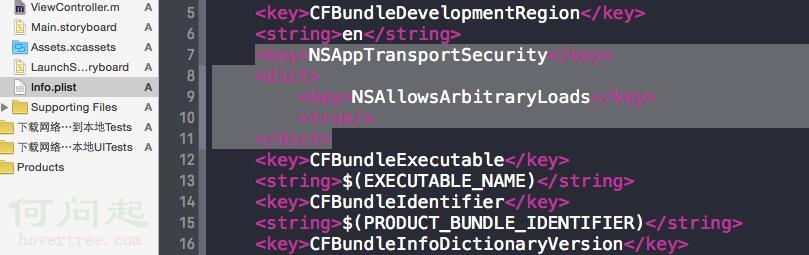
由於要訪問的 URL 有可能是 http 而非 https,需要在 Info.plist 中加入 App Transport Security 例外配置:
<key>NSAppTransportSecurity</key>
<dict>
    <key>NSAllowsArbitraryLoads</key>
    <true/>
</dict>
添加之後的 Info.plist 結構如下:
二、完整代碼
本示例把所有代碼都寫在 UIViewController 的 .m 文件中:
#import "ViewController.h"

@interface ViewController (){
    // 定義全局變量
    UIButton *btnDownLoad;
    UIButton *btndisplay;
    UIImageView *imageView;
    UITextField *textFieldinputUrl;
    NSData *imagedata;
    NSString *newpath;
    int count;
}
@end

@implementation ViewController

- (void)viewDidLoad {
    [super viewDidLoad];

    // ===== 顯示圖片按鈕 =====
    // 初始化為圓角矩形按鈕
    btndisplay = [UIButton buttonWithType:UIButtonTypeRoundedRect];
    // 設置按鈕的位置與大小
    btndisplay.frame = CGRectMake(100, 660, 100, 50);
    // 設置按鈕背景色
    btndisplay.backgroundColor = [UIColor colorWithRed:0.512 green:0.562 blue:0.943 alpha:1.000];
    // 設置按鈕文本顏色與內容
    [btndisplay setTitleColor:[UIColor blackColor] forState:UIControlStateNormal];
    [btndisplay setTitle:@"顯示圖片" forState:UIControlStateNormal];
    // 添加顯示圖片事件
    [btndisplay addTarget:self action:@selector(display:) forControlEvents:UIControlEventTouchUpInside];
    [self.view addSubview:btndisplay];

    // ===== 下載圖片按鈕 =====
    btnDownLoad = [[UIButton alloc] initWithFrame:CGRectMake(218, 660, 100, 50)];
    btnDownLoad.backgroundColor = [UIColor colorWithRed:0.512 green:0.562 blue:0.943 alpha:1.000];
    [btnDownLoad setTitleColor:[UIColor blackColor] forState:UIControlStateNormal];
    [btnDownLoad setTitle:@"下載圖片" forState:UIControlStateNormal];
    [btnDownLoad addTarget:self action:@selector(download:) forControlEvents:UIControlEventTouchUpInside];
    [self.view addSubview:btnDownLoad];

    // ===== URL 輸入框 =====
    textFieldinputUrl = [[UITextField alloc] initWithFrame:CGRectMake(20, 590, 378, 50)];
    textFieldinputUrl.backgroundColor = [UIColor colorWithRed:0.653 green:1.000 blue:0.919 alpha:1.000];
    // 設置輸入前的提示水印
    textFieldinputUrl.placeholder = @"請輸入圖片地址";
    // 設置清除按鈕始終可見
    textFieldinputUrl.clearButtonMode = UITextFieldViewModeAlways;
    [self.view addSubview:textFieldinputUrl];

    // ===== 圖片控件 =====
    imageView = [[UIImageView alloc] initWithFrame:CGRectMake(0, 20, 418, 550)];
    imageView.backgroundColor = [UIColor grayColor];
    [self.view addSubview:imageView];

    // ===== 準備沙盒目錄 =====
    // 獲取沙盒中 Documents 的路徑
    NSString *dictpath = [NSString stringWithFormat:@"%@/Documents", NSHomeDirectory()];
    // 拼接出 download 文件夾路徑
    newpath = [NSString stringWithFormat:@"%@/download", dictpath];
    // 在 Documents 中創建 download 文件夾
    [[NSFileManager defaultManager] createDirectoryAtPath:newpath
                             withIntermediateDirectories:YES
                                              attributes:nil
                                                   error:nil];
    NSLog(@"%@", dictpath);
}

// 顯示圖片
-(void)display:(id)sender{
    // 把文本框輸入的URL轉換成數據
    NSURL *imageurl = [NSURL URLWithString:textFieldinputUrl.text];
    imagedata = [NSData dataWithContentsOfURL:imageurl];
    // 把數據轉換成圖片
    UIImage *image = [UIImage imageWithData:imagedata];
    // 顯示到UIImageView上
    imageView.image = image;
}

// 下載圖片
-(void)download:(id)sender{
    count++;
    // 在路徑下新建圖片文件
    NSString *newfilepath = [NSString stringWithFormat:@"%@/%d.jpg", newpath, count];
    // 把圖片數據寫入新建好的文件
    [[NSFileManager defaultManager] createFileAtPath:newfilepath contents:imagedata attributes:nil];
}

// 輸入結束後讓鍵盤收起
-(void)touchesBegan:(NSSet<UITouch *> *)touches withEvent:(UIEvent *)event{
    [textFieldinputUrl resignFirstResponder];
}

- (void)didReceiveMemoryWarning {
    [super didReceiveMemoryWarning];
}
@end
輸入 URL 並點擊「顯示圖片」後的效果:

點擊「下載圖片」後,在 App 沙盒路徑下可以看到文件:
三、兩個關鍵細節
1. 點擊空白處收起鍵盤
實現方式是重寫 touchesBegan:withEvent:,讓輸入框放棄第一響應者身份:
//輸入結束後讓鍵盤收起
-(void)touchesBegan:(NSSet<UITouch *> *)touches withEvent:(UIEvent *)event{
    [textFieldinputUrl resignFirstResponder];
}
2. 下載圖片時自動命名
定義一個全局計數變量,每點擊一次下載按鈕就自增,用它來拼出文件名,這樣可以保證永不重名:
//下載圖片
-(void)download:(id)sender{
    count++;
    // 在路徑下新建圖片文件
    NSString *newfilepath = [NSString stringWithFormat:@"%@/%d.jpg", newpath, count];
    // 把圖片數據保存在路徑下新建好的文件中
    [[NSFileManager defaultManager] createFileAtPath:newfilepath contents:imagedata attributes:nil];
}
四、可以進一步優化的地方
這個例子重在打通流程,真實項目中還有幾點值得改進:dataWithContentsOfURL: 是同步阻塞的,會卡住主線程,應改用 NSURLSession 異步下載;下載前應先對 URL 做非空與格式校驗;寫入文件後建議判斷返回值並做錯誤提示。