
iOS 四種資料持久化方式整理:NSUserDefaults、歸檔、檔案與 FMDB
剛入行時對資料持久化沒什麼概念,尤其是用資料庫存大量資料這塊。摸索一陣後整理成這份筆記,方便日後查閱。
一、NSUserDefaults
最常用來存輕量的設定資料,例如帳號、偏好選項。適合用於少量、結構簡單的本地資料。
支援的型別:NSNumber(Integer/Float/Double)、NSString、NSDate、NSArray、NSDictionary、BOOL。
// 準備測試資料
NSArray *myArray = [NSArray arrayWithObjects:@"hello", @"world", nil];
NSDictionary *myDict = [NSDictionary dictionaryWithObjectsAndKeys:
                        @"enuo", @"name", @"20", @"age", nil];

// 寫入
[[NSUserDefaults standardUserDefaults] setObject:myArray forKey:@"arry"];
[[NSUserDefaults standardUserDefaults] setObject:myDict forKey:@"dict"];
// 建議同步落盤(非強制)
[[NSUserDefaults standardUserDefaults] synchronize];

// 讀取
NSArray *arr = [[NSUserDefaults standardUserDefaults] objectForKey:@"arry"];
NSDictionary *dict = [[NSUserDefaults standardUserDefaults] objectForKey:@"dict"];
NSLog(@"%@ - %@", arr, dict);

// 刪除
[[NSUserDefaults standardUserDefaults] removeObjectForKey:@"keyName"];
實務建議:把 [NSUserDefaults standardUserDefaults] 定義成全域巨集,使用起來清爽很多。
二、歸檔(NSCoding)
目的在於長期保存有結構的物件資料。
(1)基本寫法:單一行物件
// 歸檔
NSArray *array = [NSArray arrayWithObjects:@1, @2, @3, nil];
NSString *filePath = [NSHomeDirectory() stringByAppendingString:@"testFile.plist"];
BOOL success = [NSKeyedArchiver archiveRootObject:array toFile:filePath];
NSLog(@"%d - %@", success, filePath);

// 反歸檔
id outArray = [NSKeyedUnarchiver unarchiveObjectWithFile:filePath];
NSLog(@"%@", outArray);
(2)多個物件歸檔成單一檔案
// 歸檔
NSMutableArray *archiverArray =
    [NSMutableArray arrayWithObjects:@"A", @"B", @"C", nil];
NSMutableData *data = [NSMutableData data];
NSKeyedArchiver *archiver =
    [[NSKeyedArchiver alloc] initForWritingWithMutableData:data];

[archiver encodeObject:archiverArray forKey:@"array"];
[archiver encodeObject:@"friends" forKey:@"name"];
// 完成編碼後,資料已寫入 data
[archiver finishEncoding];

NSString *path2 = [NSHomeDirectory() stringByAppendingPathComponent:@"arraytwo.plist"];
BOOL ok = [data writeToFile:path2 atomically:YES];

// 反歸檔
NSData *readData = [[NSData alloc] initWithContentsOfFile:path2];
NSKeyedUnarchiver *unarchiver =
    [[NSKeyedUnarchiver alloc] initForReadingWithData:readData];
NSArray *outArray = [unarchiver decodeObjectForKey:@"array"];
NSString *outName = [unarchiver decodeObjectForKey:@"name"];
(3)自訂物件歸檔(實務上最常用)
自訂類別要能被歸檔,必須遵循 NSCoding 協議並實作兩個方法。
// Person.h
#import <Foundation/Foundation.h>

@interface Person : NSObject <NSCoding>
@property (nonatomic, strong) NSString *name;
@property (nonatomic, assign) NSInteger age;
@property (nonatomic, strong) NSString *gender;
@end
// Person.m
// encodeWithCoder: 告訴系統如何編碼
- (void)encodeWithCoder:(NSCoder *)aCoder {
    [aCoder encodeObject:self.name forKey:@"name"];
    [aCoder encodeInteger:self.age forKey:@"age"];
    [aCoder encodeObject:self.gender forKey:@"gender"];
}

// initWithCoder: 告訴系統如何解碼
- (instancetype)initWithCoder:(NSCoder *)aDecoder {
    self = [super init];
    if (self) {
        _name = [aDecoder decodeObjectForKey:@"name"];
        _age = [aDecoder decodeIntegerForKey:@"age"];
        _gender = [aDecoder decodeObjectForKey:@"gender"];
    }
    return self;
}
使用時:
Person *person = [Person new];
person.name = @"rose";
person.age = 25;
person.gender = @"female";

NSString *path3 = [NSHomeDirectory() stringByAppendingString:@"person.plist"];
BOOL ok3 = [NSKeyedArchiver archiveRootObject:person toFile:path3];

Person *out = [NSKeyedUnarchiver unarchiveObjectWithFile:path3];
NSLog(@"%@", out);
三、寫入檔案
基本三步:取得路徑 → 組出檔名 → 寫入資料。
// 1. 取得文件目錄路徑
NSArray *paths = NSSearchPathForDirectoriesInDomains(NSDocumentDirectory, NSUserDomainMask, YES);
NSString *dir = paths.firstObject;

// 2. 組出完整檔名
NSString *fileName = [dir stringByAppendingPathComponent:@"file"];

// 3. 寫入
NSData *data = ...;
[data writeToFile:fileName atomically:YES];

// 讀出
NSData *outData = [NSData dataWithContentsOfFile:fileName];
幾個常見型別的具體寫法:
#pragma mark - 字串
NSString *strPath = [dir stringByAppendingPathComponent:@"str.text"];
NSString *inStr = @"寫入檔案的字串";
[inStr writeToFile:strPath atomically:YES encoding:NSUTF8StringEncoding error:nil];

NSString *outStr = [[NSString alloc] initWithContentsOfFile:strPath
                                                  encoding:NSUTF8StringEncoding
                                                     error:nil];

#pragma mark - 陣列(會產生 plist)
NSString *arrPath = [dir stringByAppendingPathComponent:@"arry.plist"];
NSArray *inArr = @[@"a", @"b", @"c"];
[inArr writeToFile:arrPath atomically:YES];

NSArray *outArr = [NSArray arrayWithContentsOfFile:arrPath];

#pragma mark - 字典(會產生 plist)
NSString *dictPath = [dir stringByAppendingPathComponent:@"dict.plist"];
NSDictionary *inDict = @{@"name": @"liuwenqiang", @"age": @"25", @"job": @"ios"};
[inDict writeToFile:dictPath atomically:YES];

NSDictionary *outDict = [[NSDictionary alloc] initWithContentsOfFile:dictPath];

#pragma mark - 二進位資料
NSString *dataPath = [dir stringByAppendingPathComponent:@"image.jpg"];
UIImage *image = [UIImage imageNamed:@"image"];
NSData *imageData = UIImageJPEGRepresentation(image, 1);
[imageData writeToFile:dataPath atomically:YES];

NSData *outData2 = [[NSData alloc] initWithContentsOfFile:dataPath];
四、資料庫(FMDB)
資料量一大(例如列表頁、甚至列表裡還有縮圖),前面幾種方式就撐不住了,該上資料庫。專案裡我用的是 FMDB,順手程度不錯。
(1)建庫與建表
@implementation FmdbTool {
    FMDatabase *db;
}

- (NSString *)createTableWithType:(NSString *)type {
    NSString *result = @"no";

    // 1. 取得資料庫路徑
    NSString *docPath = NSSearchPathForDirectoriesInDomains(
        NSDocumentDirectory, NSUserDomainMask, YES).firstObject;
    NSString *filePath = [docPath stringByAppendingPathComponent:@"doctor.sqlite"];

    // 2. 取得 db 物件
    db = [FMDatabase databaseWithPath:filePath];

    // 3. 開啟後才能操作
    if ([db open]) {
        BOOL ok = [db executeUpdate:@"CREATE TABLE IF NOT EXISTS t_doctor ("
                    "id integer PRIMARY KEY AUTOINCREMENT,"
                    "doctordict blob NOT NULL,"
                    "page_ID integer NOT NULL,"
                    "datacount text NOT NULL)"];
        result = ok ? @"yes" : @"no";
    }
    return result;
}
由於專案裡有多個列表需要持久化,我在方法上加了 type 參數,為每個頁面各建一張表,全部放進同一個 doctor.sqlite。建表前務必先 [db open],回傳值為 BOOL,為真才繼續。
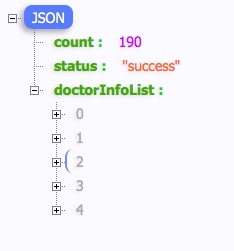
欄位說明:doctordict 存的是後端回傳的列表 JSON(對應 doctorInfoList 欄位),型別為 blob 且不可為空,故加上 NOT NULL;列表有分頁請求,因此把頁碼存為 page_ID;datacount 則是總頁數。
(2)插入資料
- (void)addData:(NSArray *)list
           page:(NSInteger)page
      dataCount:(NSString *)count
           type:(NSString *)type {
    if ([db open]) {
        NSString *pageStr = [NSString stringWithFormat:@"%ld", (long)page];

        NSData *jsonData = [NSJSONSerialization dataWithJSONObject:list
                                                          options:NSJSONWritingPrettyPrinted
                                                            error:nil];
        NSString *jsonStr = [[NSString alloc] initWithData:jsonData
                                                 encoding:NSUTF8StringEncoding];

        [db executeUpdate:@"INSERT INTO t_doctor (doctordict, page_ID, datacount) "
                          "VALUES (?,?,?)", jsonStr, pageStr, count];
    }
}
這樣就能把 responseObject[@"doctorInfoList"] 直接寫進表裡。插入前需先把陣列轉成 JSON 字串,這裡用 NSJSONSerialization 即可(若專案已引入 JSONKit,也可沿用其 objectFromJSONString)。使用 ? 佔位參數而非字串拼接,可以避免引號與特殊字元造成的 SQL 問題。
(3)讀取資料
- (NSArray *)outData:(NSString *)type {
    NSMutableArray *result = [NSMutableArray array];

    if ([db open]) {
        FMResultSet *set = [db executeQuery:@"SELECT * FROM t_doctor"];
        while (set.next) {
            NSString *jsonStr = [set stringForColumn:@"doctordict"];
            NSArray *items = [jsonStr objectFromJSONString];
            [result addObjectsFromArray:items];
        }
    }
    [db close];
    return result;
}

// 讀取目前頁碼
- (NSString *)currentPage:(NSString *)type {
    NSString *page = nil;

    if ([db open]) {
        FMResultSet *set = [db executeQuery:@"SELECT page FROM t_doctor LIMIT 1"];
        while (set.next) {
            page = [set stringForColumn:@"page"];
        }
    }
    [db close];
    return page;
}
(4)刪除資料
- (void)deleteData:(NSString *)type {
    if ([db open]) {
        [db executeUpdate:@"DELETE FROM t_doctor"];
        [db close];
    }
}
這裡只清特定表的資料,不刪整個庫,因為所有表都共用同一個 sqlite 檔。
以上是目前整理的部分,若有寫錯的地方歡迎指正。