
TabBarController 與 NavigationController 的組合:模擬微信的視圖架構
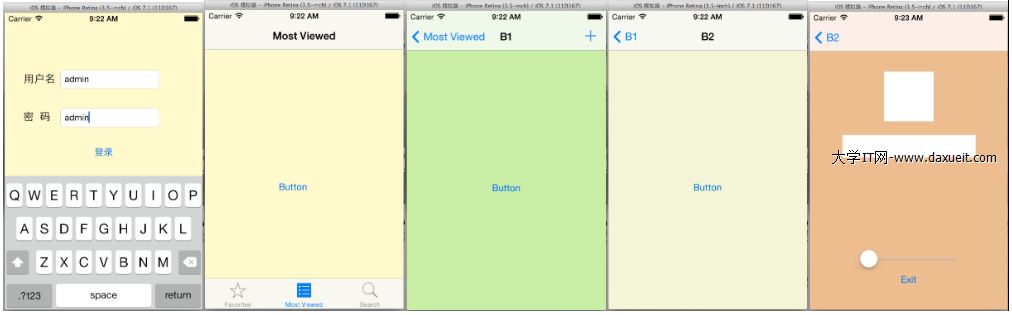
大家都用過微信。它底部有三個分頁,每個分頁各自有自己的導覽堆疊,點進去之後還能再往下鑽。這種結構在 iOS 中是由 UITabBarController 與 UINavigationController 組合而成的。本文用 storyboard 搭配程式碼,把這套架構實作一次。
整體視圖關係
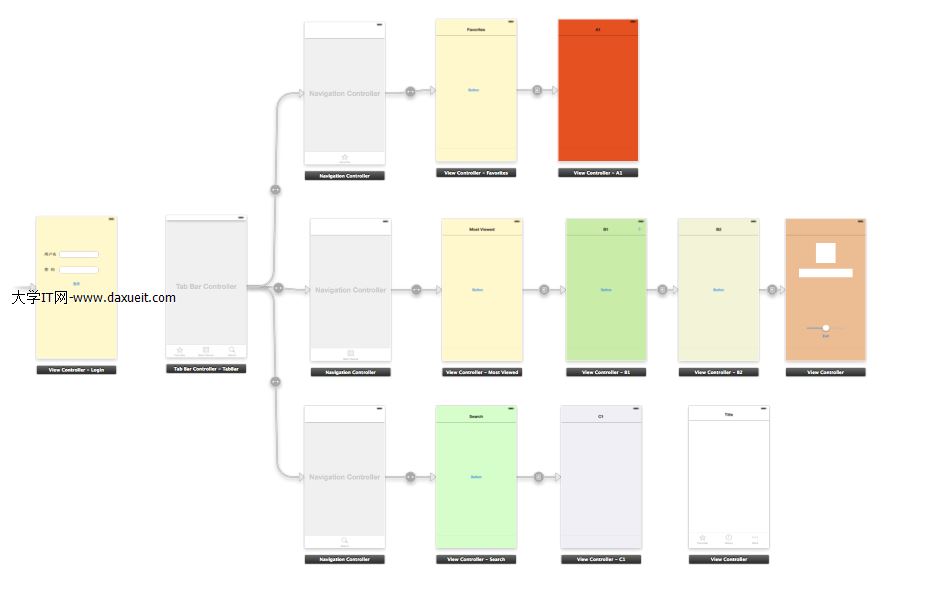
結構說明:
- 打開 App 時先出現登入頁,登入成功後跳轉到 Tab Bar Controller。
- Tab Bar Controller 底下掛著三個 Navigation Controller,點擊不同 item 會切換到不同的導覽控制器。
- 每個 Navigation Controller 各自管理一批 ViewController,彼此之間透過 push/pop 切換。
「工欲善其事,必先利其器」——本節主要用 storyboard 搭建專案骨架,必要處再以程式碼實作細節。iOS 中多視圖切換大致有三種模式:UITabBarController、UINavigationController 與模態(modal)呈現。以下結合一個實際效果說明。
一、登入頁的跳轉
登入頁在 storyboard 中與其他頁面沒有關聯,需要用業務邏輯(這裡用模態呈現)觸發跳轉。核心程式碼如下:
NSString *userName = self.userName.text;
NSString *password = self.password.text;

// 模擬登入
if ([userName isEqual:password] == YES
    && ![userName isEqual:@""]
    && ![password isEqual:@""]) {

    UIStoryboard *storyboard = [UIStoryboard storyboardWithName:@"Main"
                                                        bundle:[NSBundle mainBundle]];

    // 由 storyboard ID 取得 TabBarViewController
    UIViewController *myTabBarController =
        [storyboard instantiateViewControllerWithIdentifier:@"myTabBarController"];

    // 跳轉到 TabBarViewController
    [self presentViewController:myTabBarController animated:YES completion:^{}];
}
二、把 storyboard 中的視圖關聯到自己的類別
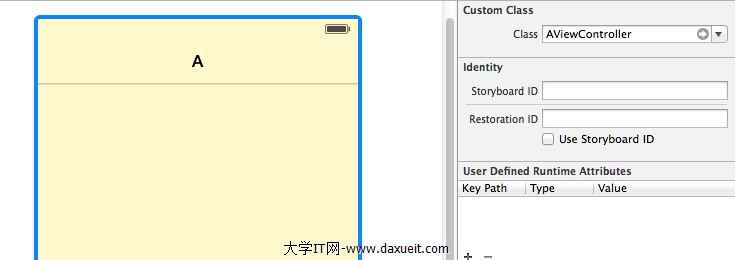
這一步在 storyboard 中很簡單:選取要關聯的視圖控制器,在 Identity Inspector 的 Class 欄位選上你建立的視圖控制器類別即可。關聯之後就能在該類別中實作業務邏輯:
三、NavigationBar 與 BarButtonItem
用 Navigation 進行的頁面切換,本質是堆疊的入棧與出棧。要特別注意一個觀念:一個 NavigationController 只有一個 NavigationBar,而它底下每個 ViewController 各自擁有屬於自己的 NavigationBarItem。這就是為什麼切換頁面時,標題與左右按鈕會跟著改變——換的是 item,不是 bar。
用 storyboard 設定
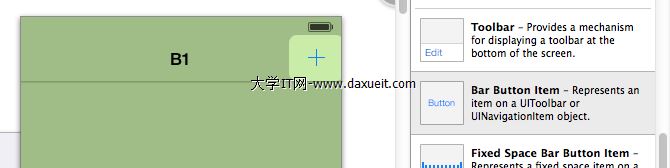
直接從物件庫拖曳 Bar Button Item 到 Navigation Bar 上,再在屬性面板調整即可:
用程式碼設定
// 建立 BarButtonItem,同時指定樣式與回呼
UIBarButtonItem *item1 = [[UIBarButtonItem alloc]
    initWithBarButtonSystemItem:UIBarButtonSystemItemAdd
                         target:self
                         action:@selector(tapBarButton)];

UIBarButtonItem *item2 = [[UIBarButtonItem alloc]
    initWithBarButtonSystemItem:UIBarButtonSystemItemCamera
                         target:self
                         action:@selector(tapBarButton)];

// 右側放一個按鈕
self.navigationItem.rightBarButtonItem = item1;
// 右側放兩個按鈕
self.navigationItem.rightBarButtonItems = @[item1, item2];
// 左側放一個按鈕
self.navigationItem.leftBarButtonItem = item1;
// 左側放兩個按鈕
self.navigationItem.leftBarButtonItems = @[item1, item2];
設定標題與自訂 titleView
// 設定標題文字
self.navigationItem.title = @"END";

// 用 ImageView 作為 titleView
UIImageView *imageView = [[UIImageView alloc] initWithFrame:CGRectMake(0, 0, 100, 30)];
imageView.image = [UIImage imageNamed:@"topView.png"];
self.navigationItem.titleView = imageView;
titleView 可以指定任何 view,除了 UIImageView,也常用 UIButton 或自製的搜尋列。
四、隱藏底部的 Tab Bar
頁面深入之後,底部的 Tab Bar 會佔掉可視空間。在 storyboard 中把 Hide Bottom Bar on Push 勾選起來,push 到該頁時 Tab Bar 就會自動隱藏:
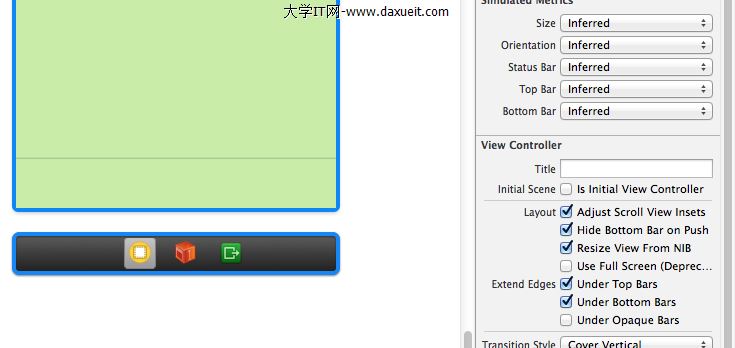
對應的程式碼寫法是 self.hidesBottomBarWhenPushed = YES;,且必須在該控制器被 push 之前設定,通常放在 viewDidLoad 中即可。
五、退出登入
登出就是關掉目前以模態呈現的 TabBarController:
- (IBAction)tapExit:(id)sender
{
    [self dismissViewControllerAnimated:YES completion:^{}];
}
總結與幾點提醒
上面這些沒有太高深的技術,主要是 storyboard 的拉線與少量程式碼。把各個 ViewController 關聯好、綁上實體類別之後,就能專心實作每個畫面的業務邏輯。資料展示環節通常會大量用到 TableView,那部分留待後續文章詳述。
幾個實務上值得注意的點:
登入判斷不該寫成「帳號等於密碼」。 範例為了簡化才這麼寫,正式專案必須向後端驗證,並依前述文章的方式保存 token 而非密碼。
模態呈現 TabBarController 要注意返回動畫。 用 dismissViewControllerAnimated: 關閉時,記得確認是誰在呼叫——通常應由「被呈現的那個控制器」呼叫,否則動畫會怪怪的。
StoryBoard ID 建議統一管理。 把 @"myTabBarController" 這種字串抽成常數,能避免拼錯字時在執行期才發現(storyboard ID 寫錯不會編譯報錯,只會回傳 nil)。
現代專案的首選架構。 若頁面層級較深或需要更靈活的導覽,可考慮 UITabBarController 搭配 UINavigationController 之外的方案;而在 iOS 13 以後,UITabBar 有了新的呈現樣式,UISplitViewController 在 iPad 上也值得評估。
- 上一篇文章: 一鍵收起鍵盤:遞迴版通用程式碼
- 下一篇文章: iOS 中 double 型別數值不穩定的成因與解法