
用 CocoaPods 整合 PPRevealSideViewController 實作側滑抽屜
側滑抽屜(又稱漢堡選單、側邊欄)是 iOS 裡非常常見的導覽模式。若要自己從零實作 gesture 判斷與視圖堆疊,工作量並不小,因此實務上多半會採用成熟的第三方元件。PPRevealSideViewController 就是其中頗受歡迎的一個。本文示範如何用 CocoaPods 引入它,並以程式碼搭配 storyboard 完成一套可運作的抽屜導覽。
一、用 CocoaPods 引入元件
先在終端查詢可用的版本:
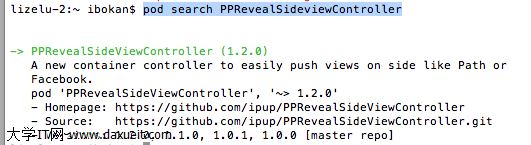
接著在專案的 Podfile 中加入對應的版本庫:

存檔後執行:
pod install
二、為專案補上 pch 檔
因為使用的是 Xcode 6,預設不會產生 pch(prefix header)檔。如果希望把第三方元件放在 pch 中全域引入,就得手動建立。
確認目前專案確實沒有 pch:

建立 pch 檔:
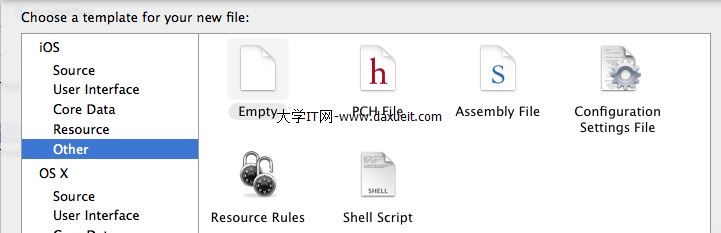

完成後要進行設定。依序找到 Targets → Build Settings → Apple LLVM 6.0 - Language:

在 Prefix Header 欄位的 Debug 與 Release 兩處,都填入 $(SRCROOT)/專案名稱/pch檔名.pch:

三、以 PPRevealSideViewController 實作抽屜
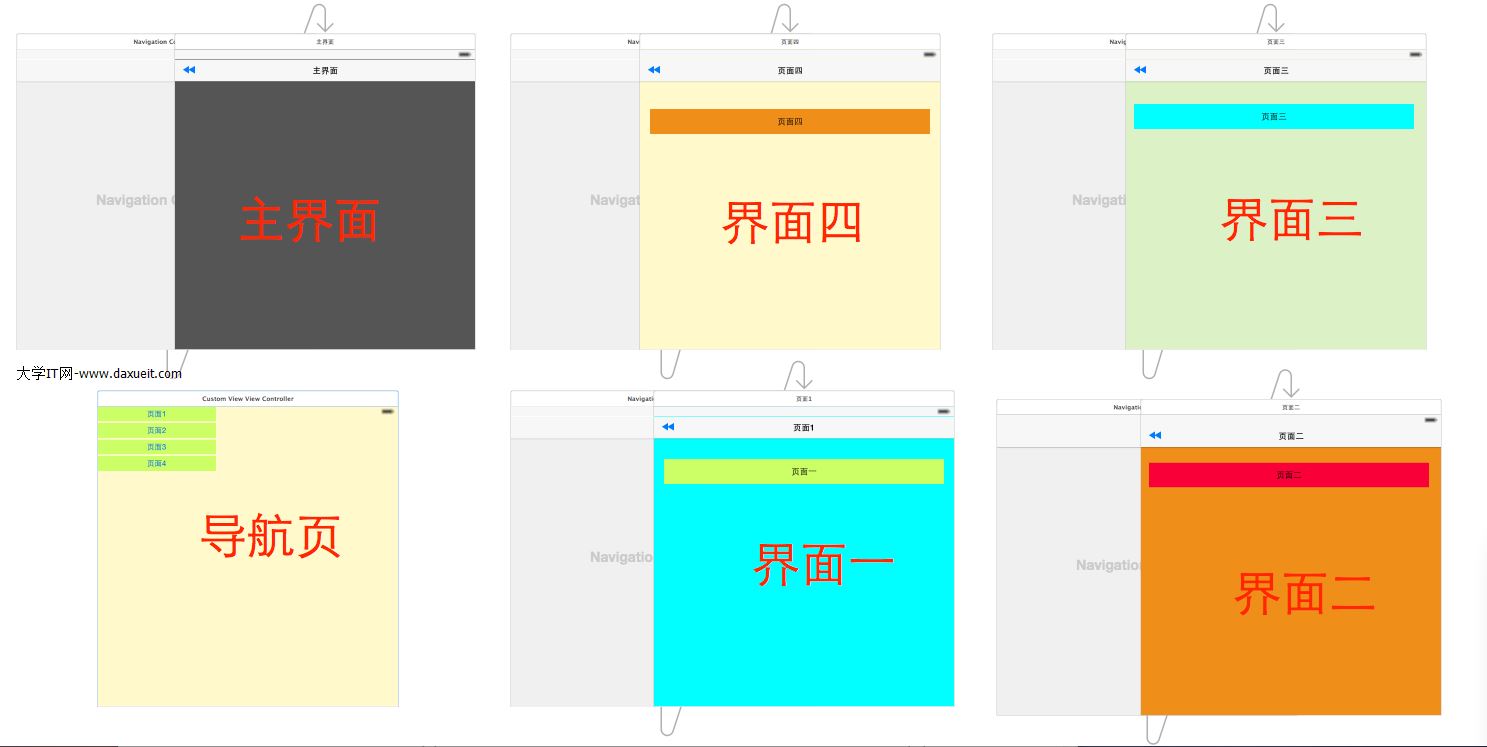
在 pch 中引入元件後,就可以開始使用。整體流程是:主畫面上的按鈕以抽屜形式推出導覽頁,導覽頁再切換到各個功能頁,各功能頁也能隨時回到主畫面。
先在 storyboard 中把需要用到的視圖控制器擺好:
1. 在 AppDelegate 中建立抽屜容器
PPRevealSideViewController 的設計是「以一個根視圖控制器為中心」,因此我們把主頁面的導覽控制器設為它的 root:
- (BOOL)application:(UIApplication *)application
didFinishLaunchingWithOptions:(NSDictionary *)launchOptions
{
    self.window = [[UIWindow alloc] initWithFrame:[[UIScreen mainScreen] bounds]];

    // 取得主畫面的導覽控制器
    UIStoryboard *storyboard = [UIStoryboard storyboardWithName:@"Main"
                                                        bundle:[NSBundle mainBundle]];
    UIViewController *vc = [storyboard instantiateViewControllerWithIdentifier:@"NavigationController"];

    // 建立抽屜容器並指定根視圖(主頁面的導覽視圖)
    PPRevealSideViewController *sideViewController =
        [[PPRevealSideViewController alloc] initWithRootViewController:vc];
    sideViewController.fakeiOS7StatusBarColor = [UIColor whiteColor];

    self.window.rootViewController = sideViewController;
    [self.window makeKeyAndVisible];
    return YES;
}
2. 從主畫面推出導覽頁
- (IBAction)tapItem:(id)sender
{
    UIStoryboard *storyboard = [UIStoryboard storyboardWithName:@"Main"
                                                        bundle:[NSBundle mainBundle]];
    UITableViewController *table =
        [storyboard instantiateViewControllerWithIdentifier:@"CustomViewViewController"];
    [self.revealSideViewController pushViewController:table
                                          onDirection:PPRevealSideDirectionLeft
                                             animated:YES];
}
3. 從導覽頁切換到不同功能頁
這裡用的是 popViewControllerWithNewCenterController:,它會把指定的控制器設為新的中央內容,同時把抽屜收回:
- (IBAction)tap1:(id)sender
{
    UIStoryboard *storyboard = [UIStoryboard storyboardWithName:@"Main"
                                                        bundle:[NSBundle mainBundle]];
    UIViewController *one = [storyboard instantiateViewControllerWithIdentifier:@"one"];
    [self.revealSideViewController popViewControllerWithNewCenterController:one animated:YES];
}

- (IBAction)tap2:(id)sender
{
    UIStoryboard *storyboard = [UIStoryboard storyboardWithName:@"Main"
                                                        bundle:[NSBundle mainBundle]];
    UIViewController *two = [storyboard instantiateViewControllerWithIdentifier:@"two"];
    [self.revealSideViewController popViewControllerWithNewCenterController:two animated:YES];
}

- (IBAction)tap3:(id)sender
{
    UIStoryboard *storyboard = [UIStoryboard storyboardWithName:@"Main"
                                                        bundle:[NSBundle mainBundle]];
    UIViewController *three = [storyboard instantiateViewControllerWithIdentifier:@"three"];
    [self.revealSideViewController popViewControllerWithNewCenterController:three animated:YES];
}

- (IBAction)tap4:(id)sender
{
    UIStoryboard *storyboard = [UIStoryboard storyboardWithName:@"Main"
                                                        bundle:[NSBundle mainBundle]];
    UIViewController *four = [storyboard instantiateViewControllerWithIdentifier:@"four"];
    [self.revealSideViewController popViewControllerWithNewCenterController:four animated:YES];
}
4. 從各功能頁回到主畫面
- (IBAction)tapPage:(id)sender
{
    UIStoryboard *storyboard = [UIStoryboard storyboardWithName:@"Main"
                                                        bundle:[NSBundle mainBundle]];
    UIViewController *view = [storyboard instantiateViewControllerWithIdentifier:@"NavigationController"];
    [self.revealSideViewController popViewControllerWithNewCenterController:view animated:YES];
}
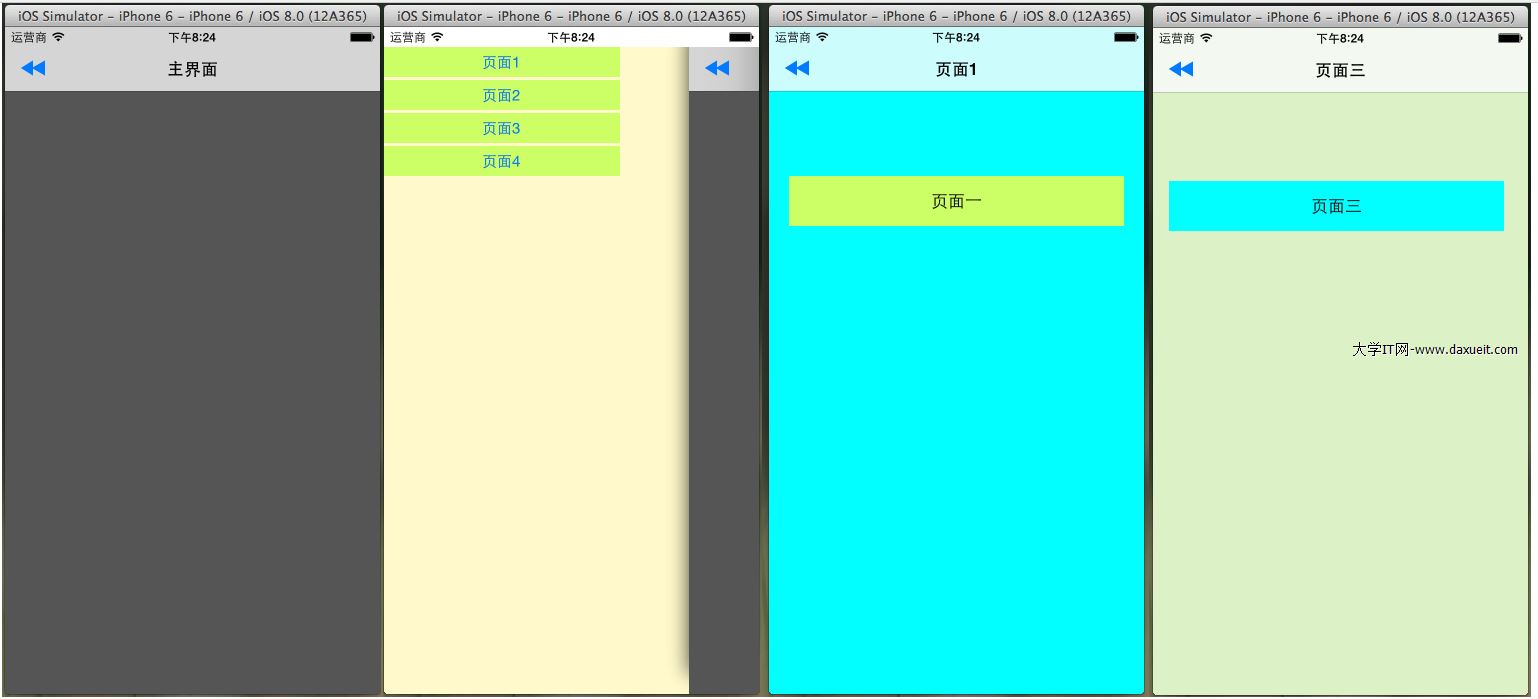
四、成果
幾點經驗分享
第一,revealSideViewController 這個便捷屬性是由元件透過關聯物件(associated object)掛上去的,因此在使用前不需要額外宣告,但要在元件已引入編譯單元的前提下才能存取。
第二,大量重複的 storyboard 實例化程式碼其實可以抽成一個工具方法,例如 - (UIViewController *)viewControllerWithIdentifier:(NSString *)identifier,能讓每個 IBAction 保持精簡。
第三,若專案後續要支援更複雜的側邊層級(例如多層抽屜、同時支援左右兩側),可以考慮改用更新、維護更活躍的方案;本元件屬於較早期的實作,選型時建議先確認其與目前 SDK 版本的相容性。