
用 Reachability 偵測 iOS 網路狀態(WiFi/行動網路/無網路)
編輯:iOS 技巧大全
有些 App 只在 WiFi 下提供完整功能(例如 Reeder 的高畫質圖片),有些則需要在無網路時提供離線模式(例如 Evernote)。這類需求都會用到 Reachability 這個函式庫。
本文涵蓋的內容
- Reachability 能做什麼:偵測 2G/3G/WiFi/無網路四種狀態
- 如何使用通知機制(單一 controller 與多個 controller 的差別)
- 一個實用範例:僅在 WiFi 下啟用某項功能
Reachability 簡介
Reachability 是 iOS 上用來偵測裝置網路環境的函式庫,可以:監視特定主機是否可達、判斷目前的連線方式、以及接收連線方式變更的通知。
Apple 官方文件與範例:https://developer.apple.com/library/ios/#samplecode/Reachability/Introduction/Intro.html
社群版本(tonymillion):https://github.com/tonymillion/Reachability
安裝
- 建立專案(此處以 network 為例)
- 使用 CocoaPods 安裝相依元件
- 在專案中加入
SystemConfiguration.framework
由於 Reachability 使用頻率很高,可以直接加入 Supporting Files 中的 prefix pch 檔,省去每個檔案手動引入的麻煩。
基本用法
- (void)viewDidLoad {
    [super viewDidLoad];

    DLog(@"開啟 www.apple.com 的網路偵測");
    Reachability *reach = [Reachability reachabilityWithHostname:@"www.apple.com"];
    DLog(@"-- current status: %@", reach.currentReachabilityString);

    // 啟動 notifier,這會讓 reachability 物件自我 retain
    [[NSNotificationCenter defaultCenter] addObserver:self
                                            selector:@selector(reachabilityChanged:)
                                                name:kReachabilityChangedNotification
                                              object:nil];
    [reach startNotifier];
}

- (void)reachabilityChanged:(NSNotification *)note {
    Reachability *reach = [note object];

    if (![reach isReachable]) {
        self.notificationLabel.text = @"網路不可用";
        self.notificationLabel.backgroundColor = [UIColor redColor];
        self.wifiOnlyLabel.backgroundColor = [UIColor redColor];
        self.wwanOnlyLabel.backgroundColor = [UIColor redColor];
        return;
    }

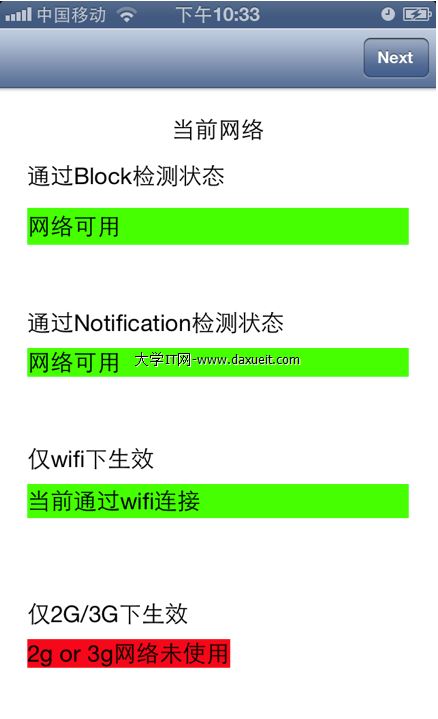
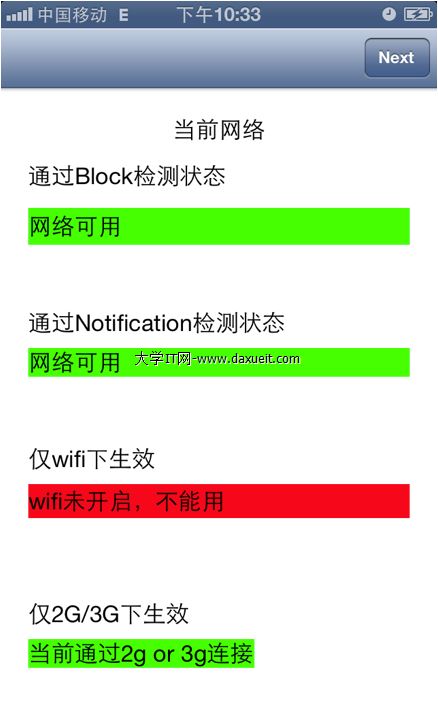
    self.notificationLabel.text = @"網路可用";
    self.notificationLabel.backgroundColor = [UIColor greenColor];

    if (reach.isReachableViaWiFi) {
        self.wifiOnlyLabel.backgroundColor = [UIColor greenColor];
        self.wifiOnlyLabel.text = @"當前通過 wifi 連接";
    } else {
        self.wifiOnlyLabel.backgroundColor = [UIColor redColor];
        self.wifiOnlyLabel.text = @"wifi 未開啟,不能用";
    }

    if (reach.isReachableViaWWAN) {
        self.wwanOnlyLabel.backgroundColor = [UIColor greenColor];
        self.wwanOnlyLabel.text = @"當前通過 2g or 3g 連接";
    } else {
        self.wwanOnlyLabel.backgroundColor = [UIColor redColor];
        self.wwanOnlyLabel.text = @"2g or 3g 網路未使用";
    }
}
範例執行結果
WiFi 開啟狀態:
WiFi 關閉狀態:
幾個實務重點
- 記得移除觀察者:在 dealloc 中執行
[[NSNotificationCenter defaultCenter] removeObserver:self],並對 Reachability 呼叫stopNotifier。 - 何時該停止偵測:頁面不需要網路狀態時就該停,長時間開著 notifier 會消耗額外電力。
- 多個 controller 共用一個實例:範例中是「一個 controller 一個 Reachability 實例」,實務上更好的做法是建立一個單例服務,集中管理並對外廣播狀態變更。
- 「可達」不等於「網路可用」:
reachabilityWithHostname:指定的主機若被阻擋或 DNS 異常,結果可能與實際連線能力不一致,重要操作仍應搭配實際請求的失敗回呼來處理。 - iOS 12 之後也可使用
NWPathMonitor(Network framework)取代 Reachability,API 更現代且不需引入第三方庫。