
iOS UIKit 中替 UIButton 加上圓角與邊框的技巧
在 iOS 開發中,為 UIButton 加上圓角與邊框是很常見的樣式需求。這一切都得歸功於 CALayer——每個 UIView(包含 UIButton)都有一個 layer 屬性,透過它我們可以輕鬆設定圓角、邊框等效果。以下程式碼完整示範:
UIButton *testButton = [UIButton buttonWithType:UIButtonTypeSystem];
[testButton setFrame:CGRectMake(self.view.frame.size.width/2, self.view.frame.size.height/2, 100, 100)];
[testButton setTitle:@"獲取屏幕尺寸" forState:UIControlStateNormal];
[testButton.layer setMasksToBounds:YES];//設置按鈕的圓角半徑不會被遮擋
[testButton.layer setCornerRadius:10];
[testButton.layer setBorderWidth:2];//設置邊界的寬度
//設置按鈕的邊界顏色
CGColorSpaceRef colorSpaceRef = CGColorSpaceCreateDeviceRGB();
CGColorRef color = CGColorCreate(colorSpaceRef, (CGFloat[]){1,0,0,1});
[testButton.layer setBorderColor:color];
[testButton addTarget:self action:@selector(touch) forControlEvents:UIControlEventTouchUpInside];
[self.view addSubview:testButton];
實現效果:
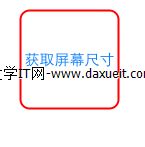
這裡有幾個關鍵點:setMasksToBounds 設為 YES 才能讓圓角裁切生效;setCornerRadius 控制圓角半徑;setBorderWidth 設定邊框粗細;而邊框顏色需要透過 Core Graphics 建立 CGColor 再指定給 layer。掌握這幾個屬性,就能輕鬆做出各種風格的按鈕外觀。